Create images, videos and music — on your PC, just for you.
TRAG Studio is a Windows app for AI generation that runs 100% locally on your machine's graphics card. No cloud, no hidden subscription, no waiting line: your ideas, your files, at home.
TRAG Studio is organized around three categories — Image, Video and Audio — reachable through the tabs at the top of the screen. Each category contains workflows: ready-to-use creative studios.
Image
Text to Image (create from text), Image to Image (transform a picture), Magic EditPro (repaint a masked area) and Blend ImagesPro (merge 2–3 pictures).
Video Pro
Text to Video (a clip from a prompt alone), Image to Video (animate a still, with synchronized audio and dialogue), Smooth Motion (bridge a start frame and an end frame) and Lip Sync (match a face to an audio track).
Audio Pro
Text to Music (compose a track, with optional lyrics), Remix (restyle an existing track) and Section Edit (regenerate one exact passage).
Trag Muse Muse
The connected production studio, coming soon: direct TRAG from Claude, Codex or any MCP agent, and connect the APIs you use — while everything renders on your machine.
Who it's for
Influencers & content creators
A daily clip in TikTok, YouTube or Square format, b-roll on demand, music that belongs to you — batched overnight with Add Multiple Jobs.
Digital agencies
Client-ready visuals at volume, without per-image fees or quota anxiety — and everything stays on your machines: confidentiality by design.
Narrative world-builders
Keep characters consistent with Image to Image and Blend, stage scenes in video, compose each chapter's soundtrack — a whole universe from one desk.
Indie studios & musicians
Concept art, animatics, temp tracks and remixes to iterate fast — unlimited tries, zero cloud bill.
Throughout this guide you'll see screenshots of the app: the bright-green boxes and arrows in them point at the element being discussed. Click any image to enlarge it.
The three offers: Free, Pro and Trag Muse
TRAG comes in two editions, plus an optional automation layer:
Offer
Price
What you can do
Models downloaded
Trag Studio FreeFree
Free
Image only: Text to Image + Image to Image, unlimited use.
Image models only
Trag Studio ProPro
One-time purchase (web portal)
Everything: image (+ Magic Edit, Blend Images), all video, all audio.
All models (image + video + audio)
Trag MuseMuse
Add-on — coming soon
The connected production studio: your agents and APIs drive TRAG through the Agent Gateway. Combines with Free or Pro — join the first wave from the app.
— (software layer)
Two possible paths, your pick:
Start free, go Pro later. Download TRAG Studio Free from the website, create images at will… then, when video or audio calls, buy Pro on the web portal. The key is attached to your profile: the app unlocks the workflows and offers to download the missing models.
Buy Pro right away. The purchase places the key in your profile; on first sign-in, onboarding installs the complete experience from the start.
Inside the app, reserved workflows carry a PRO badge (e.g. “Magic Edit Pro”) — that badge is the visual marker of this matrix. The full workflow-by-workflow matrix is recapped in the FAQ.
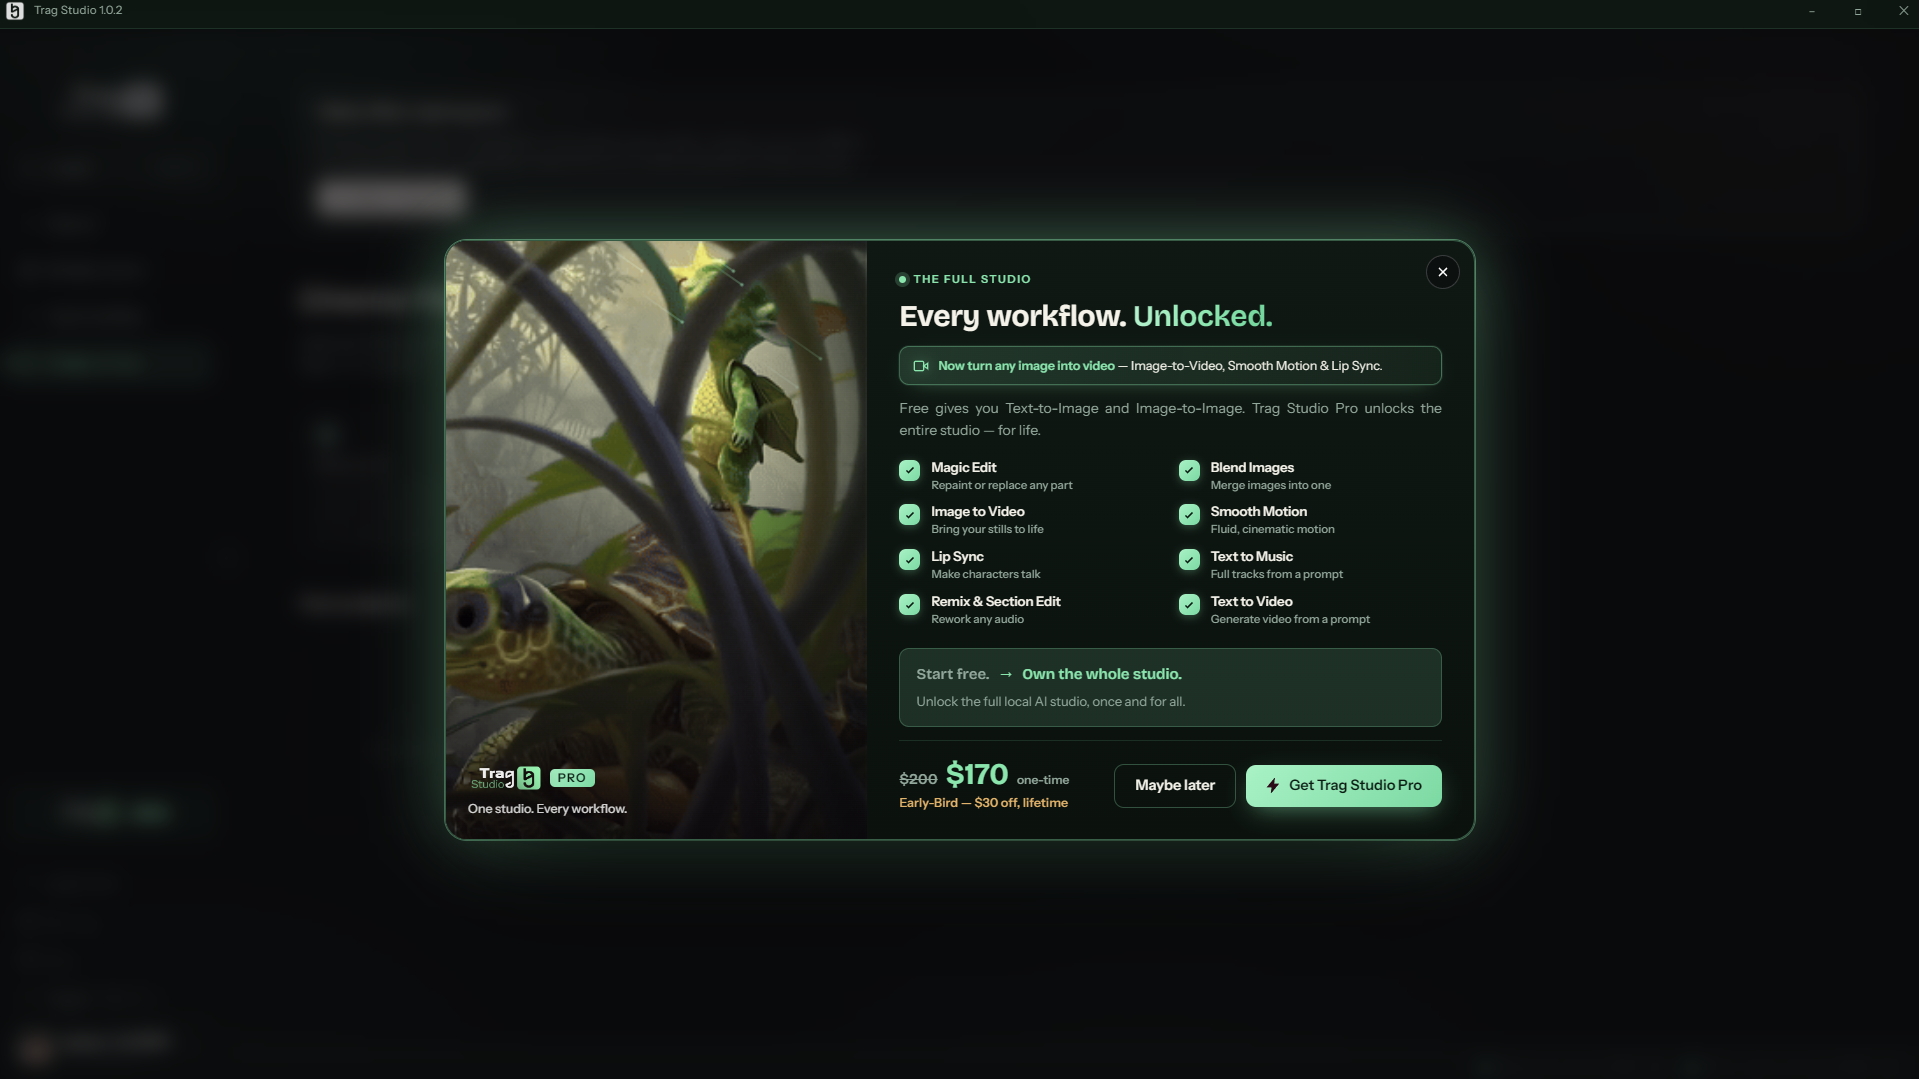
The Pro window in app: every workflow unlocked with a one-time purchase — and an Early-Bird discount while it lasts.
02Installation
Installation uses a classic Windows wizard — a few clicks on “Next” and you're done. Here is the exact journey, screen by screen.
Before you start: the installer carries the app and its execution engines (Python, CUDA, ComfyUI) — not the AI models. Those download afterwards, during first-time setup, and only the packs you tick. Installing can still take a moment — that's normal, and it only happens once.
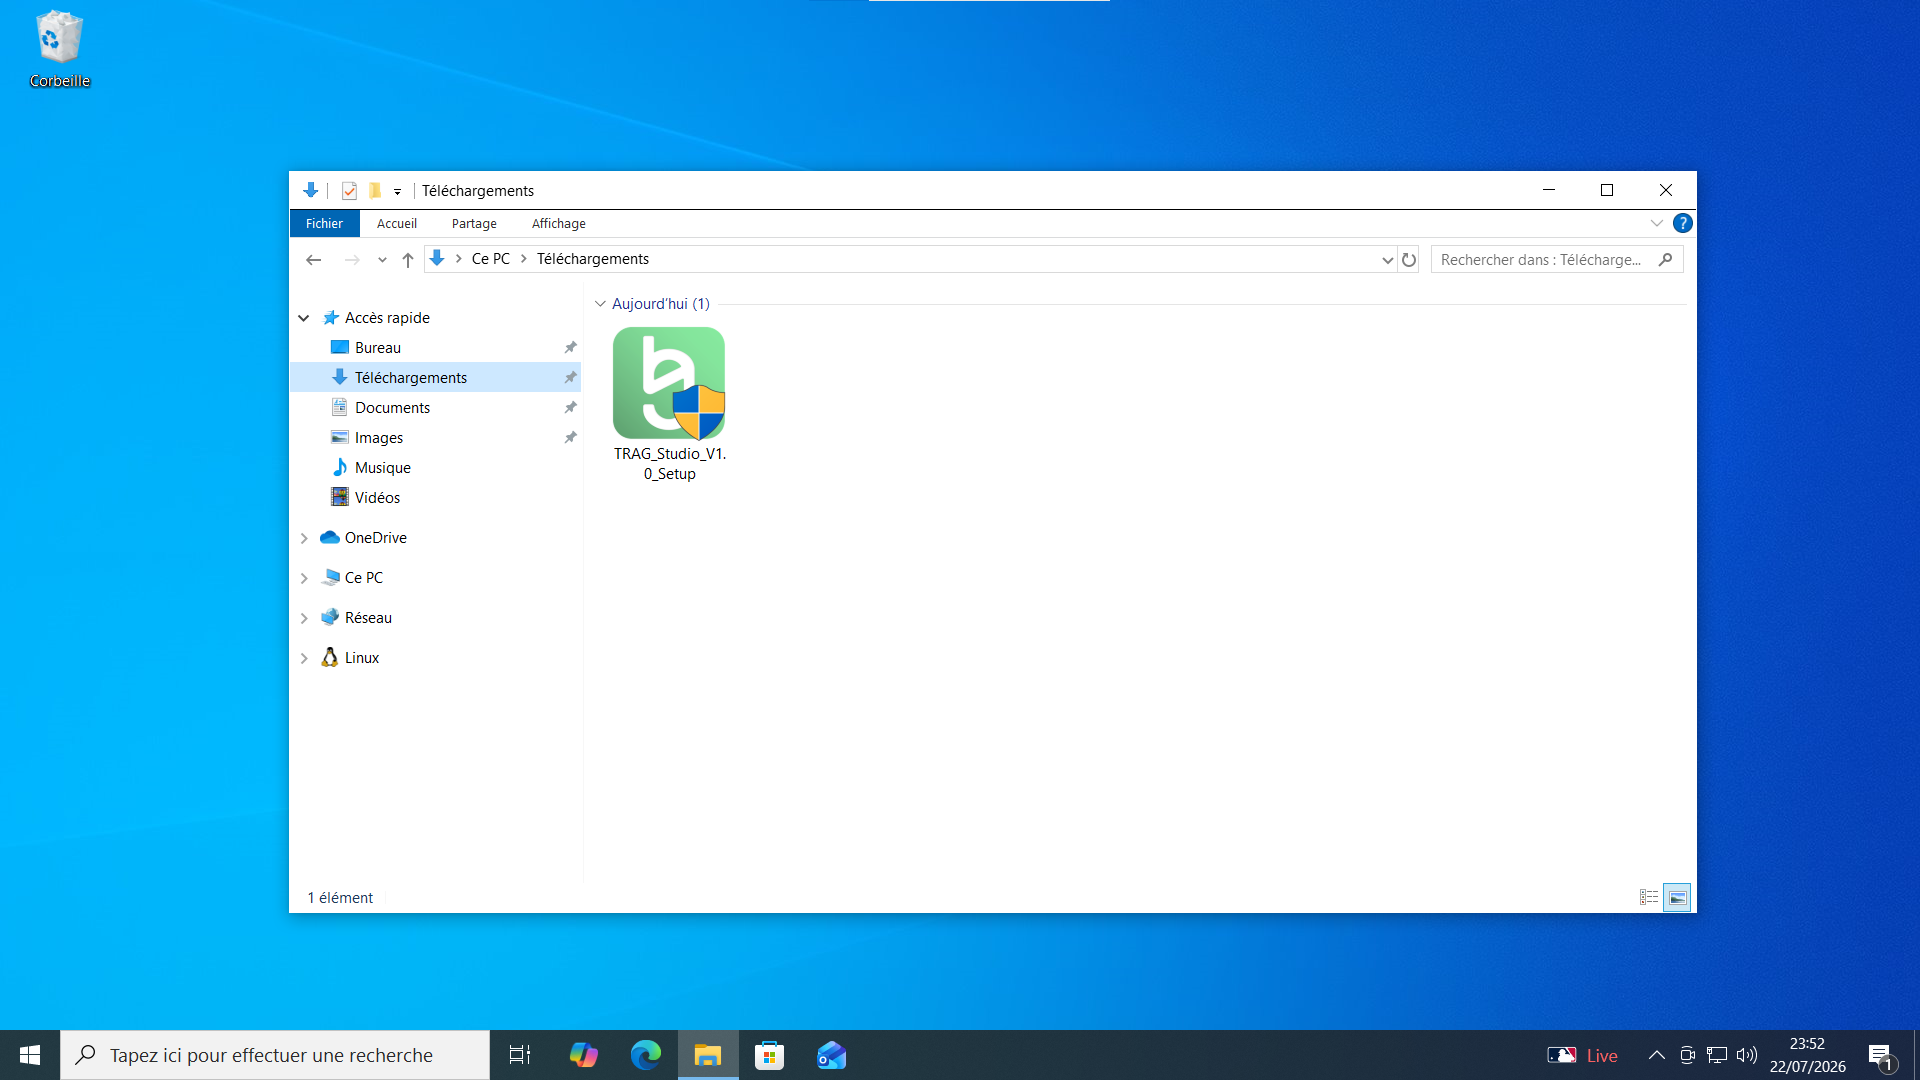
Run the TRAG_Studio_V1.0_Setup file downloaded from the TRAG website (about 1 GB). Windows asks for a security confirmation: accept to continue.
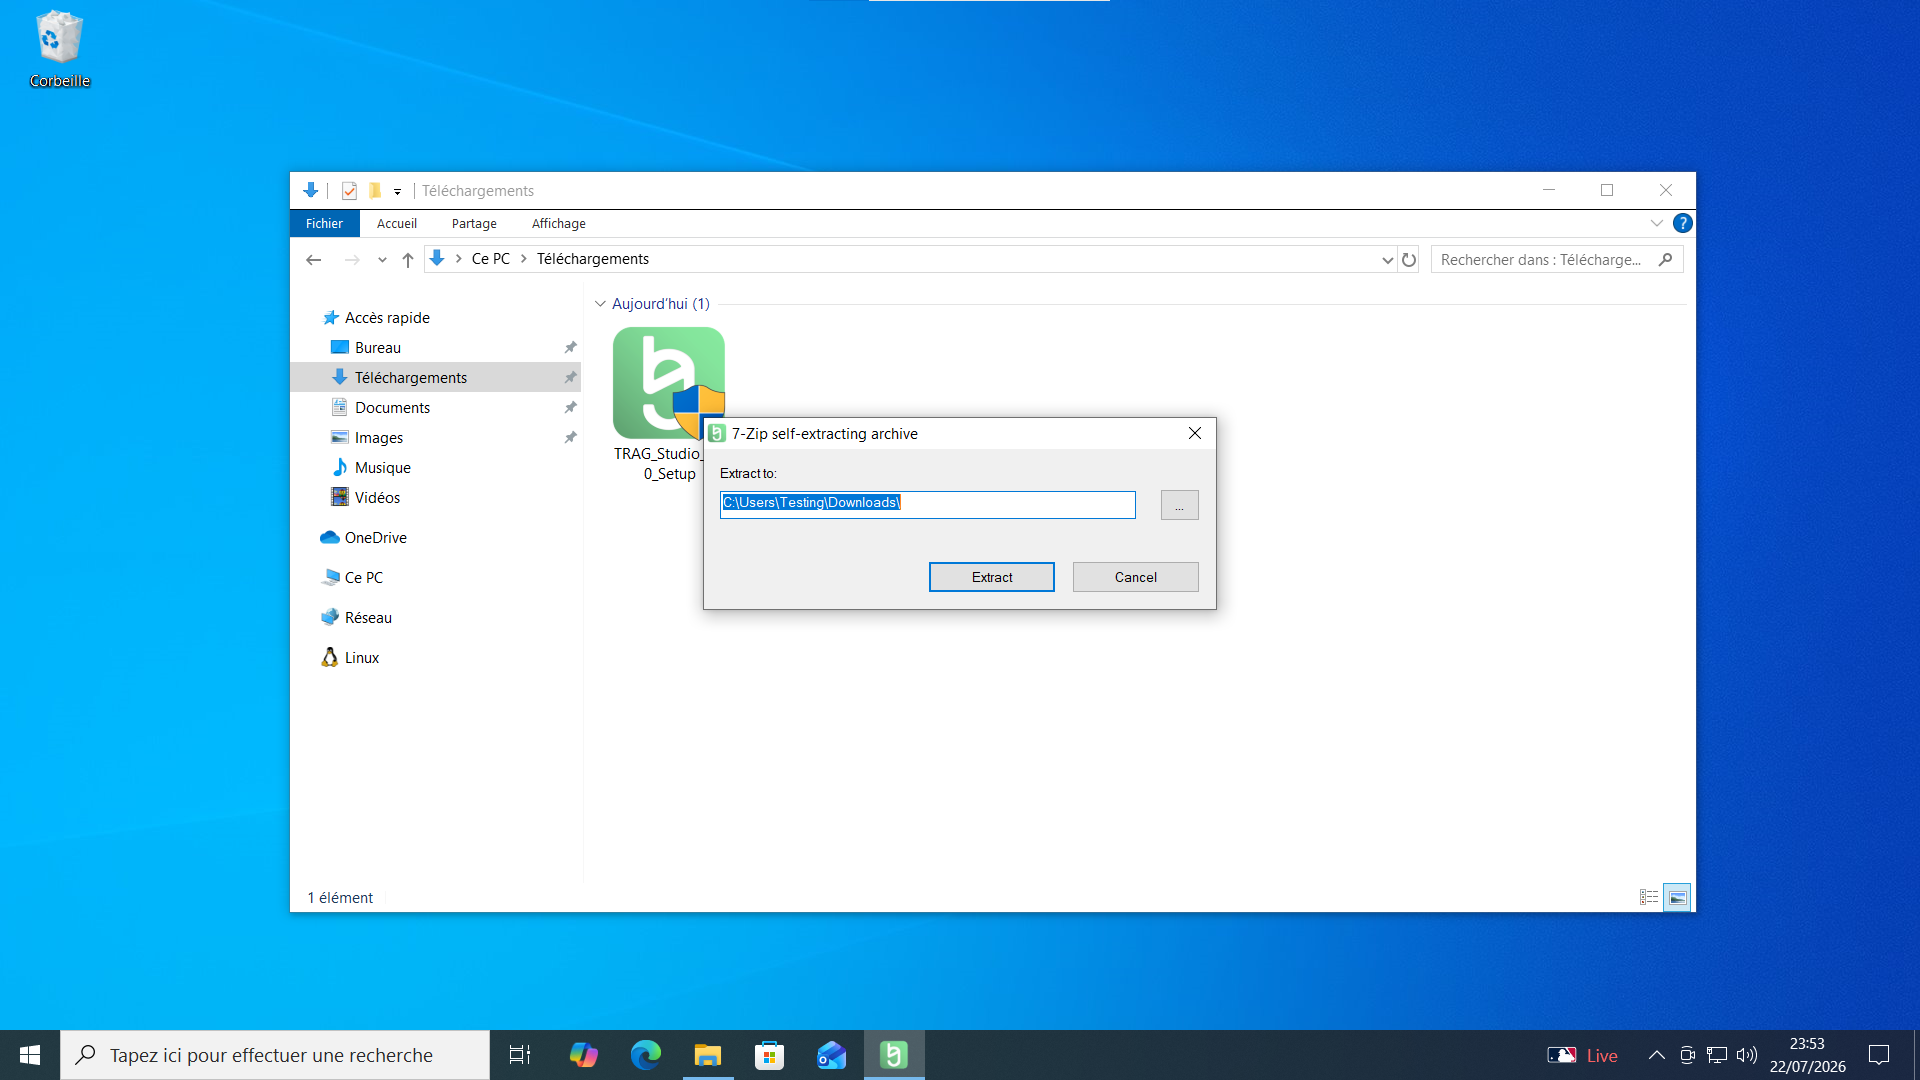
Extract the installer. A small self-extracting window opens, pointed at your Downloads folder. Click Extract and let it finish.
The downloaded file, ready to run — the green TRAG icon in your Downloads folder.The self-extracting step: click “Extract” and let it finish.
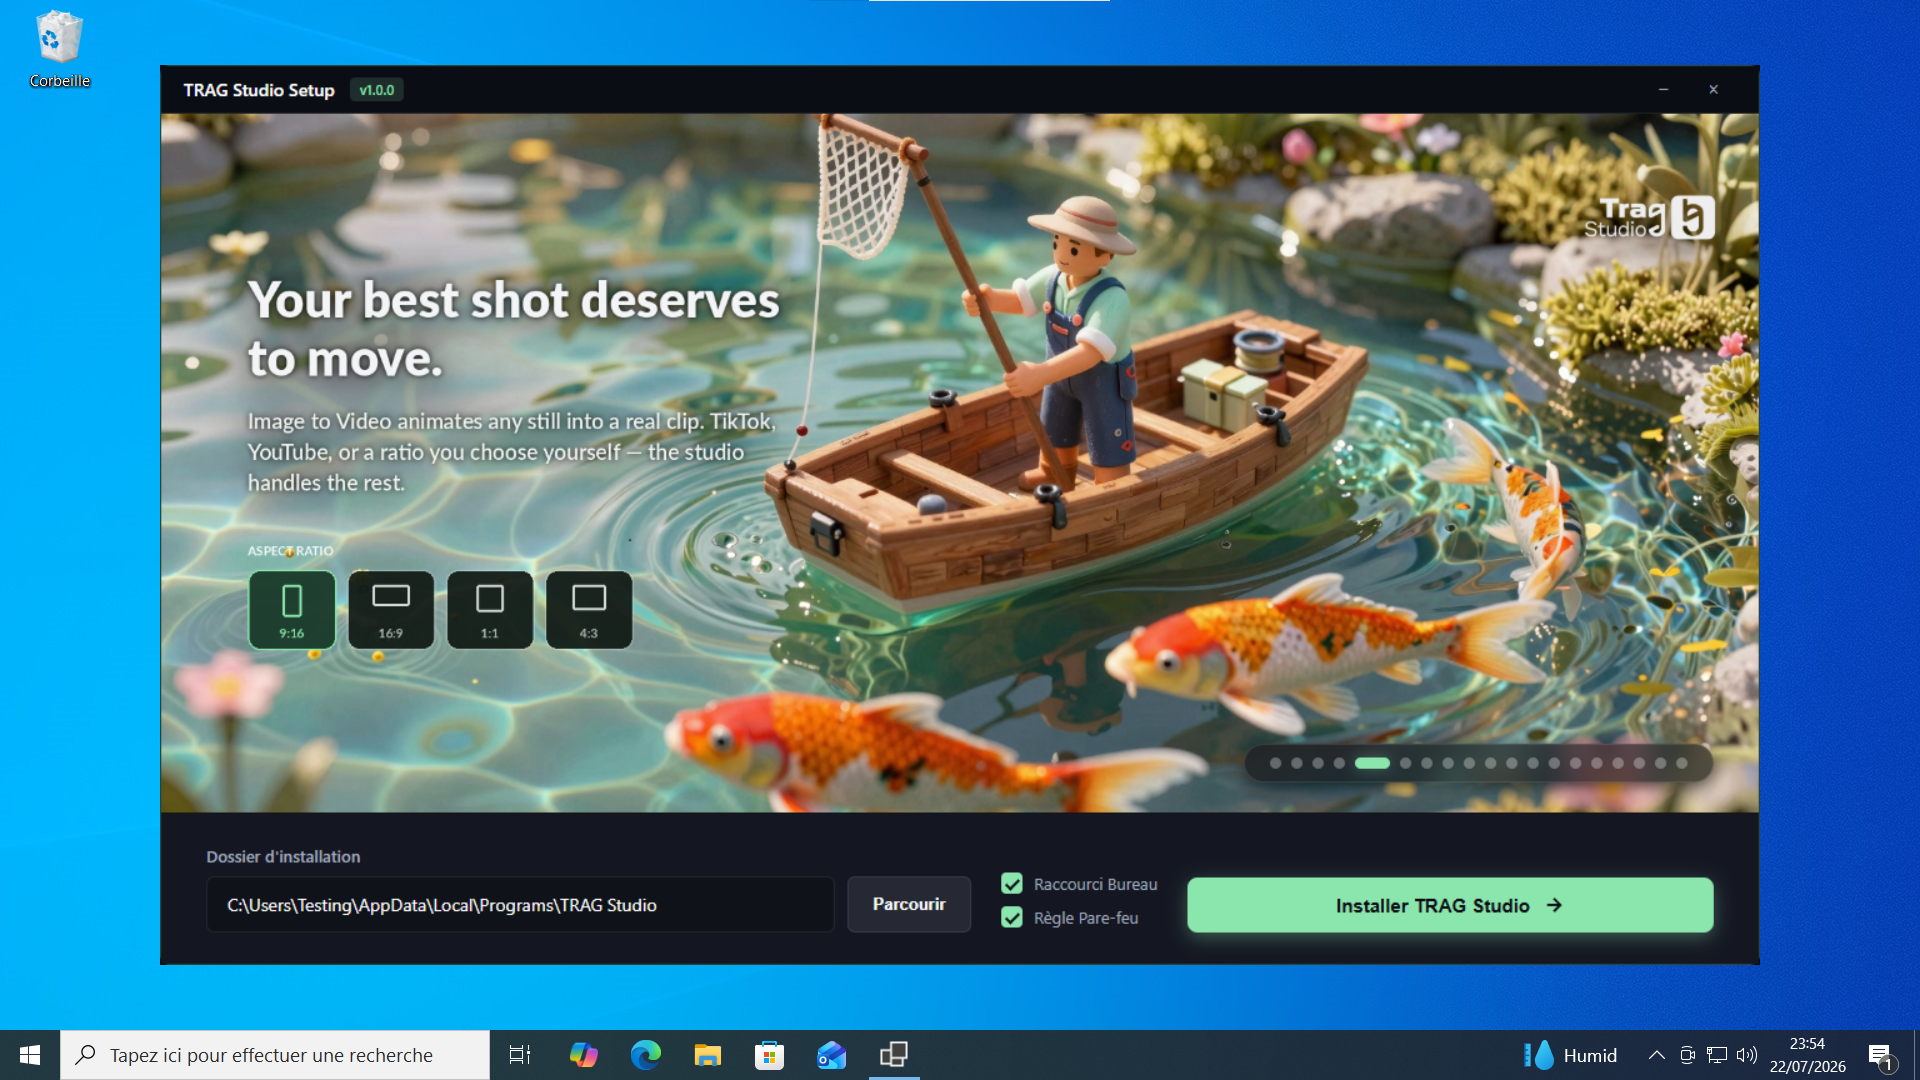
Choose your options in TRAG Studio Setup. The installer opens on a single screen: the install folder is pre-filled with your user folder (…\AppData\Local\Programs\TRAG Studio — no administrator rights needed), with two boxes already ticked: desktop shortcut and firewall rule. Leave them on, then click Install TRAG Studio →.
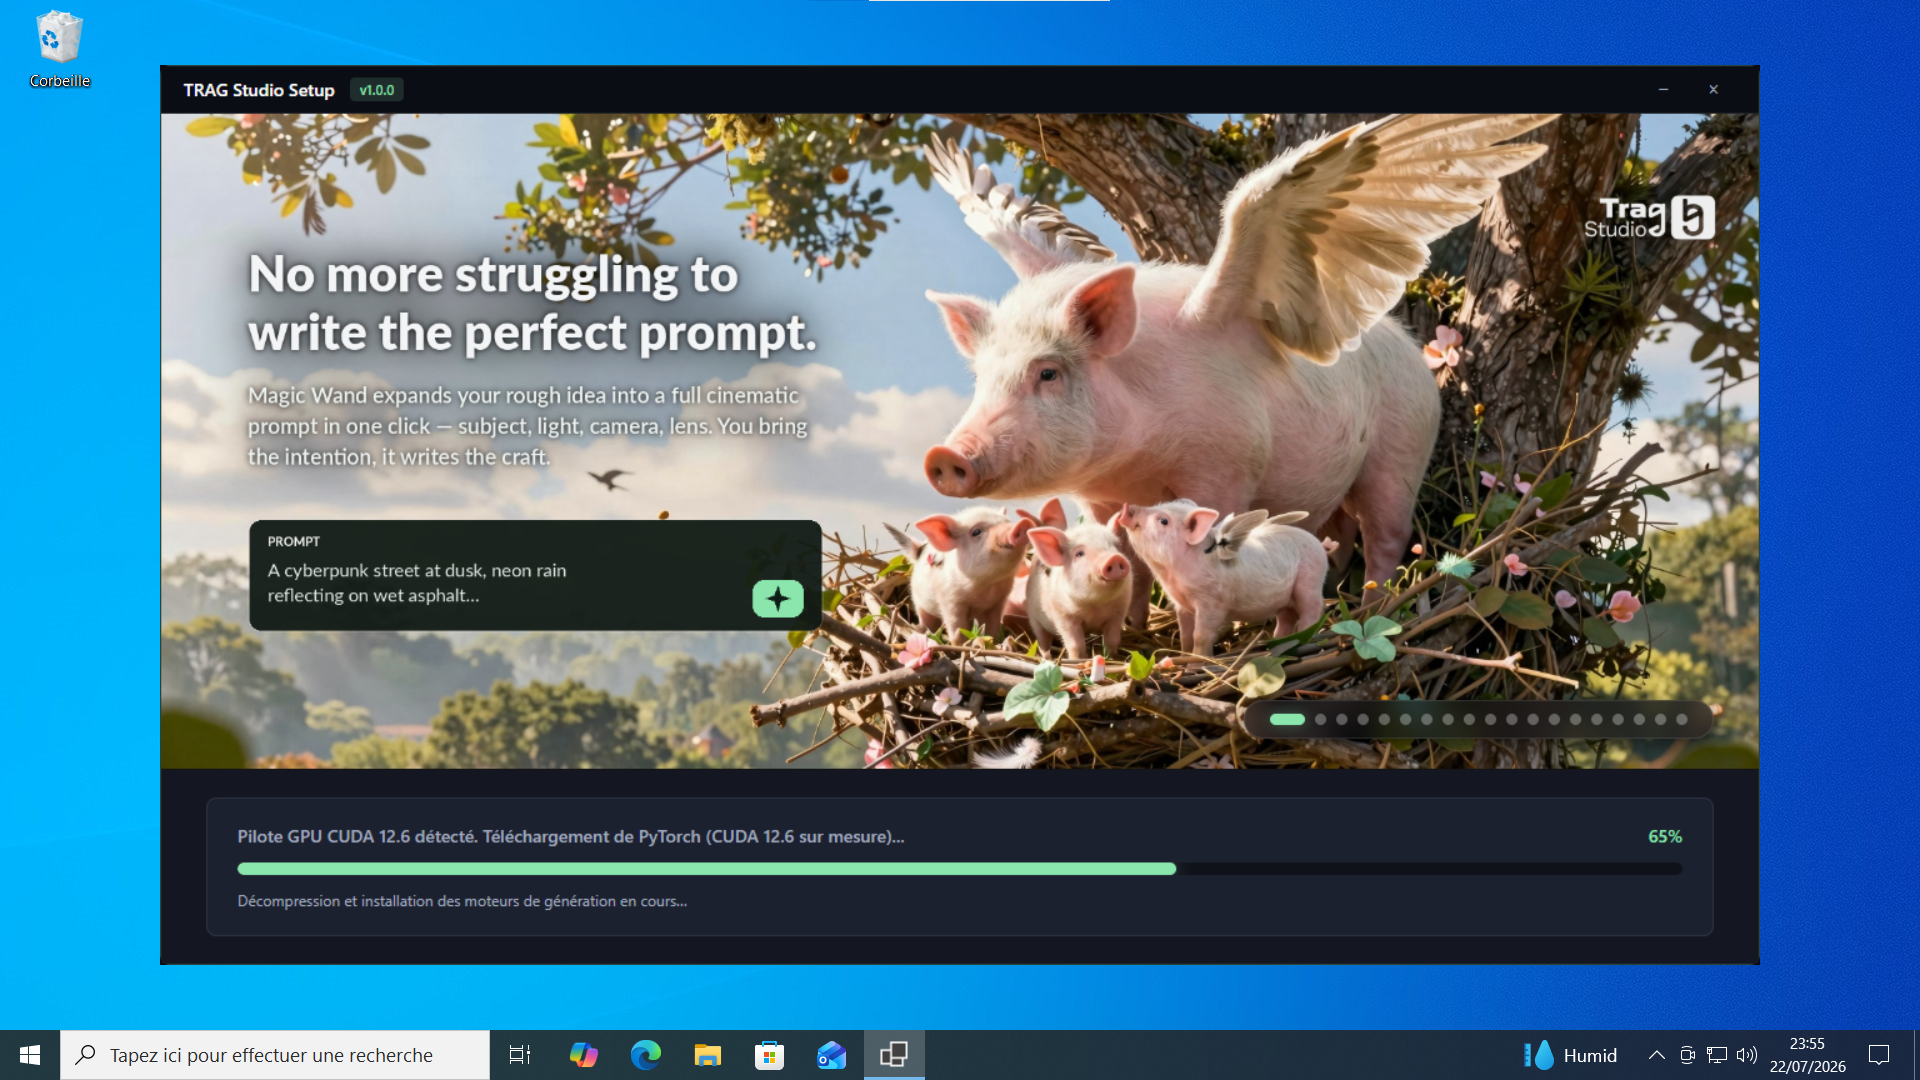
Let the installer work. While a slideshow presents the studio, the progress bar tells you exactly what is happening — including the step where TRAG checks which CUDA version your graphics driver supports and fetches the matching build. Nothing to do but wait.
One screen, three choices: the folder, the desktop shortcut and the firewall rule — then Install.The install narrates itself: here, the CUDA 12.6 driver was detected and the matching build is downloading.
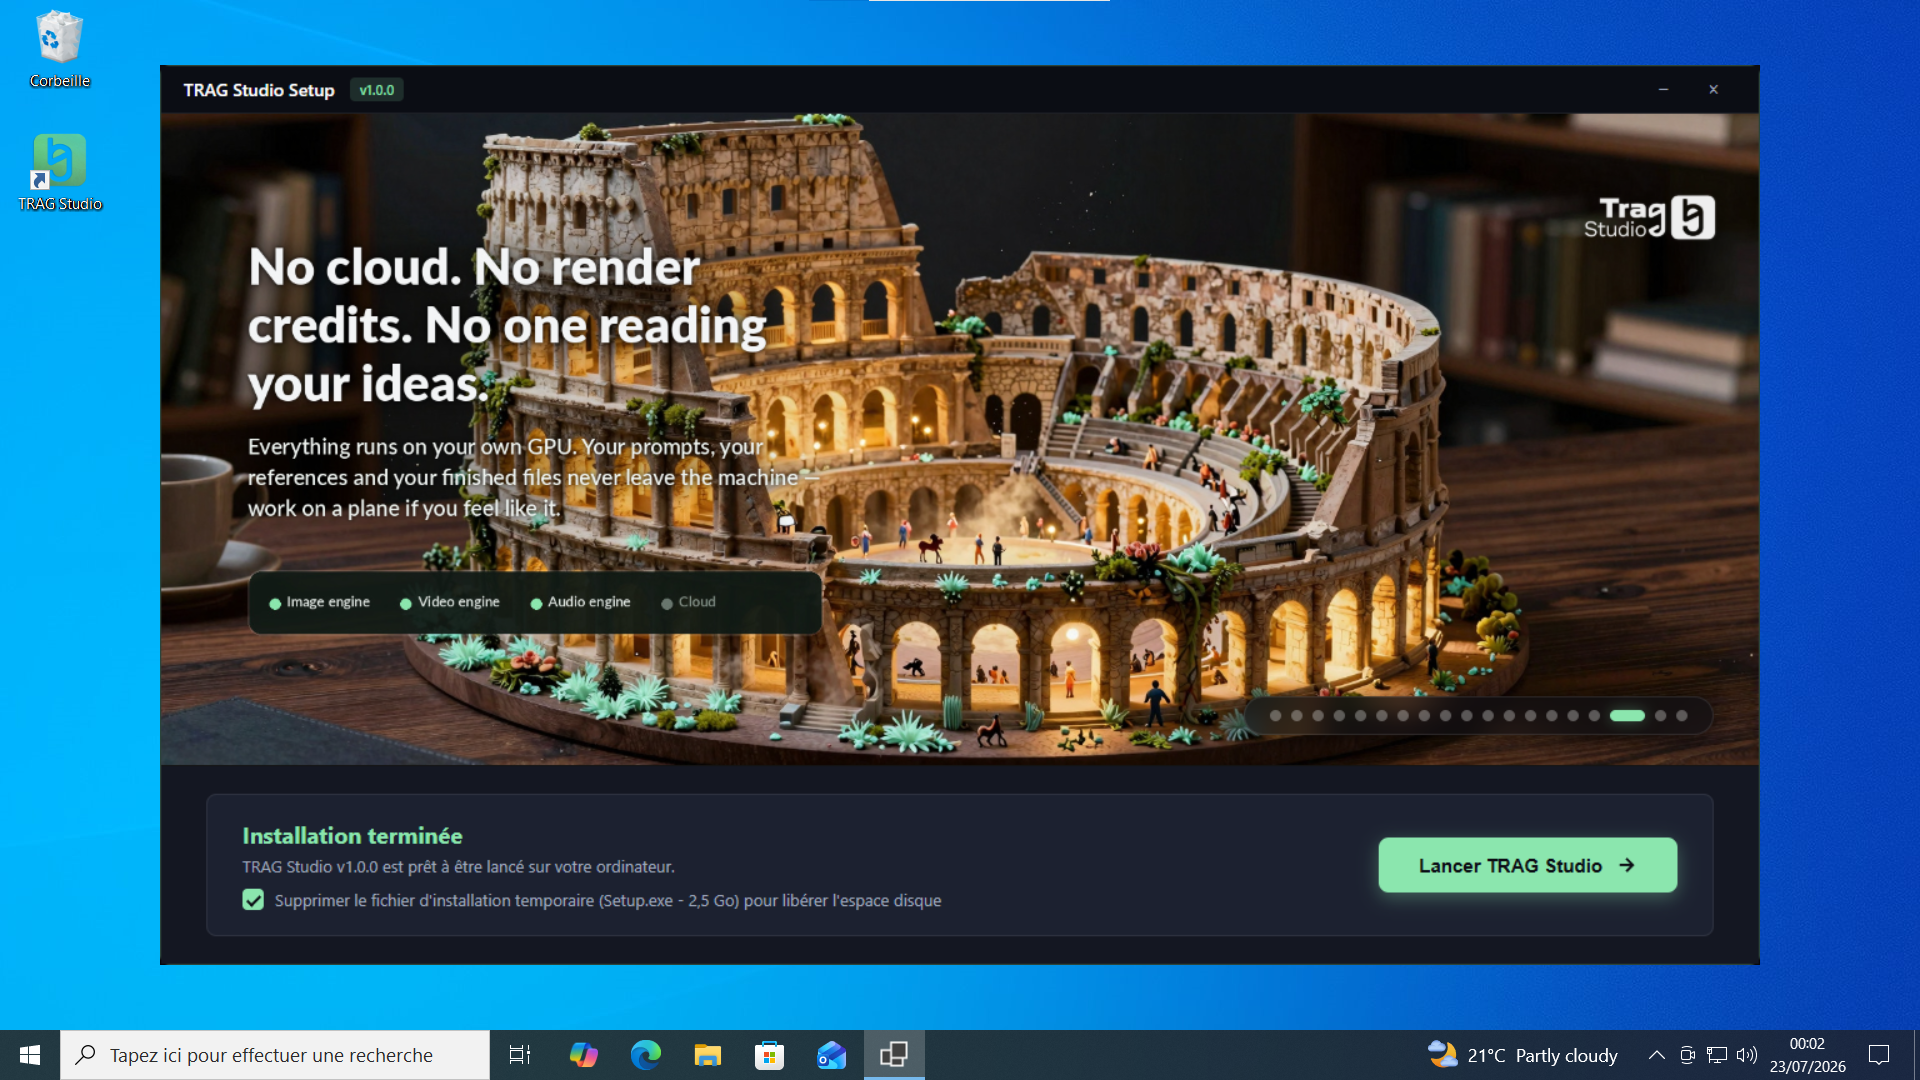
Finish and launch. “Installation terminée” offers to delete the temporary setup file (about 2.5 GB — tick it to free the space) and a big Launch TRAG Studio → button. On first start, TRAG greets you with the sign-in screen — on to the next section!
Done: free up the temporary file, then launch the studio.
A Windows Firewall prompt may appear on first launch. Click “Allow” only if you plan to drive TRAG from another device on your network (see Agent Gateway). Otherwise close the window — TRAG runs perfectly without it.
03Sign-in & first-time setup
On first launch, TRAG walks you through a short setup: sign-in, hardware detection, workflow picks, output folder. Five minutes, tops (model downloads aside).
Sign in
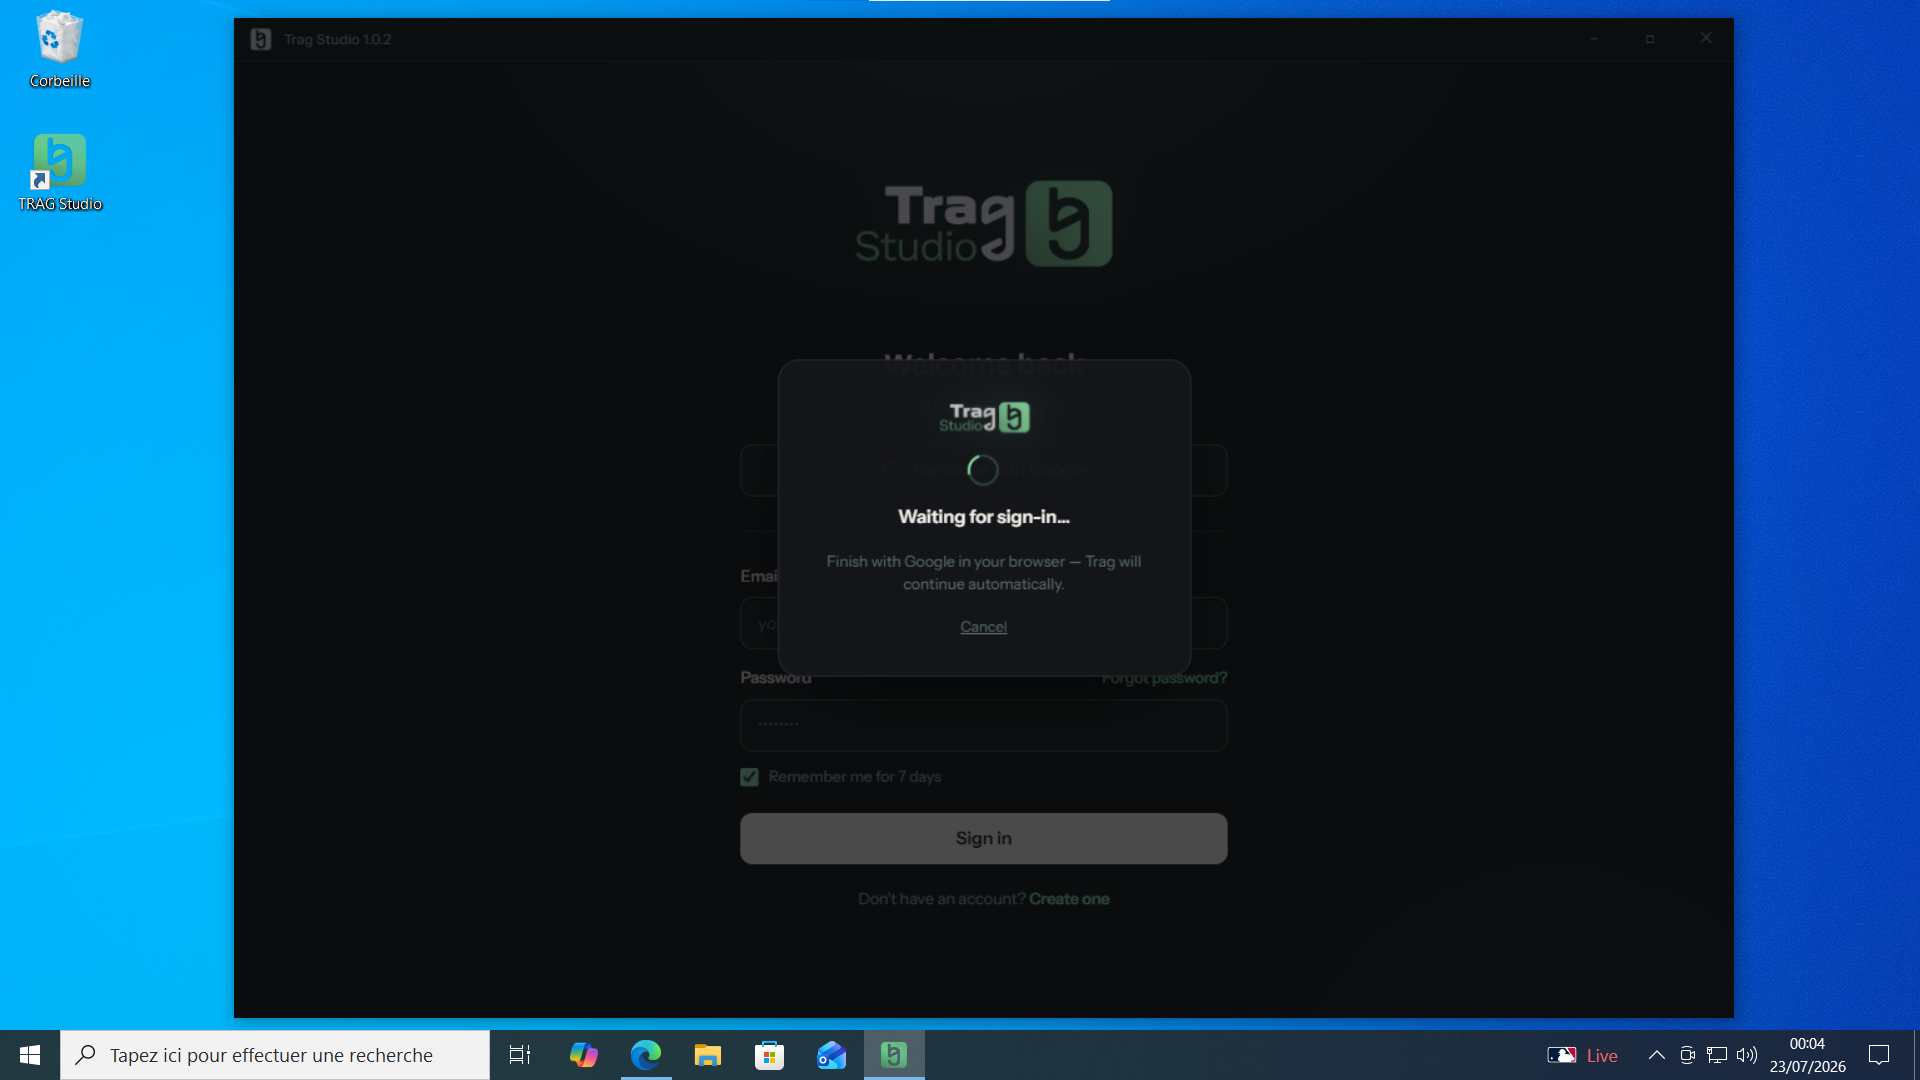
The “Welcome back” screen offers two doors: Continue with Google, or e-mail and password. With Google, the sign-in finishes in your browser — TRAG waits, then continues automatically the moment you are done. No account yet? “Create one” takes a moment.
Your account carries your license: the Pro key is attached to your profile. Signing in is required — it is what lets your purchases and your presets follow you.
Signing in with Google: finish in the browser — TRAG picks up automatically and returns you to the studio.
The onboarding welcome
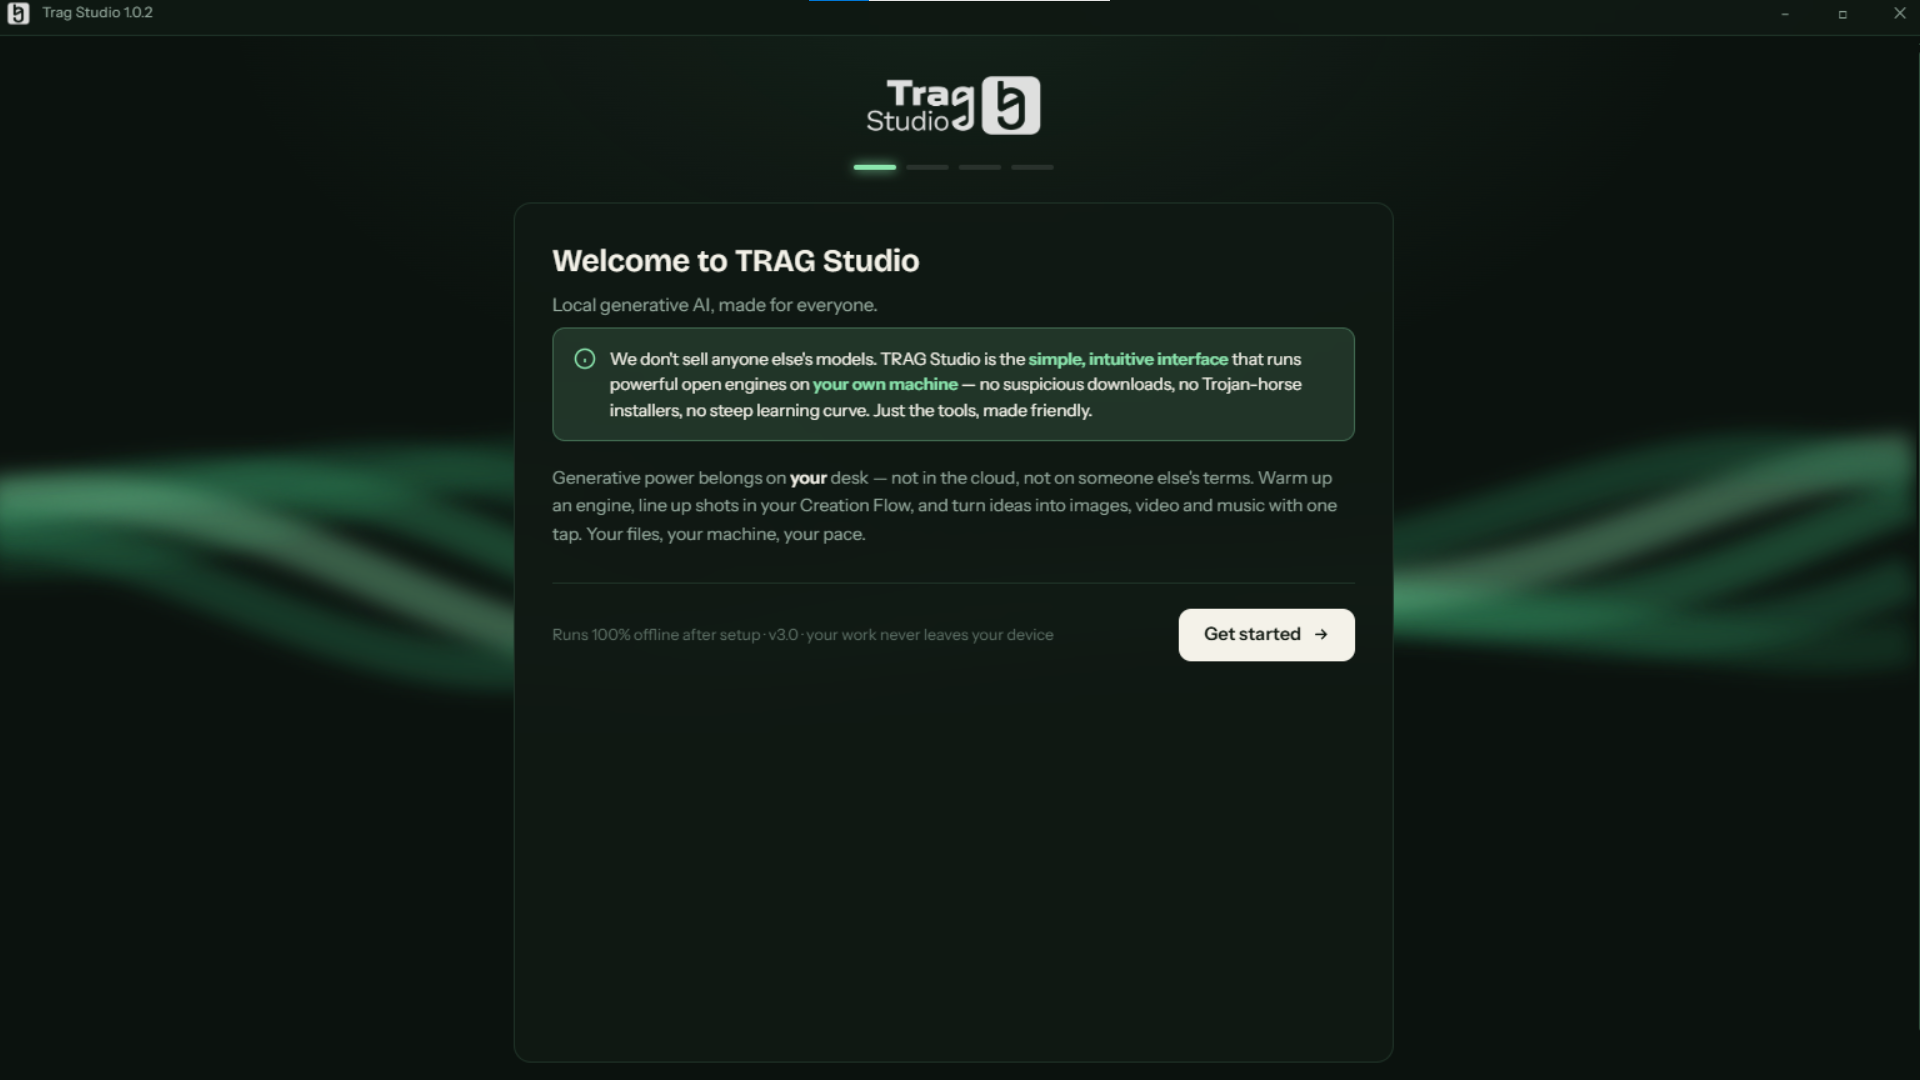
TRAG introduces itself in one line — “Local generative AI, made for everyone.” — and restates the promise: a simple interface running powerful open-source engines on your machine, with no shady downloads and no steep learning curve. Click Get started →.
Welcome to TRAG Studio: everything runs locally — your work never leaves your device.
Hardware detection and the Studio Index
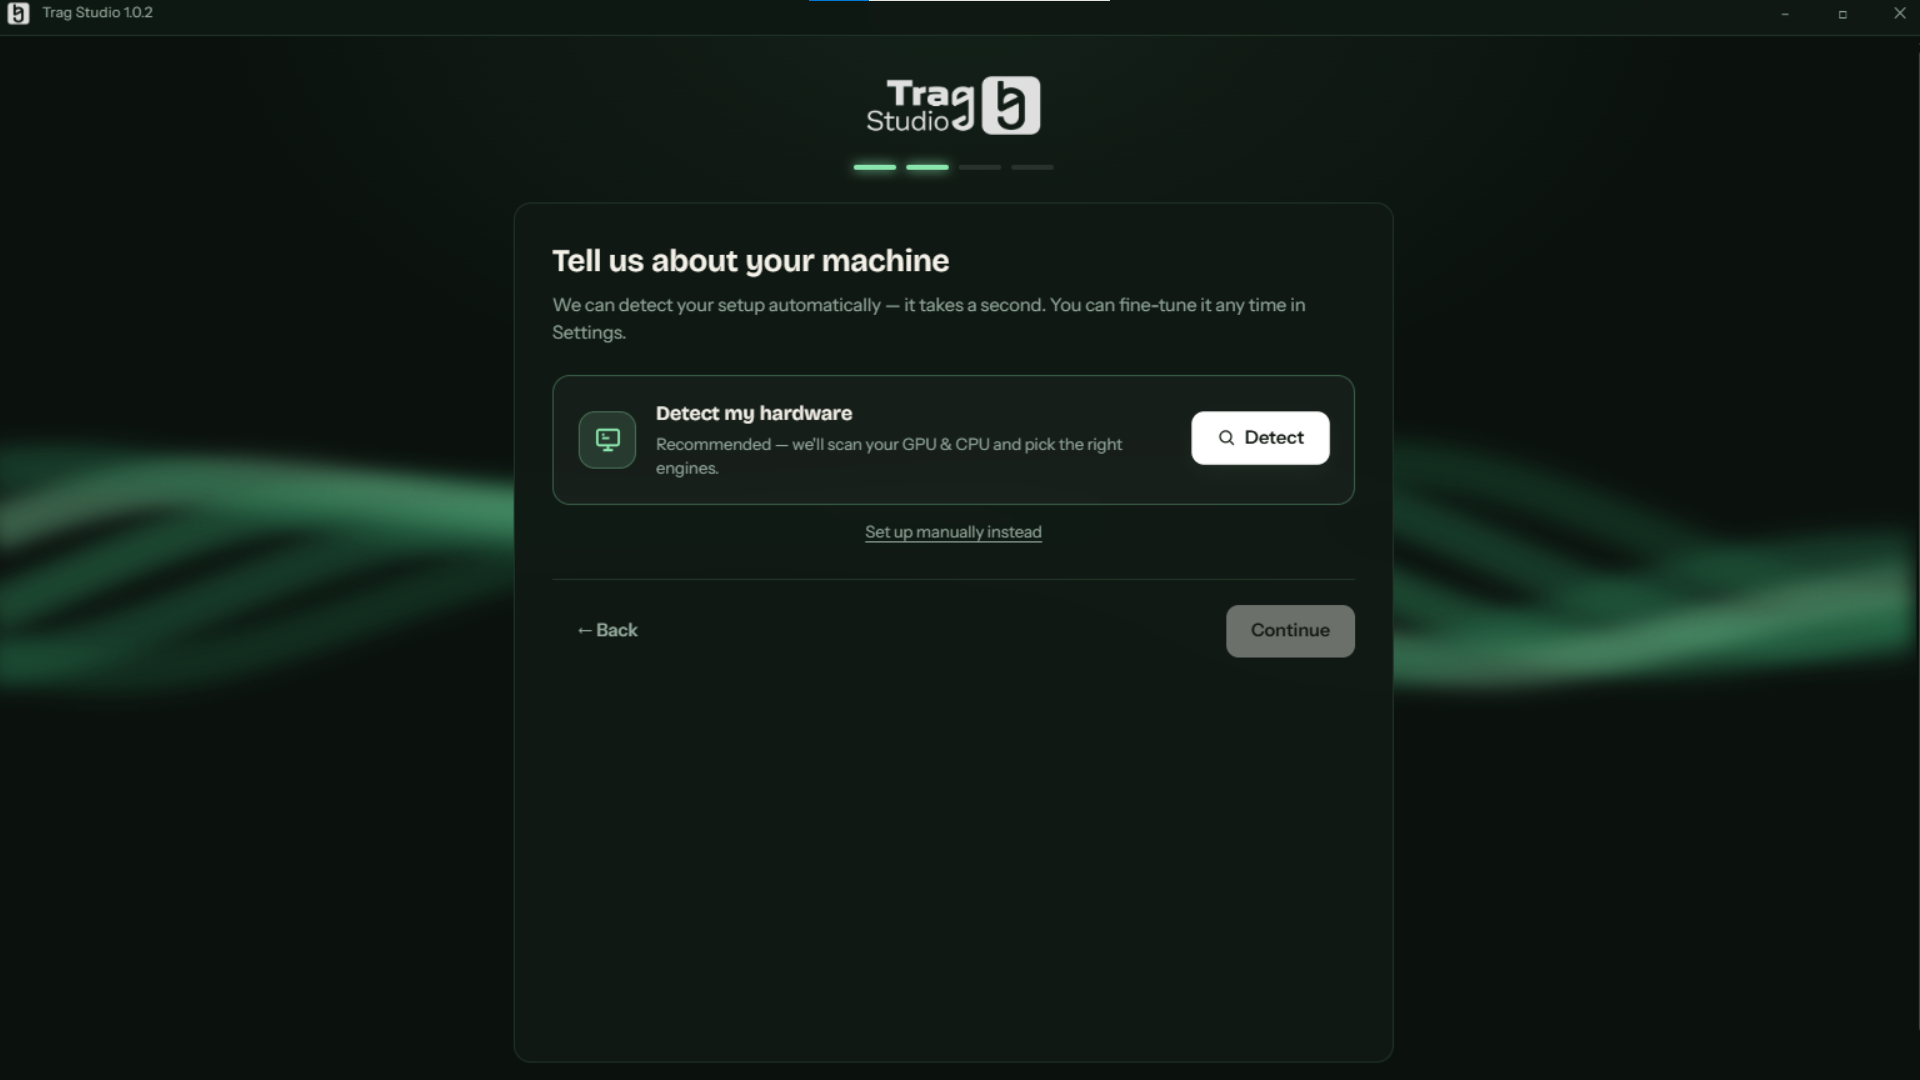
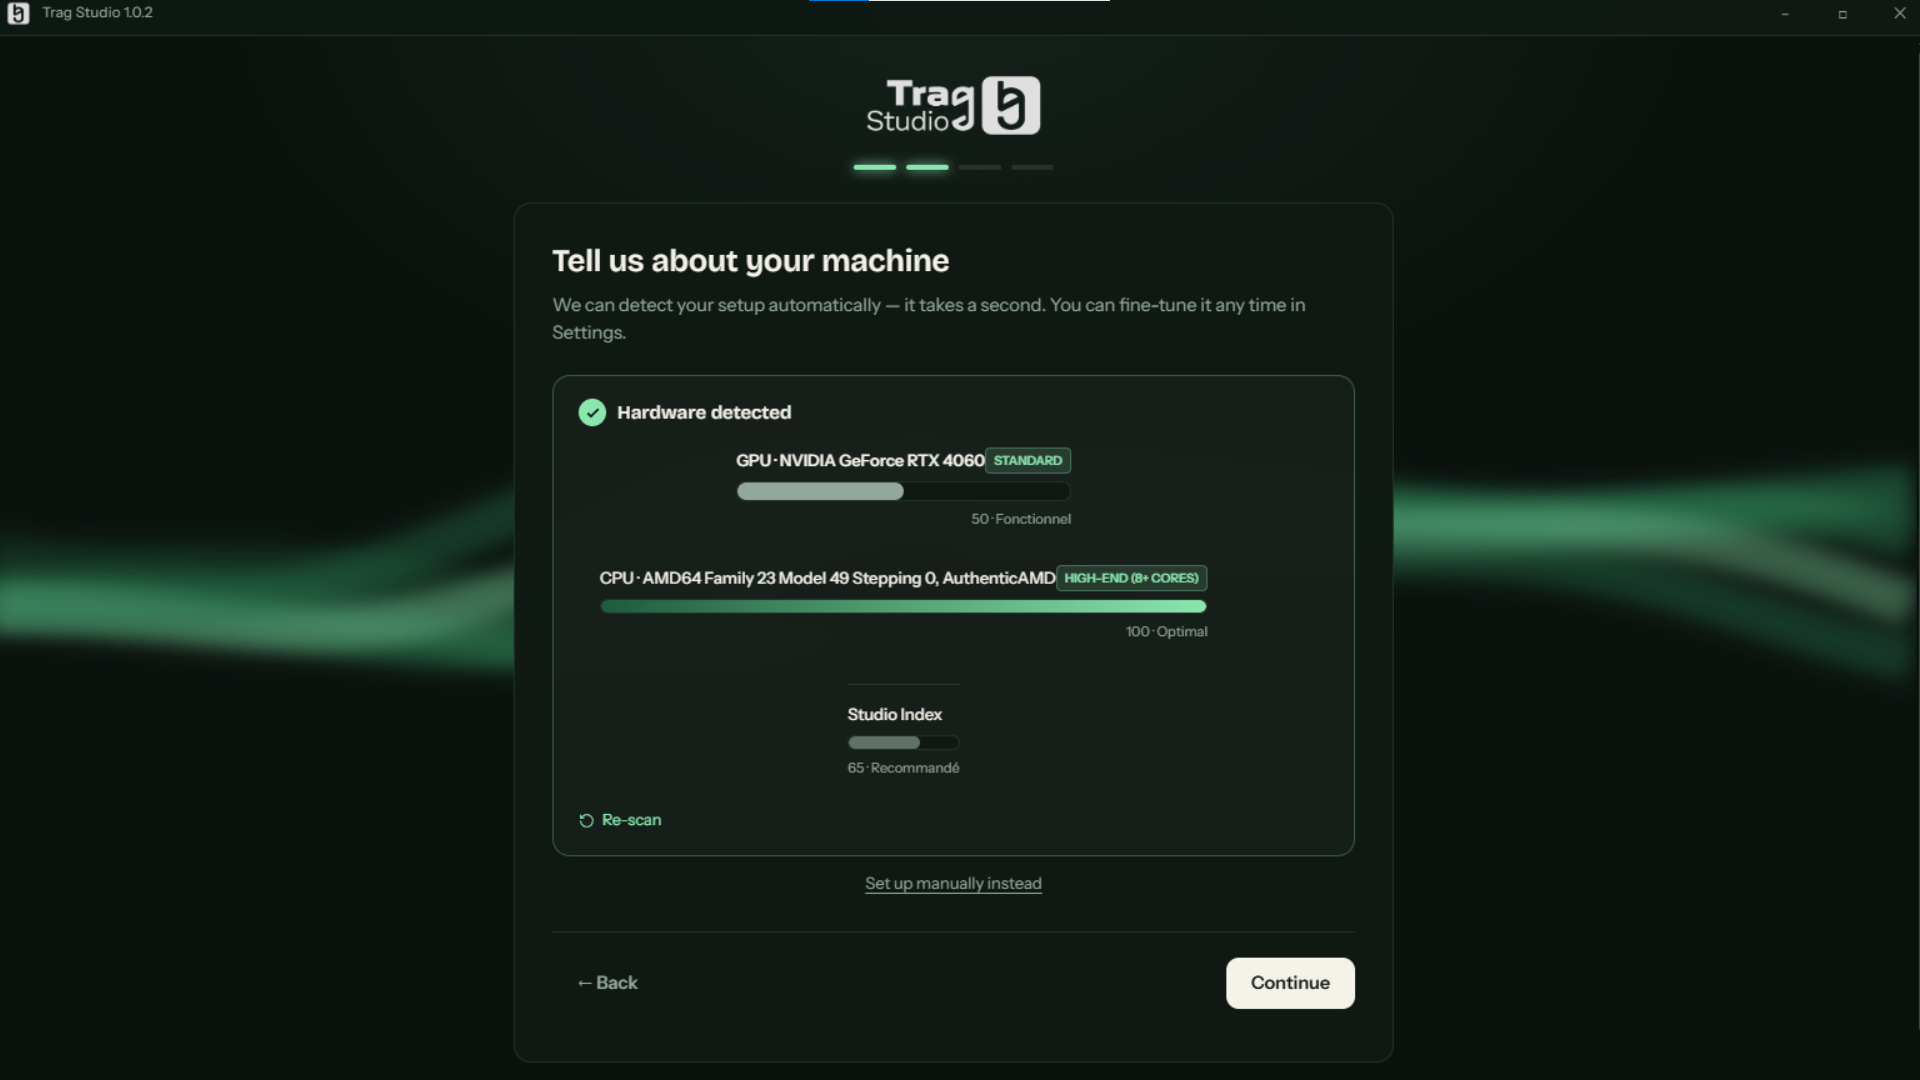
To suggest the right defaults, TRAG inspects your machine. On “Tell us about your machine”, click Detect (recommended): in a second, the app identifies your graphics card and processor, scores each one, then computes your Studio Index — the overall rating that calibrates the app to your PC's muscle.
“Detect my hardware”: let TRAG scan your GPU and CPU (or set things manually).The scan result: each component gets a score, and the Studio Index sums up the overall power.
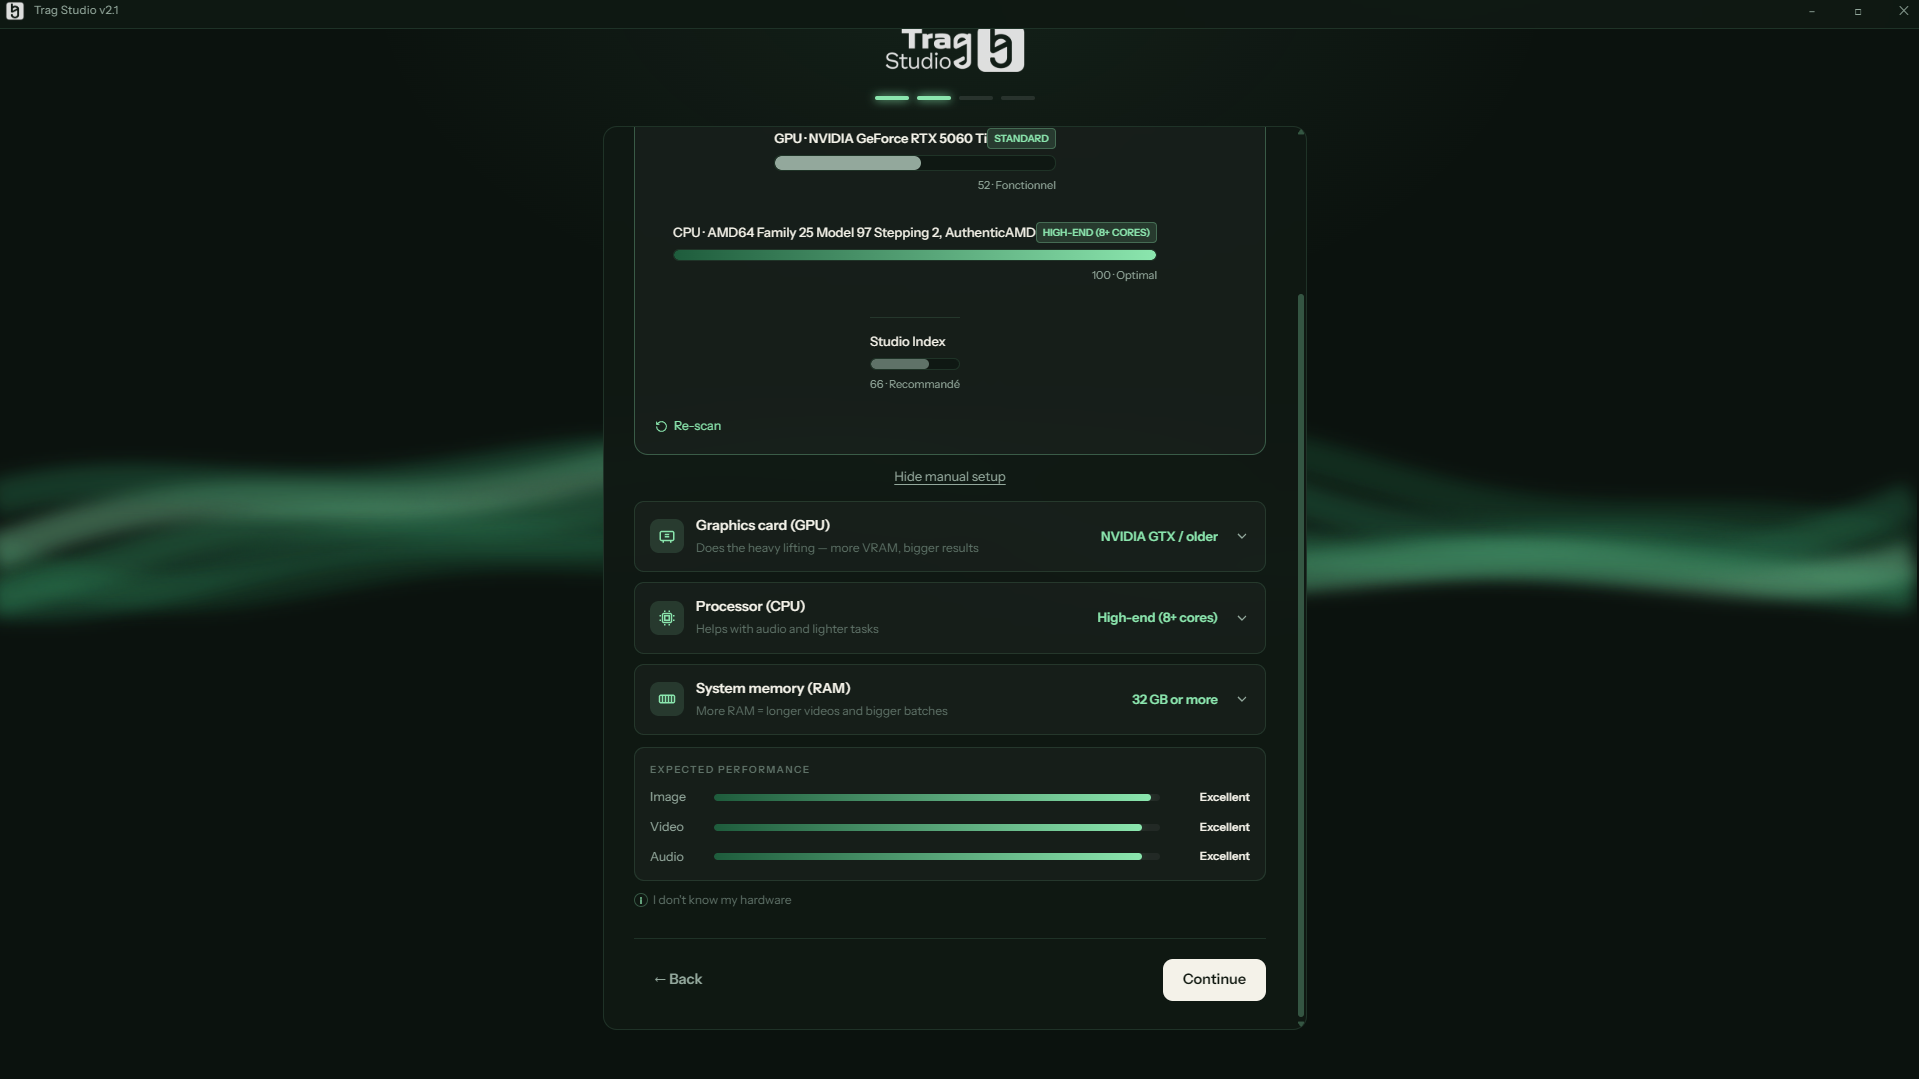
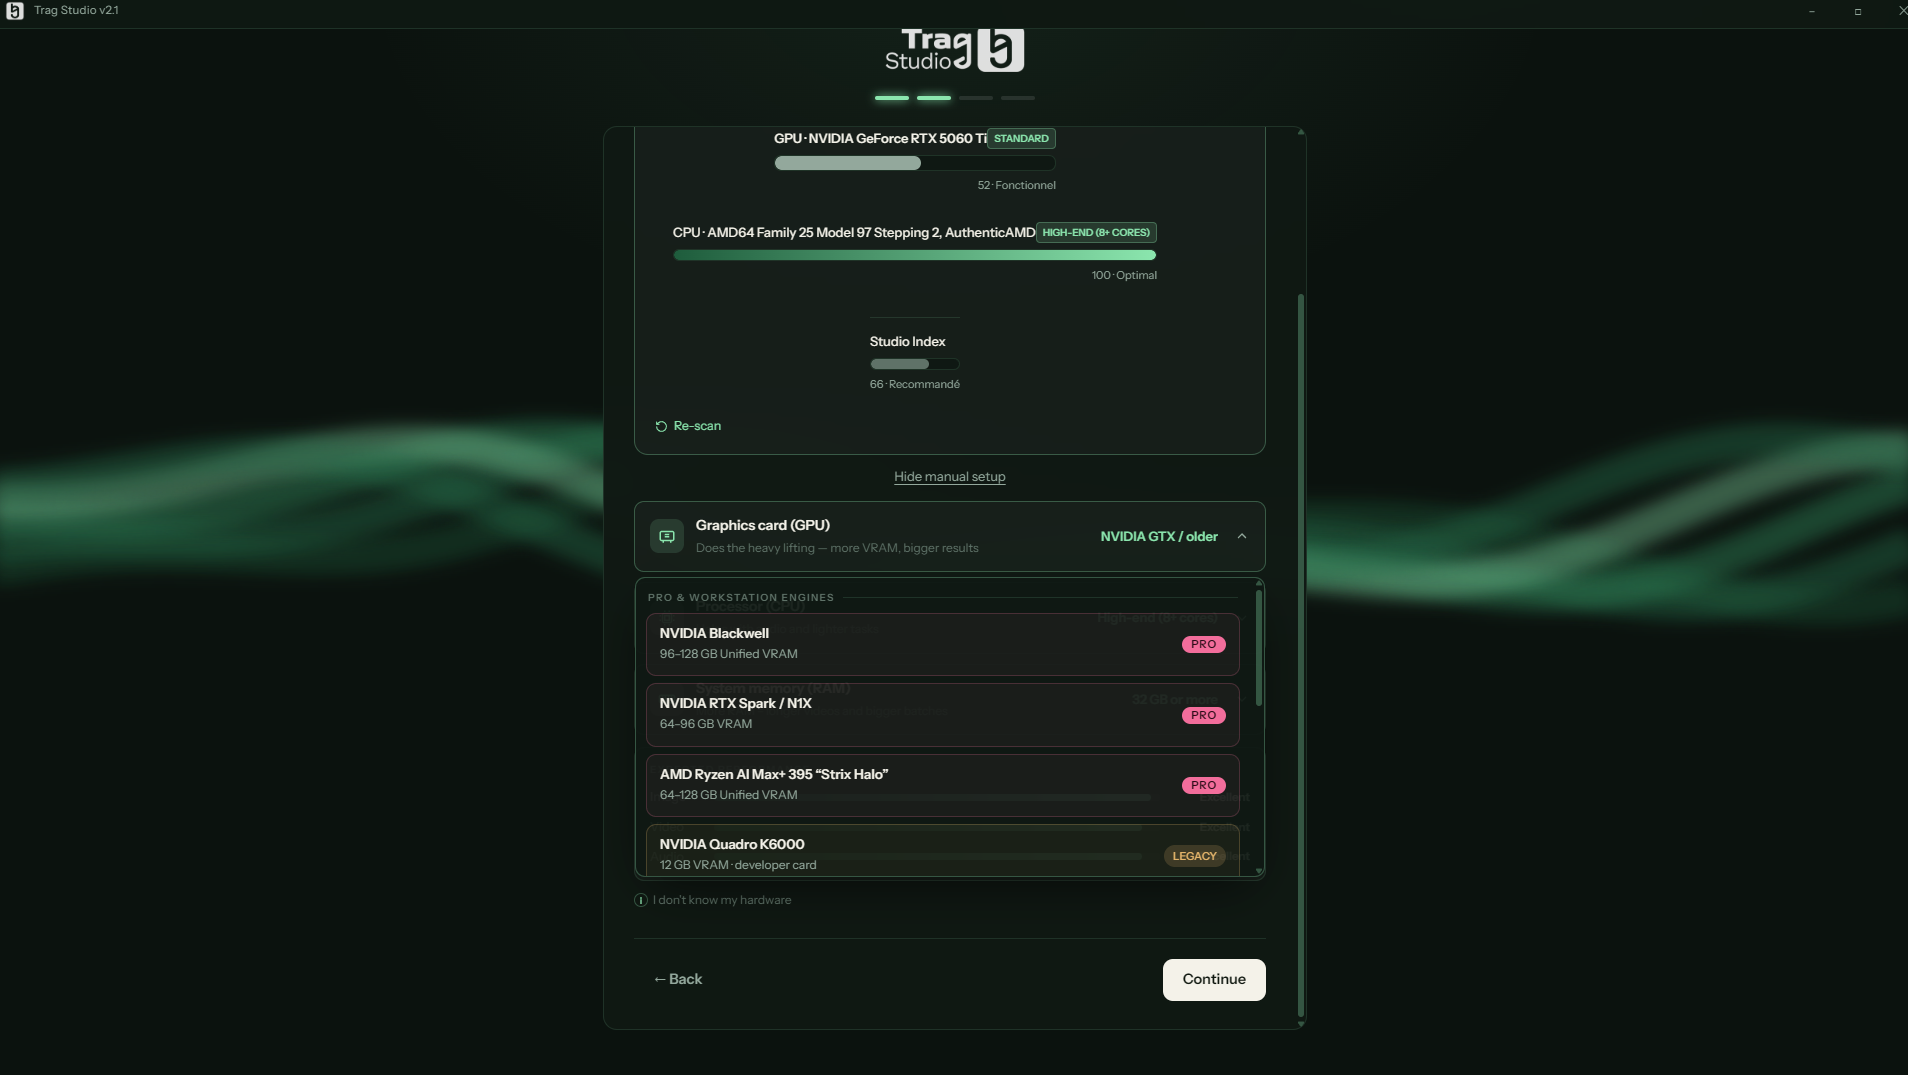
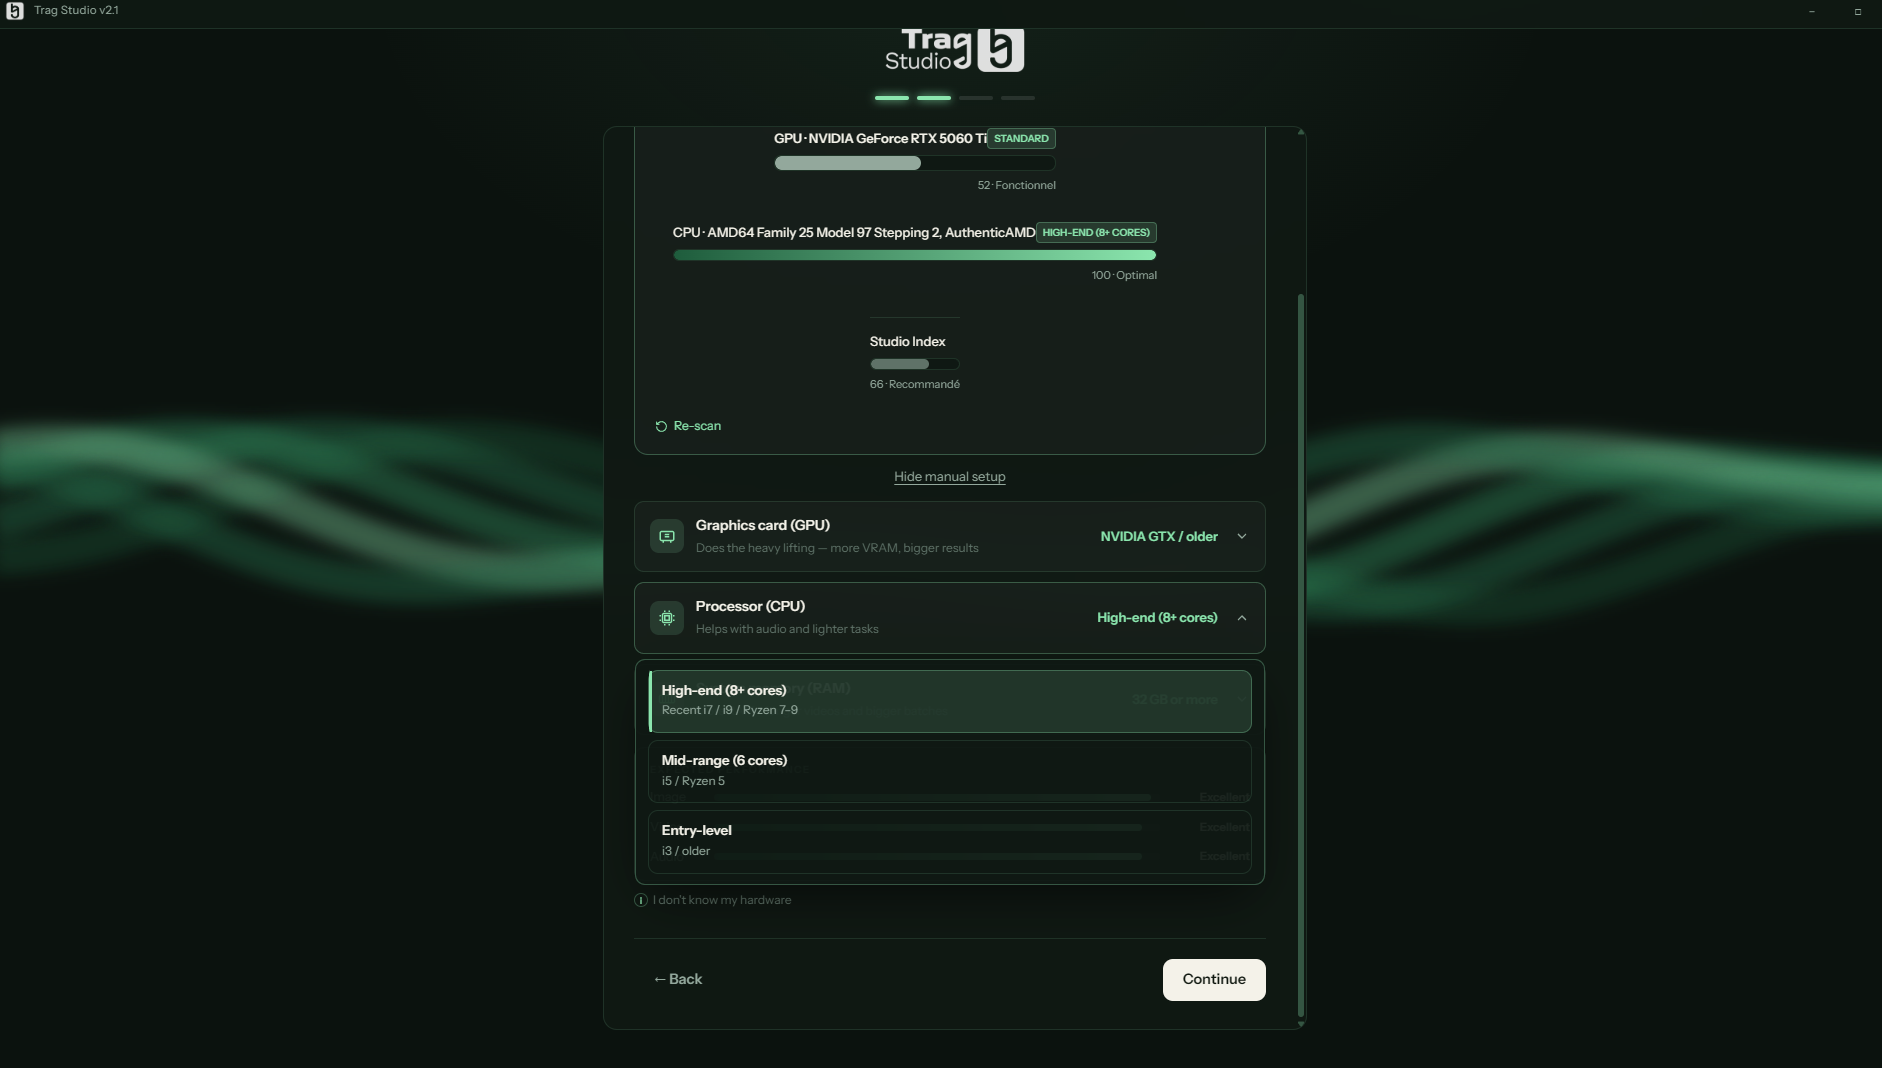
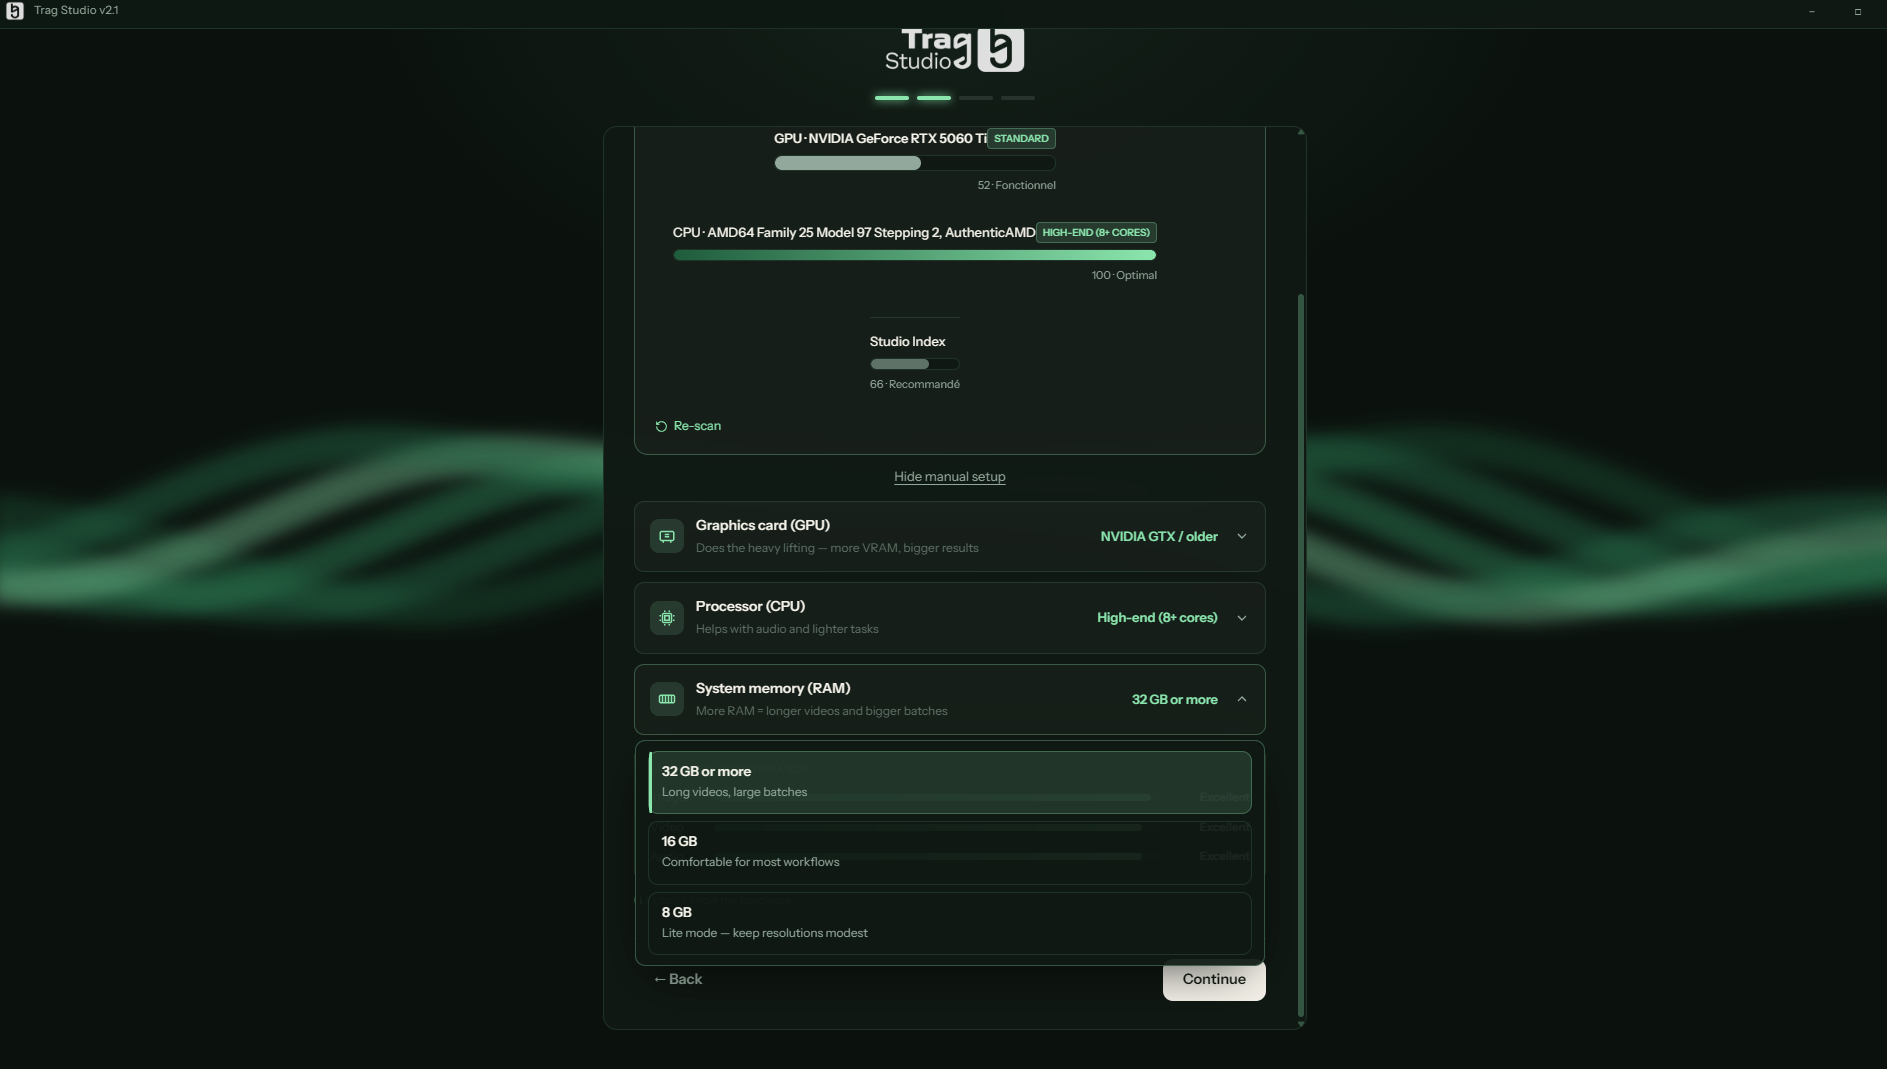
Prefer to stay in control? “Set up manually instead” unfolds three pickers — graphics card, processor, memory — and previews the expected performance (Image / Video / Audio) live. The “I don't know my hardware” option picks cautious defaults for you.
Manual setup: GPU, CPU, RAM, and the live “Expected performance” preview.
The GPU picker also covers pro and workstation cards.Processor side: high-end, mid-range or entry-level.And memory: more RAM = longer videos and bigger batches.
Minimum configuration
TRAG adapts to your machine — and the floor is lower than you'd think:
Component
Minimum
Graphics card
NVIDIA RTX 20 series — 4 GB of VRAM
Memory
16 GB of RAM
Processor
Intel Core i5 (7th gen) or AMD equivalent
Below that, the Studio Index simply picks humbler settings; above it, every extra gigabyte of VRAM buys speed and resolution.
And the ceiling is about to blow off: the new generation of NVIDIA Spark PCs — GB10 Grace Blackwell superchip, 128 GB of unified memory, up to a petaFLOP of AI compute on a desk — is exactly the hardware TRAG was built to feast on. On a Spark, batches that took an evening take a coffee break.
What your machine actually changes
Beyond the floor above, three things decide how TRAG feels day to day: free disk space, video memory, and whether an NVIDIA card is present at all.
Disk space — the real first wall
The models install inside the application folder, pack by pack. The exact weights:
Pack
Size
Included with
Magic Wand (prompt assistant)
3.6 GB
everyone, automatic
Image — generation
10.9 GB
Free
Image — editing
30.9 GB
Free
Video
47.2 GB
Pro
Audio
19.1 GB
Pro
Total
111.7 GB
To install and make images: plan for 50 GB free.
To have everything, Pro included: plan for 120 GB free.
On a laptop with a small system SSD, this — not the graphics card — is usually the real blocking point.
Nothing forces you to take it all: tick what you want, add the rest later without losing anything.
Your creations go to the output folder you pick at the next step — somewhere else, and that adds up over time too.
Windows Explorer counts in gibibytes where our figures are decimal gigabytes: a file announced at 29.15 GB shows as “27.1 GB” in Windows. It is not an incomplete download.
VRAM — what it actually buys
VRAM decides video, not image. Image runs comfortably from 4 GB; video is what needs headroom.
4 GB — images without worry. Video: short clips at modest definition.
6 GB — comfortable video in short clips. Measured on a tester's laptop RTX 3060: 4.9 GB used out of 6, no incident.
8 GB and up — longer durations, higher definitions, bigger batches.
And as described in the interface tour, only one engine stays warm at a time — a choice made to spare your card, not a limitation.
No NVIDIA card? TRAG still runs
Without a usable GPU, TRAG falls back to the processor: the footer indicator announces it in amber, and generation works — just much more slowly. Fine for trying things out, not for producing. Better said here than mistaken for a breakdown.
Pick your workflows — and let the screen check your disk
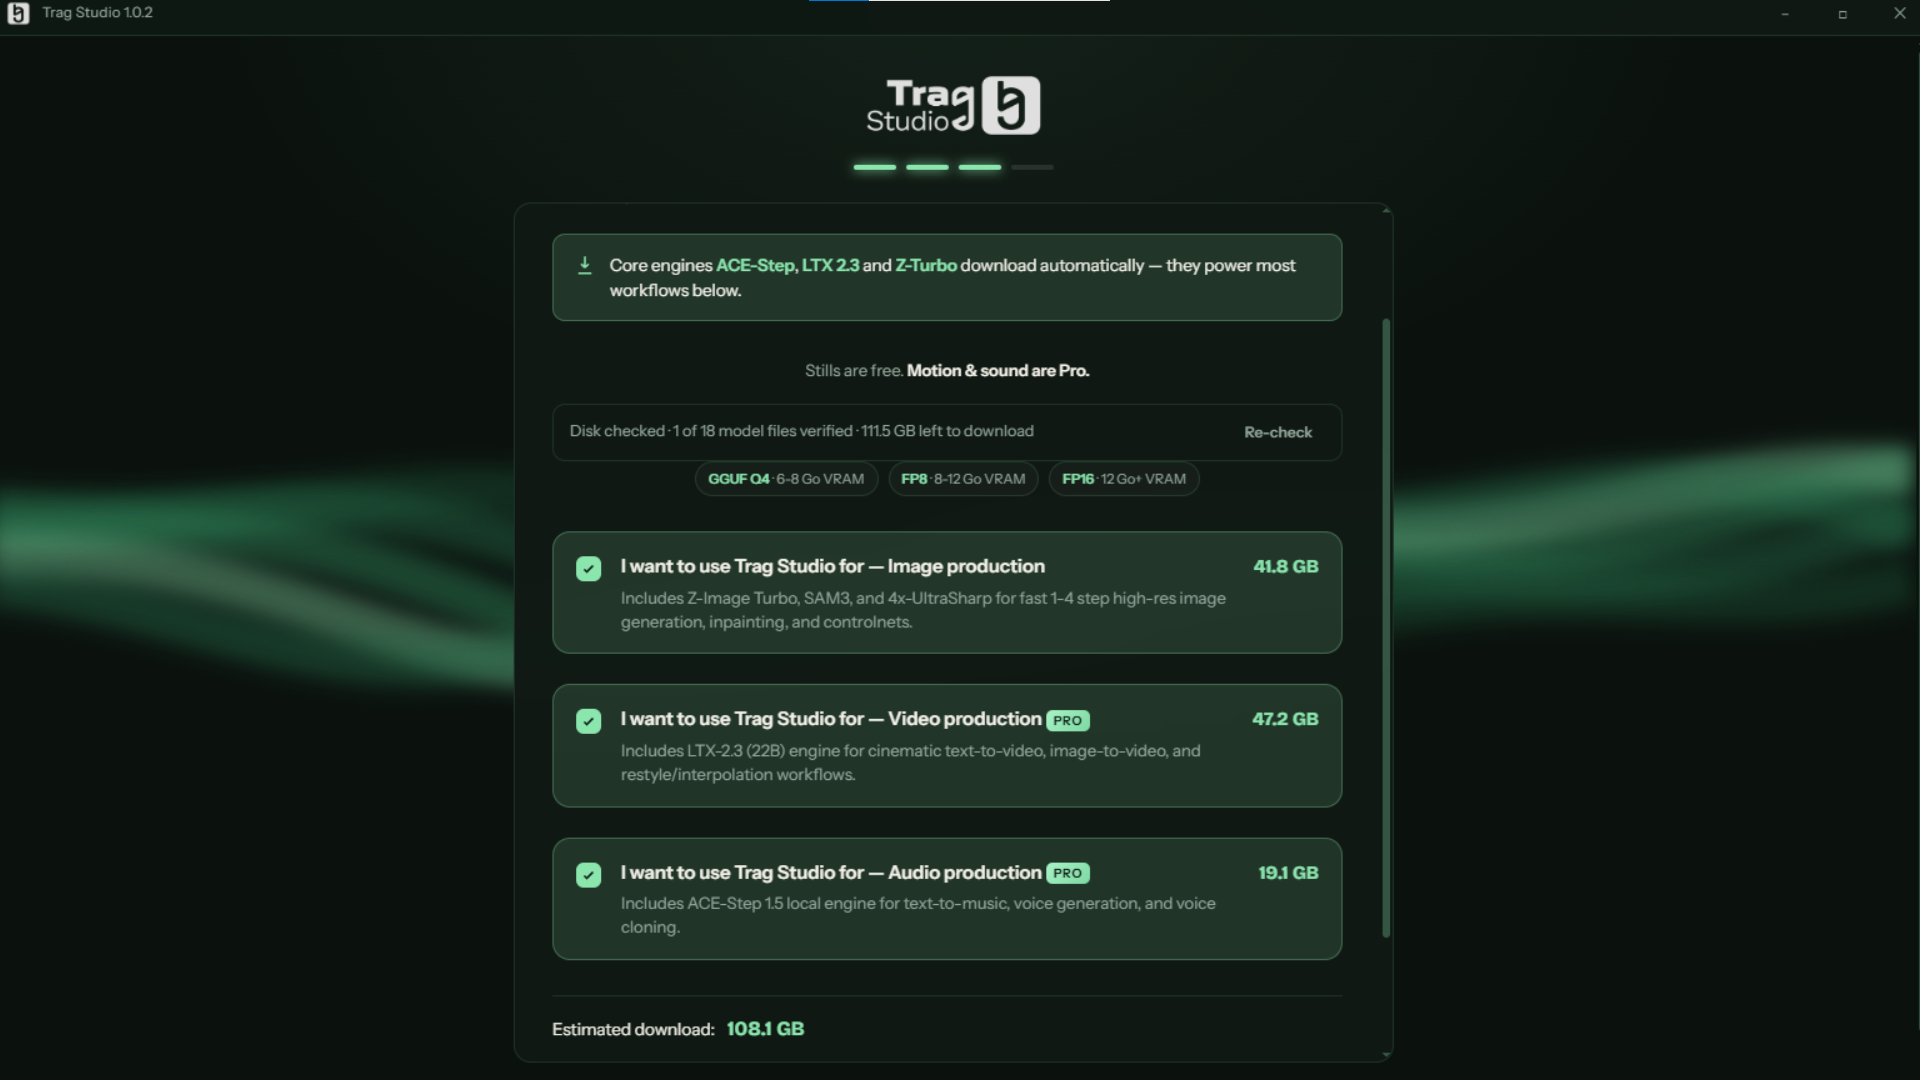
The models screen lists the packs — Image, Video, Audio — with their real download sizes; the core engines download automatically. As the screen puts it: stills are free, motion & sound are Pro. Every pack can be downloaded — the PRO stamp simply tells you what your plan can run.
Three details make this screen one you can trust:
It re-reads your disk every time it opens. The banner at the top announces it — “Checking what is already on this machine…”, then the verdict: “Disk checked · 14 of 18 model files verified · 9.4 GB left to download” — with a Re-check button.
It knows three states, not two. A complete, verified pack wears a green Already downloaded stamp (no checkbox — a discreet Download again remains). An interrupted file shows amber with Check needed and a Redownload button. Anything absent keeps its checkbox and its exact remaining weight.
Closing the window cancels nothing. The download card lives on; collapsed, it keeps the percentage and the bar visible — “Keep working — this continues in the background.”
The models screen: disk-check banner at the top, real sizes per pack, PRO stamps on Video and Audio, and the estimated download at the bottom.
And you get to work early: as soon as the essentials are in (about 14.5 GB), the studio opens and the rest keeps downloading in the background. You can add or remove packs anytime via Settings › Hardware & Models — models already on disk are never fetched twice.
Choose the output folder
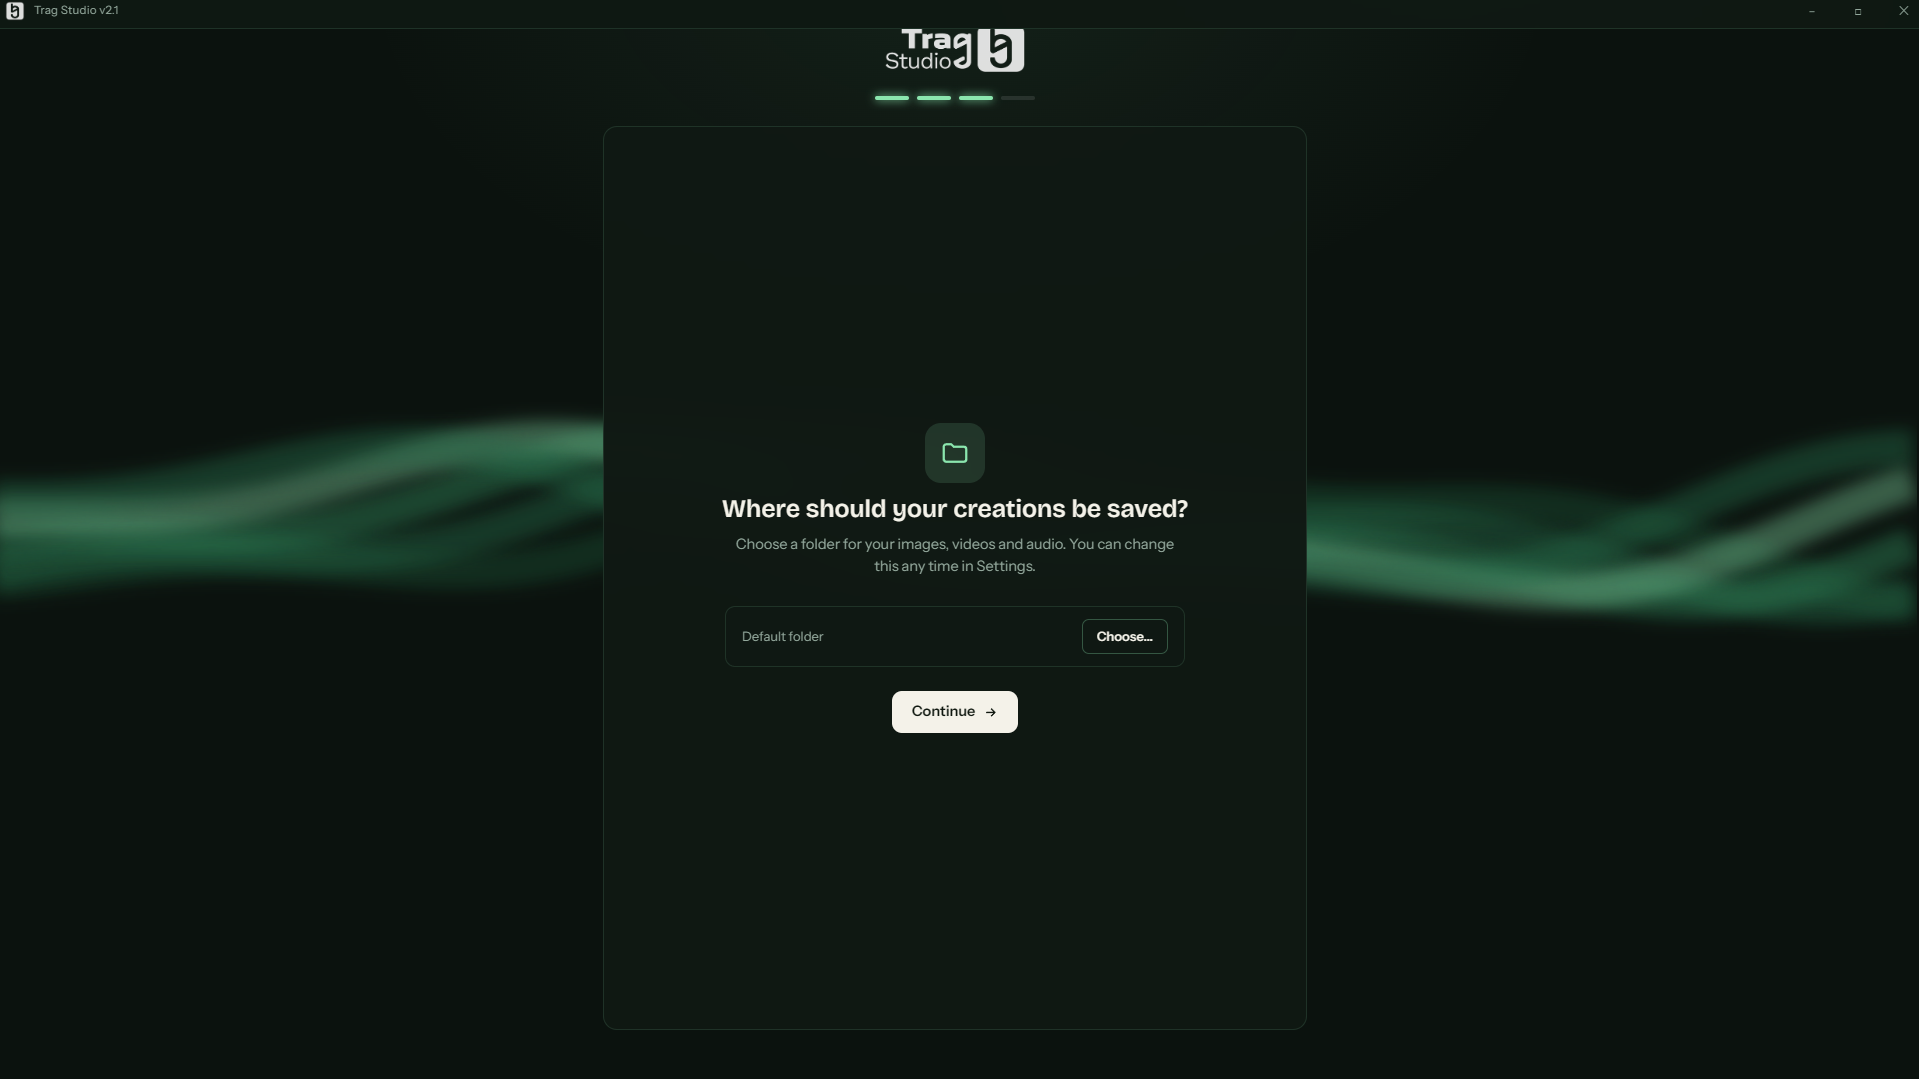
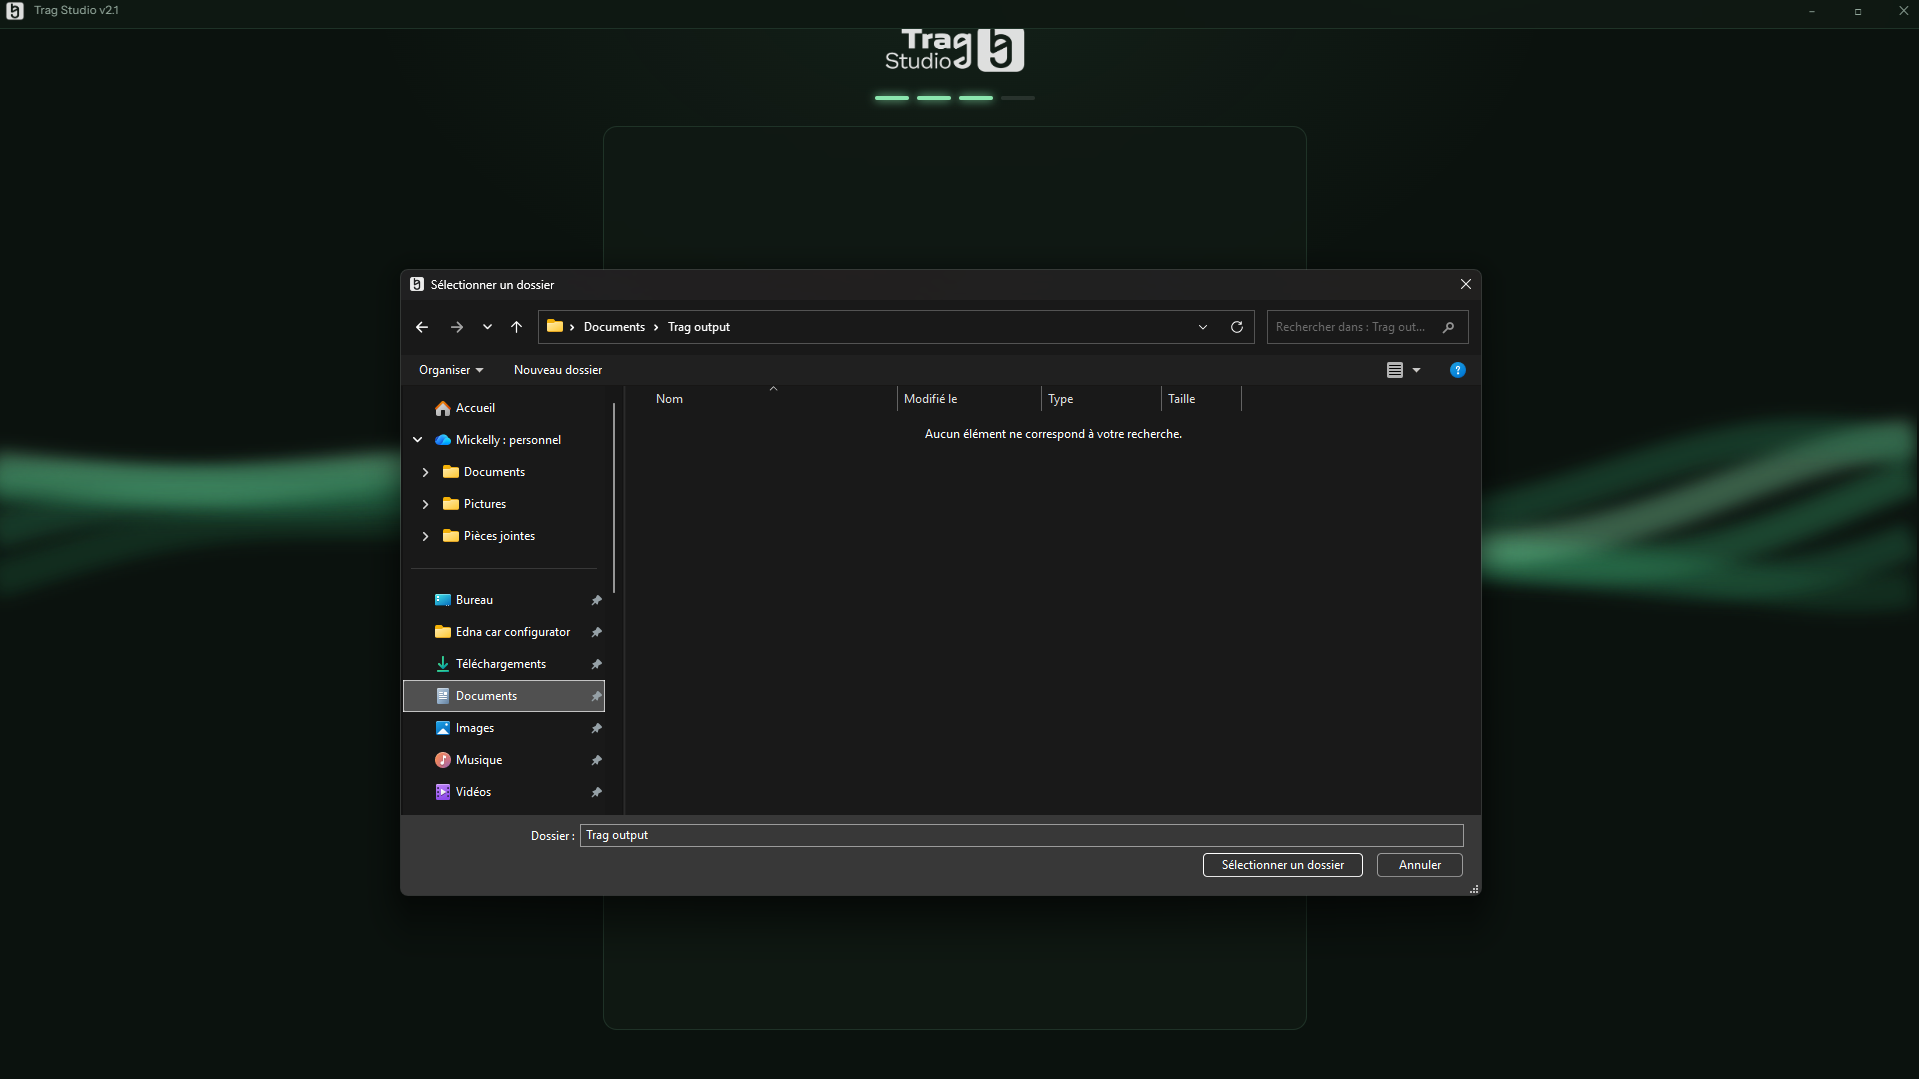
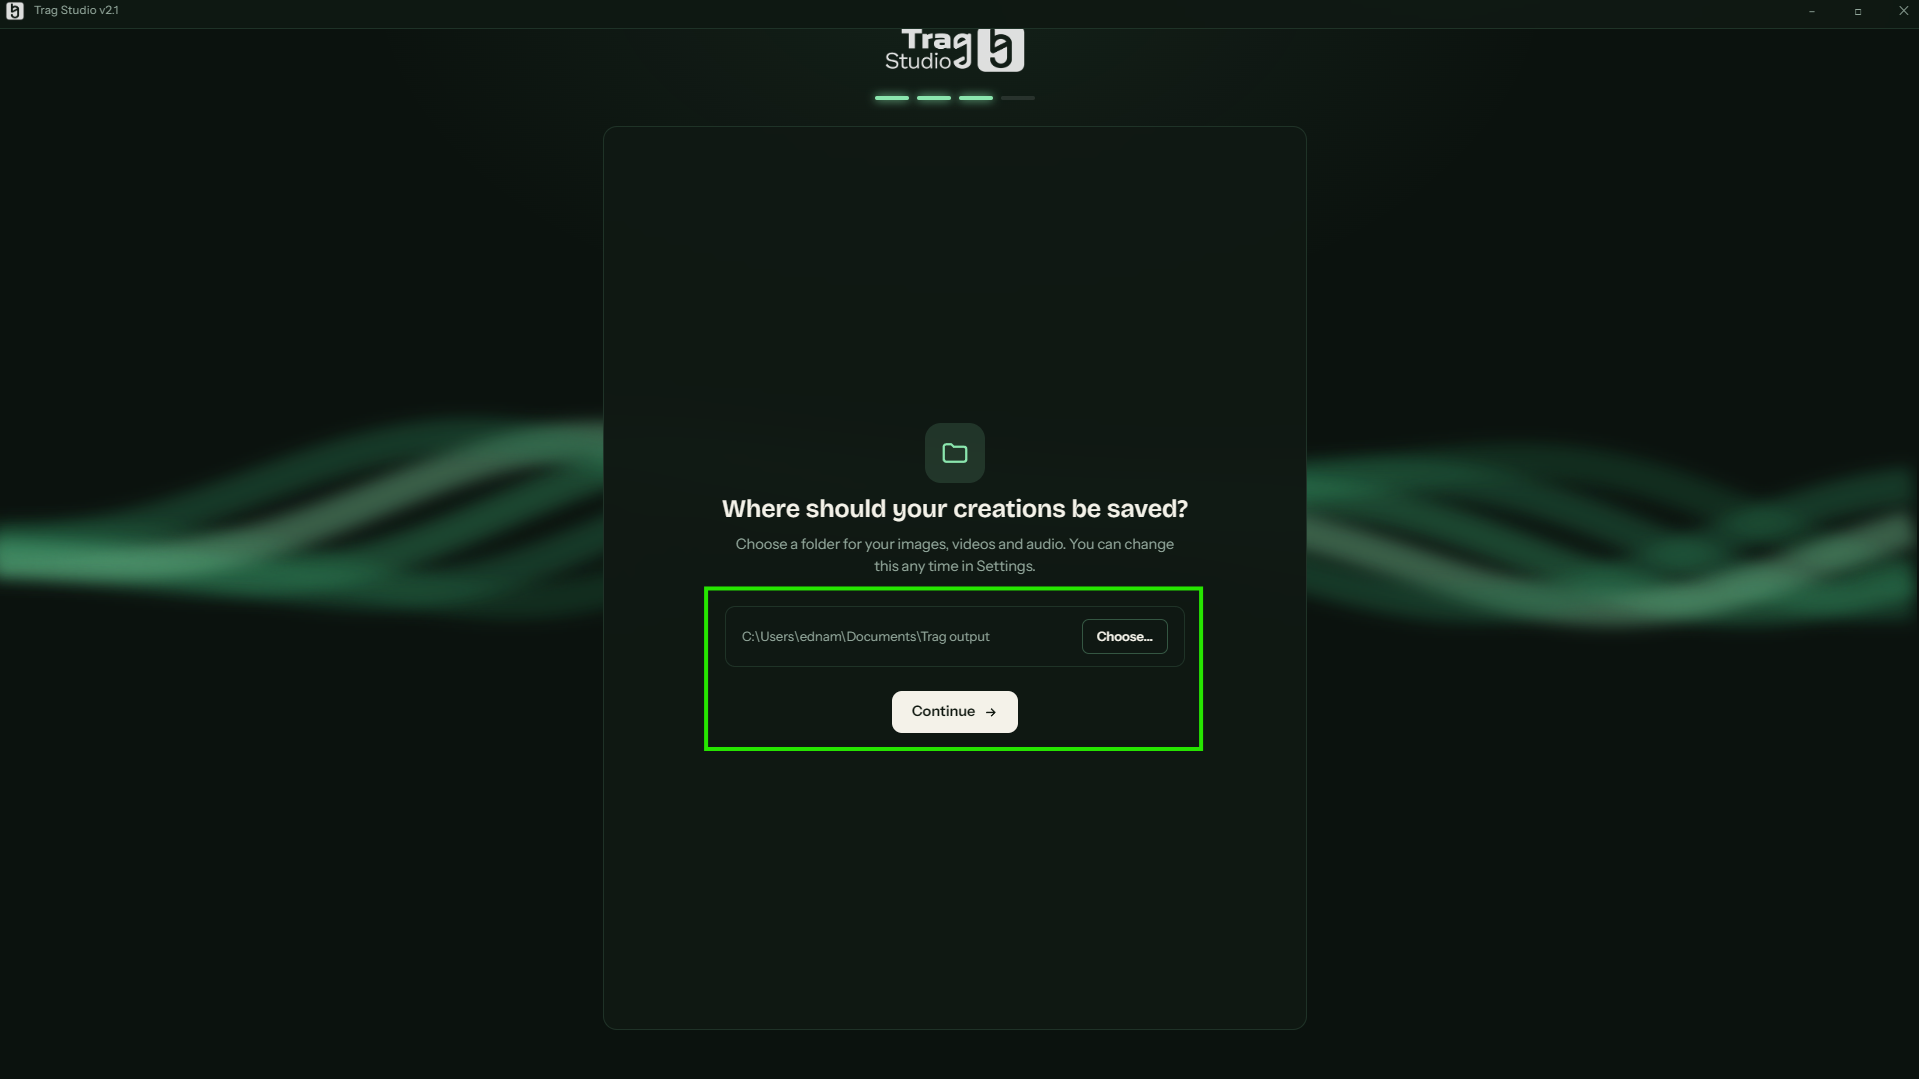
“Where should your creations be saved?”: pick the folder where your images, videos and tracks will land. Click Choose…, select (or create) a folder in Windows Explorer, then confirm with Continue →. You can change it anytime in Settings.
Choosing the output folder: click “Choose…”.Windows Explorer opens: create, say, a “Trag output” folder in your Documents.
The path is set: all that's left is “Continue →” (highlighted in green).
Home stretch
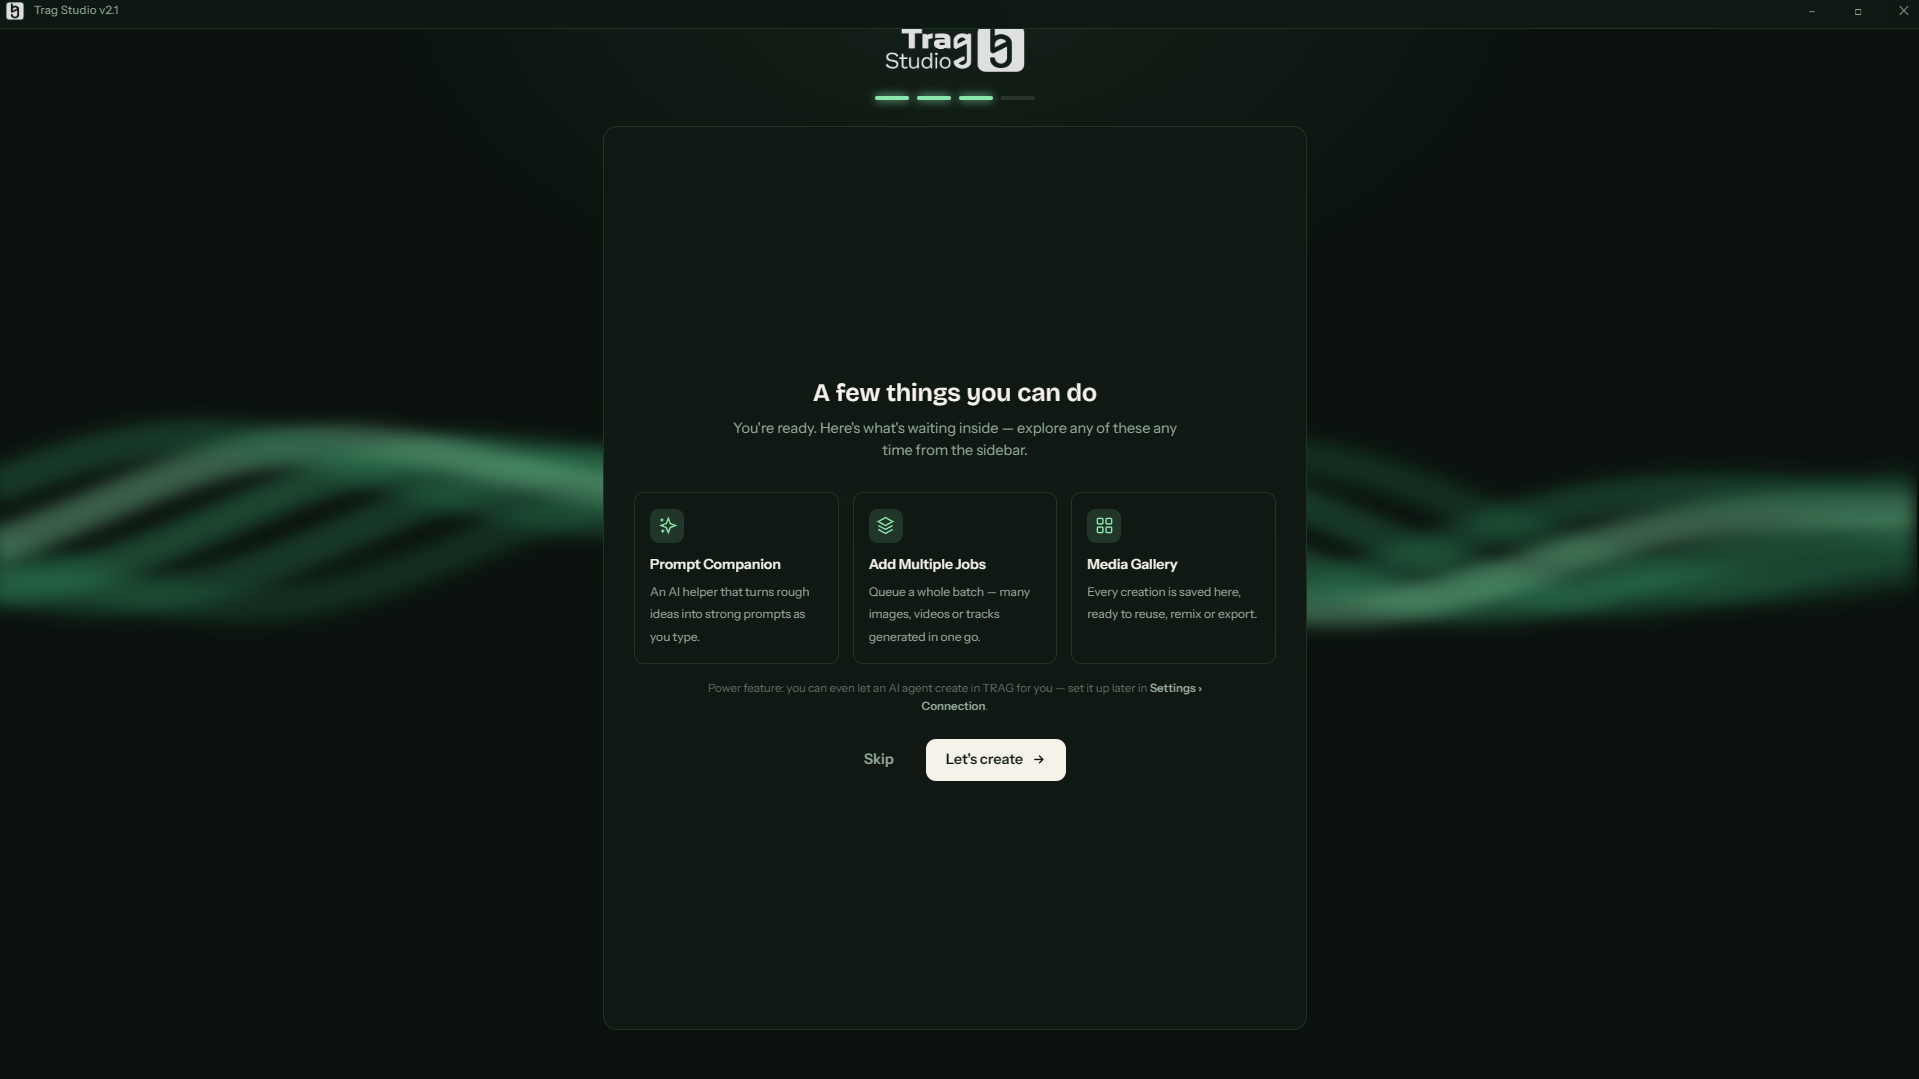
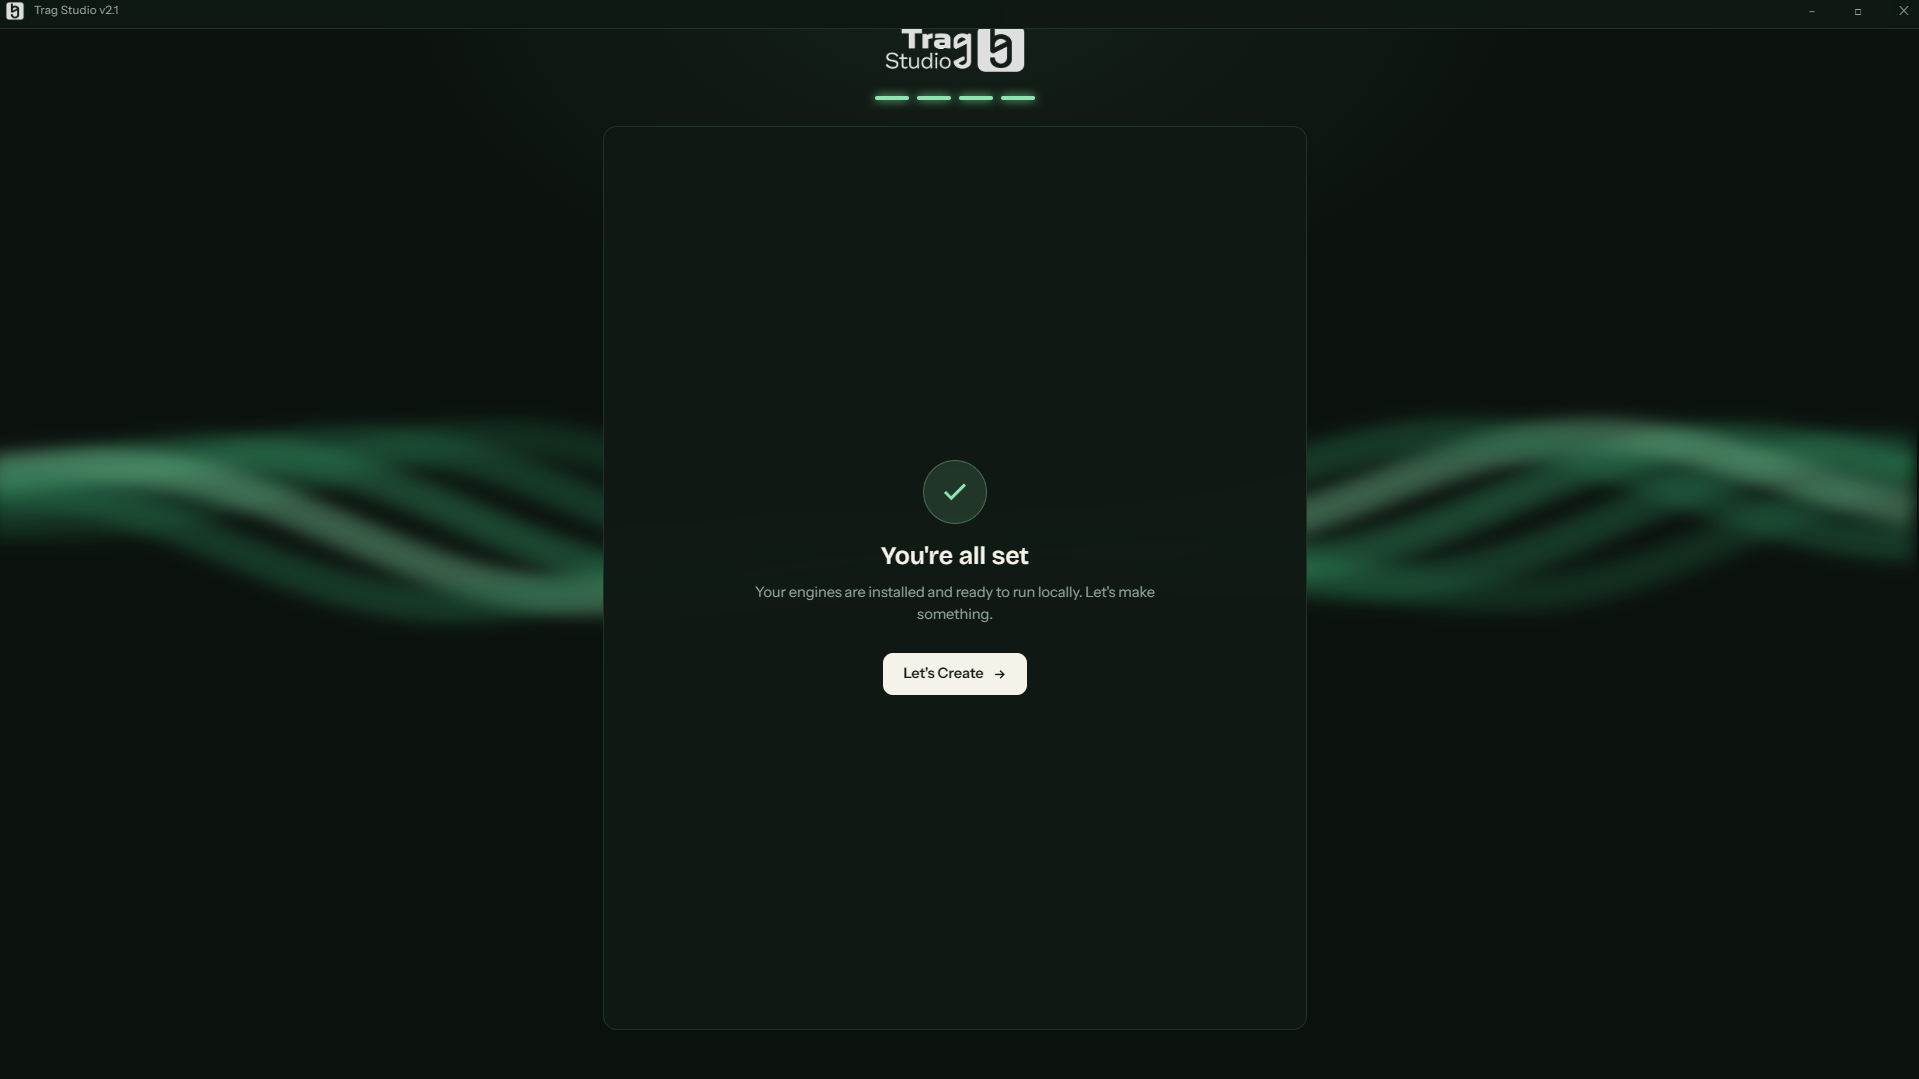
TRAG shows three things worth remembering — the Main chat bar and its ✦ magic wand (your prompt upgraded in one click), Add Multiple Jobs (run a whole batch in one go) and the Media Gallery (all your creations, ready for reuse). Then “You're all set” confirms your engines are installed: click Let's Create →.
Three things to explore right away — plus a hint: an AI agent can even create for you (Settings › Connection).“You're all set”: everything's installed — time to create.
The guided tour (8 steps)
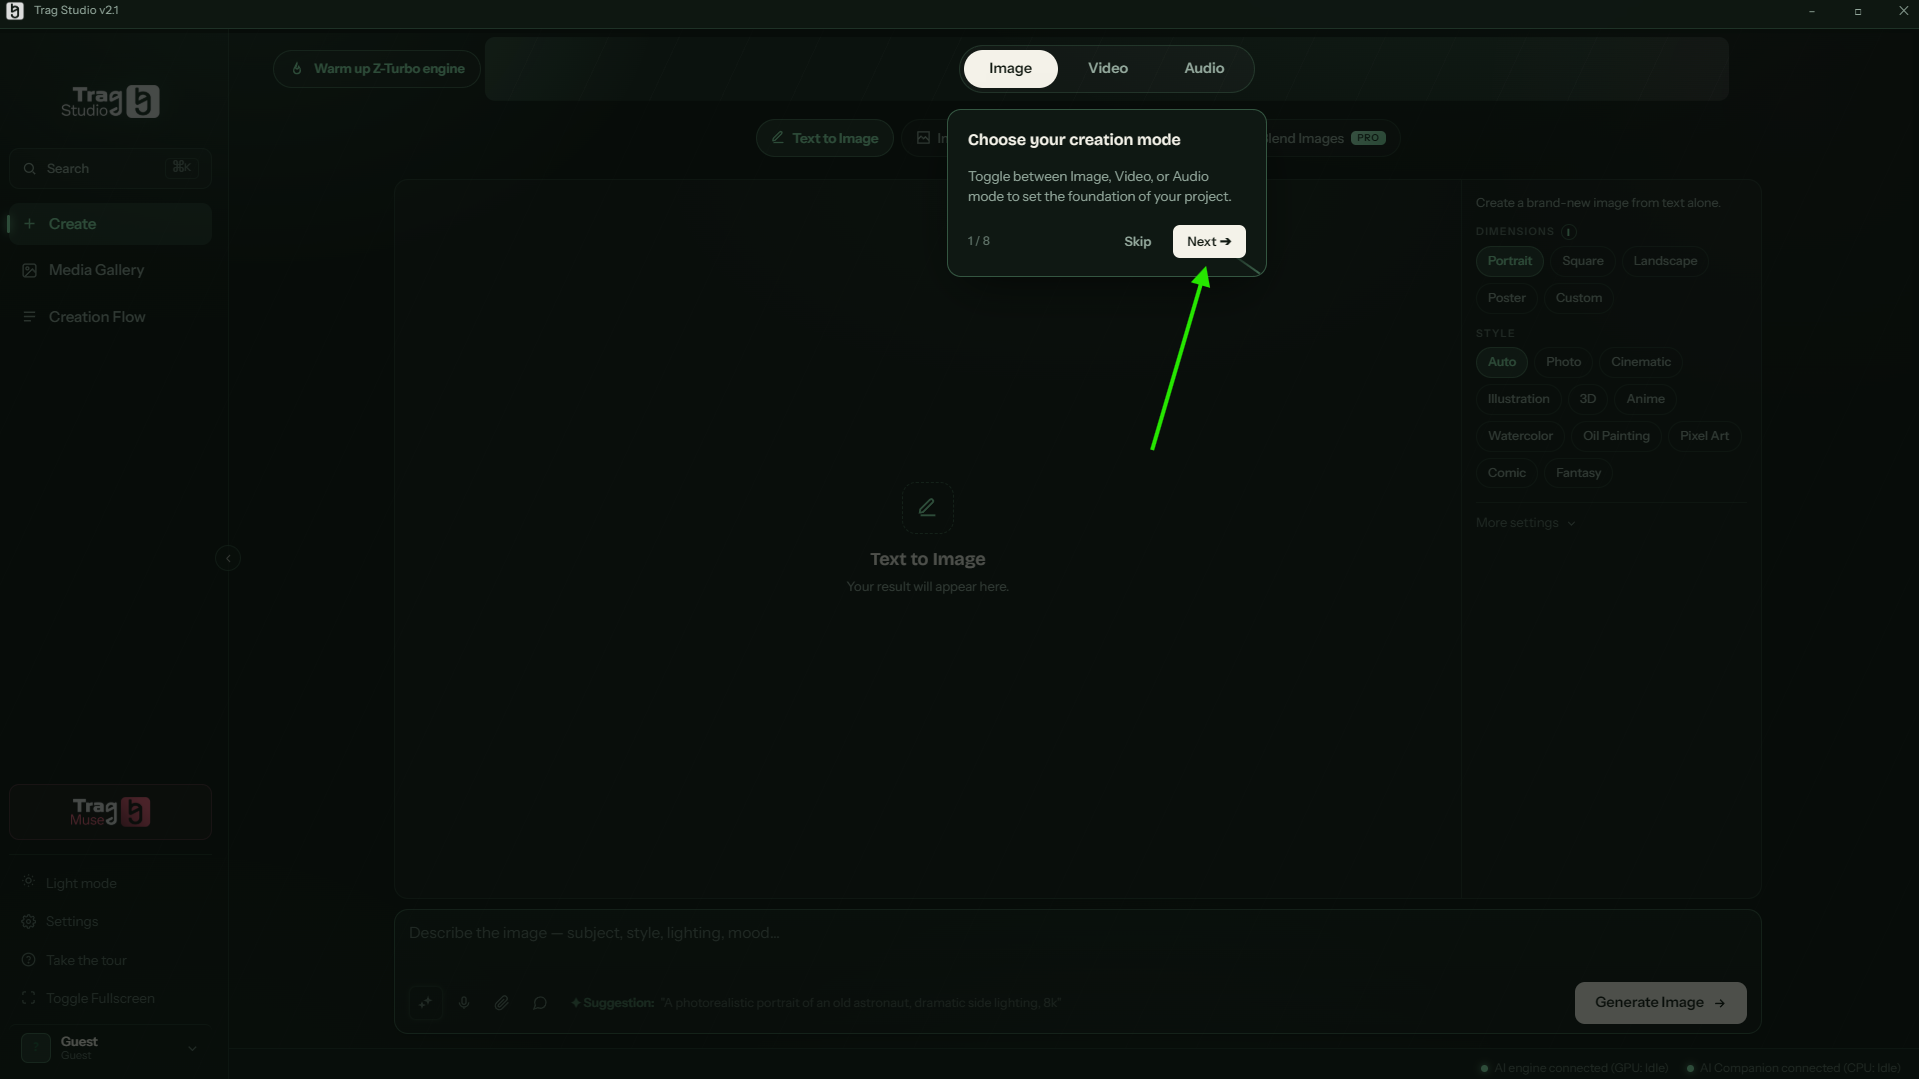
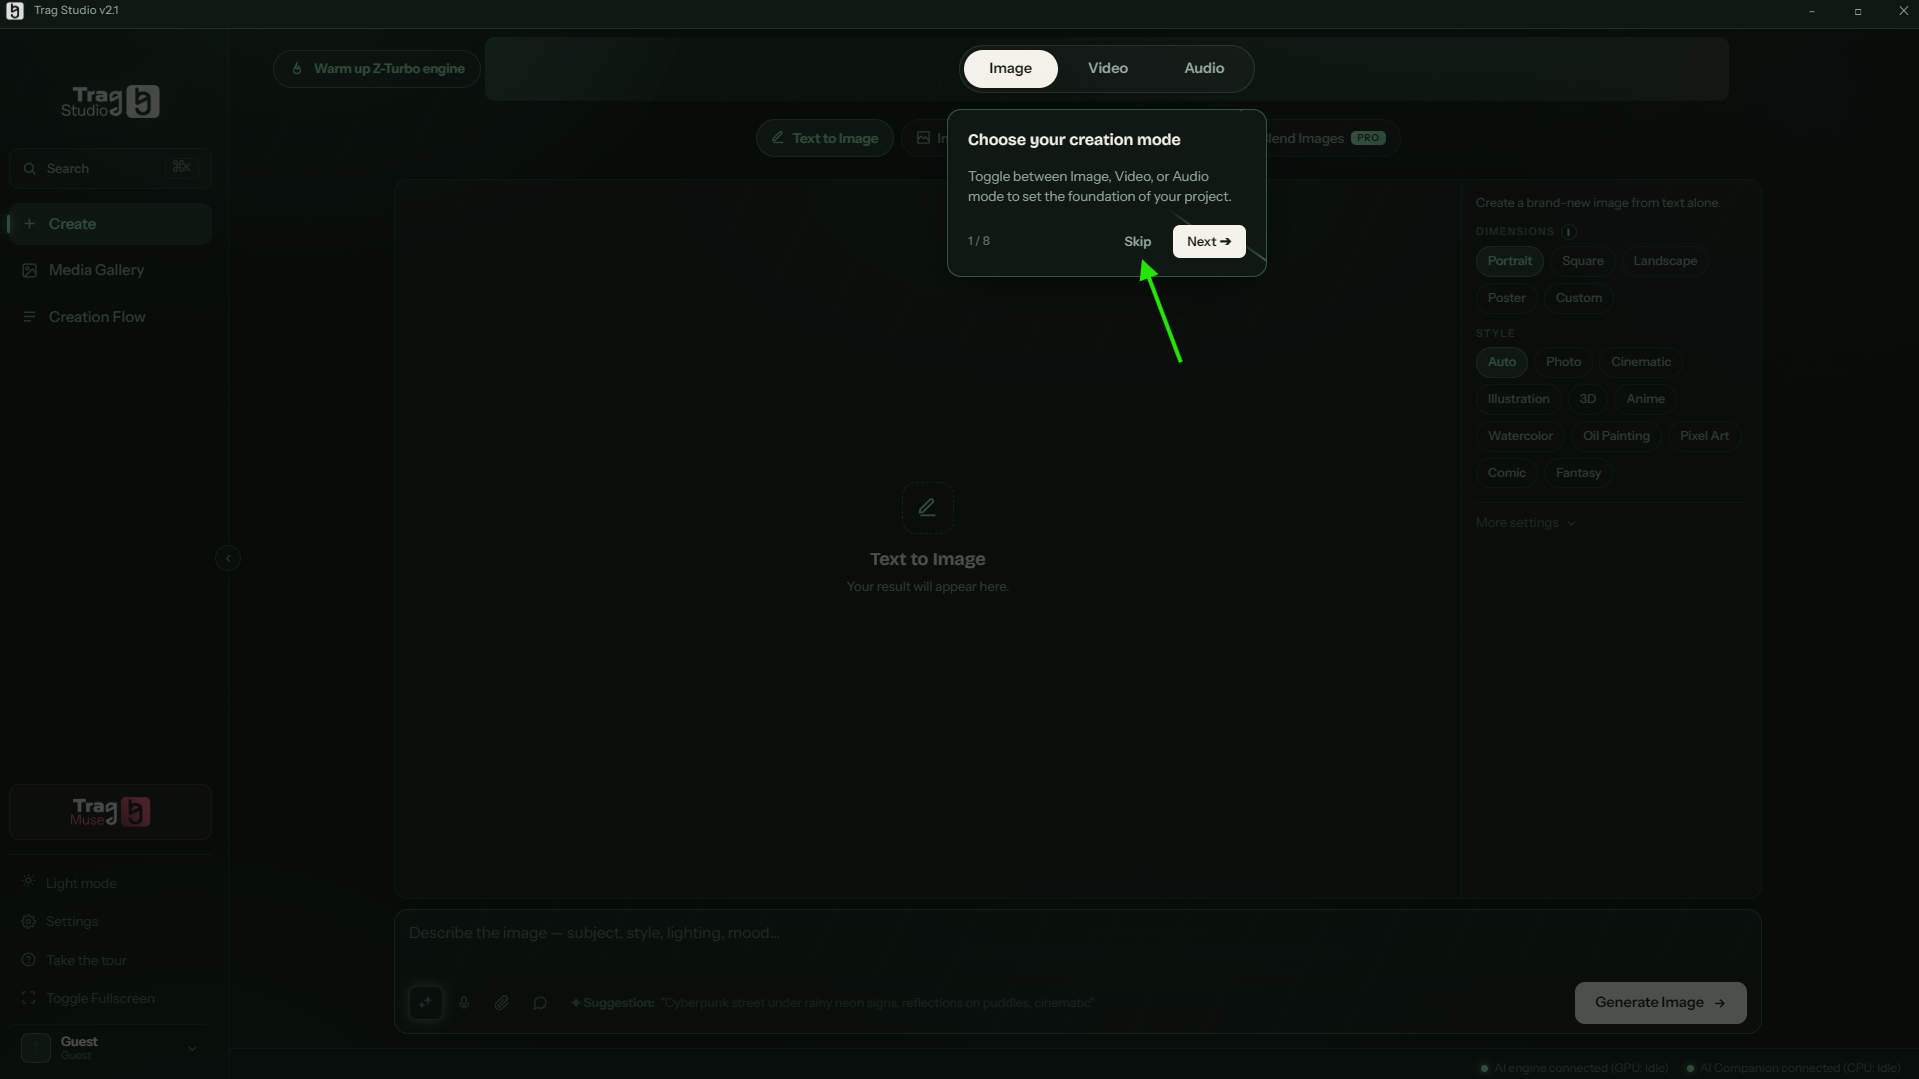
On first open, a short guided tour spotlights the key areas one by one (mode picker, workflows, settings, prompt…). Follow along with Next →, or dismiss it with Skip — you can relaunch it anytime via “Take the tour” in the sidebar.
The guided tour (step 1 of 8): “Next” moves you along.In a hurry? “Skip” closes the tour — it stays available in the sidebar.
04The interface at a glance
All of TRAG fits on one screen, built so you never get lost. Here's the map.
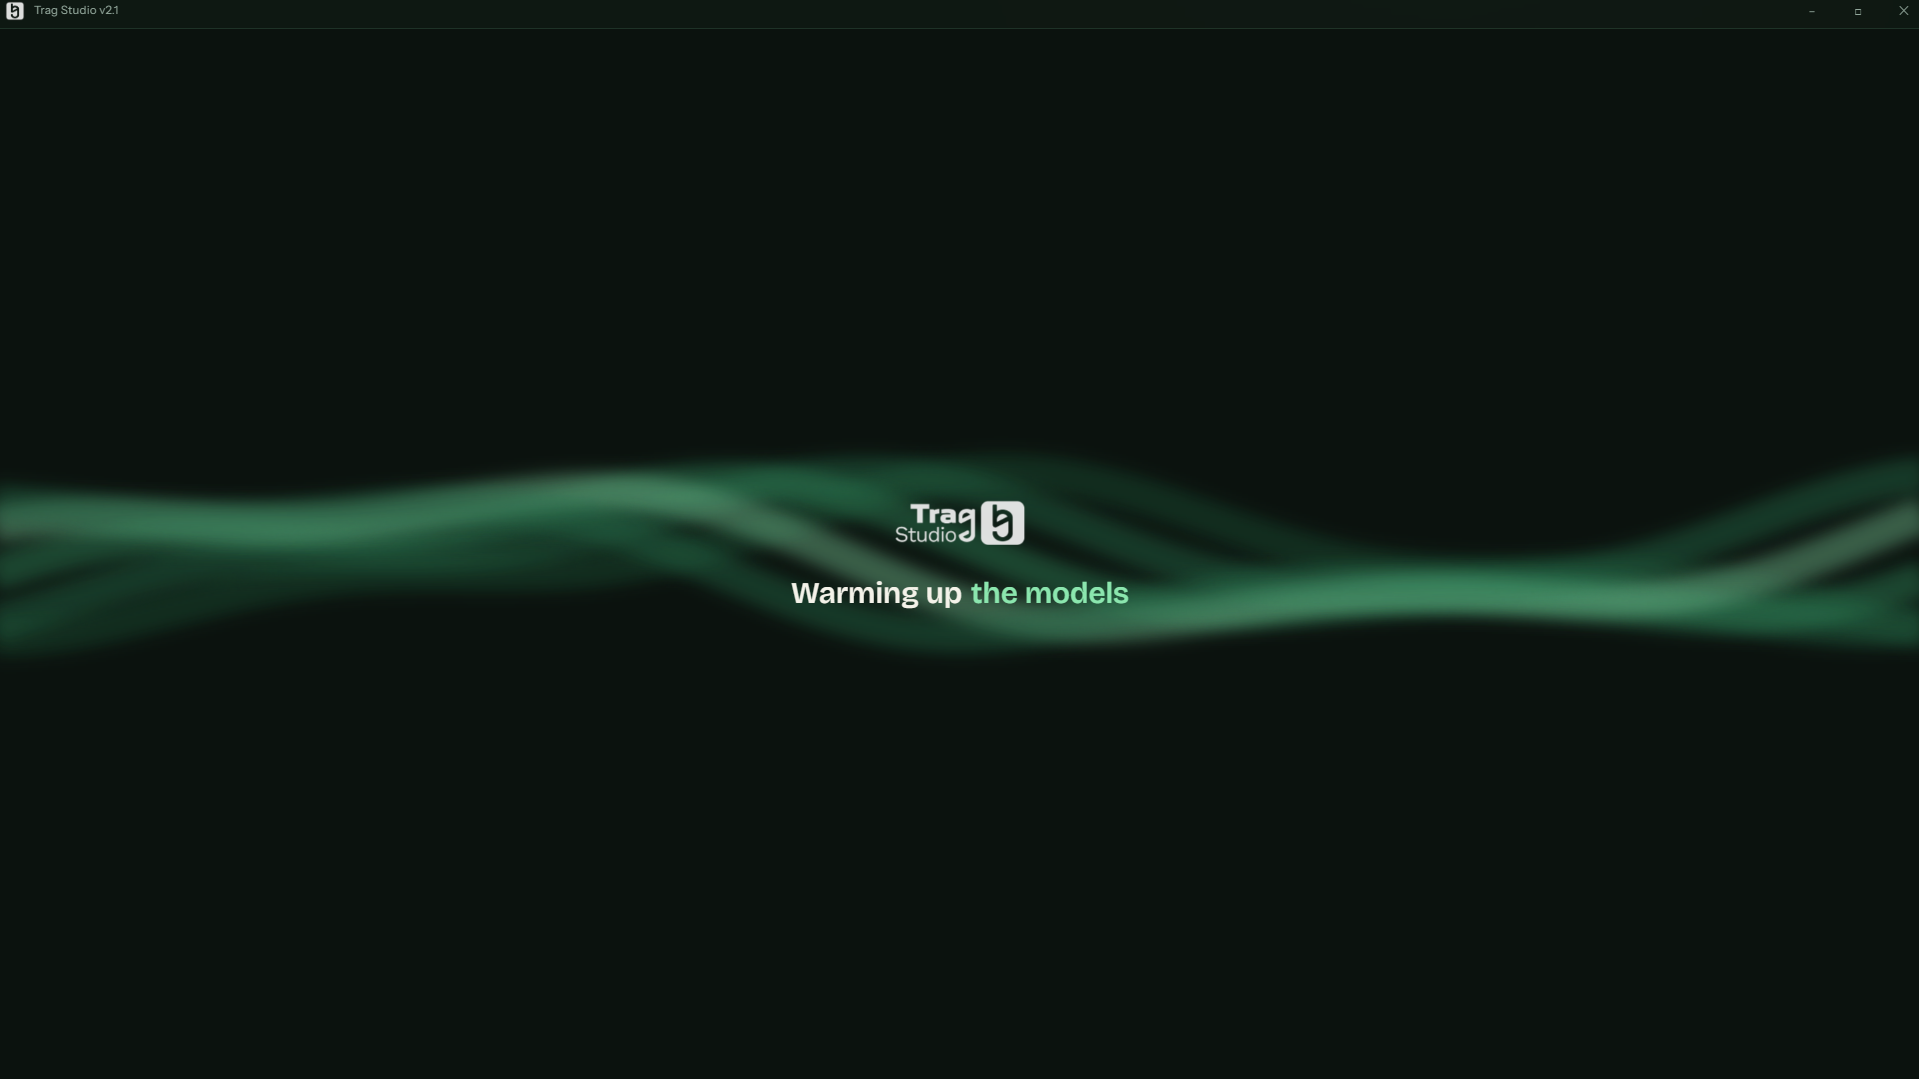
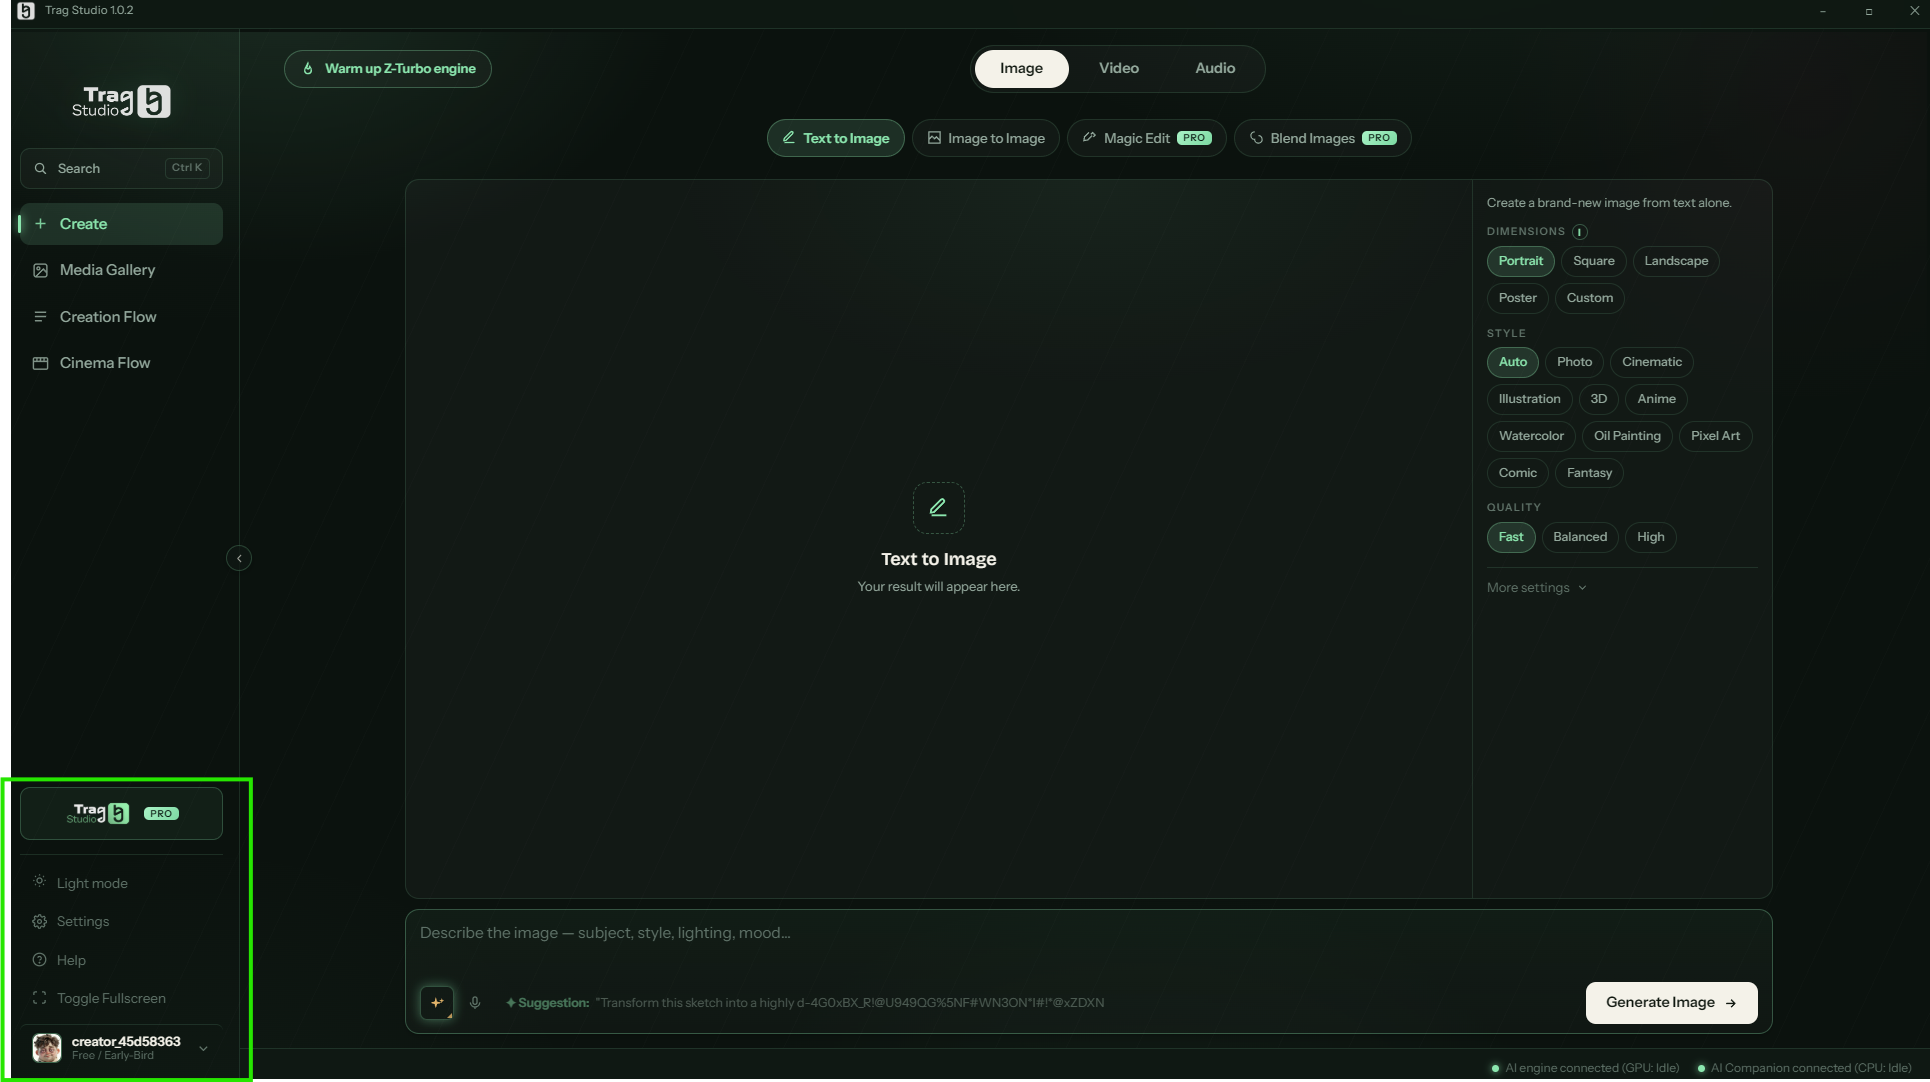
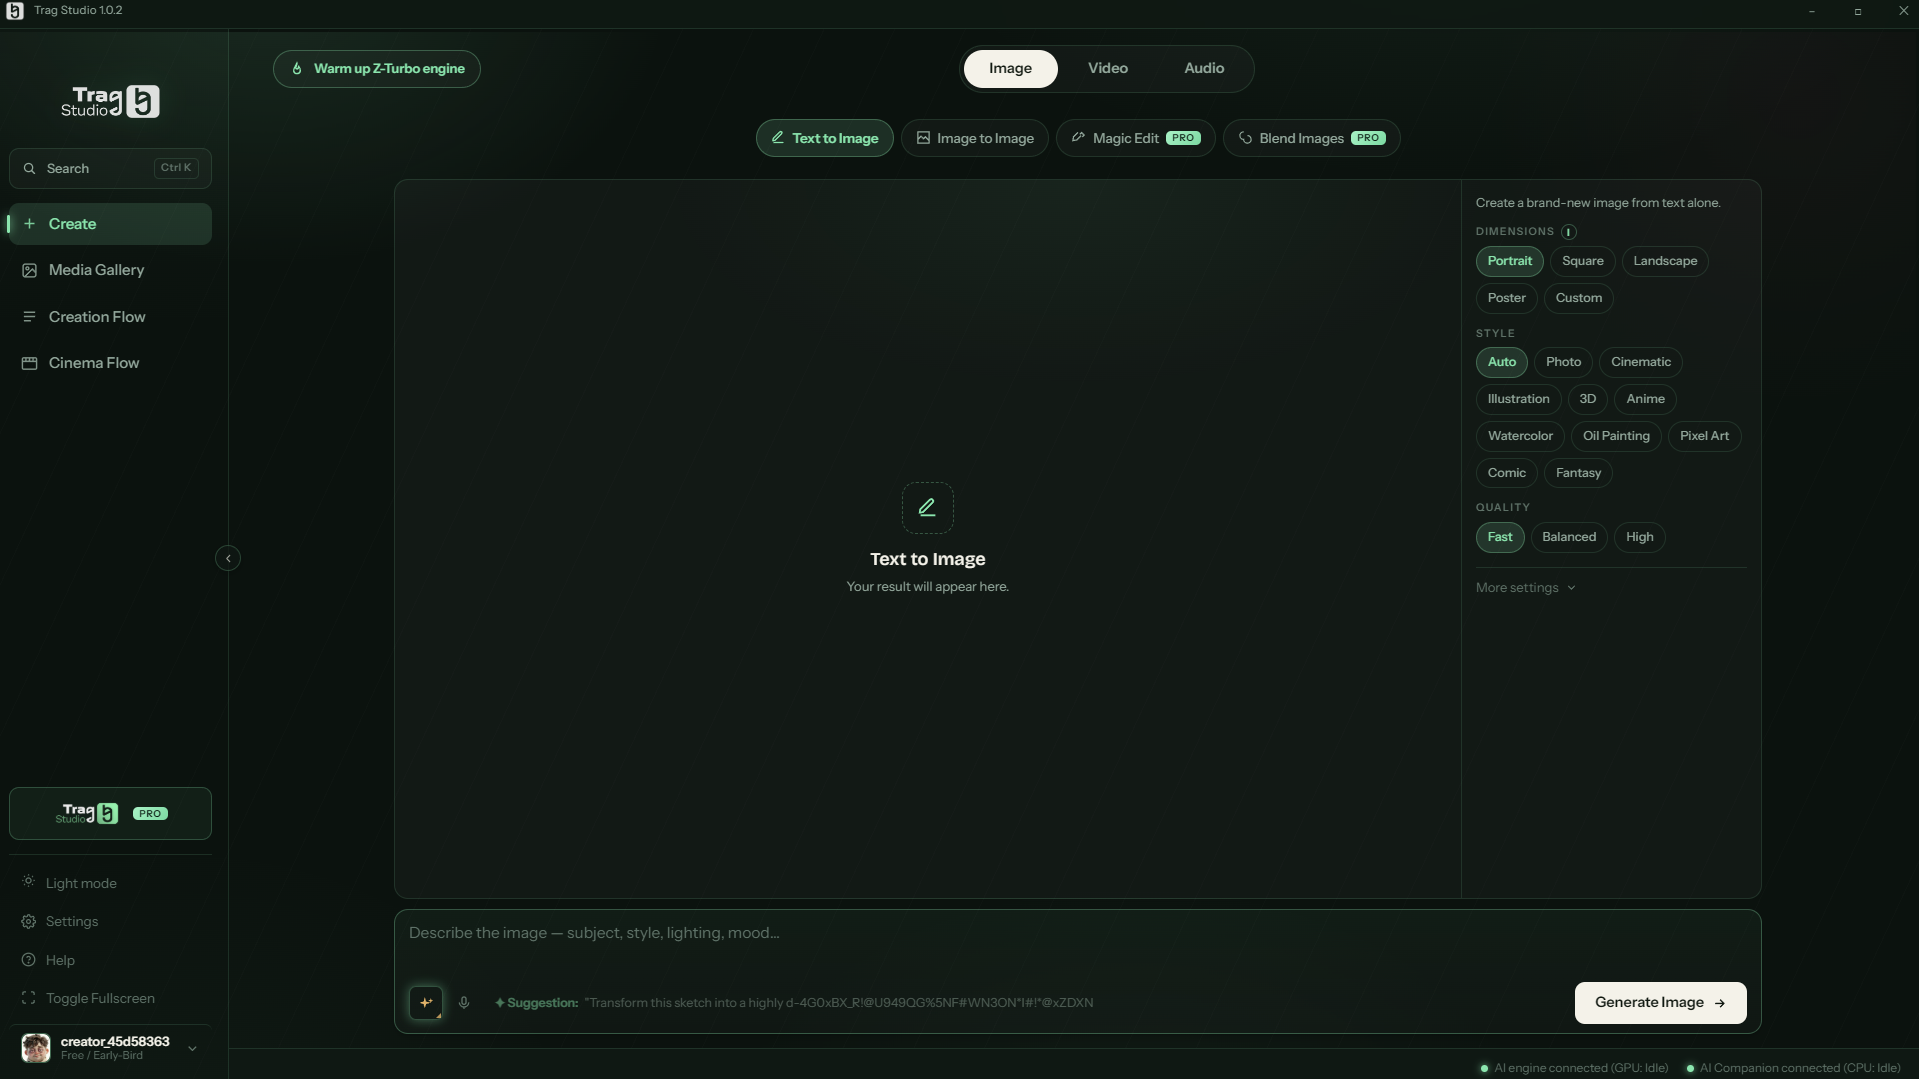
On startup, TRAG preloads its models (“Warming up the models”), then drops you into the Create space:
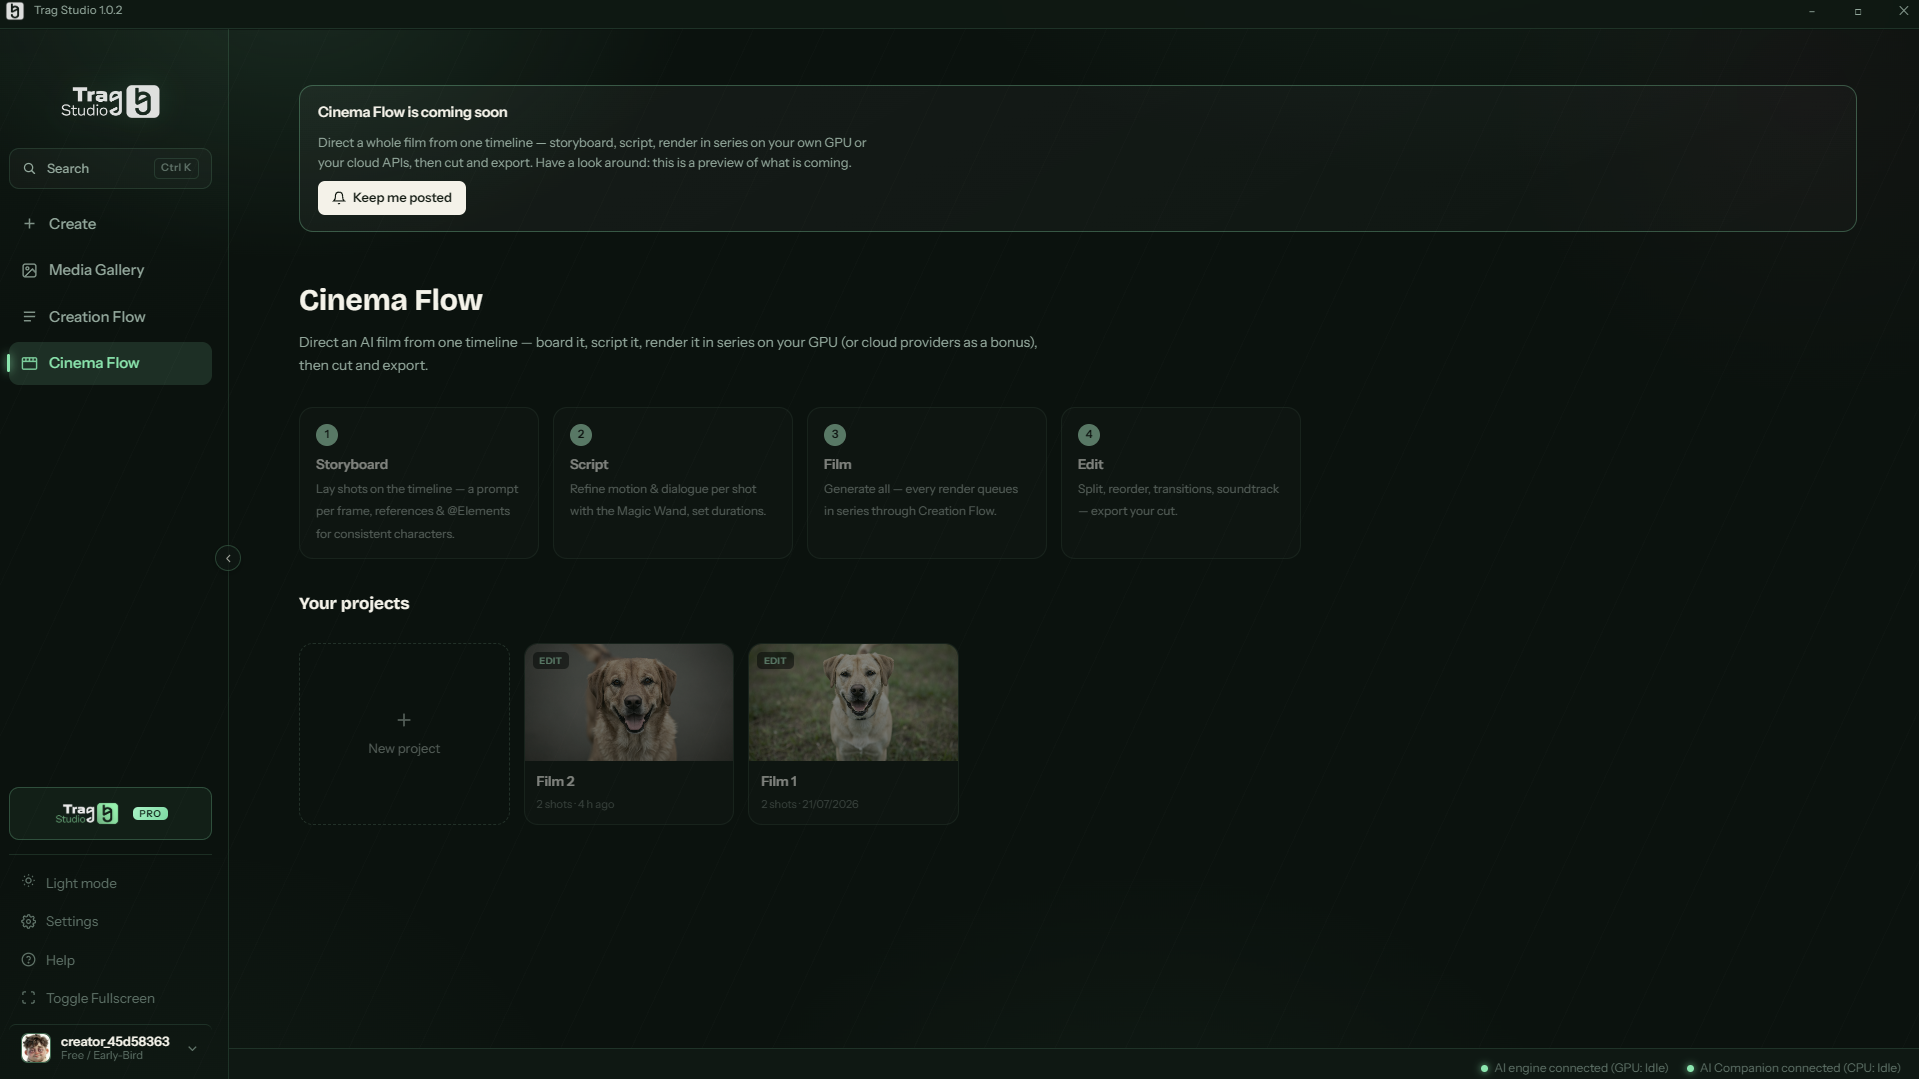
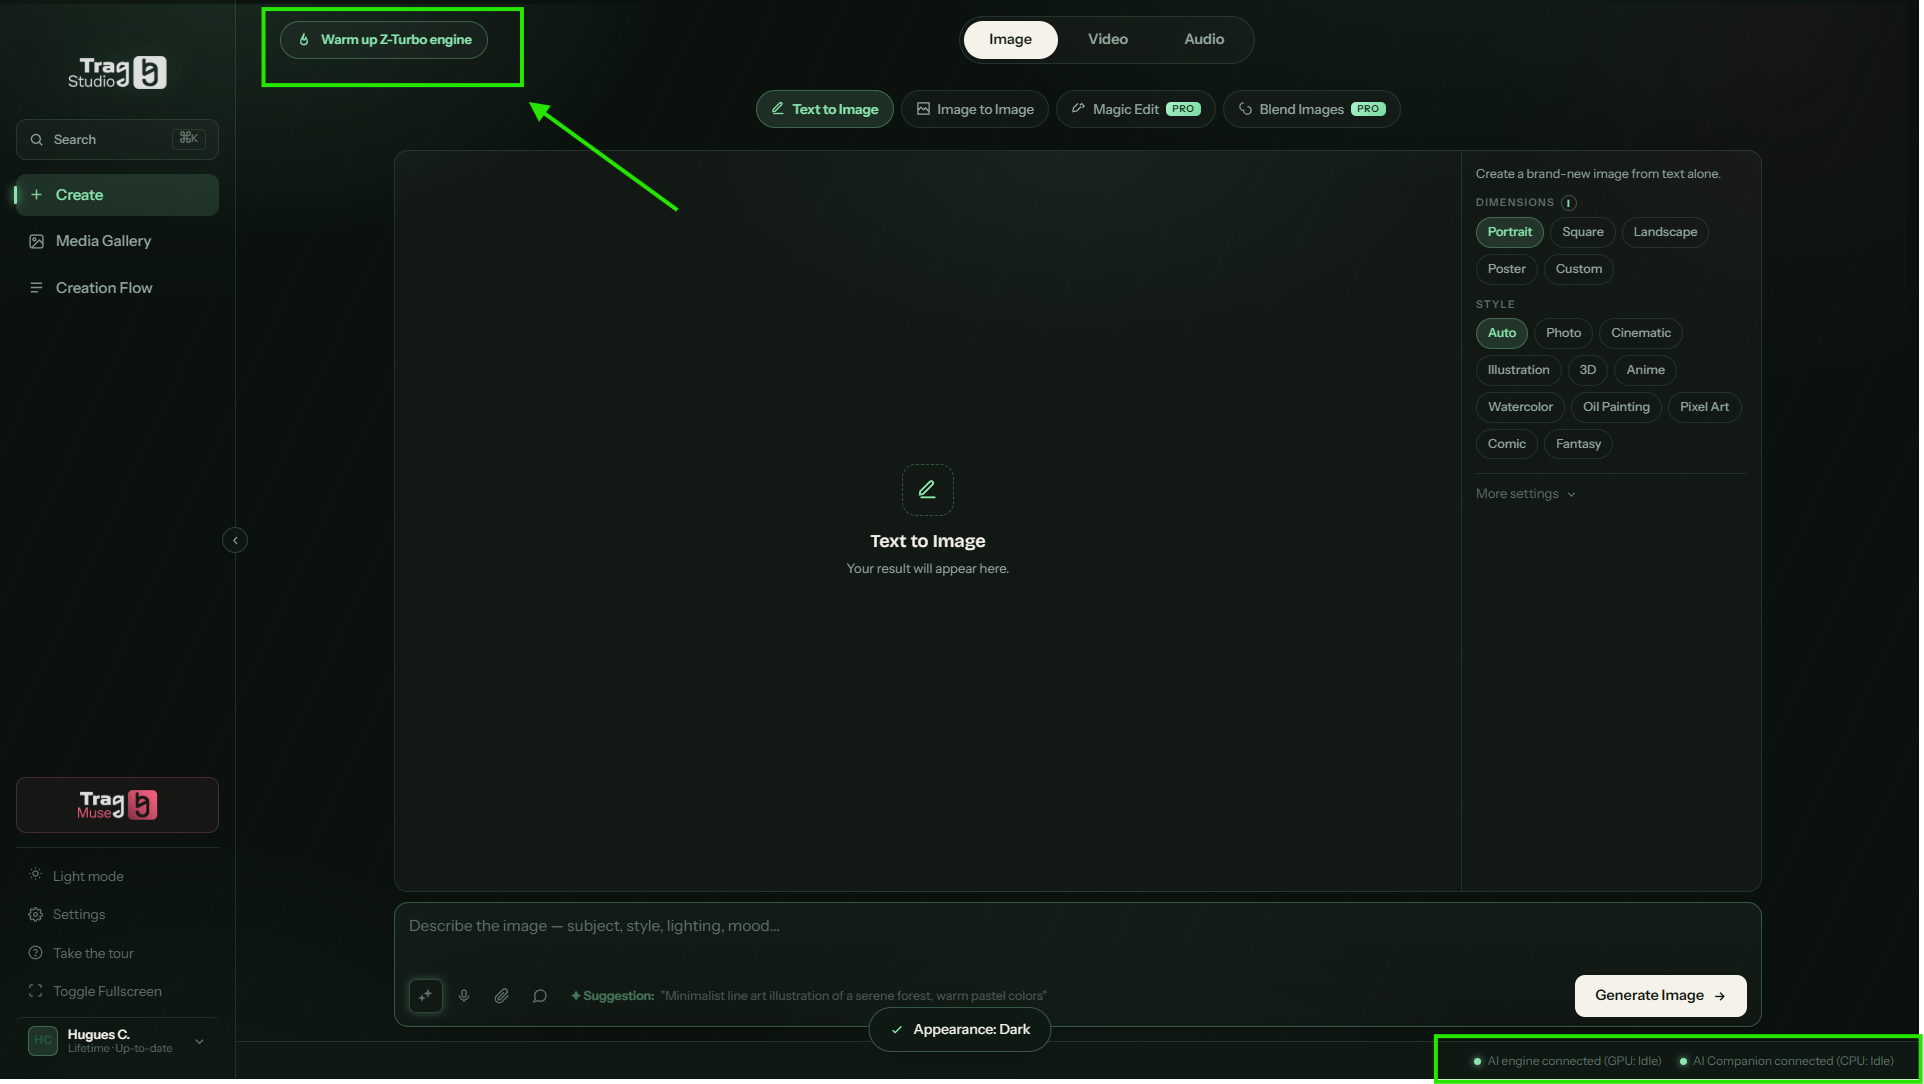
App launch: TRAG gets its models going.The main interface (here in Text to Image). The green box marks the bottom of the sidebar: light mode, Settings, Help, fullscreen and your account.Cinema Flow, the film timeline — Storyboard, Script, Film, Edit. A preview of what is coming: have a look around and press “Keep me posted”.
The sidebar (left) — Search (the command palette), Create (the studio), Media Gallery (your creations), Creation Flow (the render queue) and Cinema Flow (a preview of the film timeline — coming soon), then at the bottom: Light mode, Settings, Help, Toggle Fullscreen and your profile.
The Image / Video / Audio tabs (top center) — the creation category. Each category then shows its workflow sub-tabs (Text to Image, Image to Image, Magic Edit, Blend Images…).
The viewport (center) — the stage where your result appears, compares, replays.
The settings panel (right) — the options of the current workflow: Dimensions, Style, Quality… “More settings” unfolds the advanced ones.
The Main chat bar (bottom) — describe your idea, then hit the big action button (Generate Image, Animate Image, Generate Music…). The ✦ magic wand upgrades your prompt in one click, the mic takes voice dictation, and an example suggestion sits underneath for inspiration.
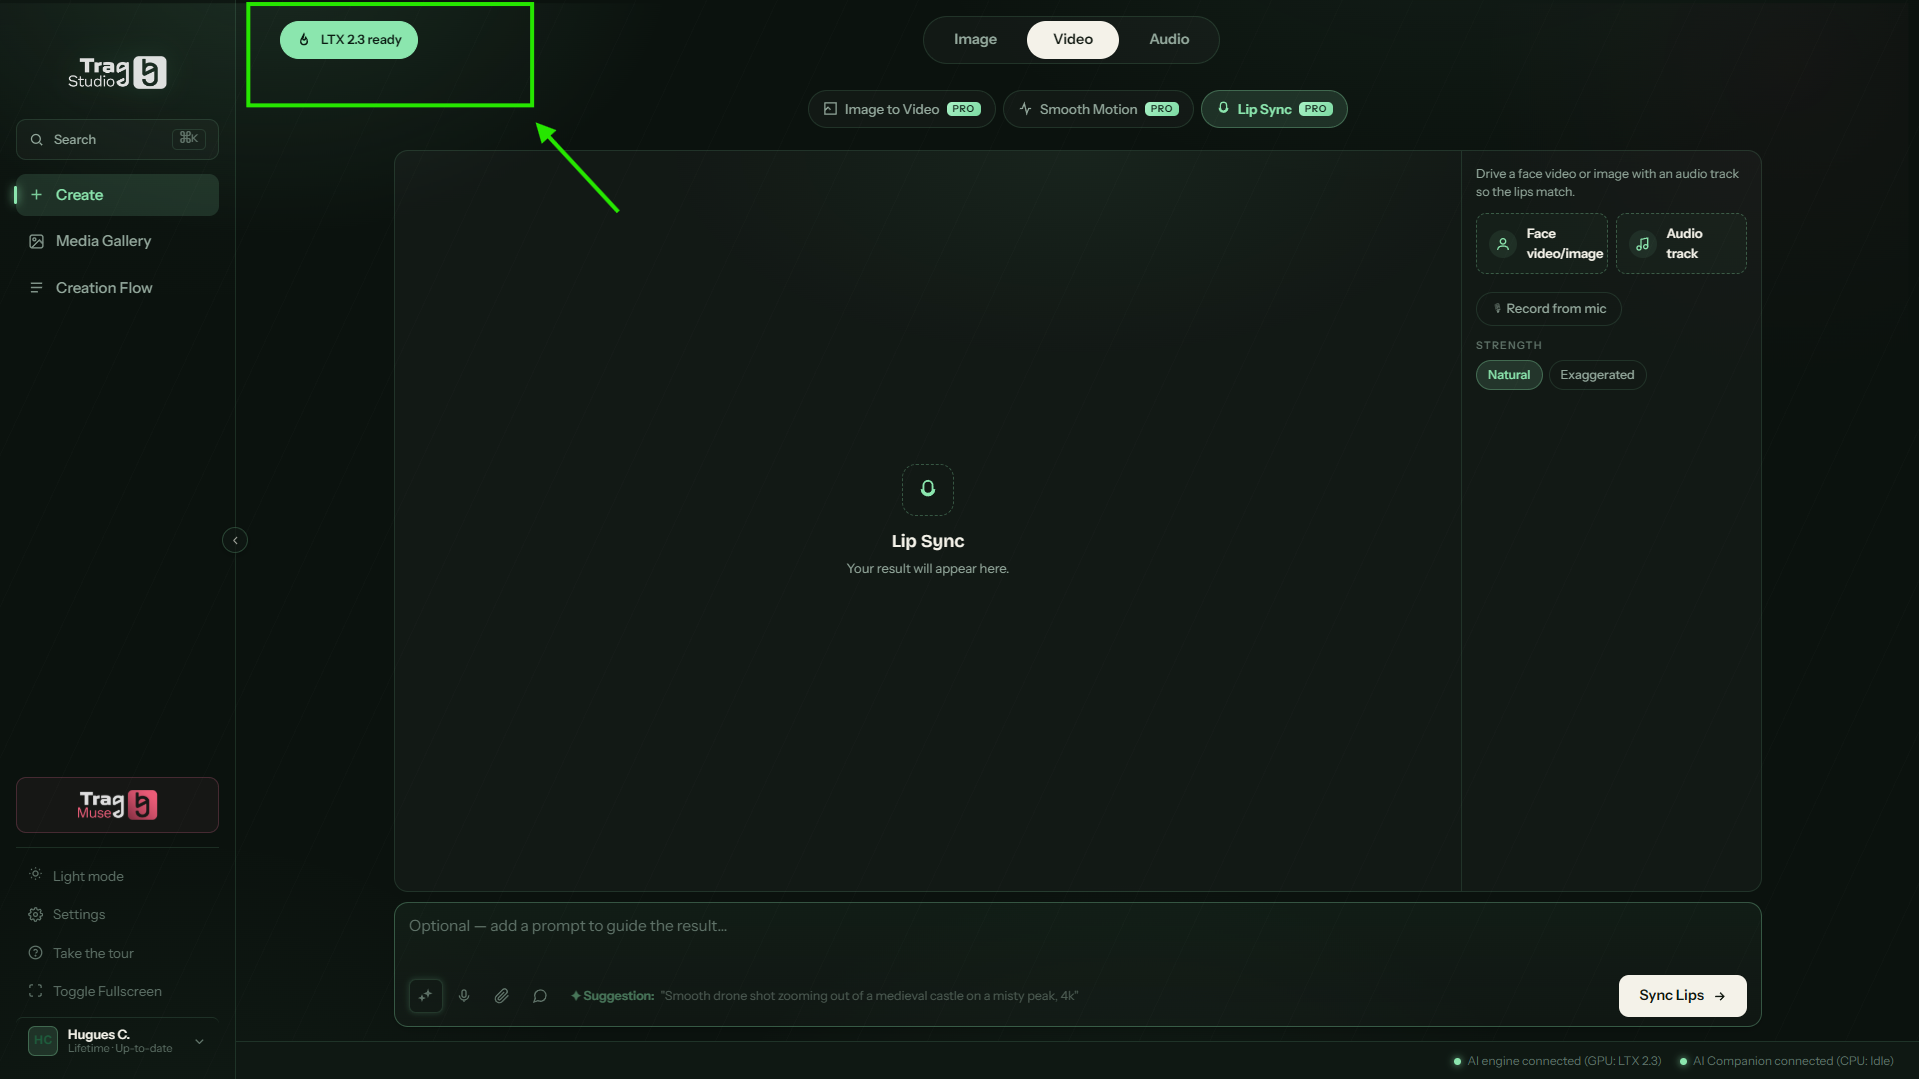
The Warm up button (top left) — preheats the active category's engine so the first render starts without delay.
The status bar (very bottom) — the health of the local services: “AI engine connected” (the generation engine, with GPU activity) and “AI Companion connected” (the prompt assistant, on CPU).
The Warm up button and engine status
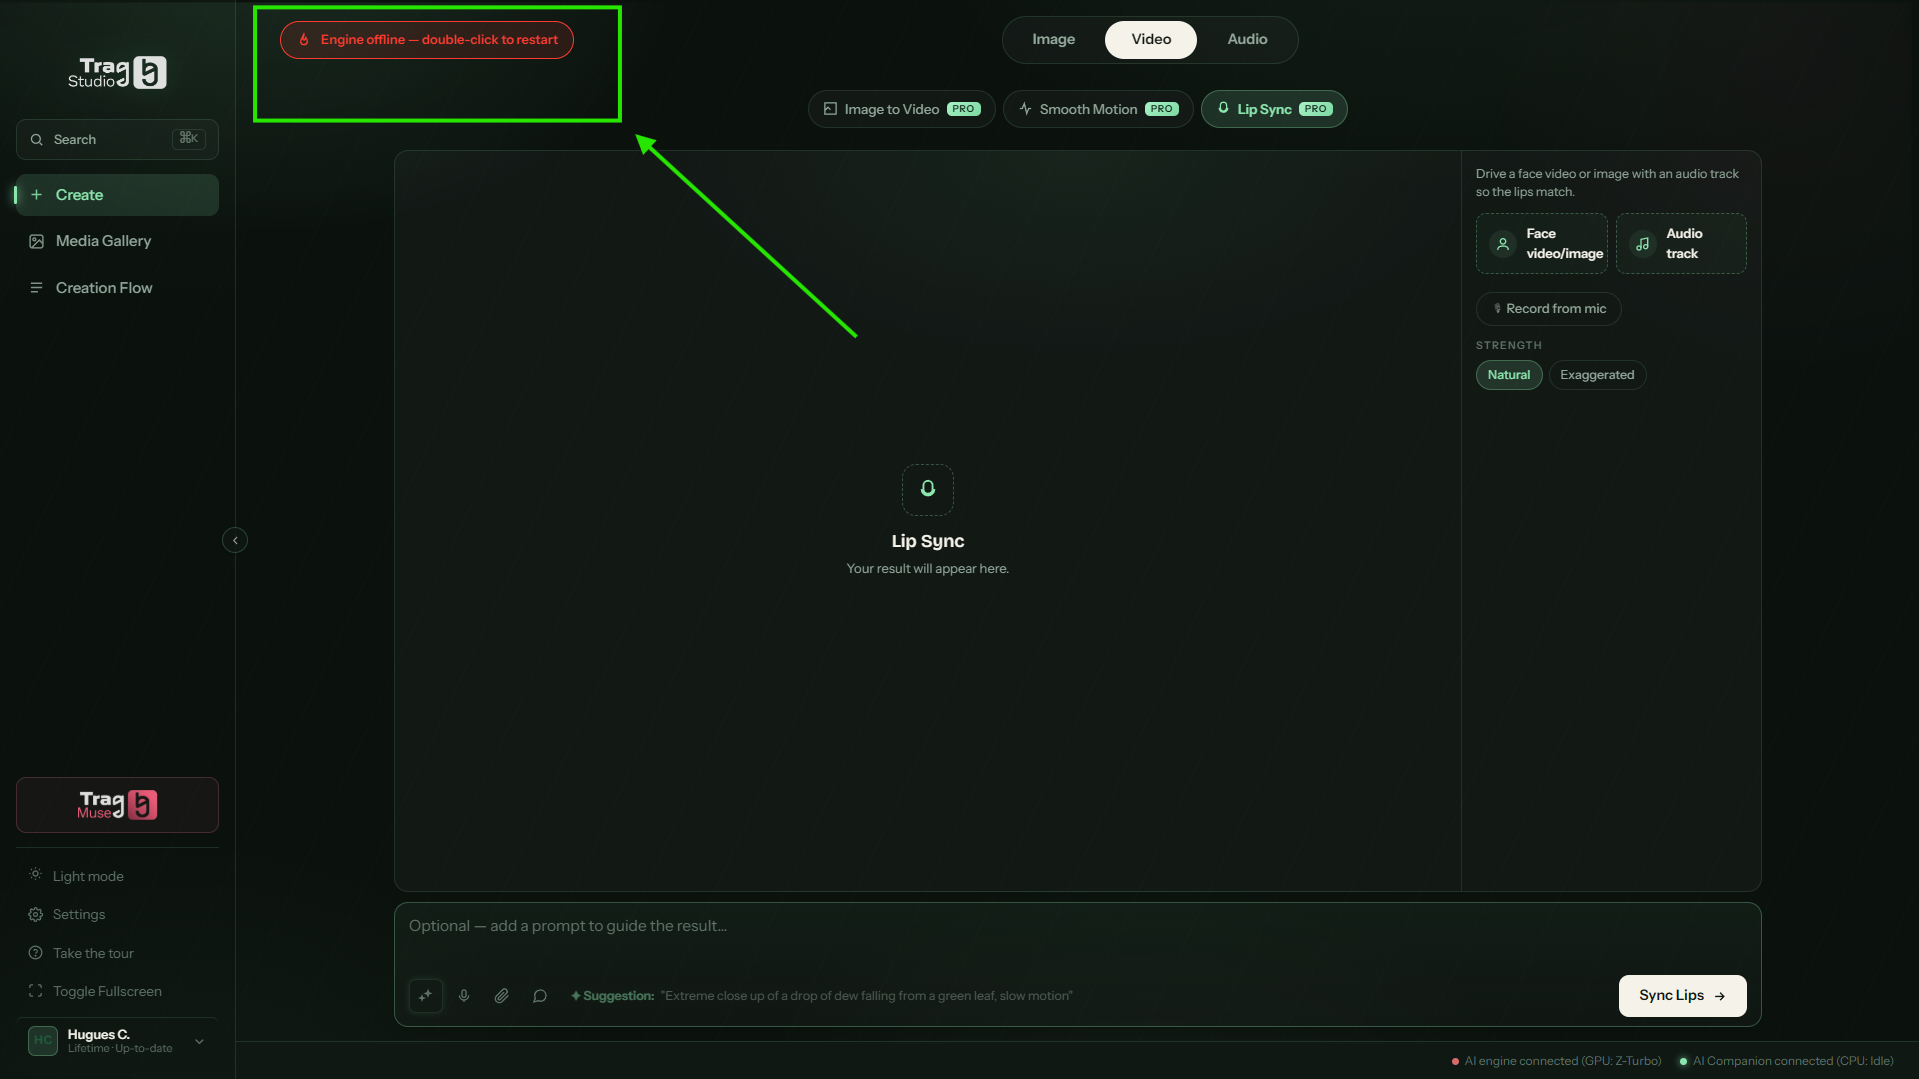
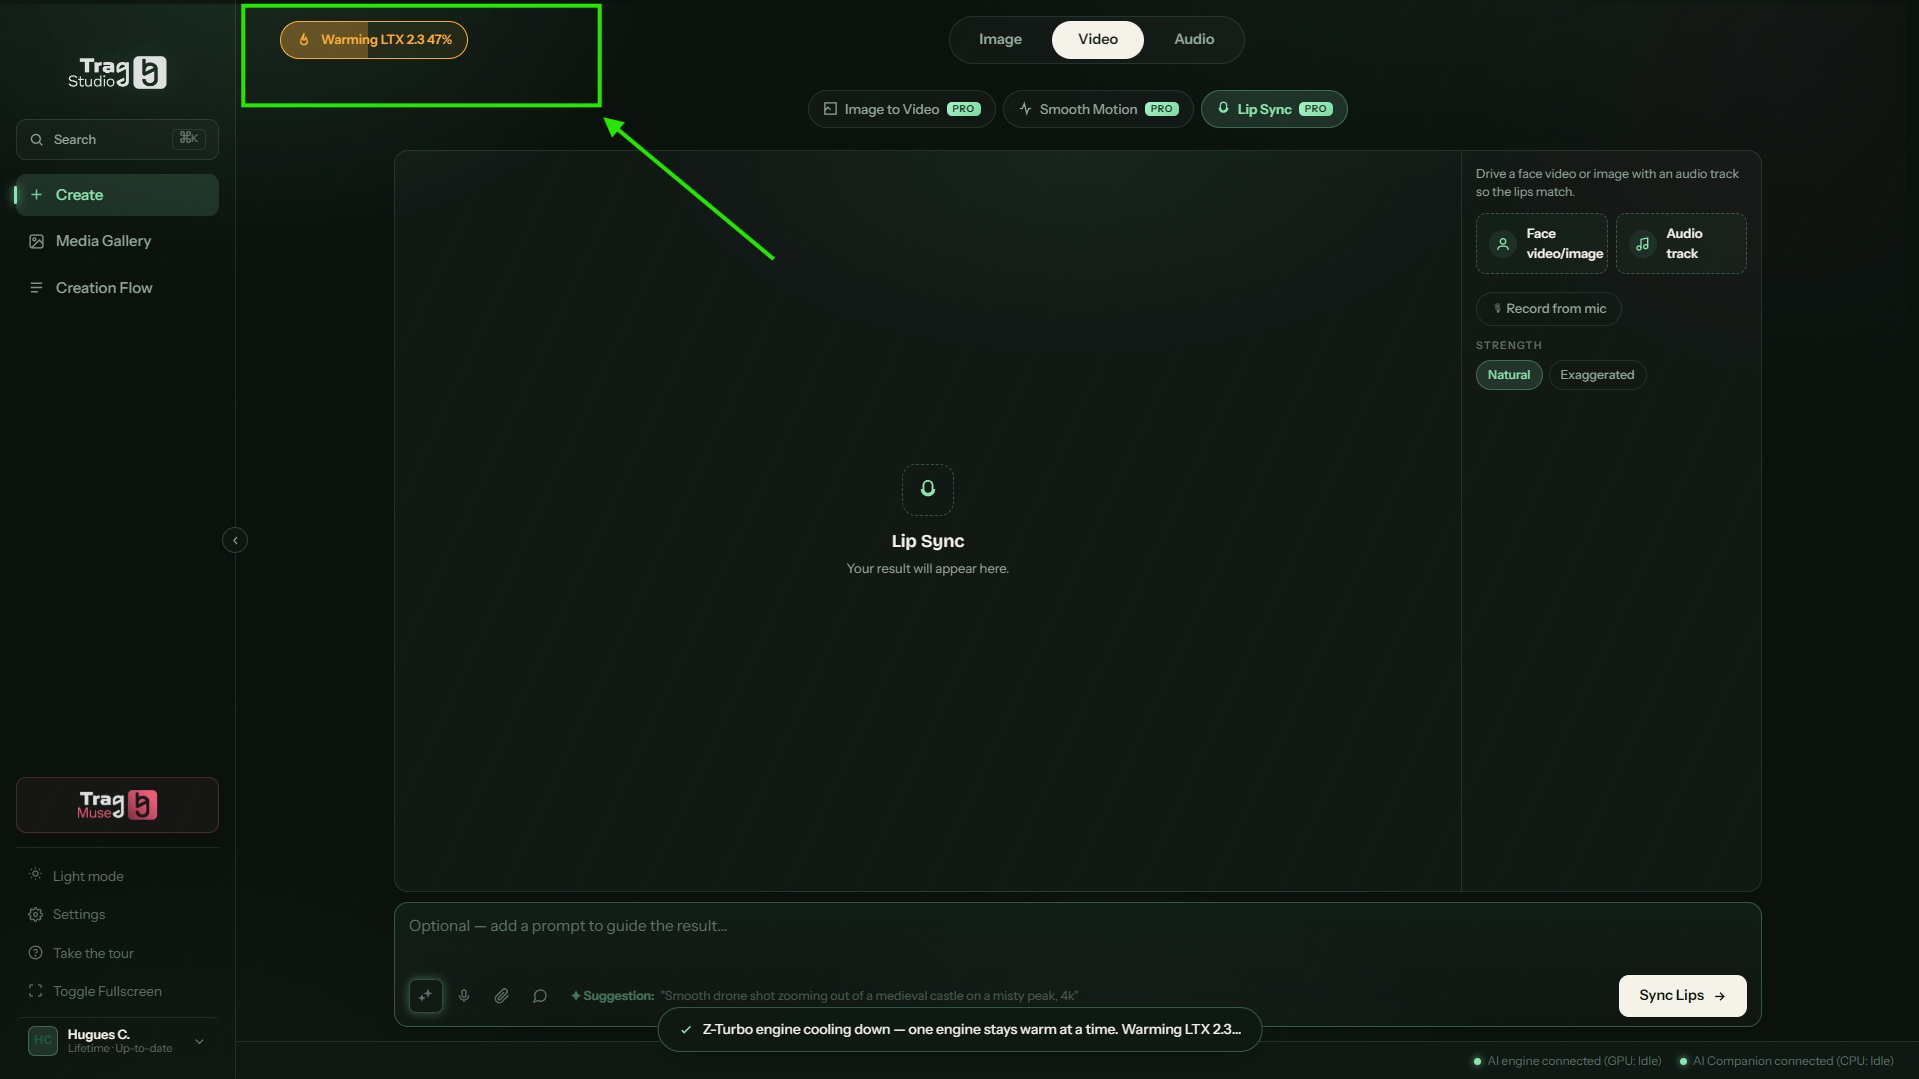
Each category has its own engine, and TRAG keeps only one warm at a time to be kind to your graphics card. The badge at the top left tells the whole story:
The two health markers: the “Warm up” button top-left, and the status bar bottom-right.
Red — Engine offline: the engine is stopped. Double-click the badge to restart it.Orange — Warming: the engine is starting (the percentage climbs). Switching category cools the previous engine — only one stays warm.Green — ready: the engine is warm; generation starts instantly.
A fourth state exists: when no GPU is usable, the footer indicator turns amber and says so plainly — “AI engine connected (CPU — no GPU detected)”. That is the processor fallback described in section 03: everything works, just much more slowly.
Light, dark… or Creator
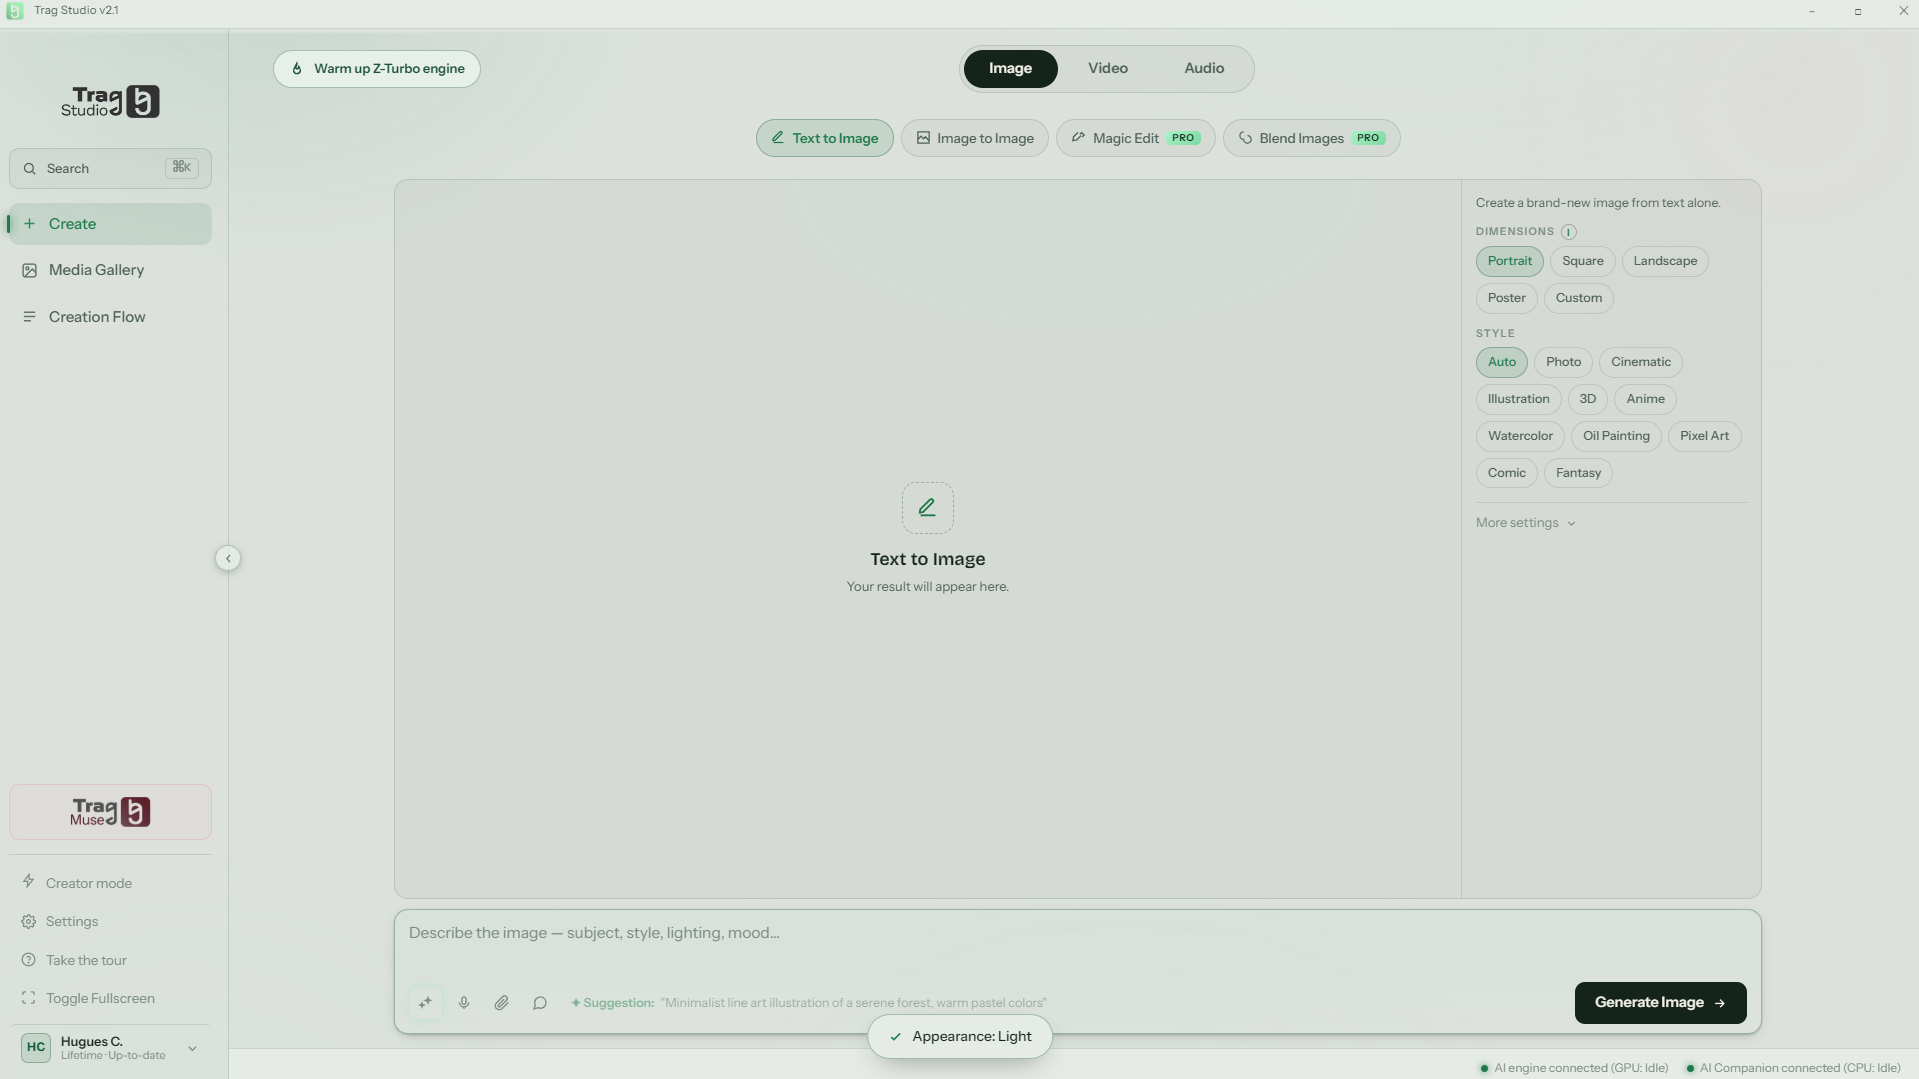
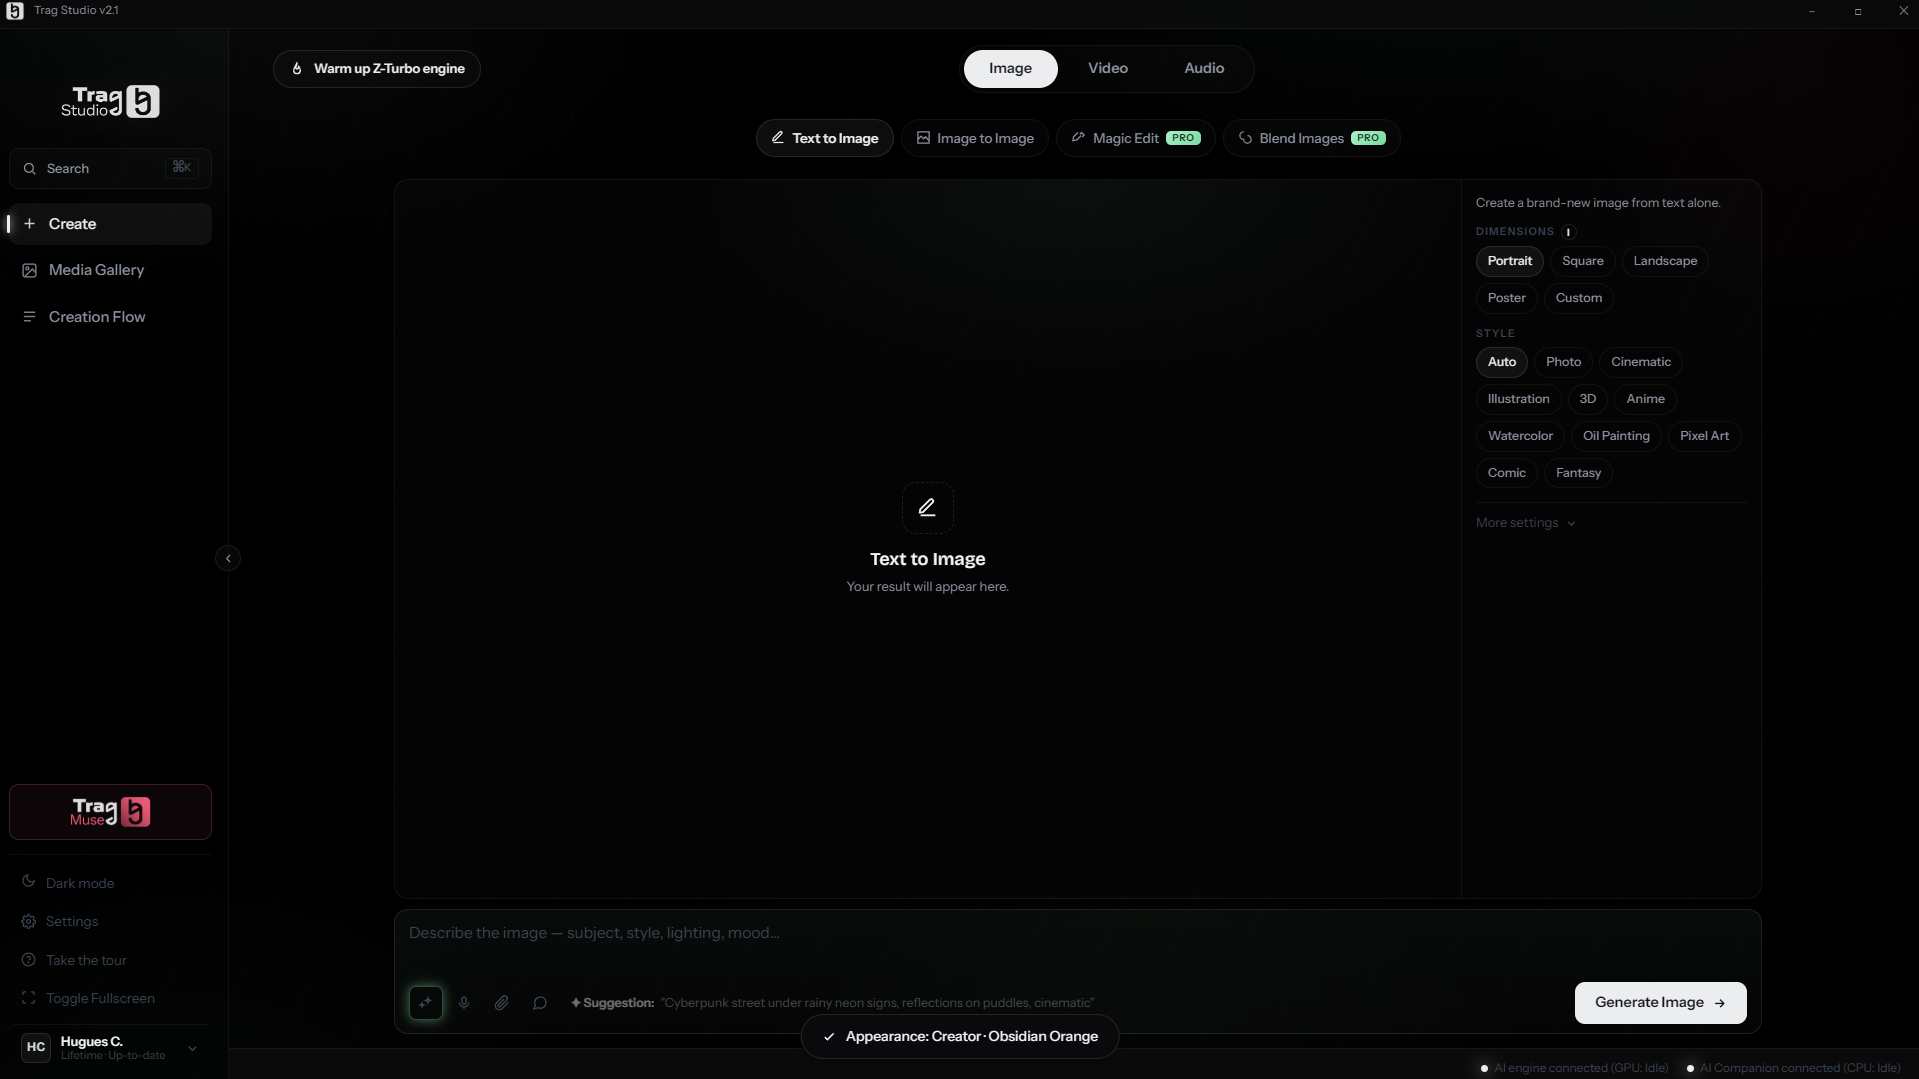
The first button at the bottom of the sidebar switches the mood: a clean light mode, a deep dark mode, and Creator mode — a matte black made for distraction-free creating, with optional accent flavors (like “Obsidian Orange”). A small toast confirms each appearance change.
Light mode — same interface, brighter mood.Creator mode's matte black — here with the “Obsidian Orange” accent; the toast confirms the chosen appearance.
The search palette
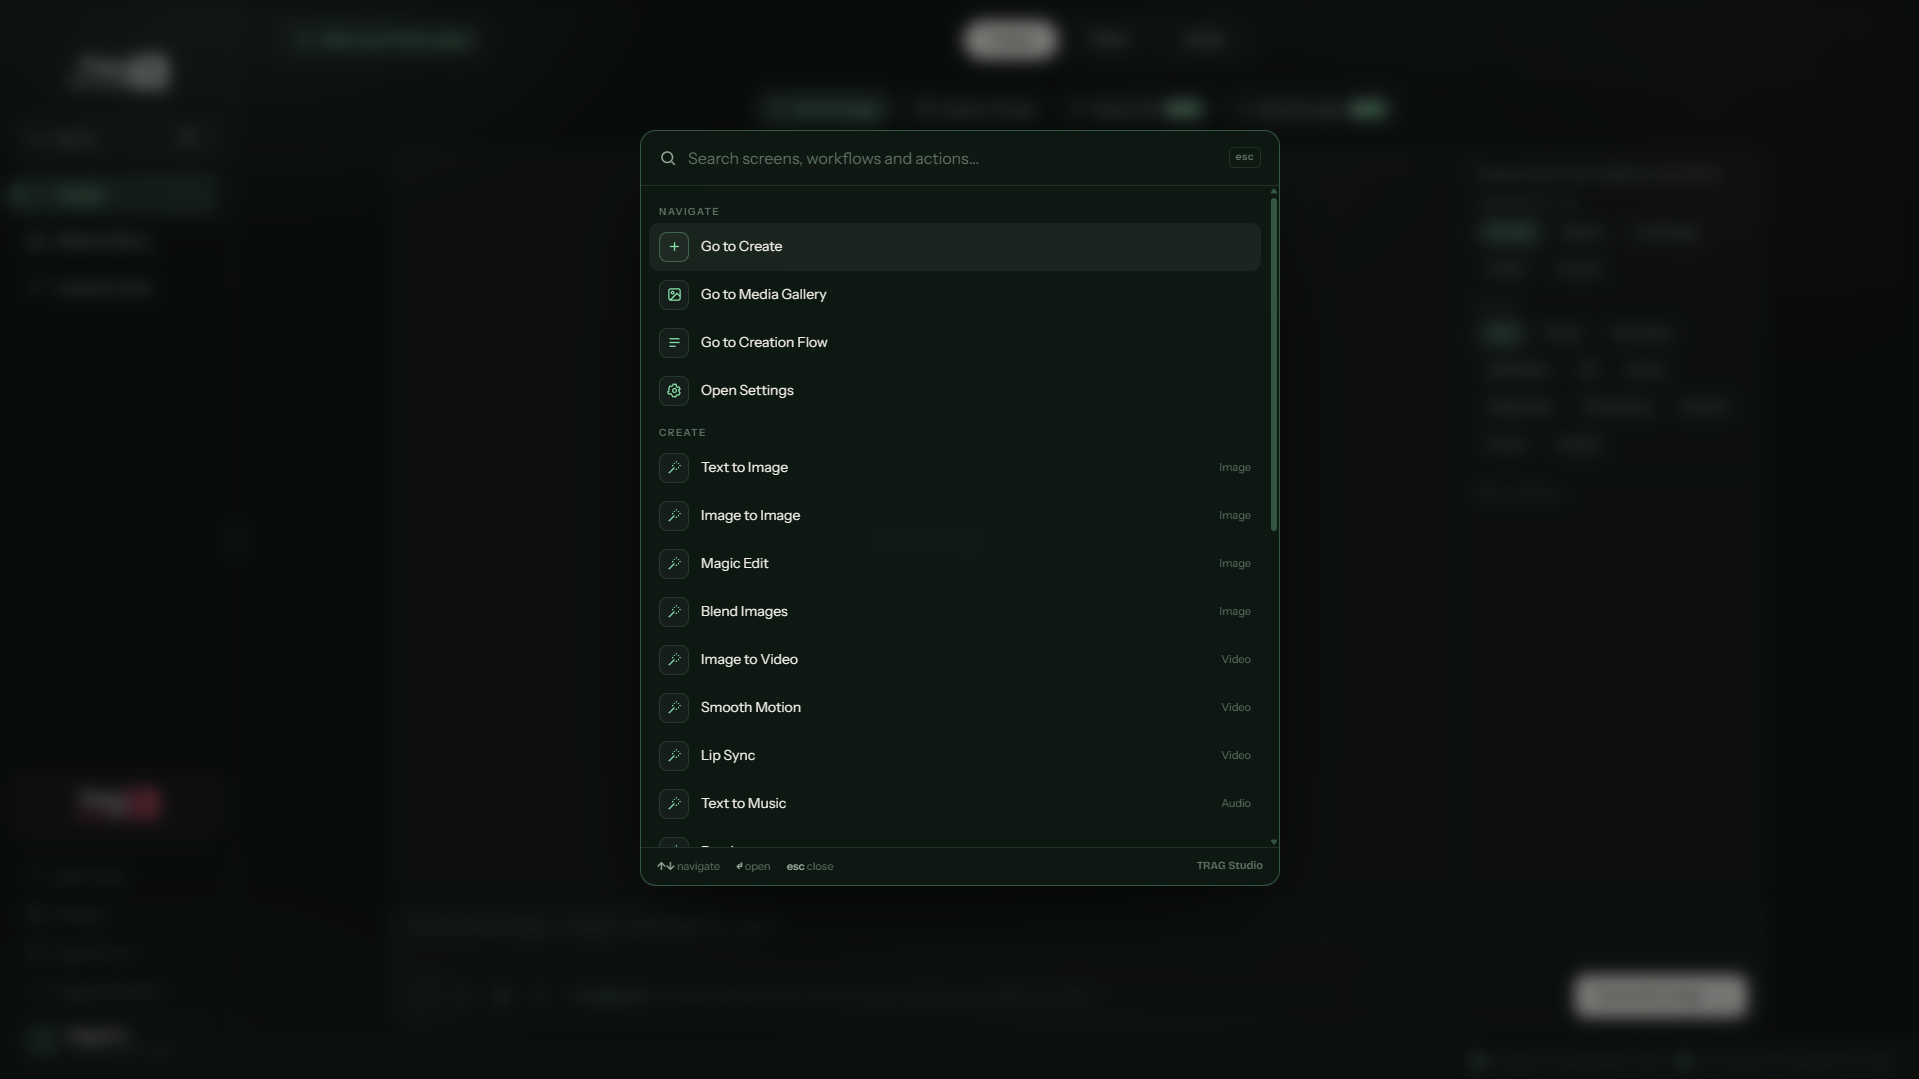
The sidebar's Search button opens a command palette: type to filter screens, workflows and actions (“Go to Media Gallery”, “Text to Image”, “Open Settings”…) and confirm with Enter. Esc closes it.
The search palette: all of TRAG within keyboard reach.
05Create images
The Image tab gathers four workflows: create from text, transform a picture, retouch one exact spot, or merge several images into one.
The prompt describes the content; the settings describe the technique. In the prompt: subject, mood, lighting. In the right-hand panel: format (Dimensions), look (Style), finish (Quality). Never write “4K” or “square format” in the prompt — one click in the settings does it better.
Text to Image — create from text
“Create a brand-new image from text alone.” The starting workflow, and the most direct:
Image tab → Text to Image sub-tab.
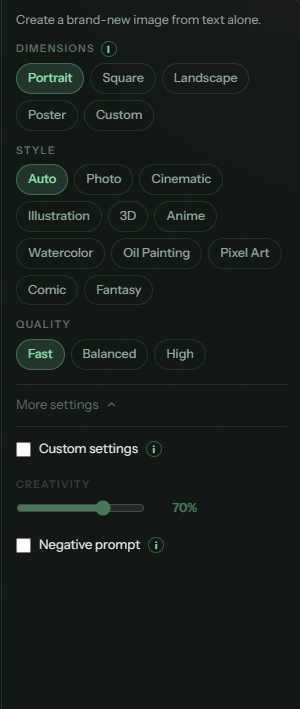
Pick your settings on the right: Dimensions (Portrait, Square, Landscape, Poster or Custom) and Style (Auto, Photo, Cinematic, Illustration, 3D, Anime, Watercolor, Oil Painting, Pixel Art, Comic, Fantasy). “More settings” adds Custom settings, a Creativity dial and a negative prompt.
Describe your image in the bottom bar — subject, style, lighting, mood.
Click Generate Image →. The result lands in the viewport and joins the Media Gallery automatically.
Text to Image: settings right, prompt below, result center-stage.The settings panel up close: Dimensions, Style, Quality — then Custom settings, Creativity and Negative prompt under “More settings”.
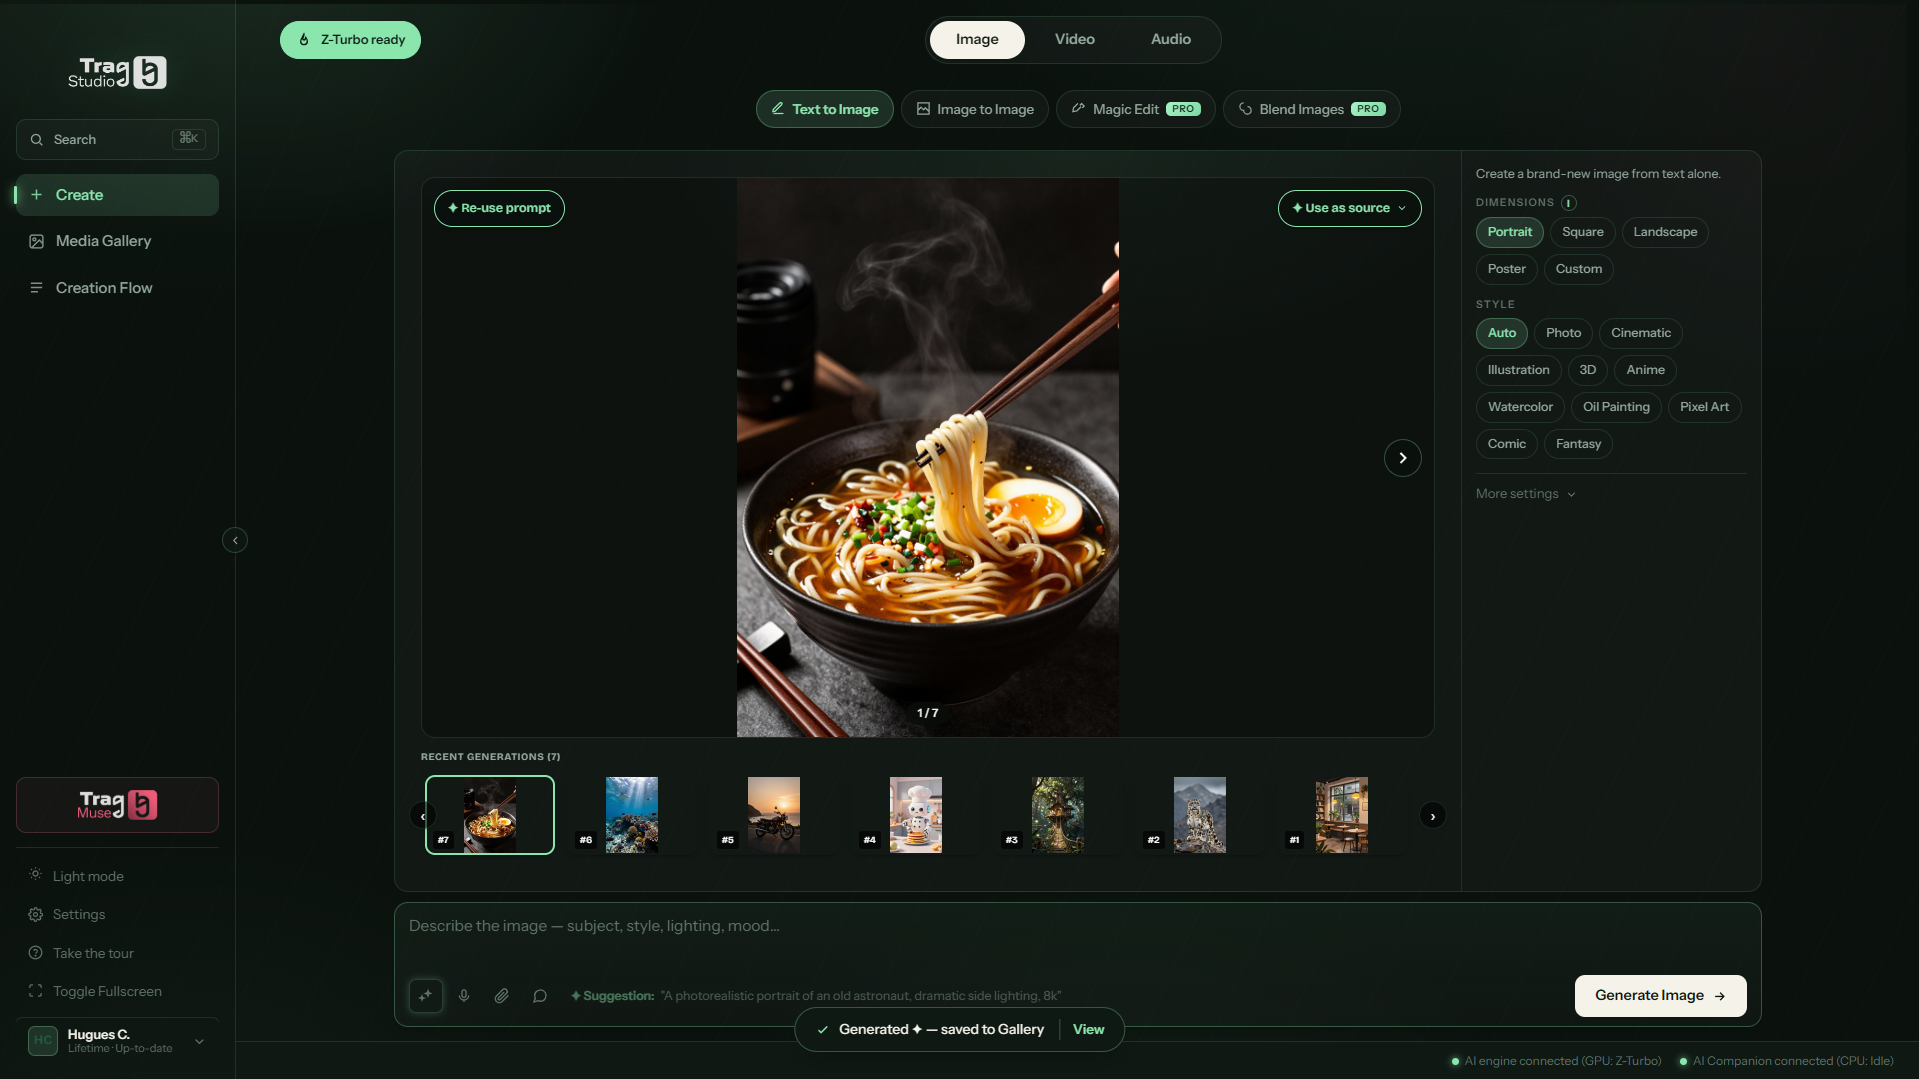
After generating, two buttons appear on the result: ✦ Re-use prompt (start again from the same text) and ✦ Use as source (send the image to another workflow). The Recent Generations strip under the viewport keeps your latest tries one click away.
A finished render: “Re-use prompt”, “Use as source”, and the “Recent Generations” strip to hop between tries.
Image to Image — transform a picture
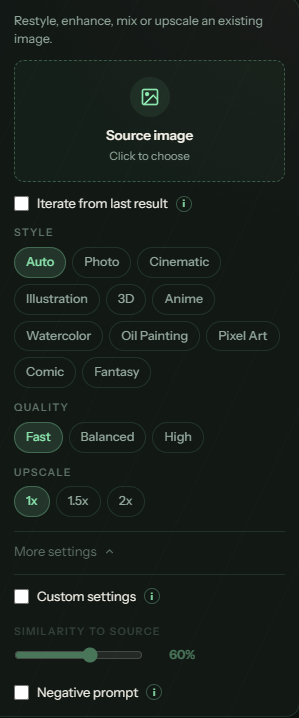
“Restyle, enhance, mix or upscale an existing image.” Hand over a starting image, describe the change:
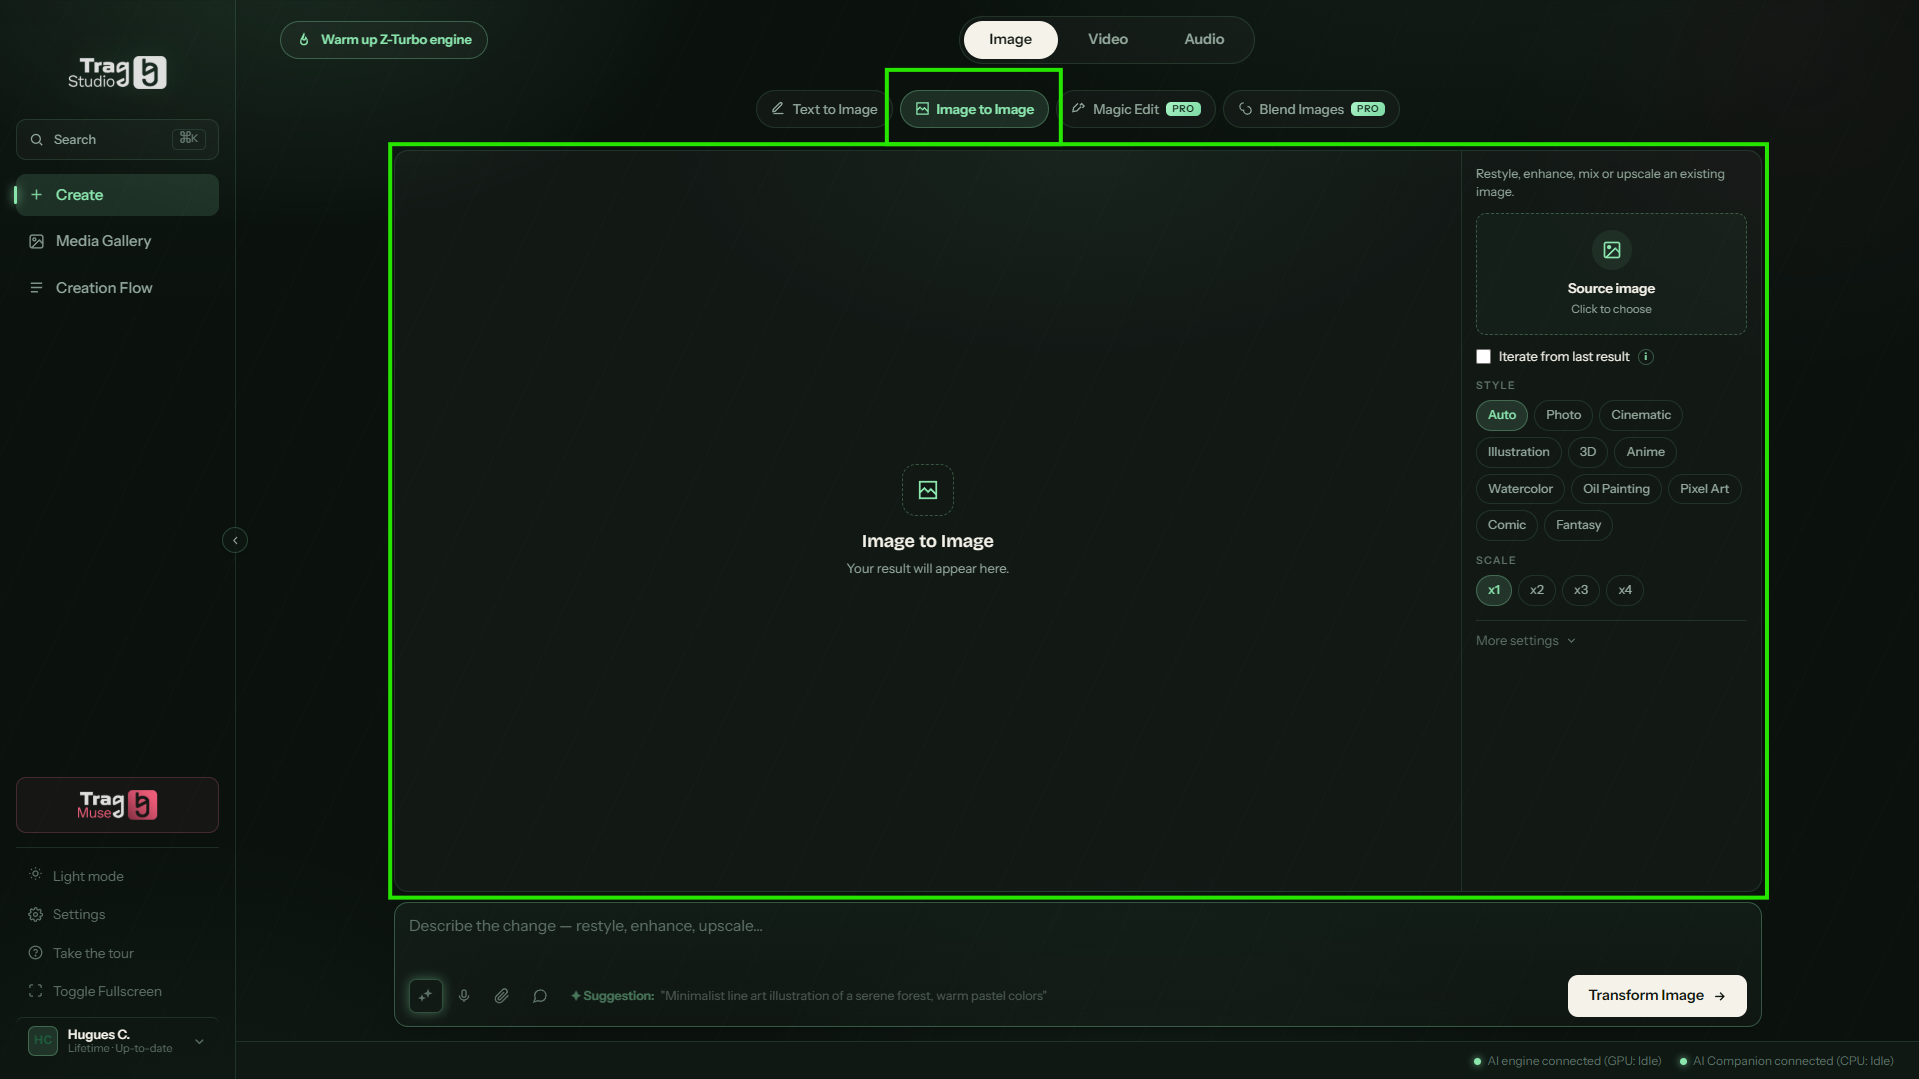
Image to Image sub-tab, then load your picture via Source image → Click to choose (or tick “Iterate from last result” to build on the previous render).
Set the Style, the Quality and the Upscale factor (1x / 1.5x / 2x — great for a crisp enlargement).
Describe the transformation — “restyle, enhance, upscale…” — then click Transform Image →.
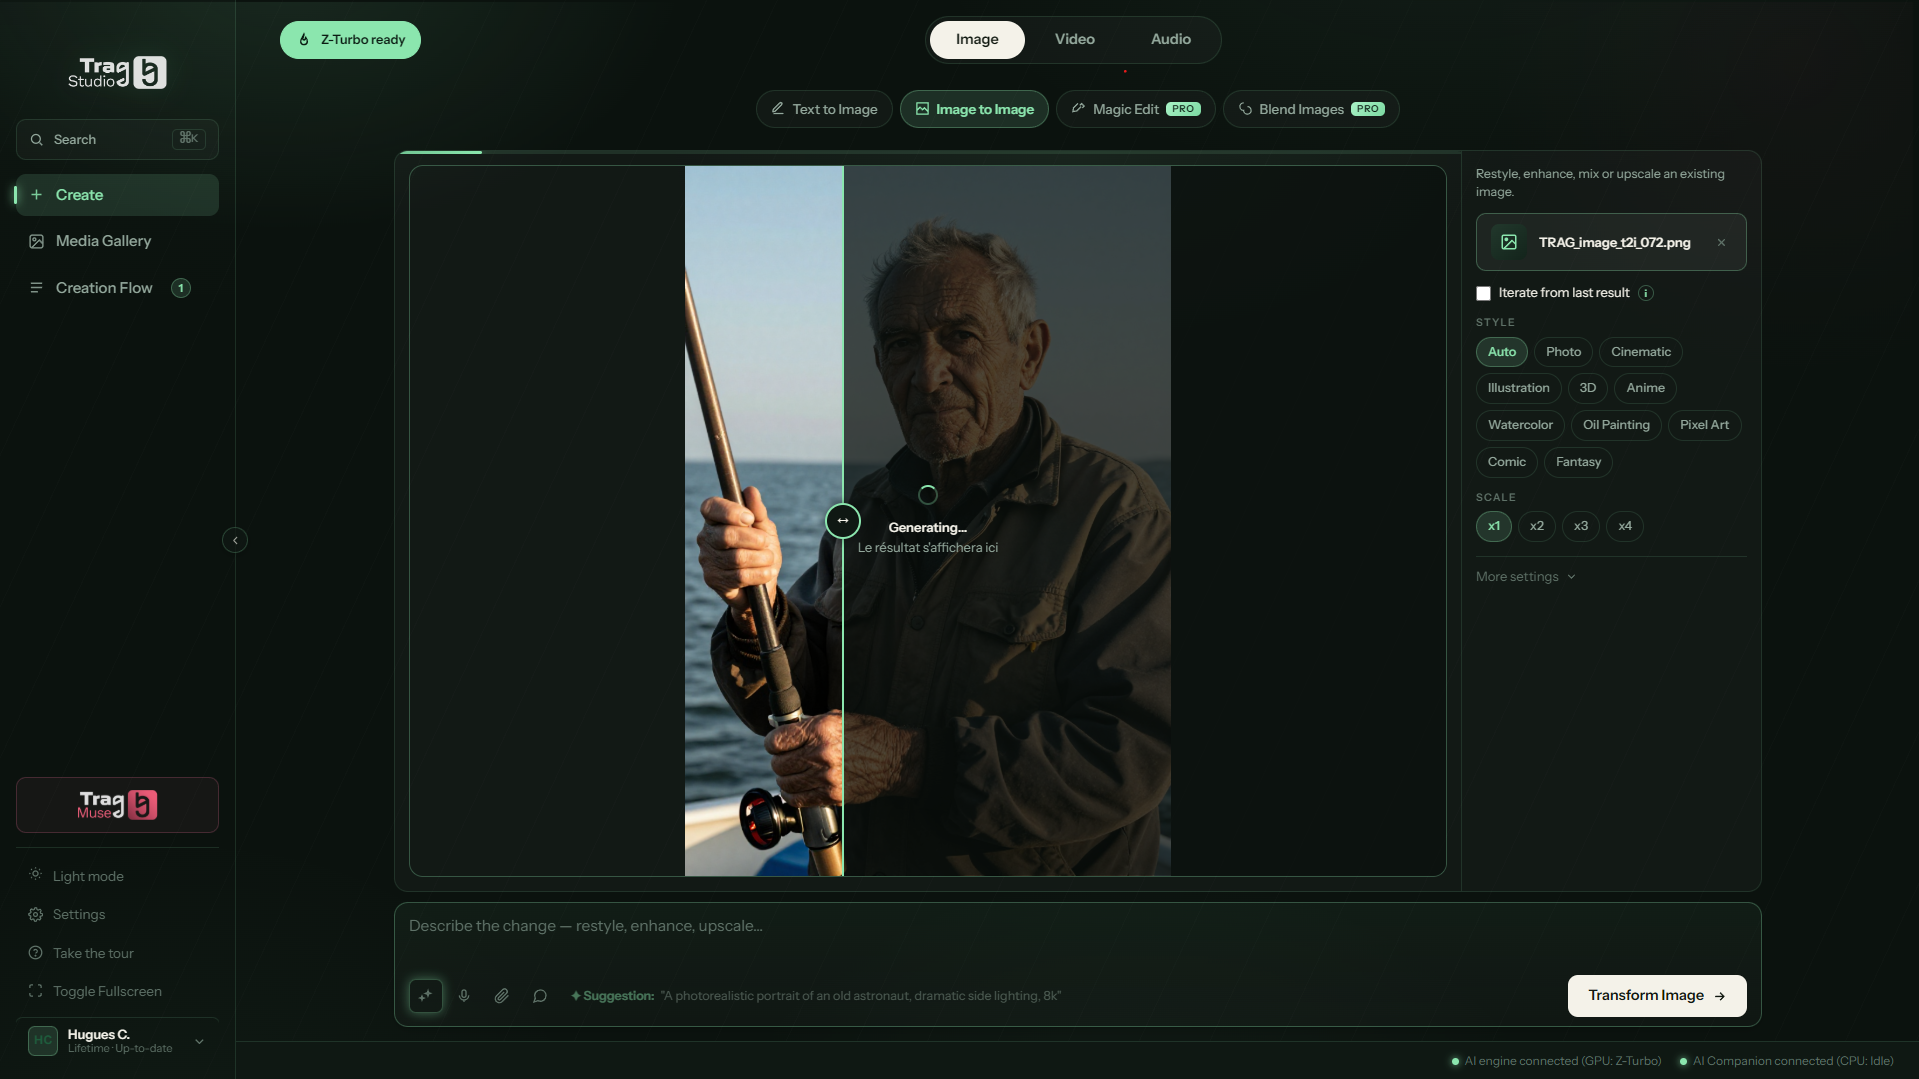
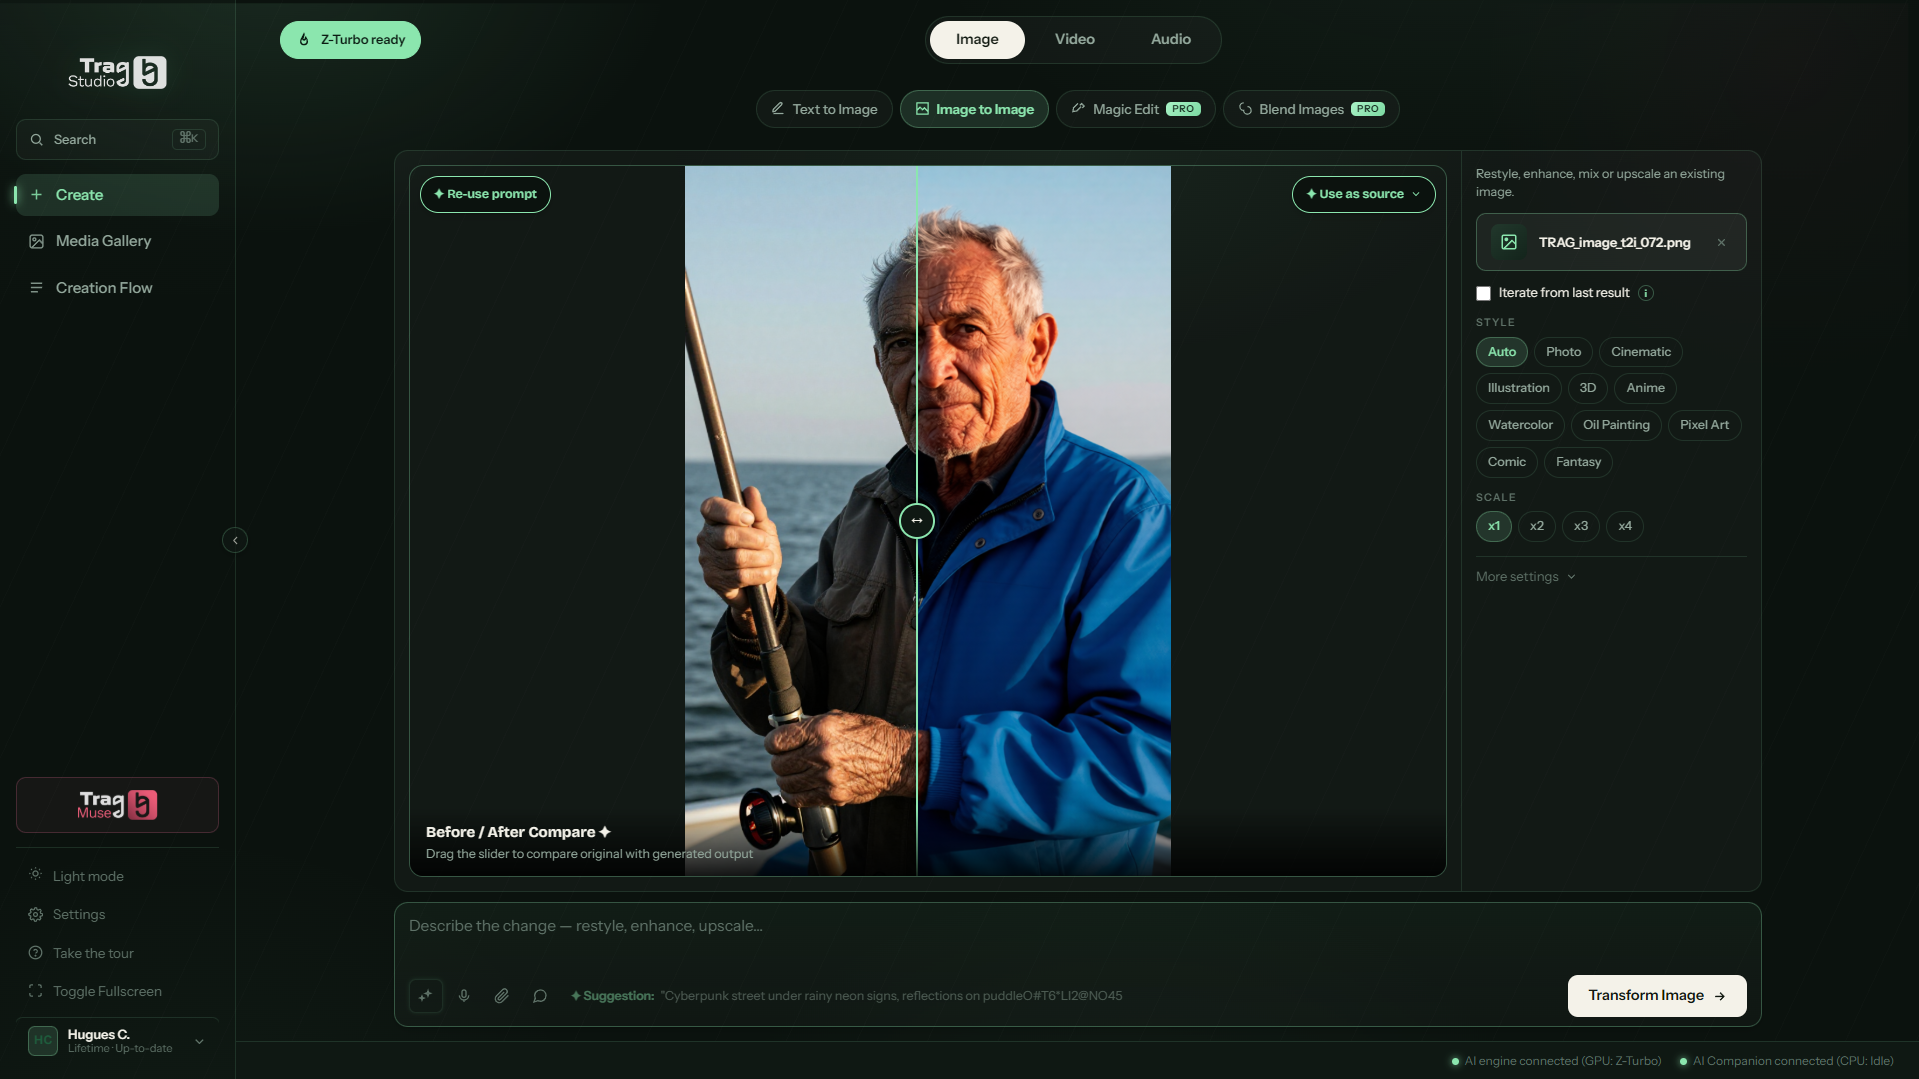
Compare. The viewport shows a Before / After slider: drag it to sweep between original and result.
Image to Image: the green boxes mark the sub-tab and the working area.The settings: source, Style, Quality, Upscale — and Similarity to source under “More settings”.
Mid-generation: the transformation sweeps across the image.The “Before / After” comparator: drag the handle to weigh the change.
Magic Edit — repaint one exact spot Pro
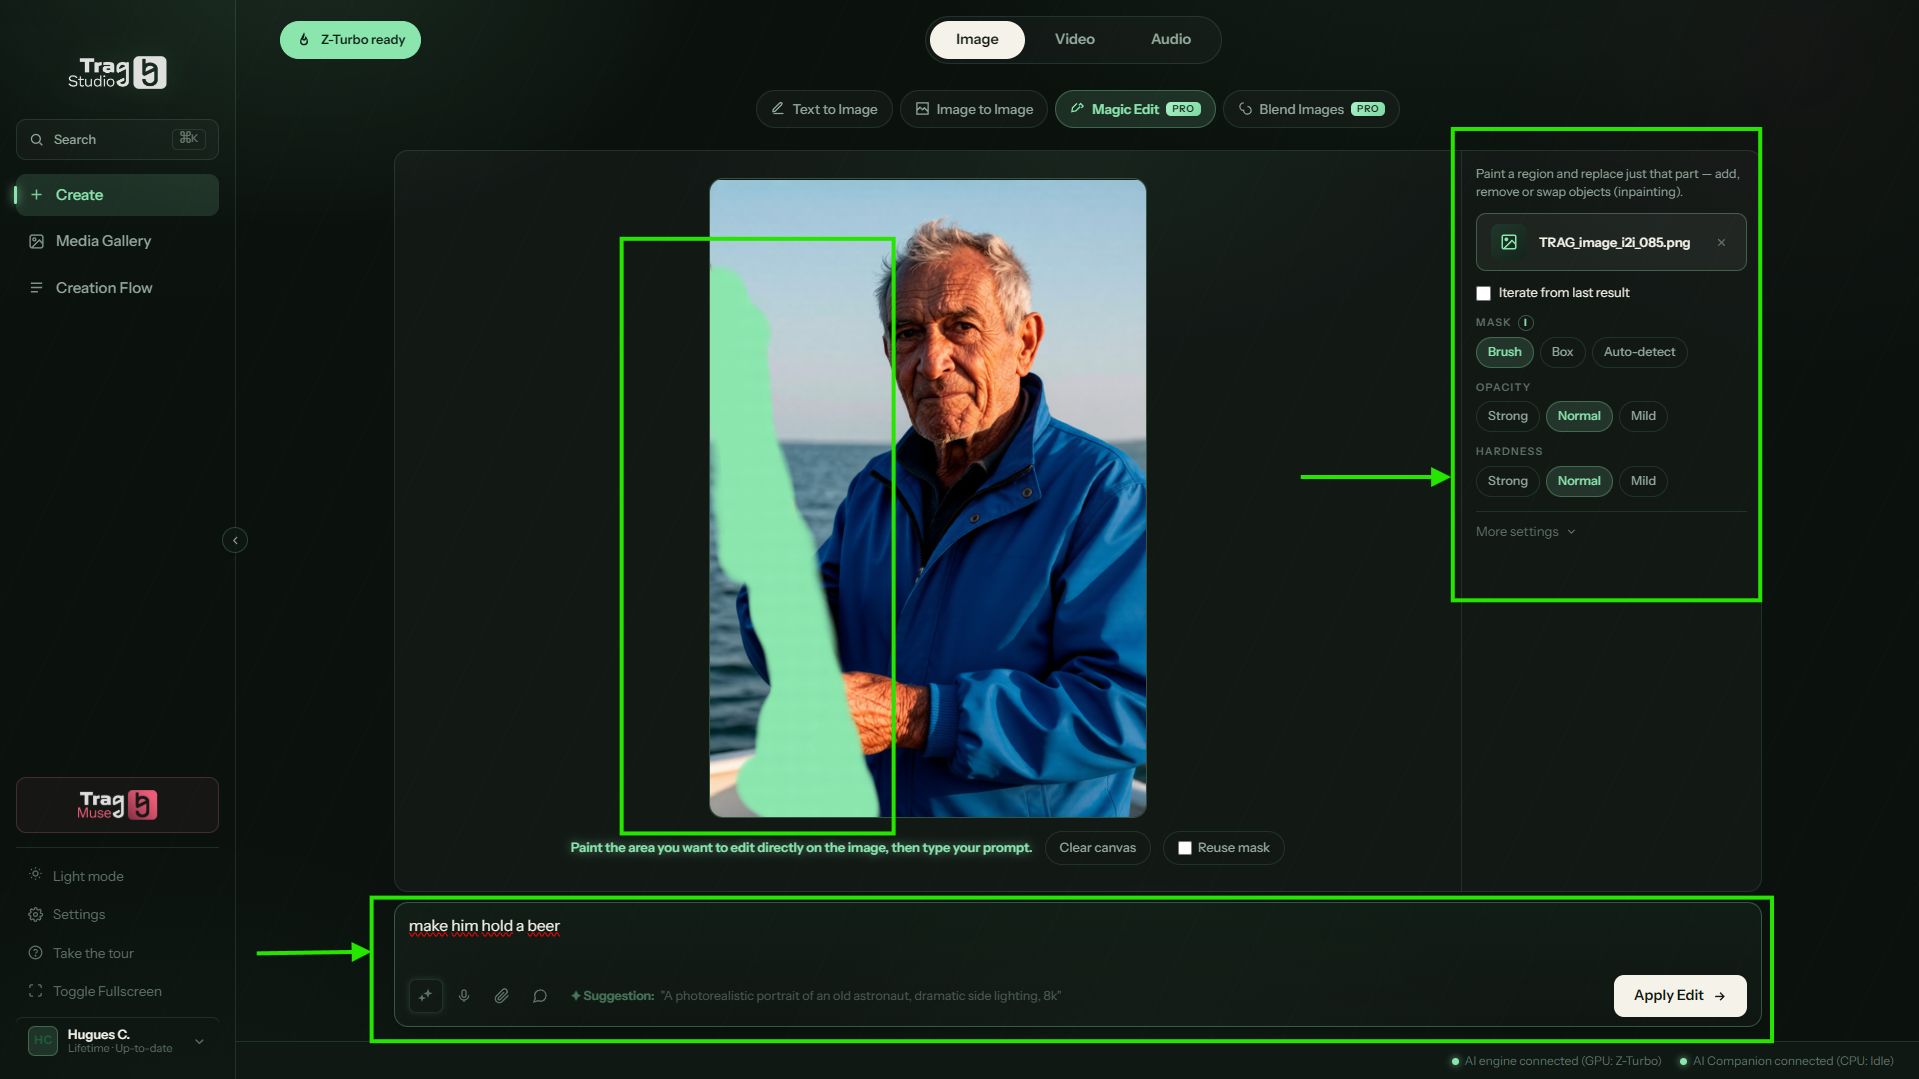
“Paint a region and replace just that part — add, remove or swap objects.” Deliciously simple: you paint the area to change, you say what goes there, TRAG touches nothing else.
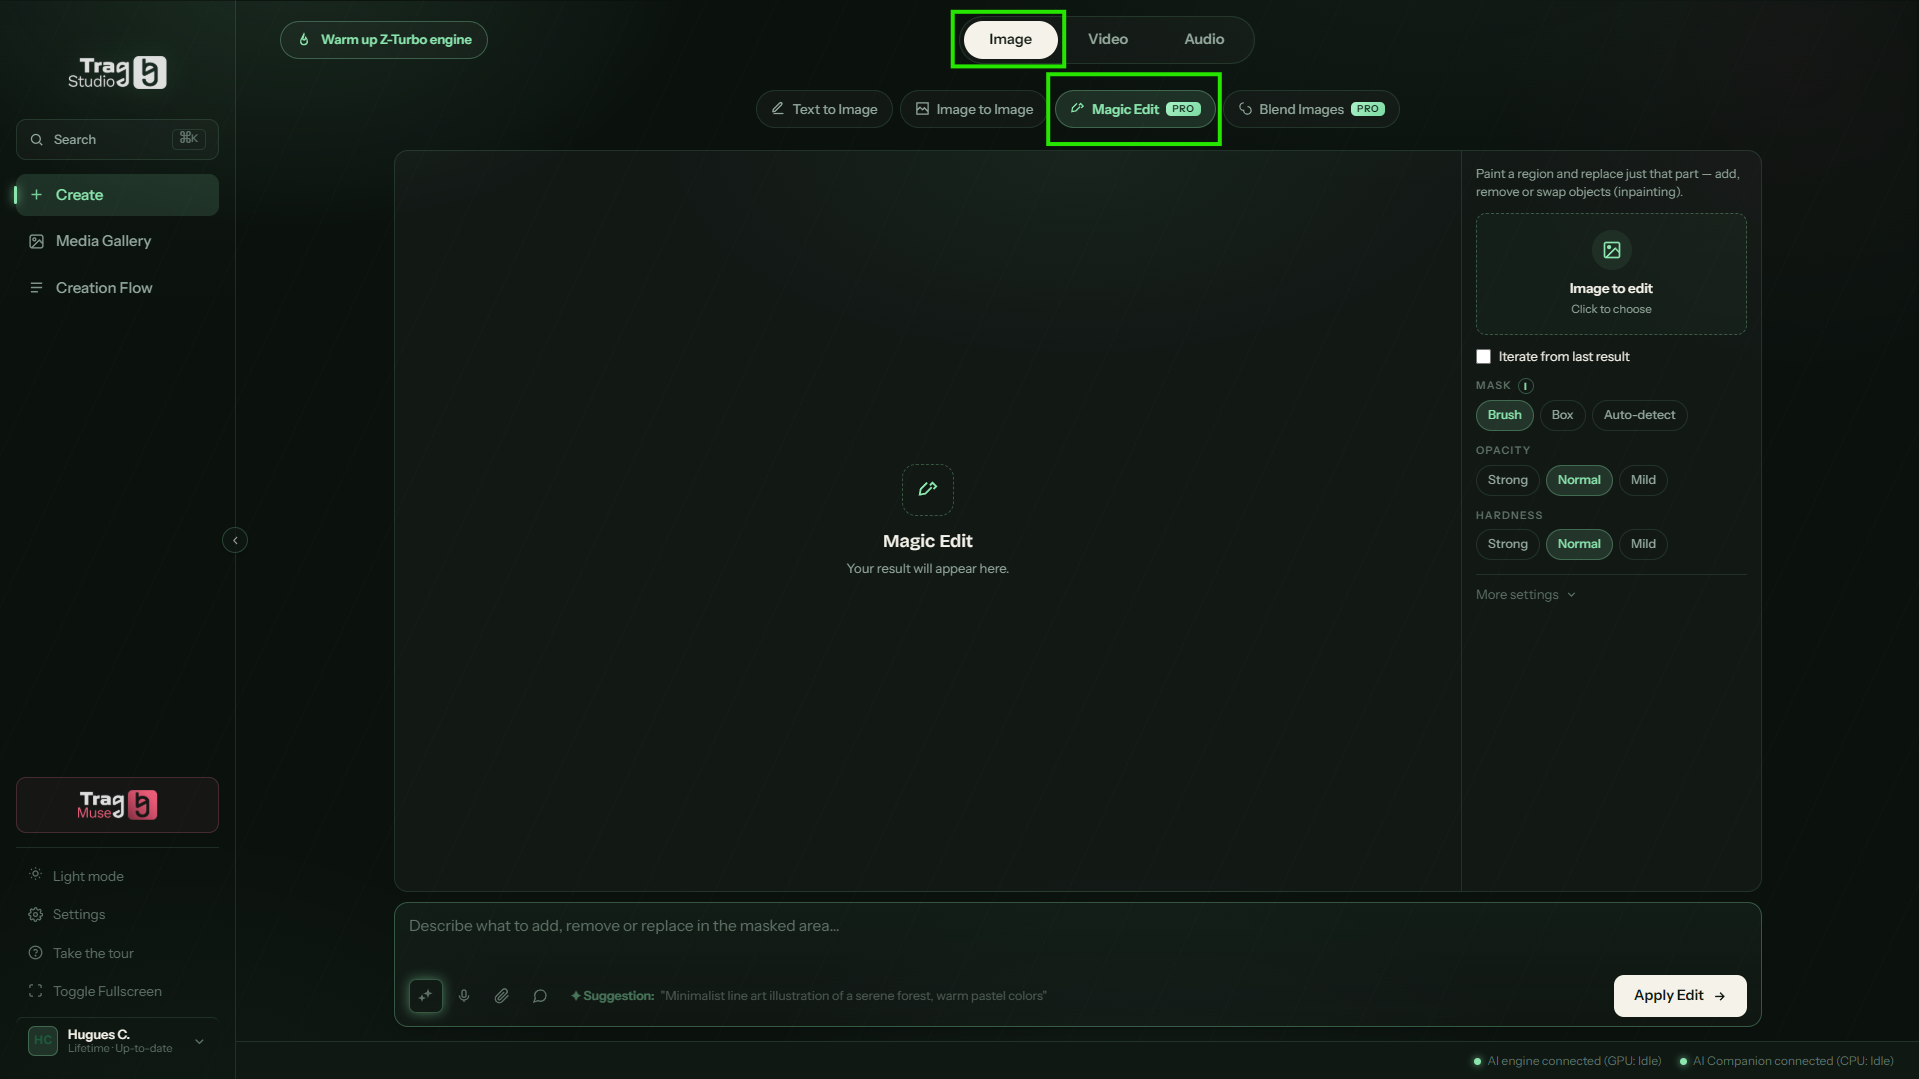
Magic Edit sub-tab, then load the image to retouch (Image to edit → Click to choose).
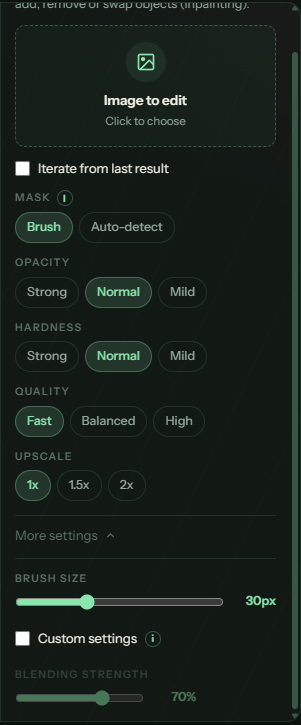
Pick your mask in the right panel: Brush (freehand) or Auto-detect. Adjust the brush's Opacity and Hardness if needed — Brush size and Blending strength live under “More settings”.
Paint the area to change right on the image — it gets a highlight veil. “Clear canvas” wipes the mask, “Reuse mask” brings back the previous one.
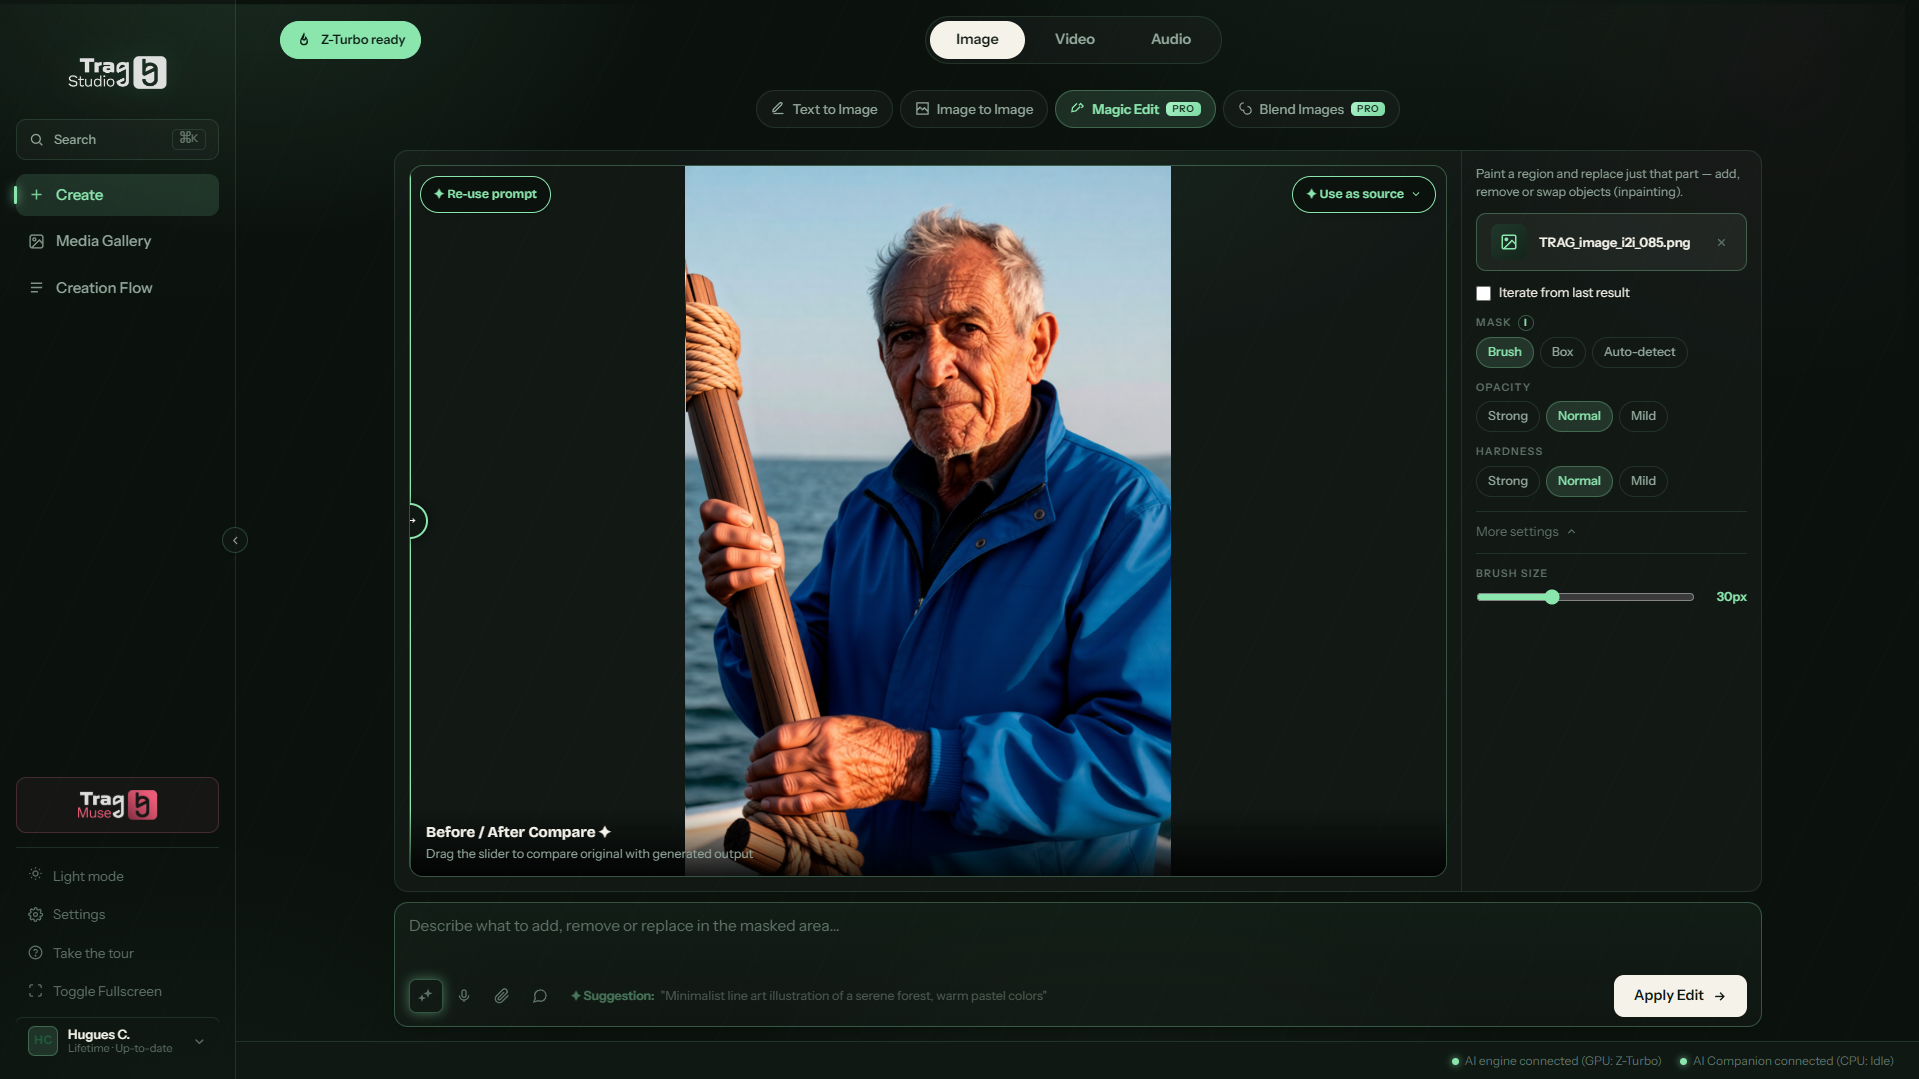
Describe the change in the bottom bar (add, remove, replace…) then click Apply Edit →. The Before / After comparator then lets you check the retouch.
Magic Edit in action: the painted mask on the image, the mask settings, and the prompt describing the swap — three green markers, three moves.
Magic Edit at the start: load an image, choose the mask mode.The Magic Edit settings: Mask (Brush / Auto-detect), Opacity, Hardness — Brush size and Blending strength further down.
After the edit: the Before / After slider confirms only the masked area changed.
Blend Images — merge several pictures Pro
“Combine multiple images into one — subject + style, or several references.” A subject from here, a style from there: Blend marries two images (plus an optional third).
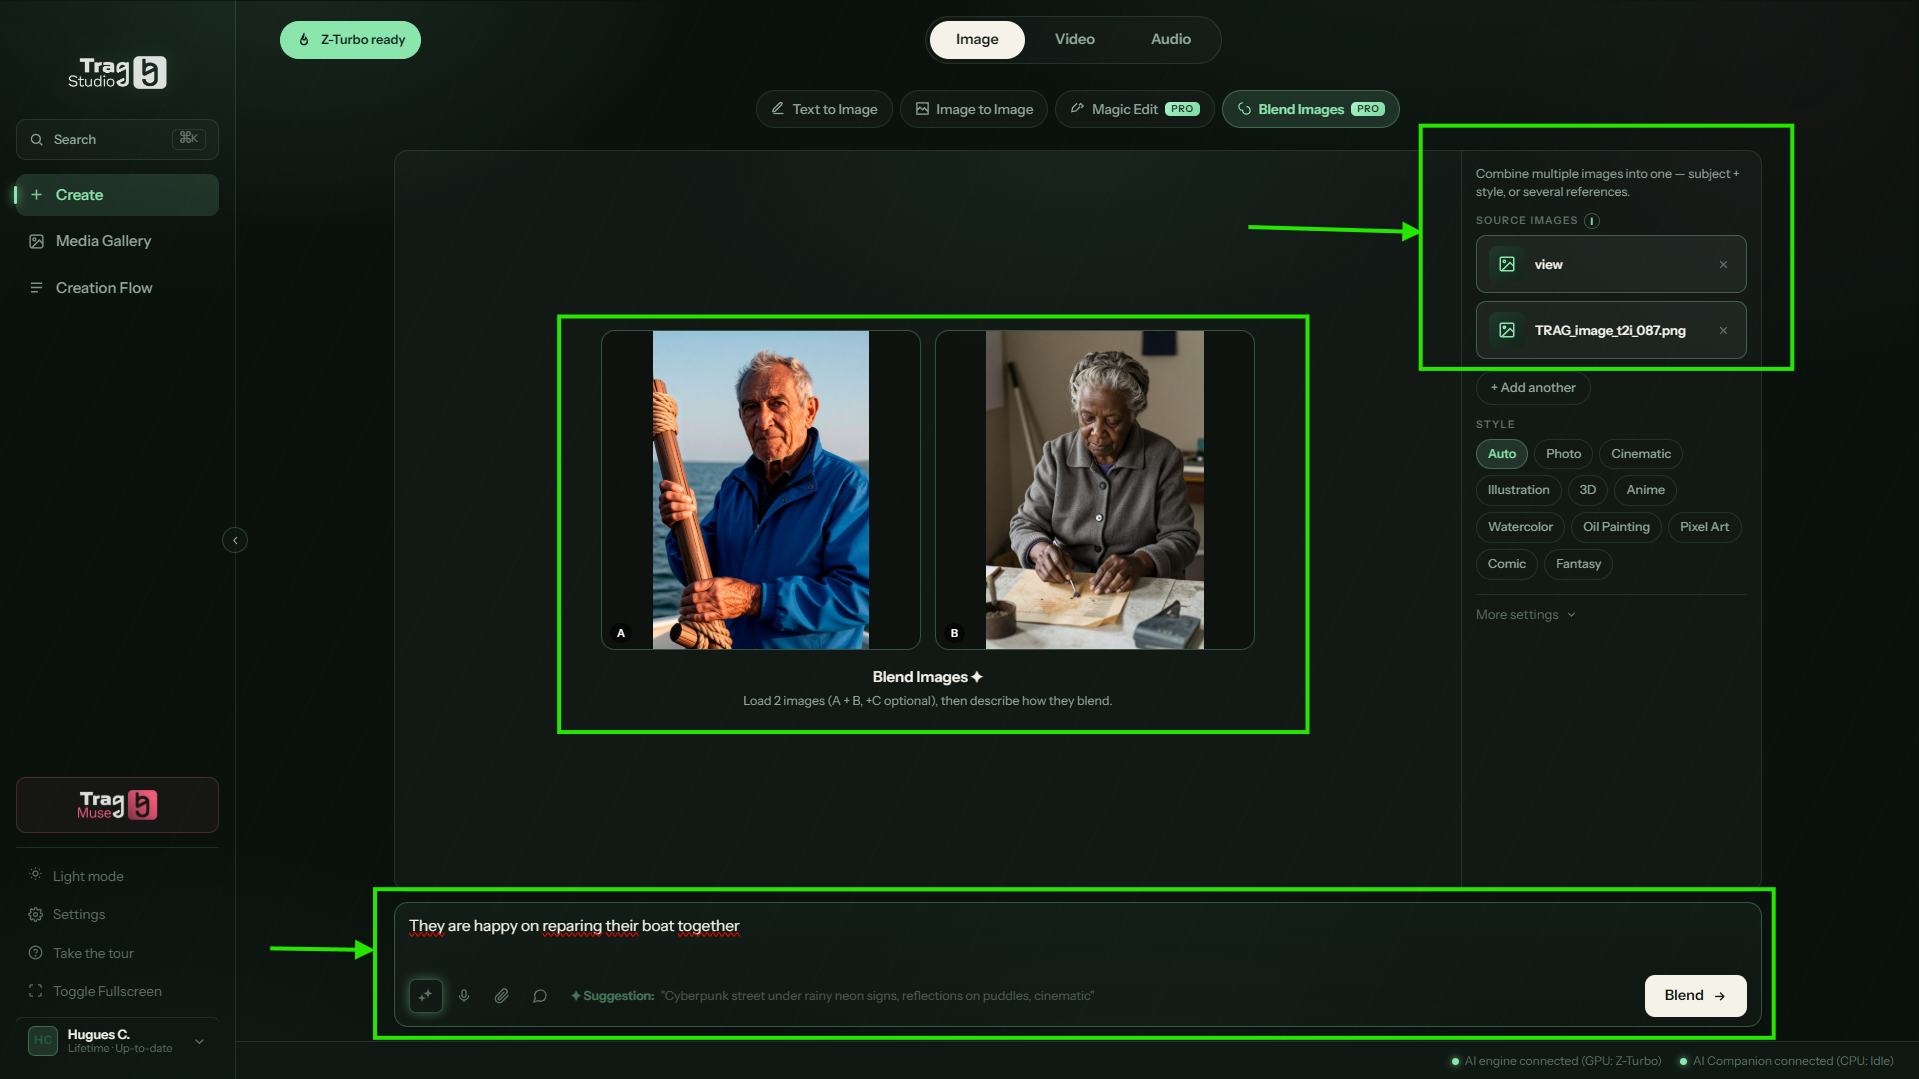
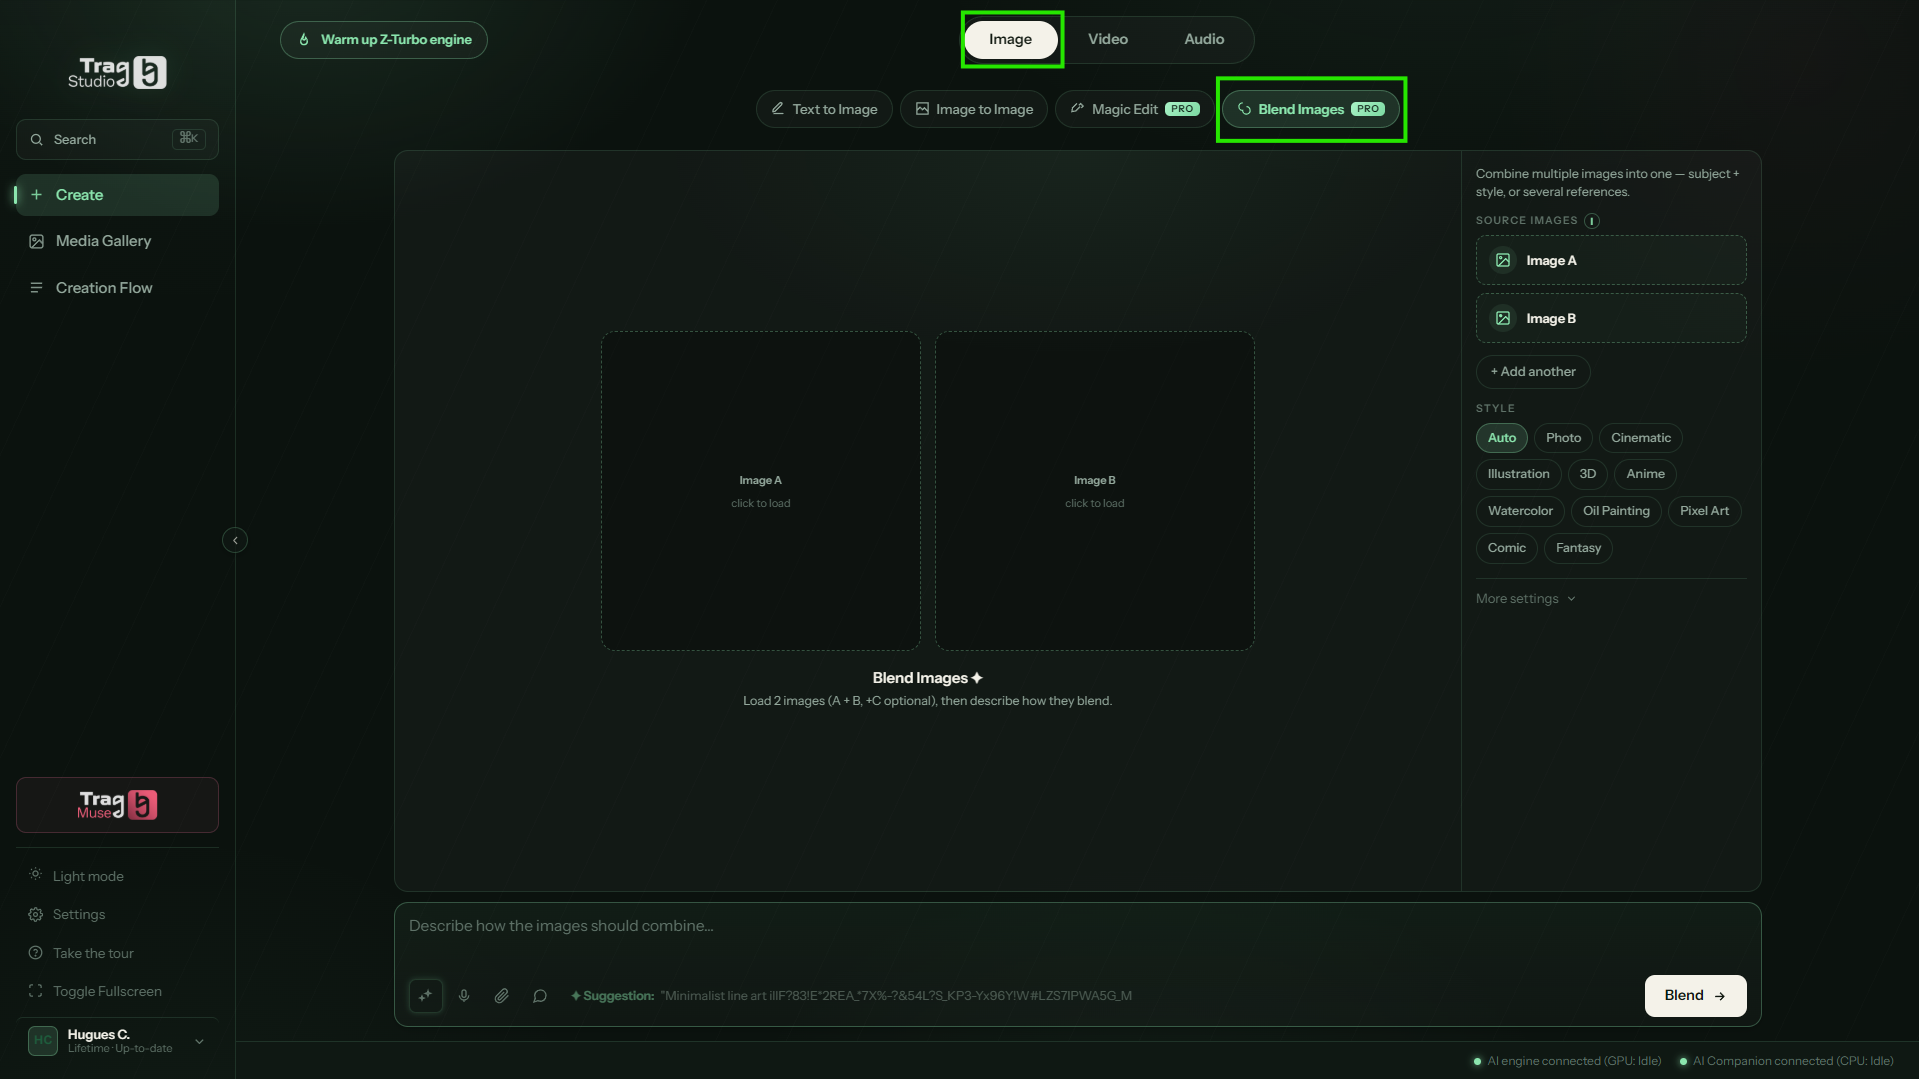
Blend Images sub-tab, then load Image A and Image B (“+ Add another” for an optional C).
Pick a Style if you want to steer the look.
Describe how the images combine — who does what, in which scene — then click Blend →.
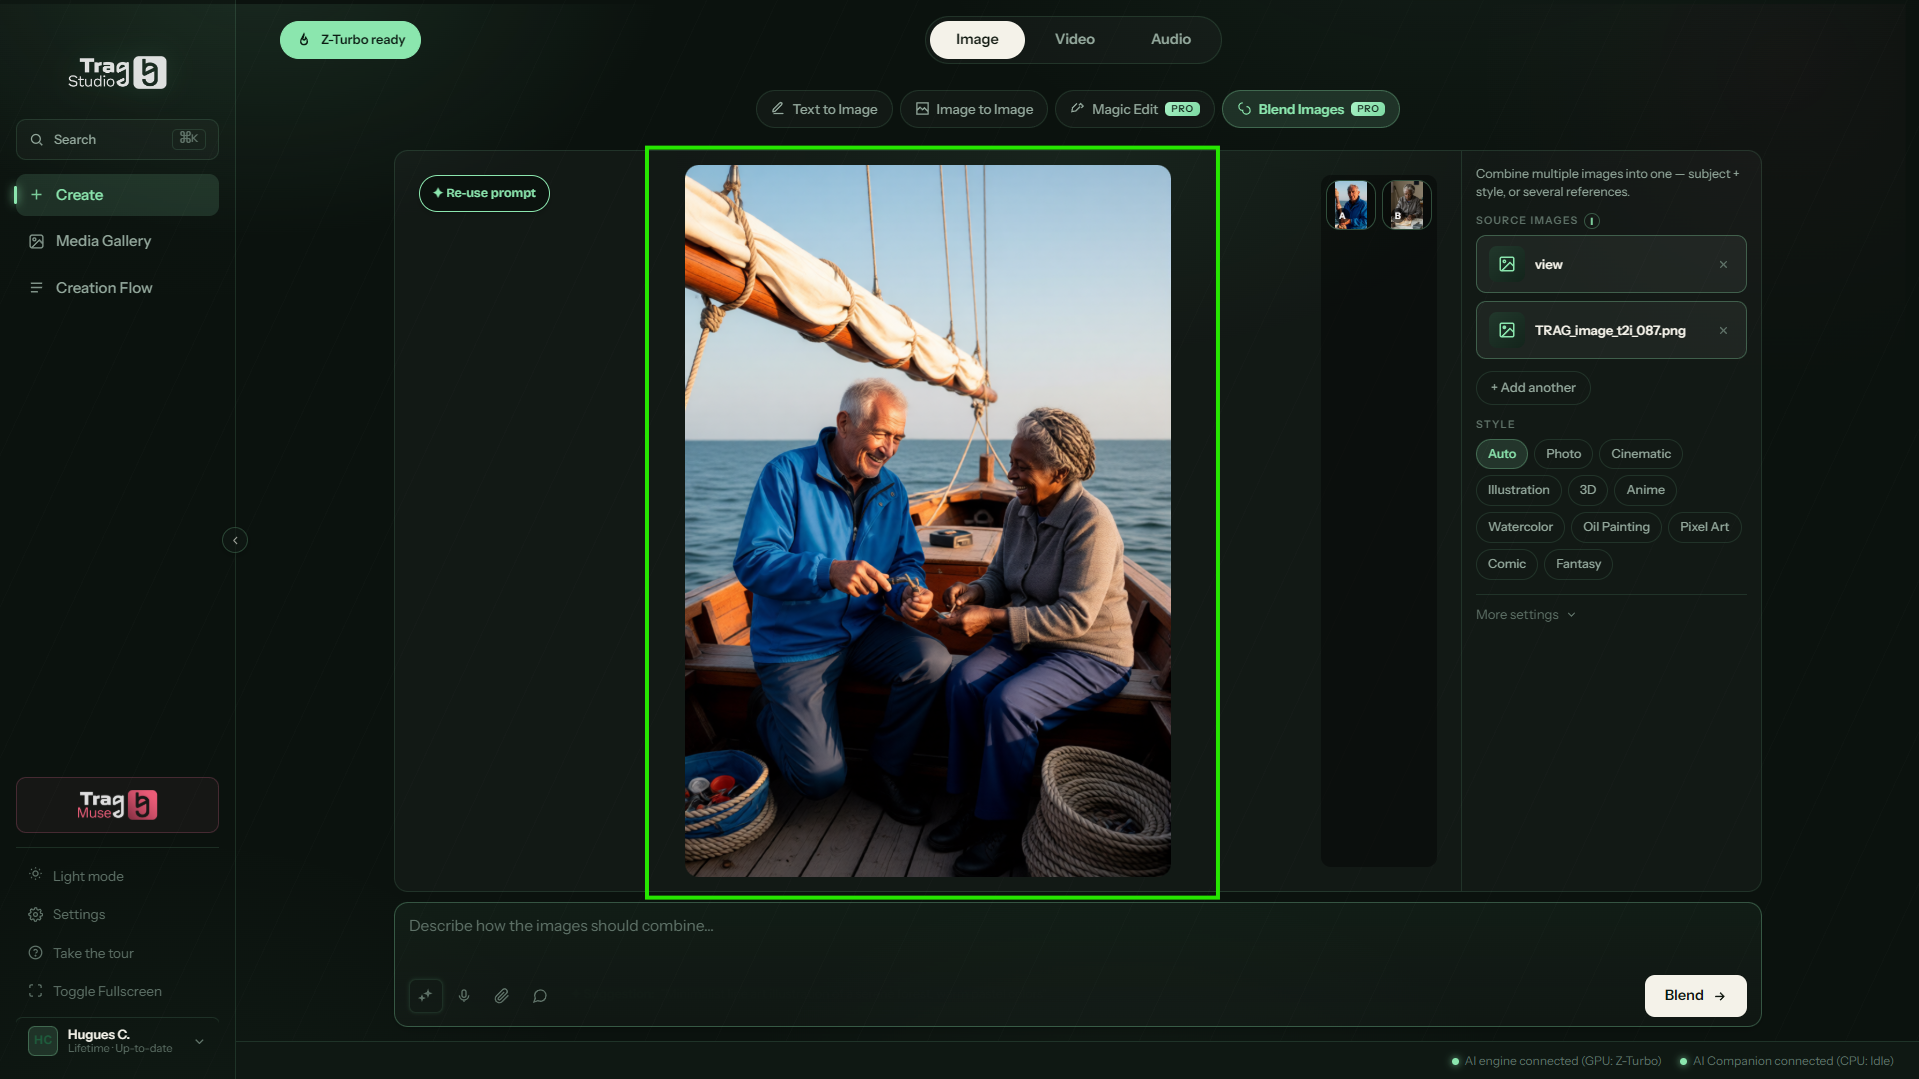
Two sources loaded (A + B) and a prompt that tells the merge — all three zones marked in green.The result: the characters from images A and B united in a single scene.
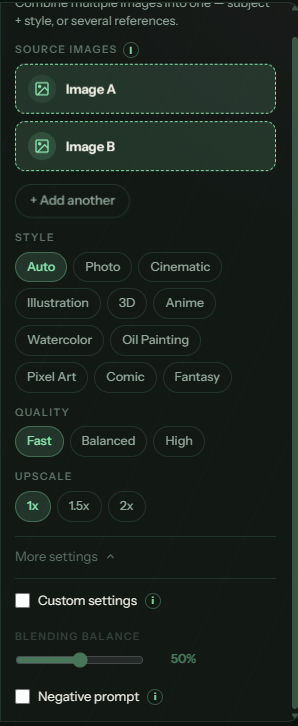
Blend Images at the start: slots A and B await your pictures.The settings: Source Images (A, B, + Add another), Style — and the Blending balance under “More settings”.
06Create videos Pro
The Video tab creates a clip from a prompt alone, animates your images, bridges two moments with fluid motion, or makes a face speak. All four video workflows belong to the Pro edition.
When you switch to the Video tab, the top button becomes “Warm up LTX 2.3 engine”: click it before your first video to preheat the video engine. Short clips are faster and more stable — start at 5 s.
Text to Video — a clip from a prompt alone
“Create a video entirely from a text description.” No source image needed: describe the scene and the motion, and TRAG films it.
Video tab → Text to Video sub-tab.
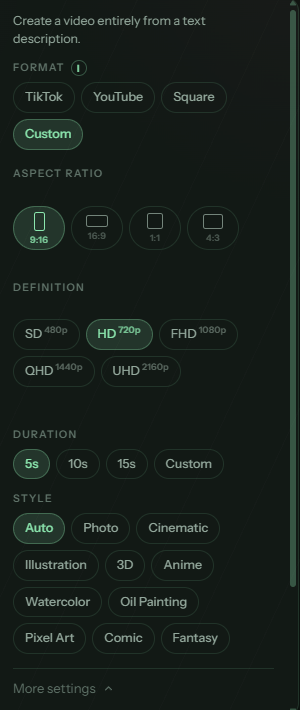
Pick the frame: Format (TikTok, YouTube, Square or Custom), Aspect ratio (9:16, 16:9, 1:1, 4:3), Definition (SD 480p → UHD 2160p) and Duration (5s, 10s, 15s or Custom).
Describe the shot — subject, camera move, mood — then click the action button and let the engine film.
The Text to Video settings: Format, Aspect ratio, Definition, Duration, Style.
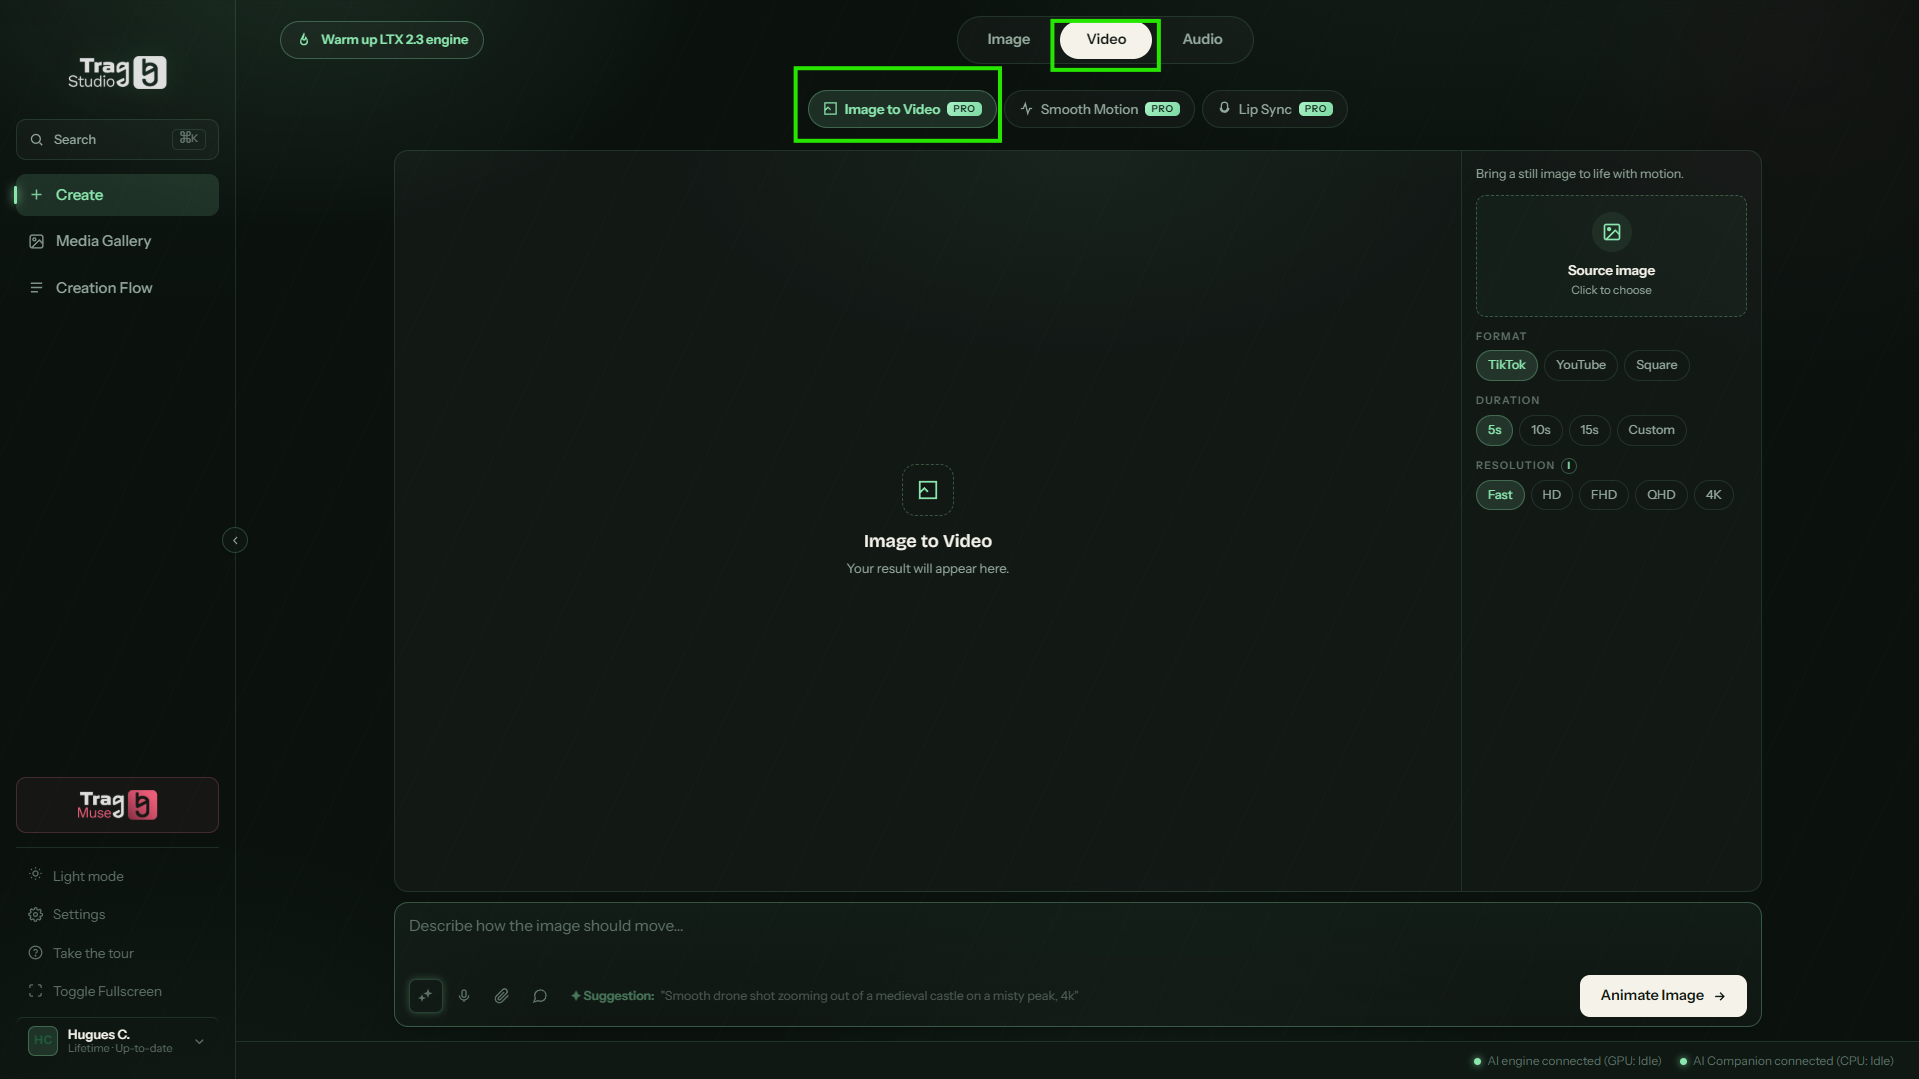
Image to Video — animate a still
“Bring a still image to life with motion.” One image + one motion description = a video clip, with synchronized audio and dialogue if you describe them.
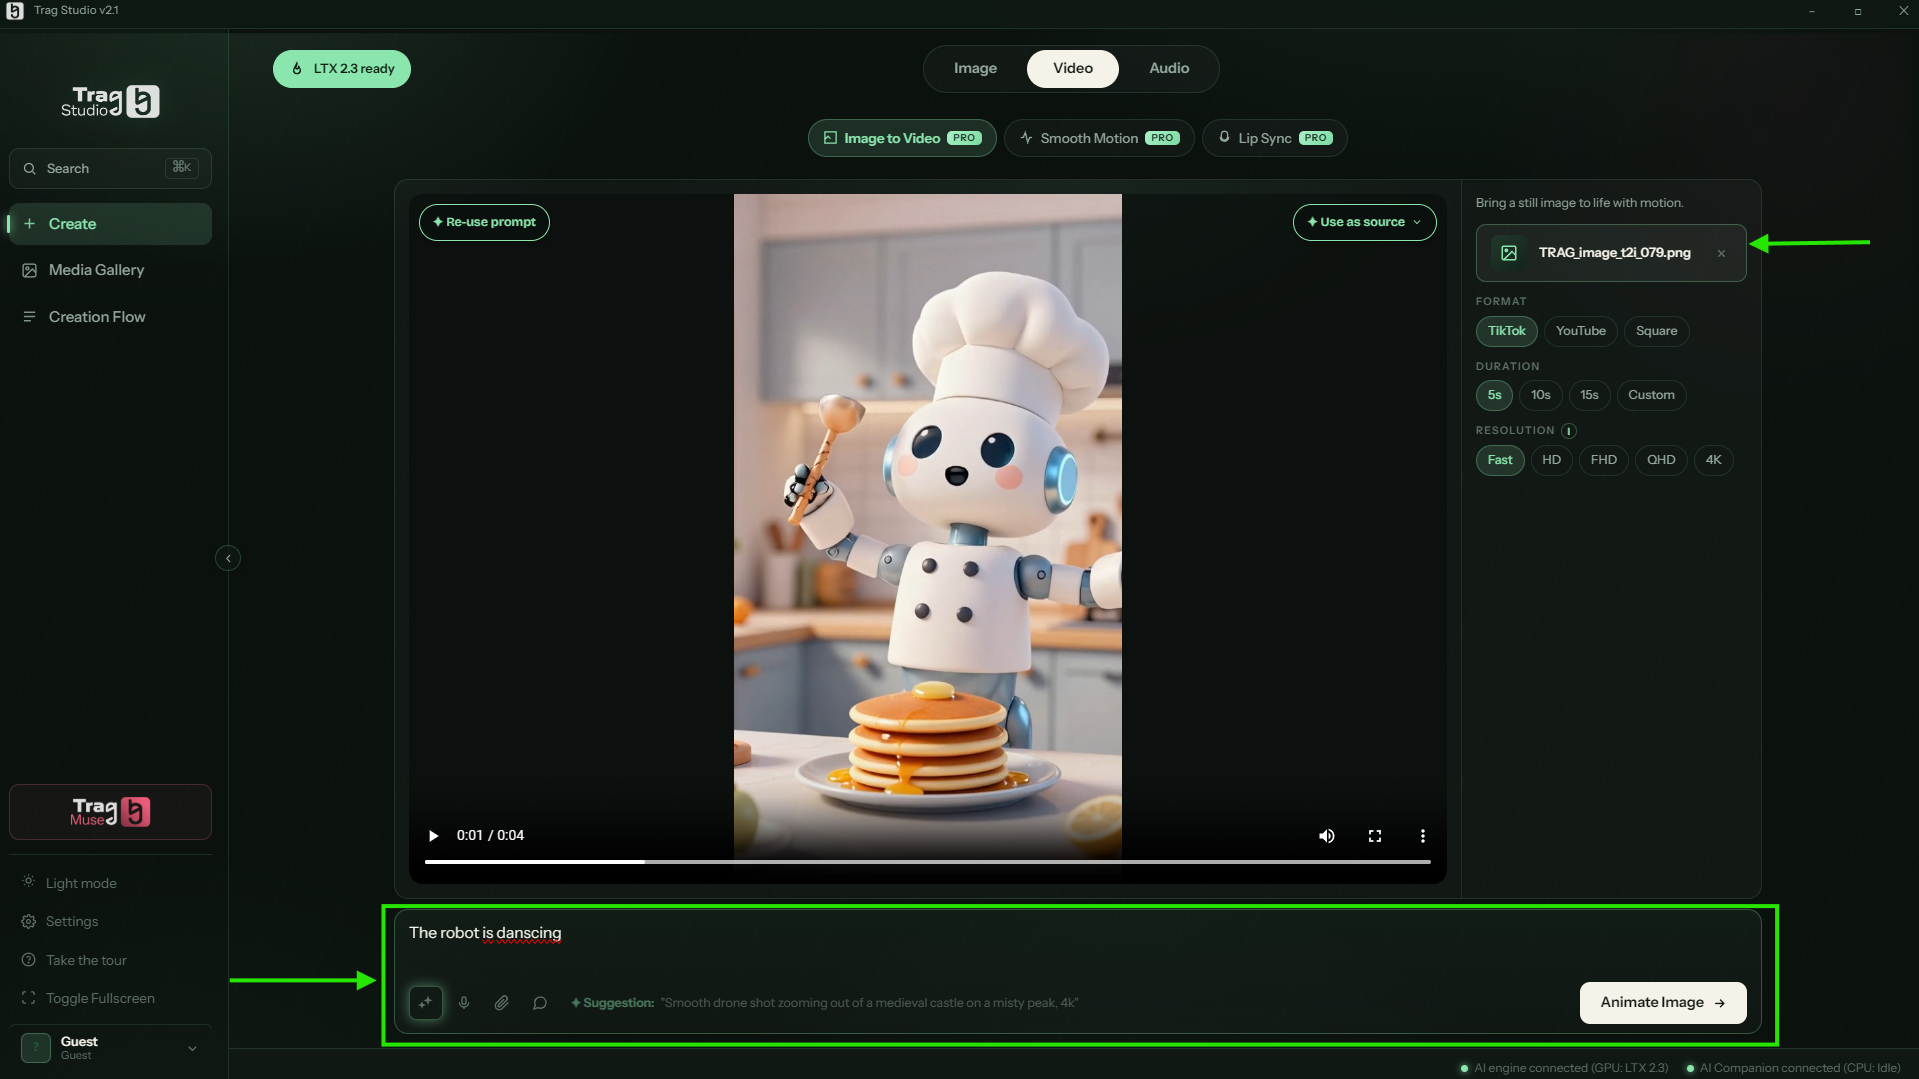
Video tab → Image to Video sub-tab, then load your image (Source image → Click to choose, or send one from the Media Gallery with “Use as source”).
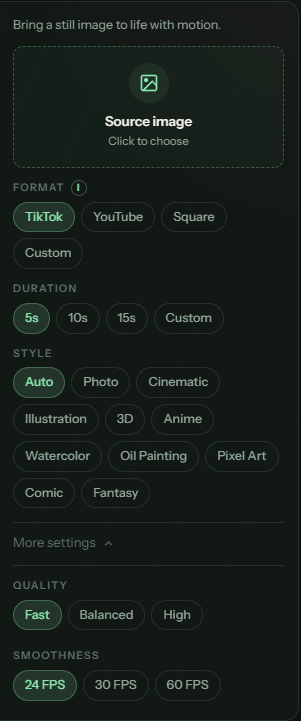
Pick the Format — TikTok (vertical), YouTube (16:9), Square or Custom — and the Duration (5s, 10s, 15s or Custom). Quality and Smoothness (24 / 30 / 60 FPS) sit under “More settings”.
Describe the motion — what the subject does, the camera move, the soundscape, even a line to speak.
Click Animate Image → and let the engine work: the clip then plays right in the viewport.
Image to Video: format, duration and resolution on the right, motion described below.The video settings: source, Format, Duration — Quality and Smoothness under “More settings”.
A generated clip playing — source and prompt marked in green.
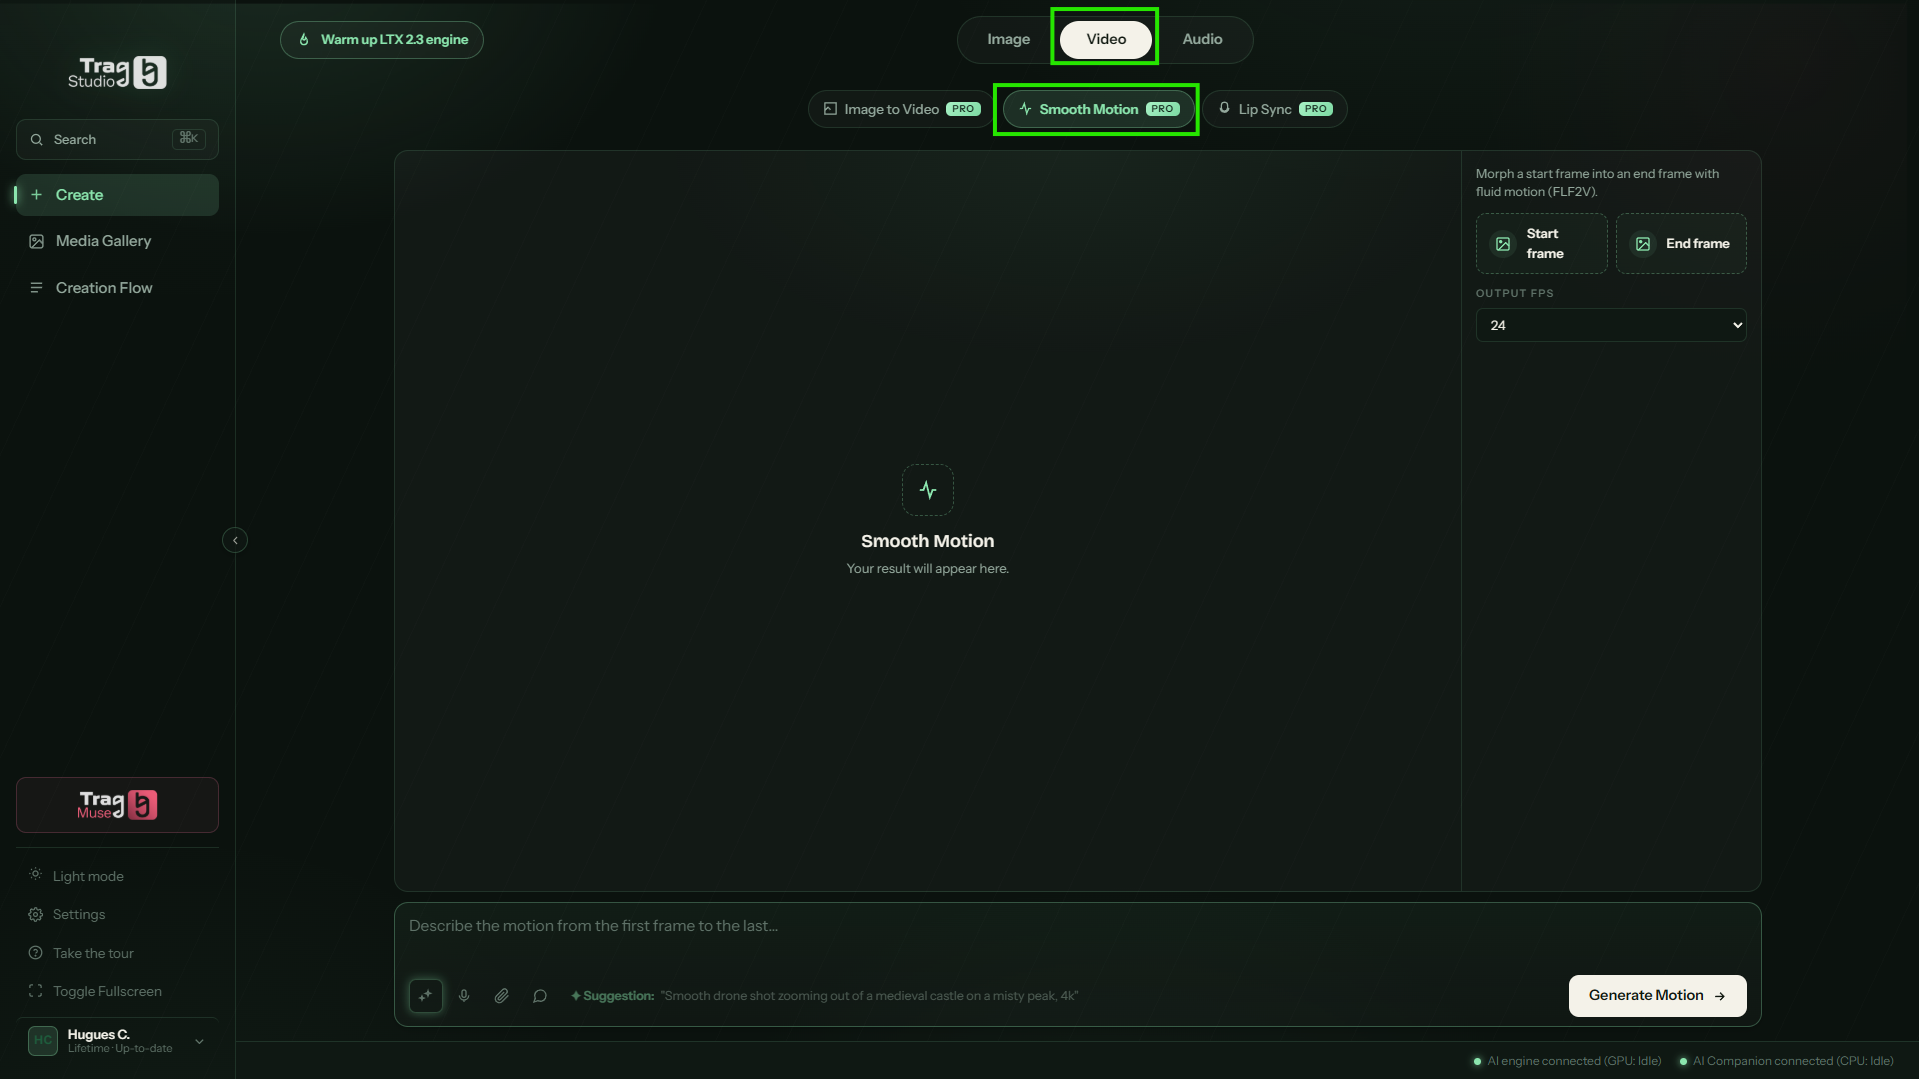
Smooth Motion — from one frame to another
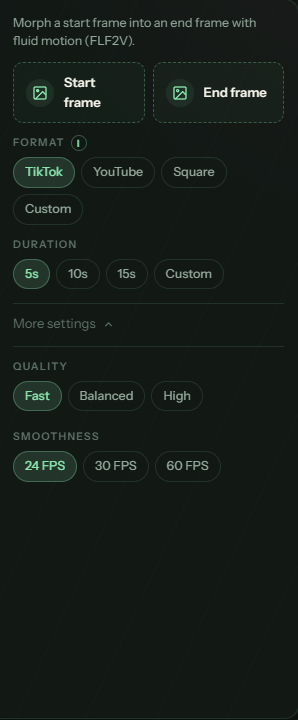
“Morph a start frame into an end frame with fluid motion.” Provide the starting picture and the ending picture: TRAG invents the fluid motion that joins them.
Smooth Motion sub-tab, then load the Start frame and the End frame.
Choose the frame and fluidity: Format, Duration — and Smoothness (24 / 30 / 60 FPS) under “More settings”.
Describe the motion from first to last frame, then click Generate Motion →.
Smooth Motion: a start frame, an end frame — the motion invents itself in between.The settings: Start frame, End frame, Format, Duration — Quality and Smoothness under “More settings”.
Lip Sync — make a face speak
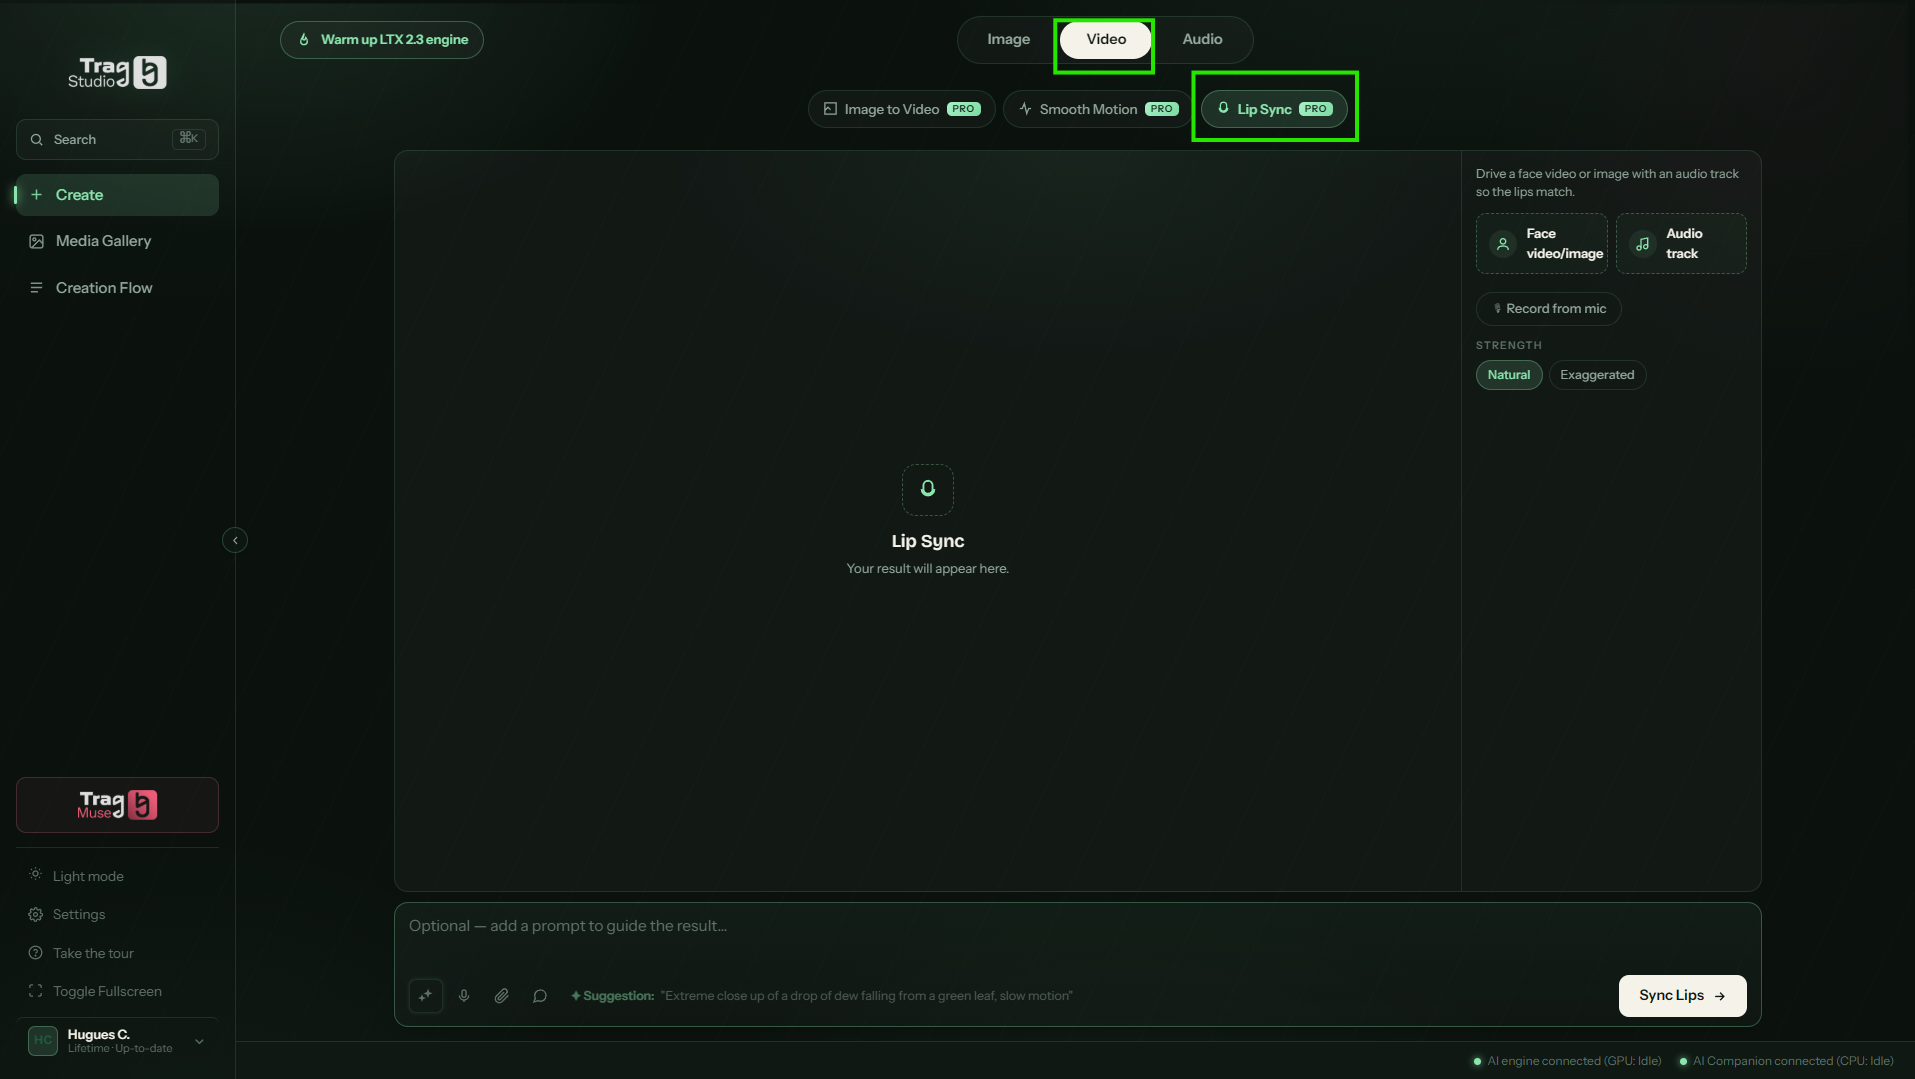
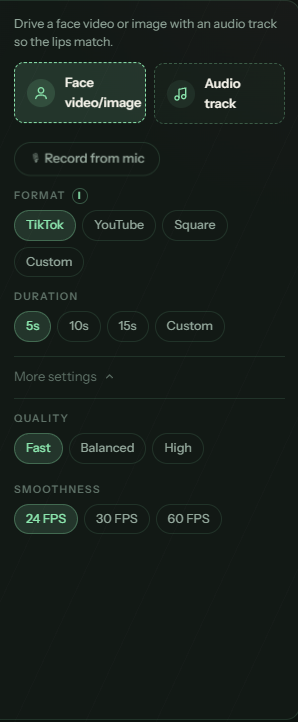
“Drive a face video or image with an audio track so the lips match.” A face (photo or video) + an audio track = perfectly synced lips.
Lip Sync sub-tab, then load the Face video/image and the Audio track. No audio file handy? Record from mic captures your voice on the spot.
Pick the frame: Format and Duration — Quality and Smoothness under “More settings”.
Add an optional prompt to guide the render, then click Sync Lips →.
Lip Sync: a face, an audio track (or the mic), and the articulation strength.The settings: Face video/image, Audio track, Record from mic, Format and Duration.
07Create audio Pro
The Audio tab composes whole tracks — with or without lyrics — remixes your music and regenerates one exact passage. All three audio workflows belong to the Pro edition.
Text to Music — compose a track
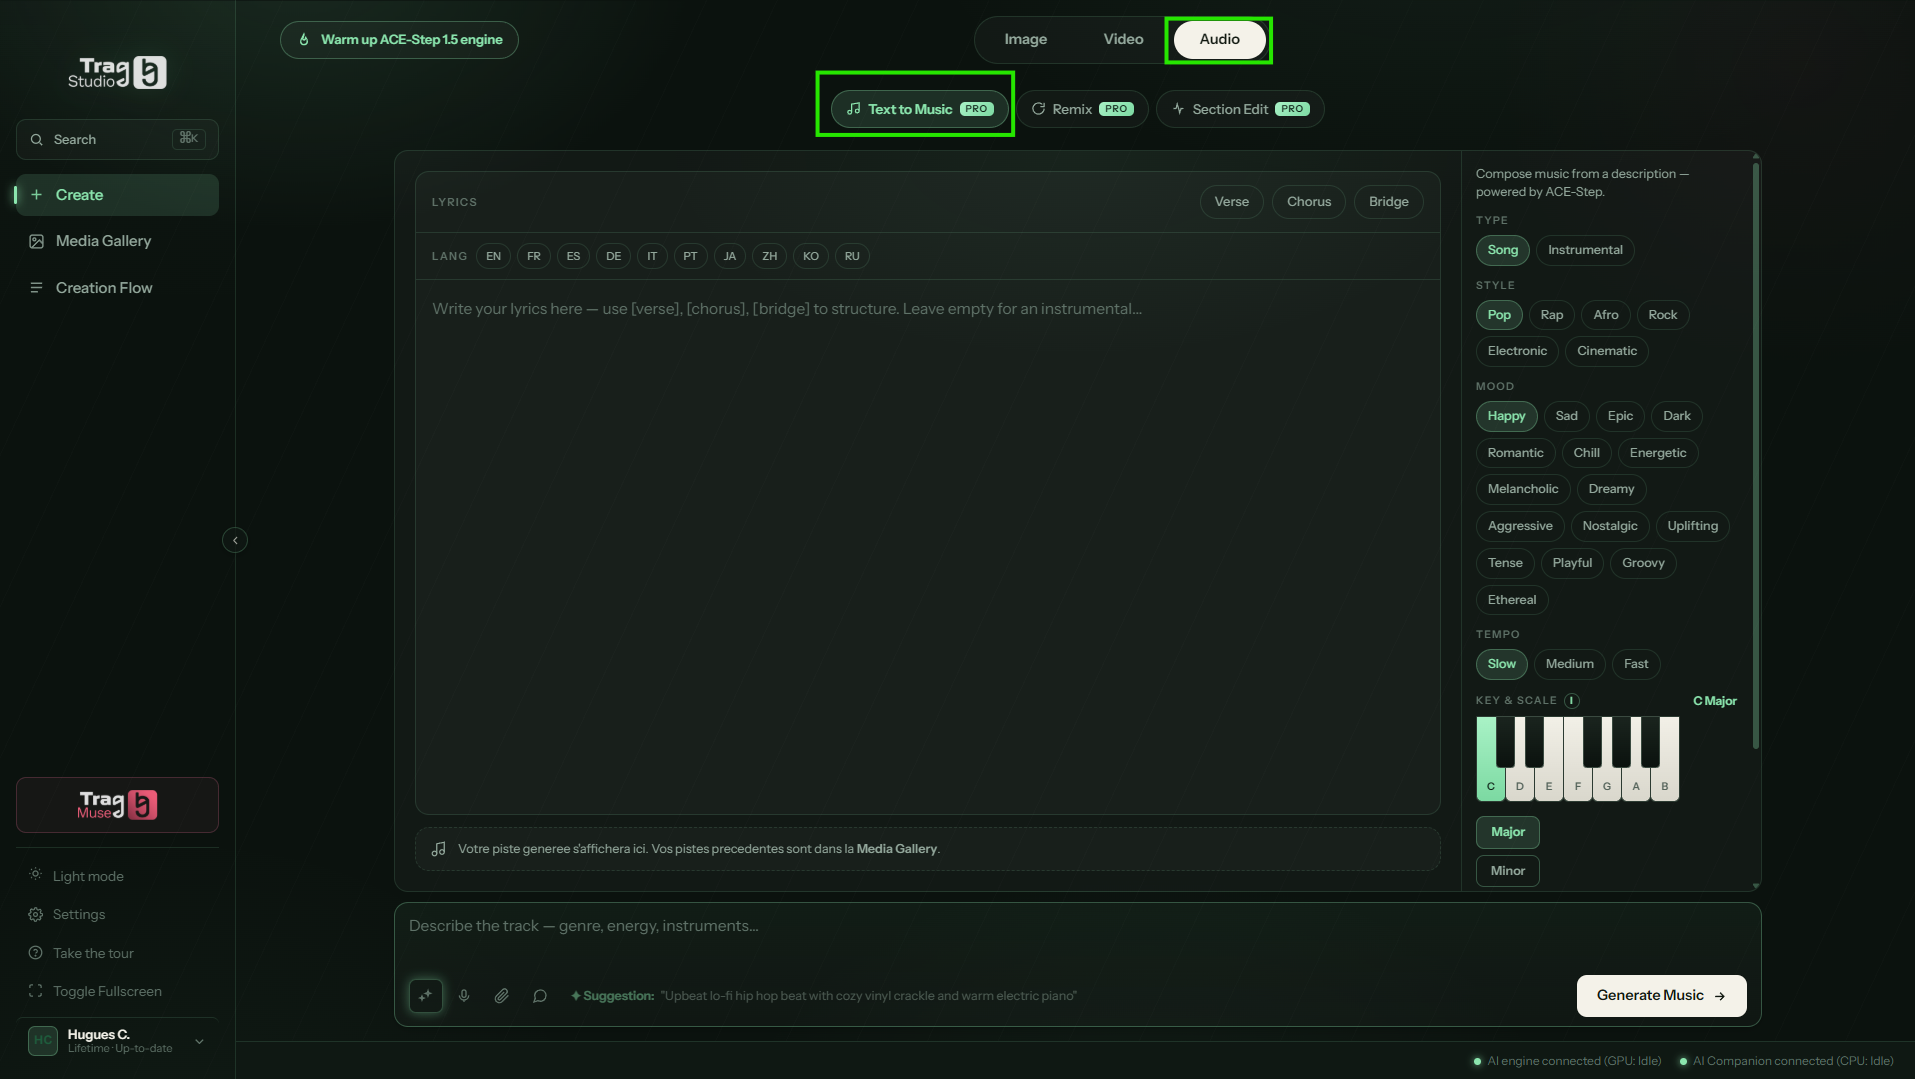
“Compose music from a description.” Describe the track, set the mood… and write lyrics if you feel like it:
Audio tab → Text to Music sub-tab. The top button becomes “Warm up ACE-Step 1.5 engine”: one click to preheat.
Write your lyrics (optional) in the central Lyrics editor: structure them with the Verse, Chorus and Bridge buttons, pick the language (EN, FR, ES, DE, IT, PT, JA, ZH, KO, RU…). Leave empty for an instrumental.
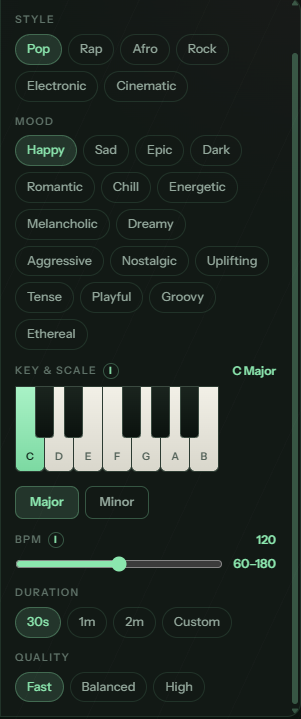
Shape the music on the right: Style (Pop, Rap, Afro, Rock, Electronic, Cinematic), Mood (Happy, Epic, Chill… sixteen moods), Key & Scale (the little piano keyboard!), BPM and Duration (30s, 1m, 2m or Custom).
Describe the track in the bottom bar, then click Generate Music →. The track shows up in a player, ready to listen — and filed in the Media Gallery.
Text to Music: the lyrics editor center-stage (Verse / Chorus / Bridge), music settings on the right.The music settings: Style, Mood, Key & Scale, BPM, Duration — Quality under “More settings”.
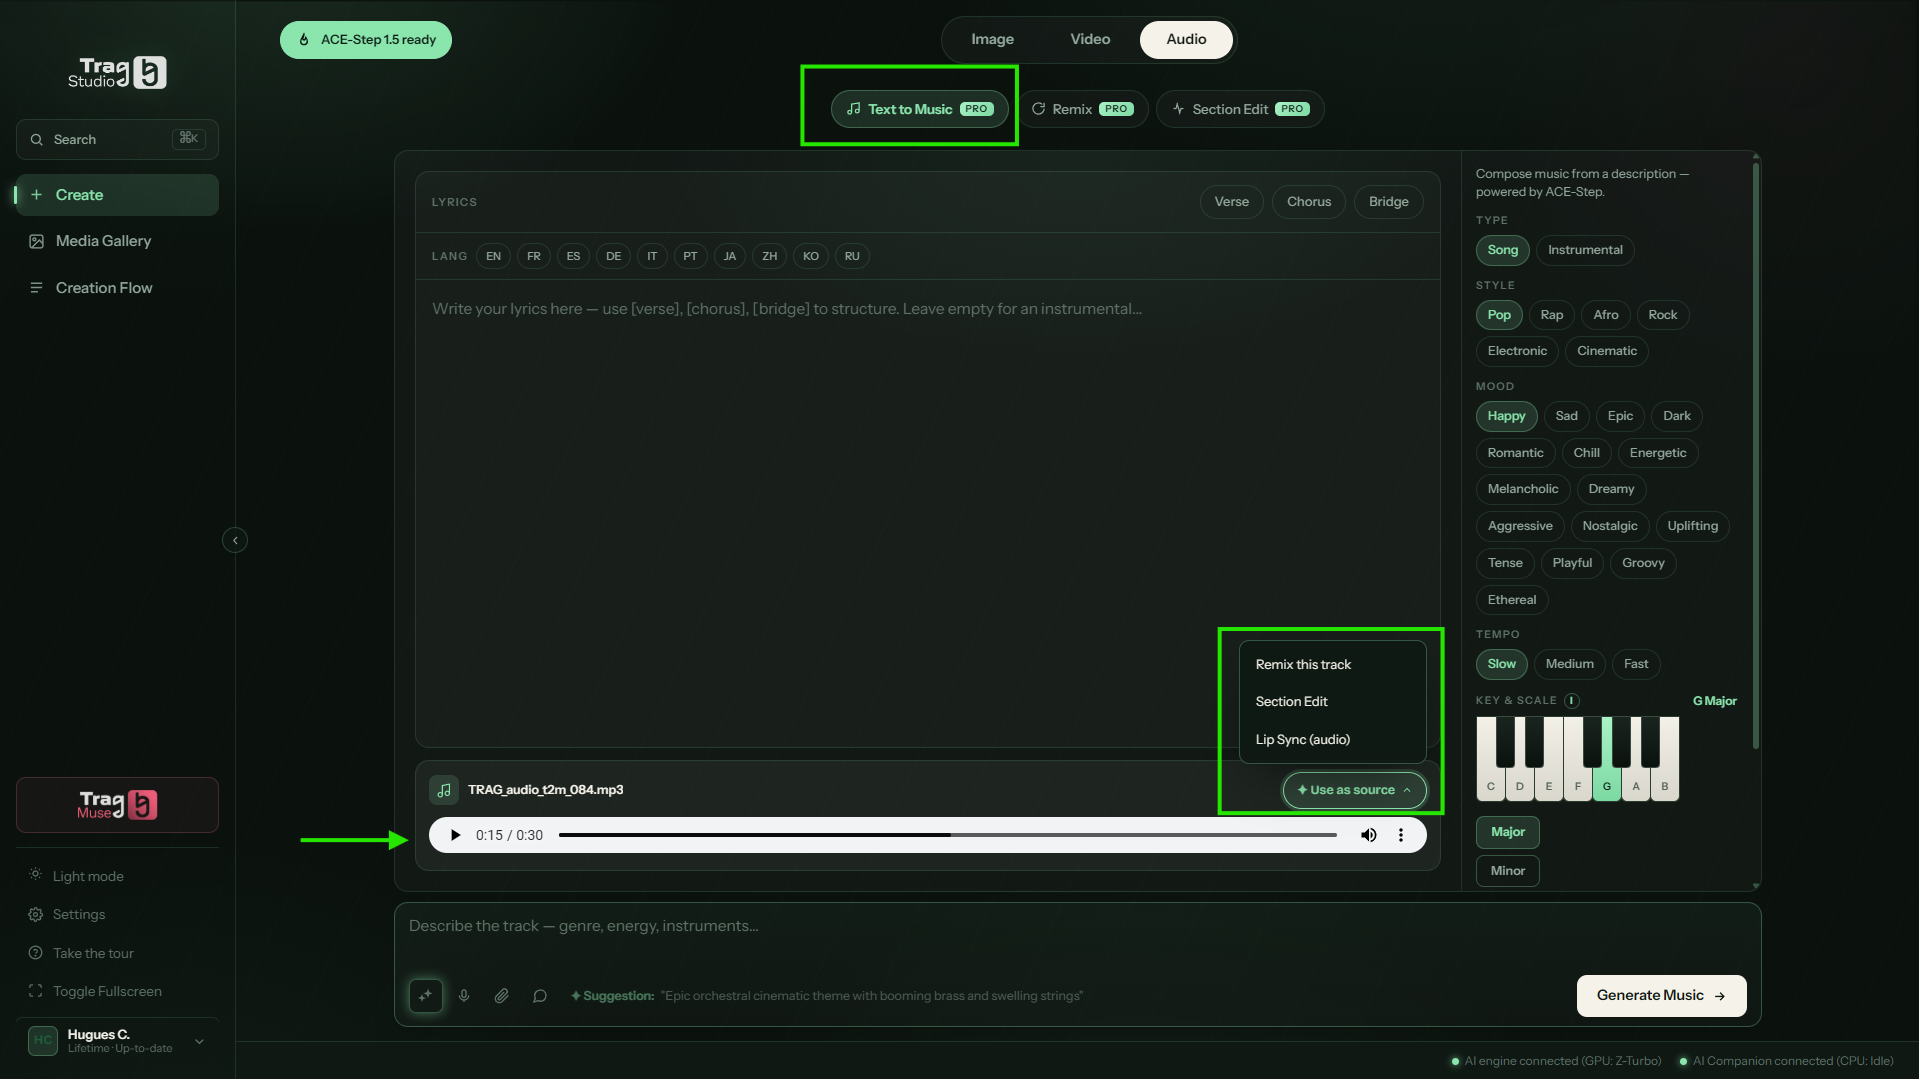
Once the track is generated, the player's ✦ Use as source button sends it one click away to Remix this track, Section Edit or Lip Sync (audio):
A generated track: the “Use as source” menu chains into Remix, Section Edit or Lip Sync.
Remix — restyle a track
“Transform an existing audio track into a new style.” Your song, a new outfit:
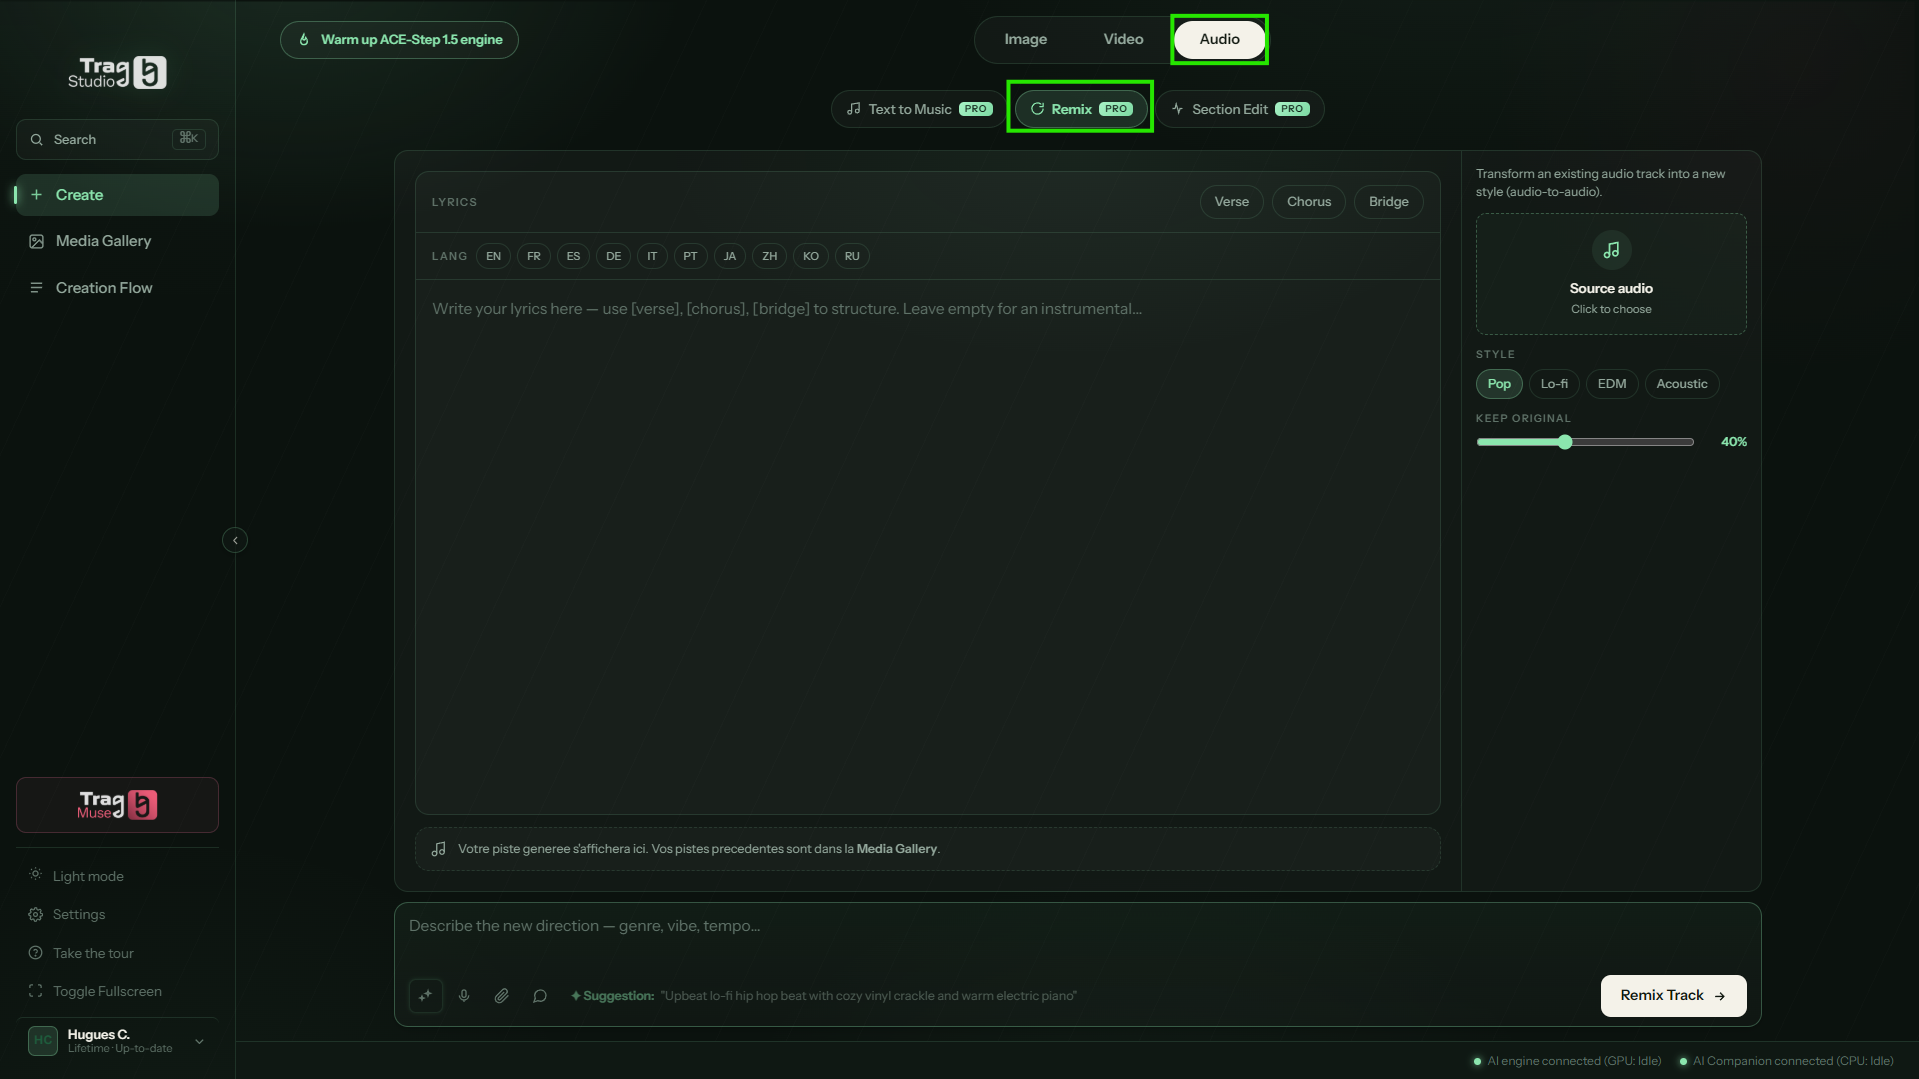
Remix sub-tab, then load the track (Source audio → Click to choose).
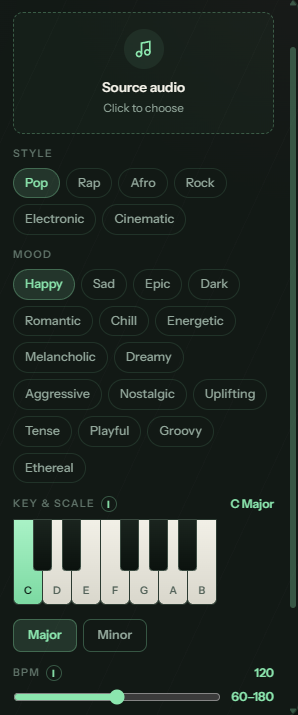
Pick the Style and the Mood, and dose Keep Original (under “More settings”): the higher the percentage, the more the original shows through.
Describe the new direction — genre, vibe, tempo — then click Remix Track →.
Remix: a source track, a target style, and the “Keep Original” dial.The Remix settings: Source audio, Style, Mood, Key & Scale — Keep Original under “More settings”.
Section Edit — regenerate a passage
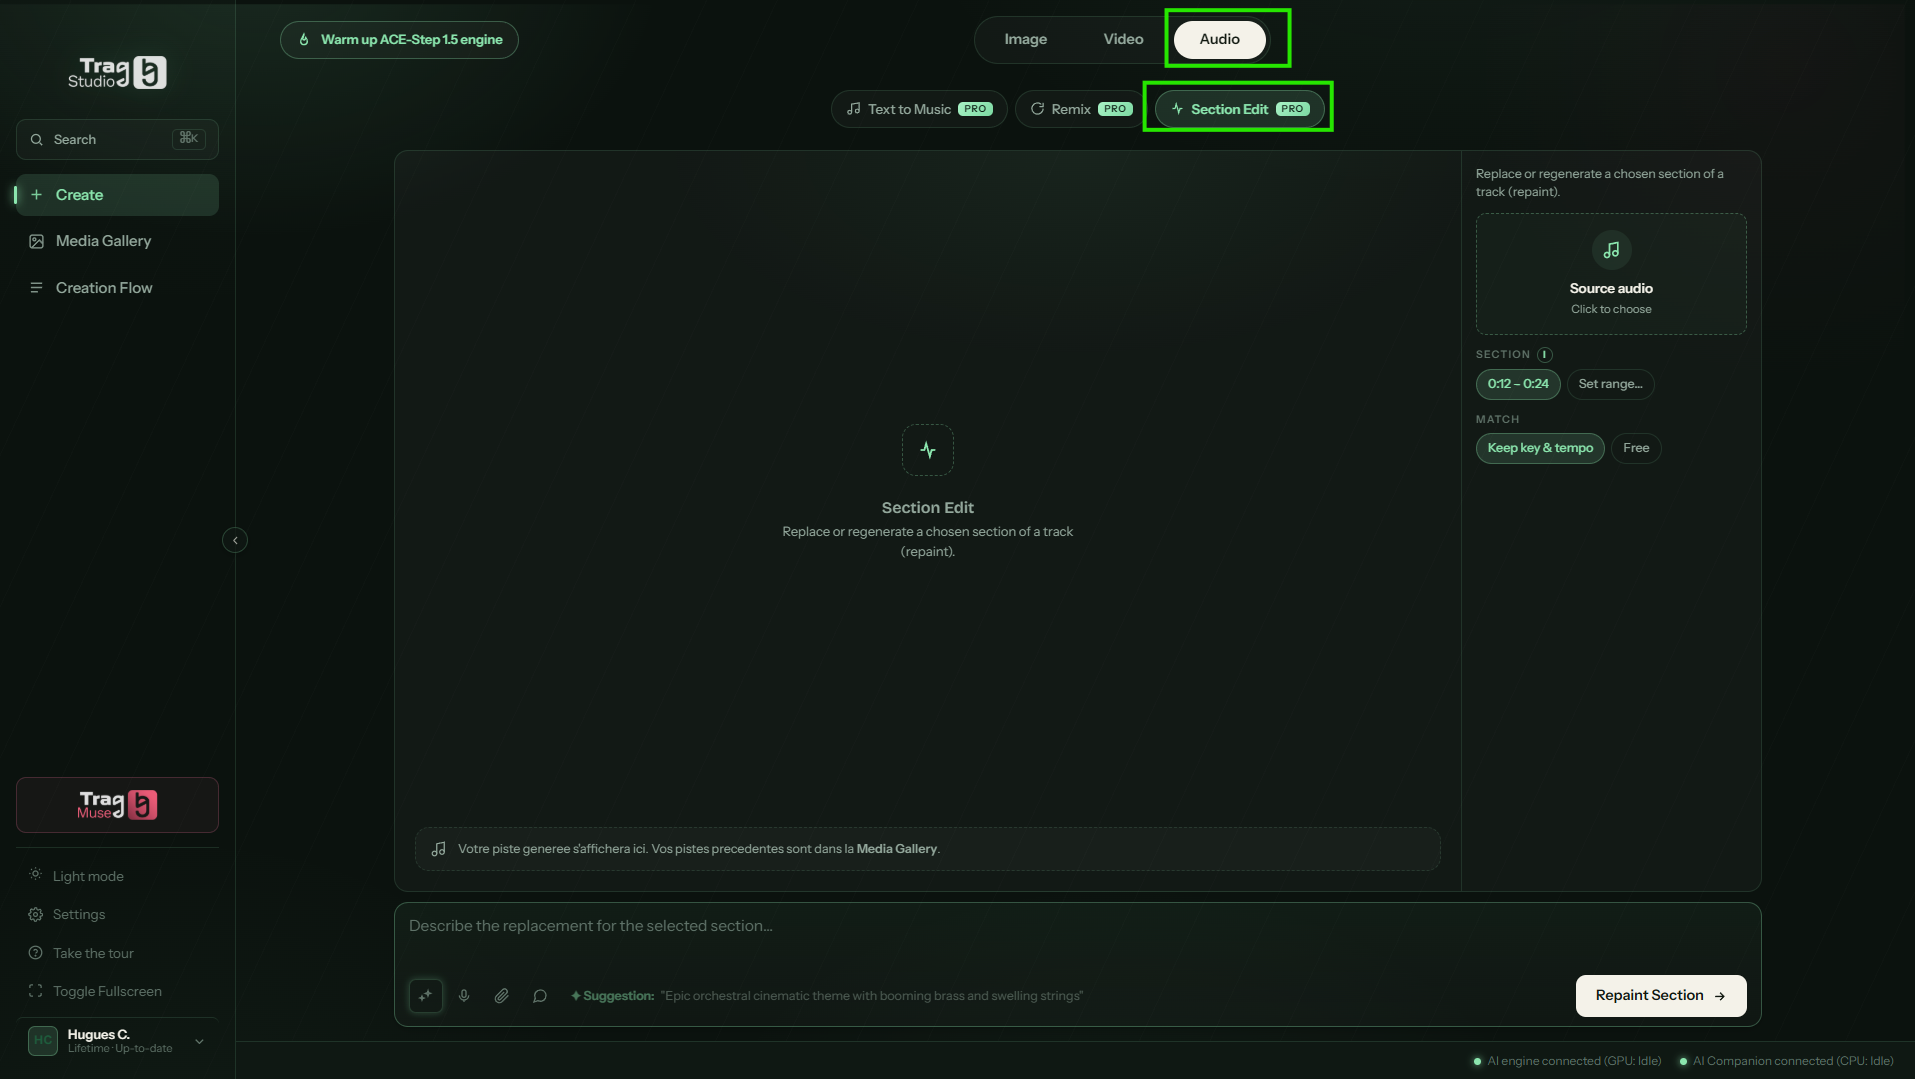
“Replace or regenerate a chosen section of a track.” Chorus falling flat? Regenerate just that, leaving the rest untouched:
Section Edit sub-tab, then load the track.
Mark the passage to rework directly on the track in the viewport.
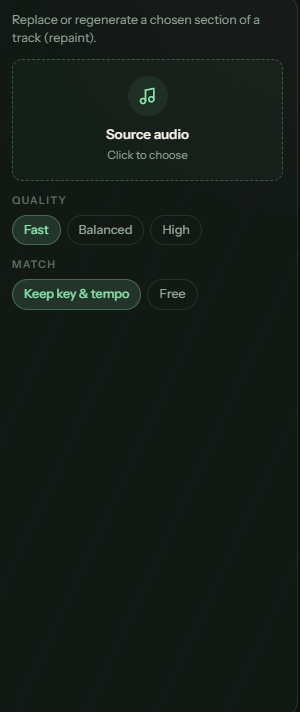
Choose Match: Keep key & tempo to stay in step with the rest of the track, or Free to let go.
Describe the replacement then click Repaint Section →.
Section Edit: pick the range to regenerate, keep (or not) key and tempo.The settings: Source audio, Quality, Match — Keep key & tempo, or Free.
The prompt bar in Section Edit mode: describe the replacement, with the ✦ wand, mic and attachment close at hand.
08Creation Flow & batch jobs
The Creation Flow is your render control tower: the live queue, the history of everything you've made, and batch launching.
The feature of the year Exclusive
TRAG is the only tool on the market with a render queue worthy of the name — drive it by hand, or let an MCP agent run it for you.
Follow the render queue
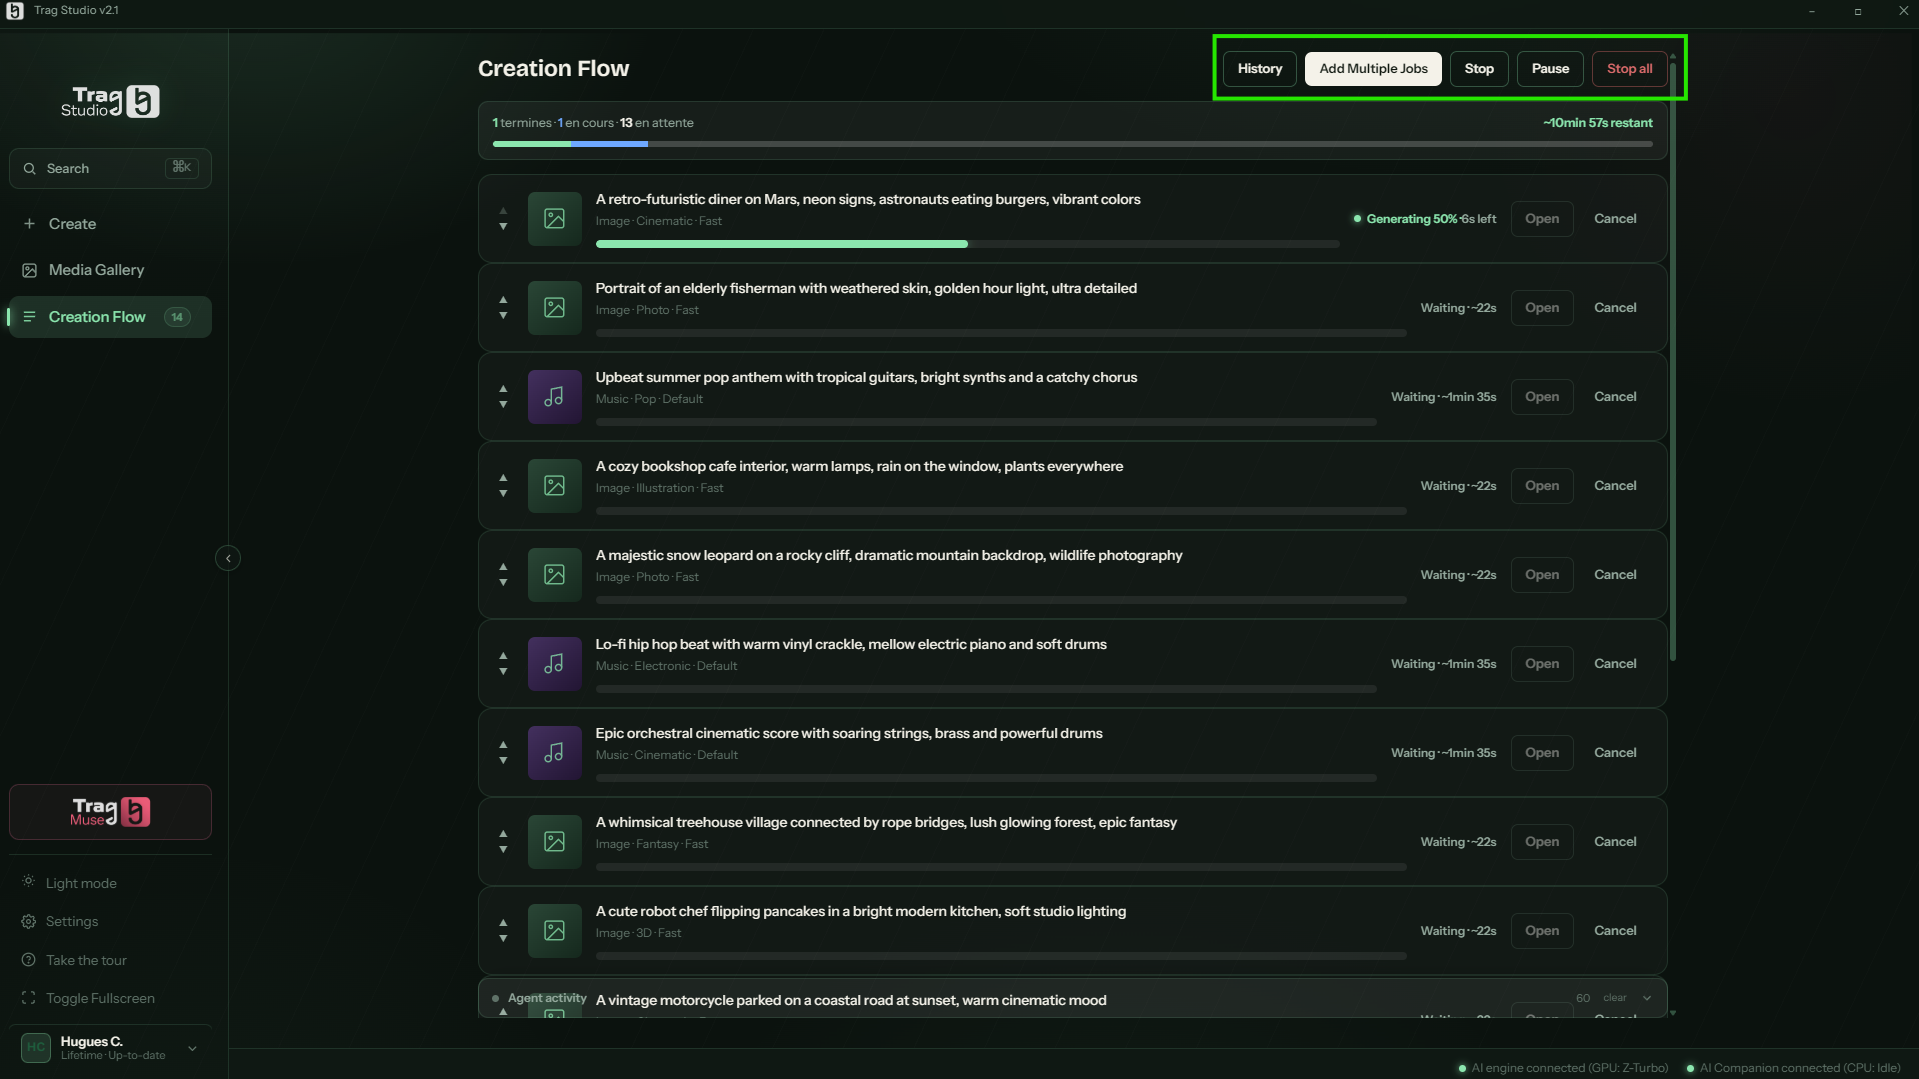
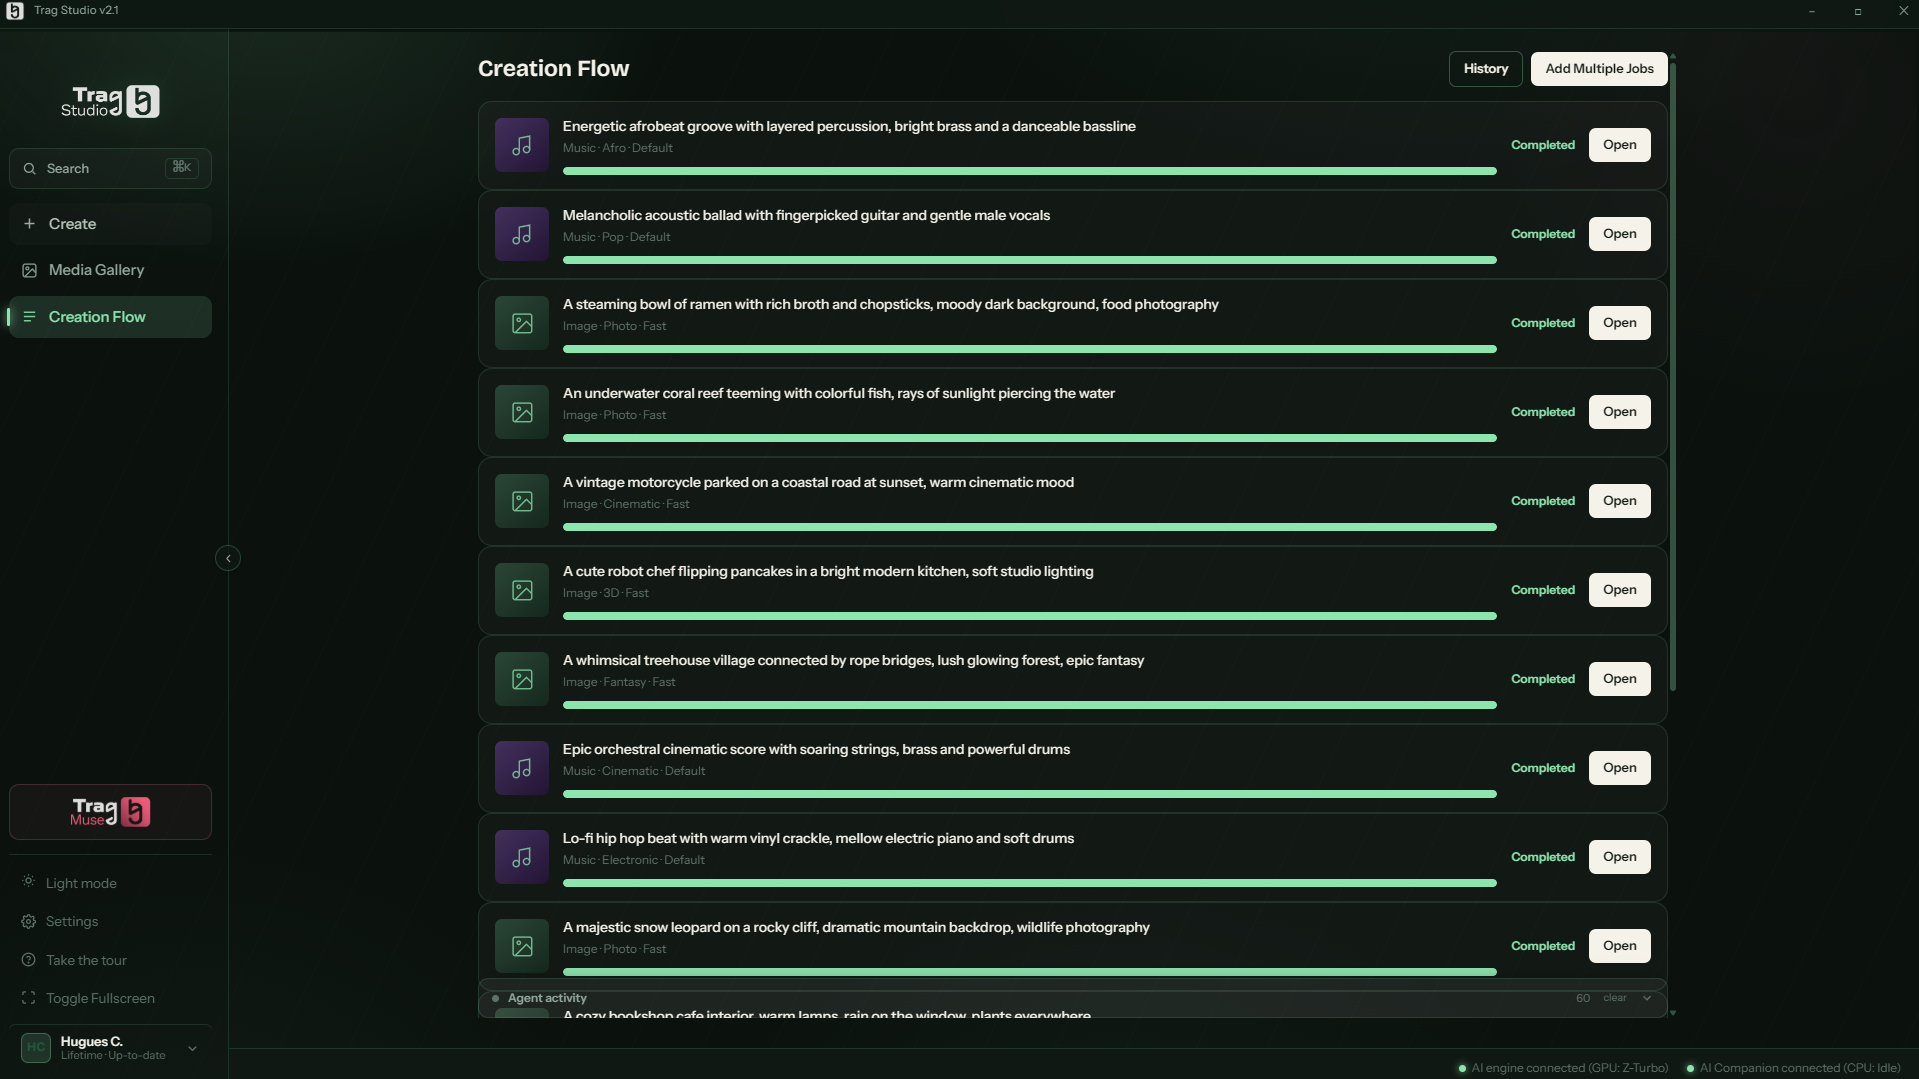
Open Creation Flow from the sidebar (the badge on the icon counts waiting jobs). Each row shows its state — Generating with percentage and time left, Waiting with an estimate, then Completed — plus its Open / Cancel buttons. Top right: History, Add Multiple Jobs, and while running, Stop, Pause and Stop all.
The queue at work: one job generating, the next ones waiting, and the History / Add Multiple Jobs / Stop / Pause / Stop all commands (boxed in green).All done: every row turns “Completed”, each with its “Open” button.
The creation history
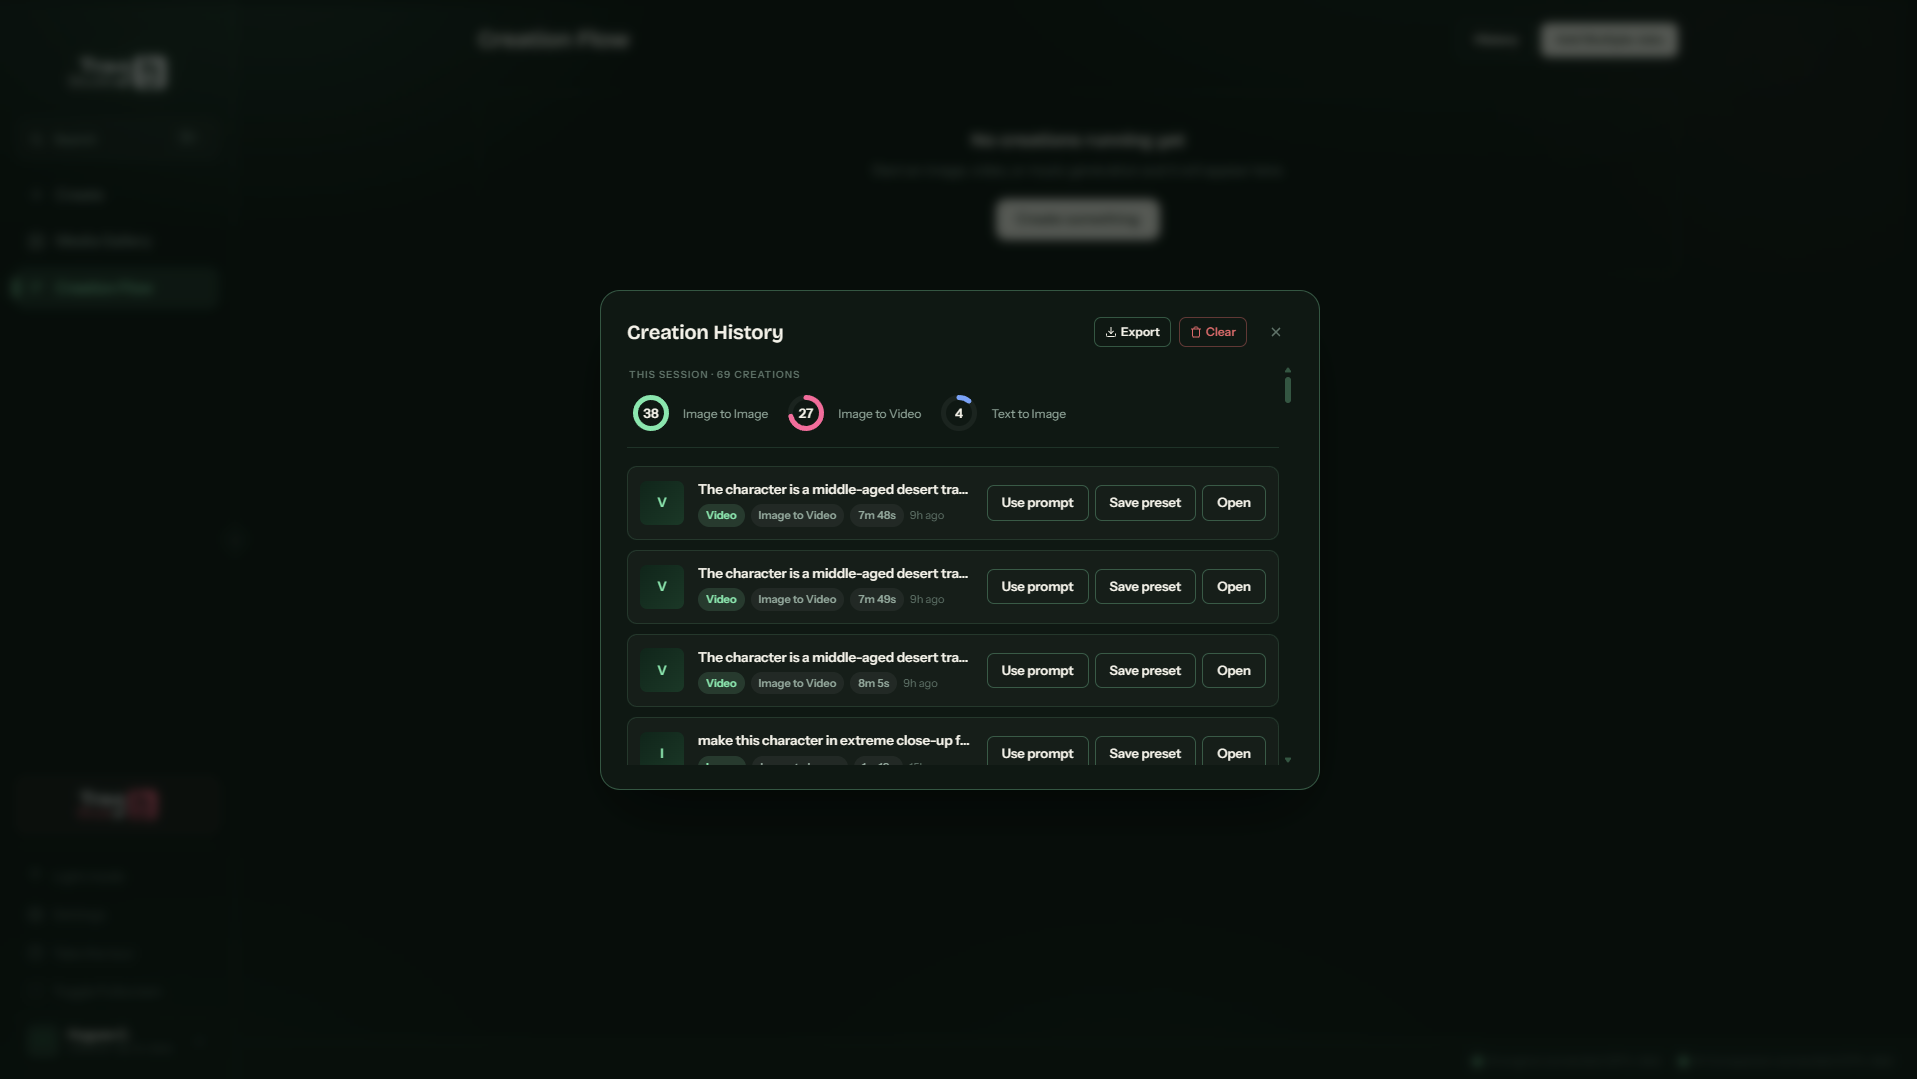
The History button opens the Creation History: session stats (creations per workflow) and, for each entry, Use prompt (reuse the text), Save preset (memorize the settings) and Open. Export saves the history, Clear empties it.
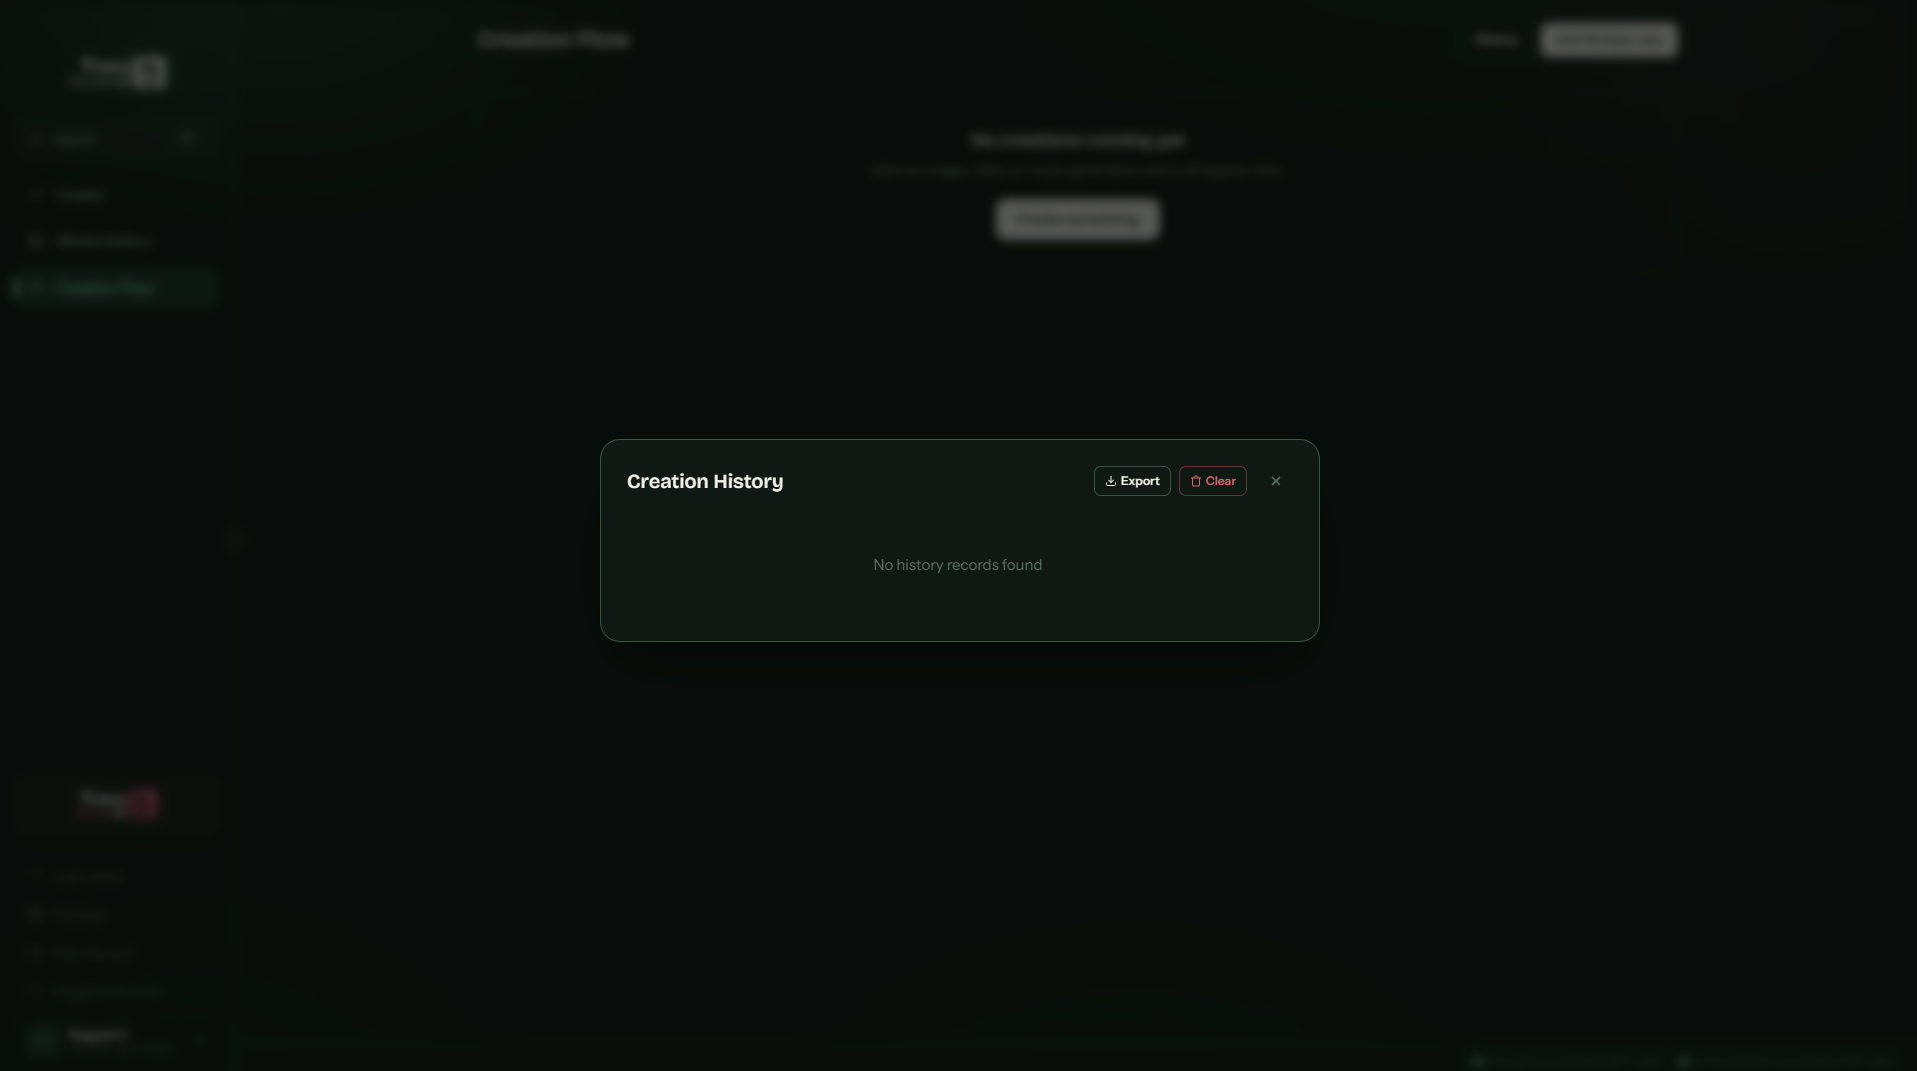
The Creation History: per-workflow counters and the Use prompt / Save preset / Open actions.At the very beginning the history is empty — it fills with every render.
Add Multiple Jobs — launch a whole batch
Feel like generating ten images and five tracks over lunch? Add Multiple Jobs runs a whole list of creations, automatically:
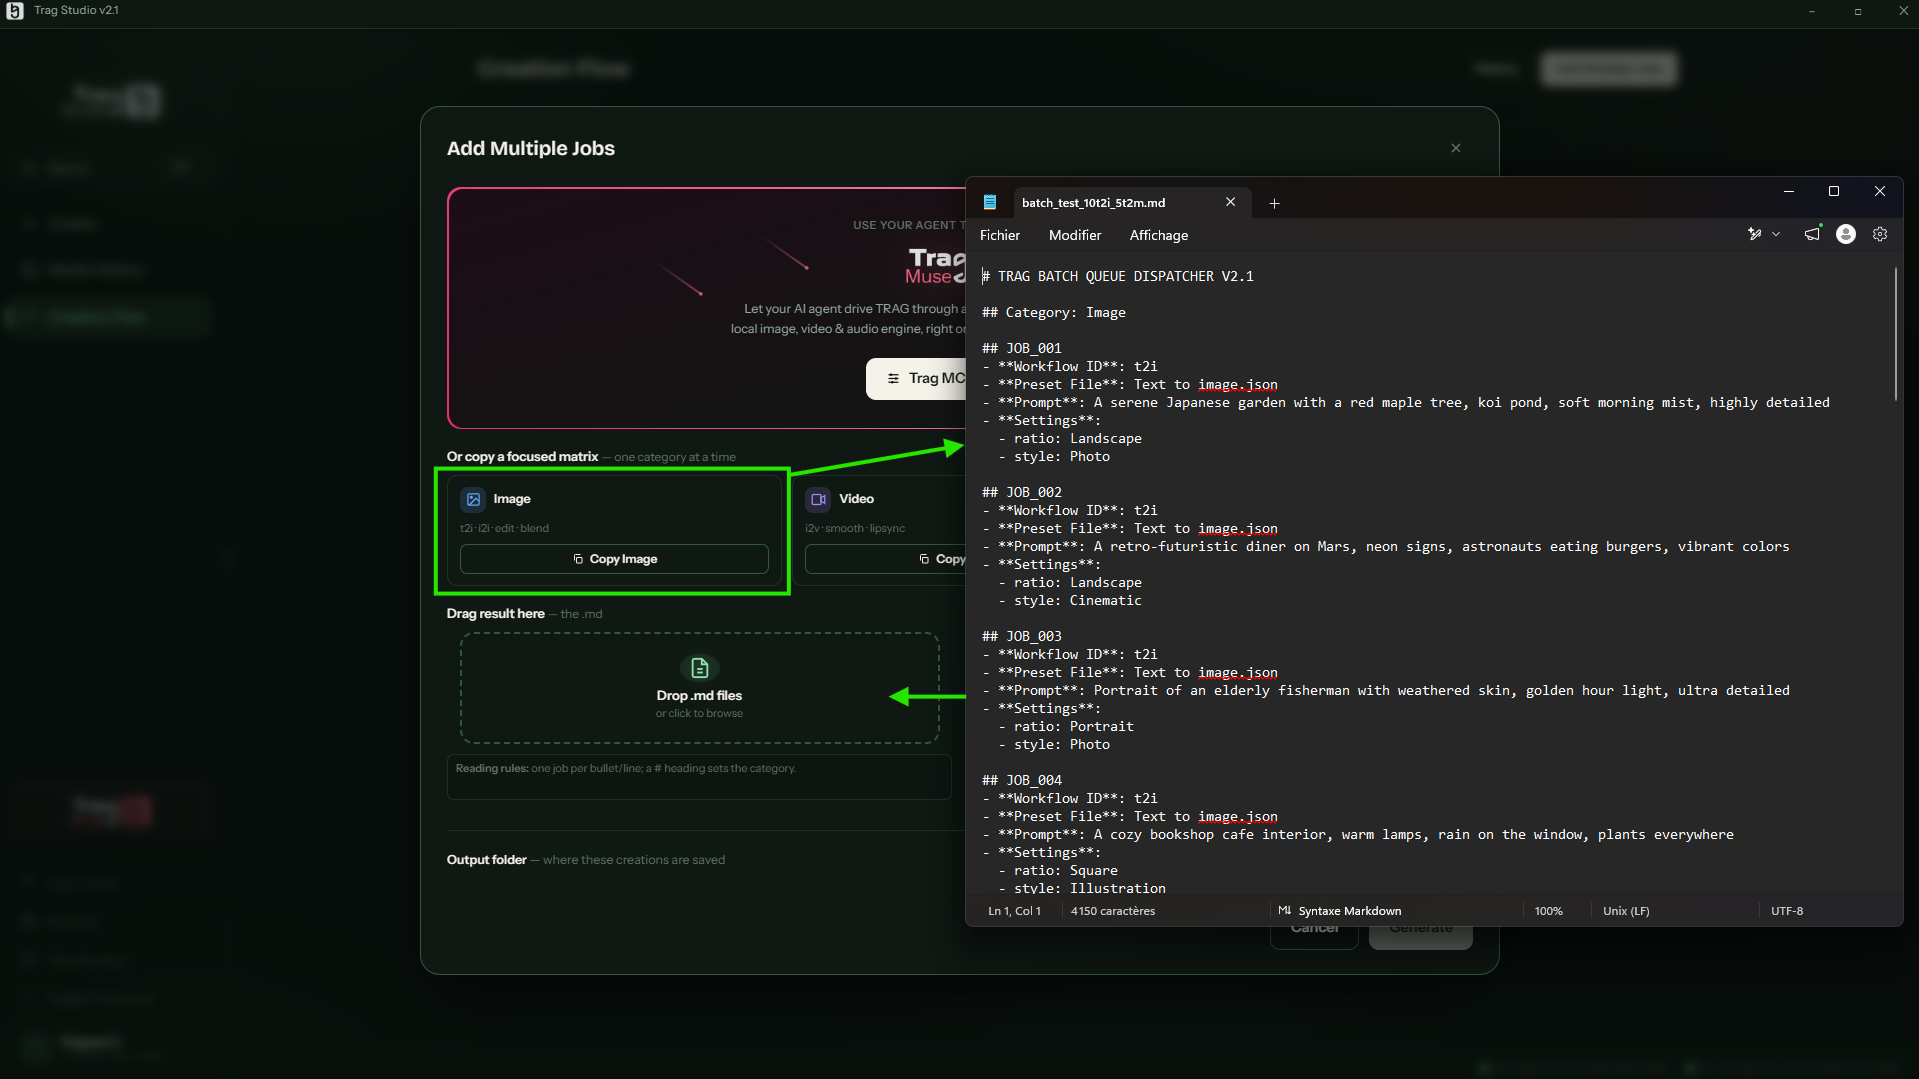
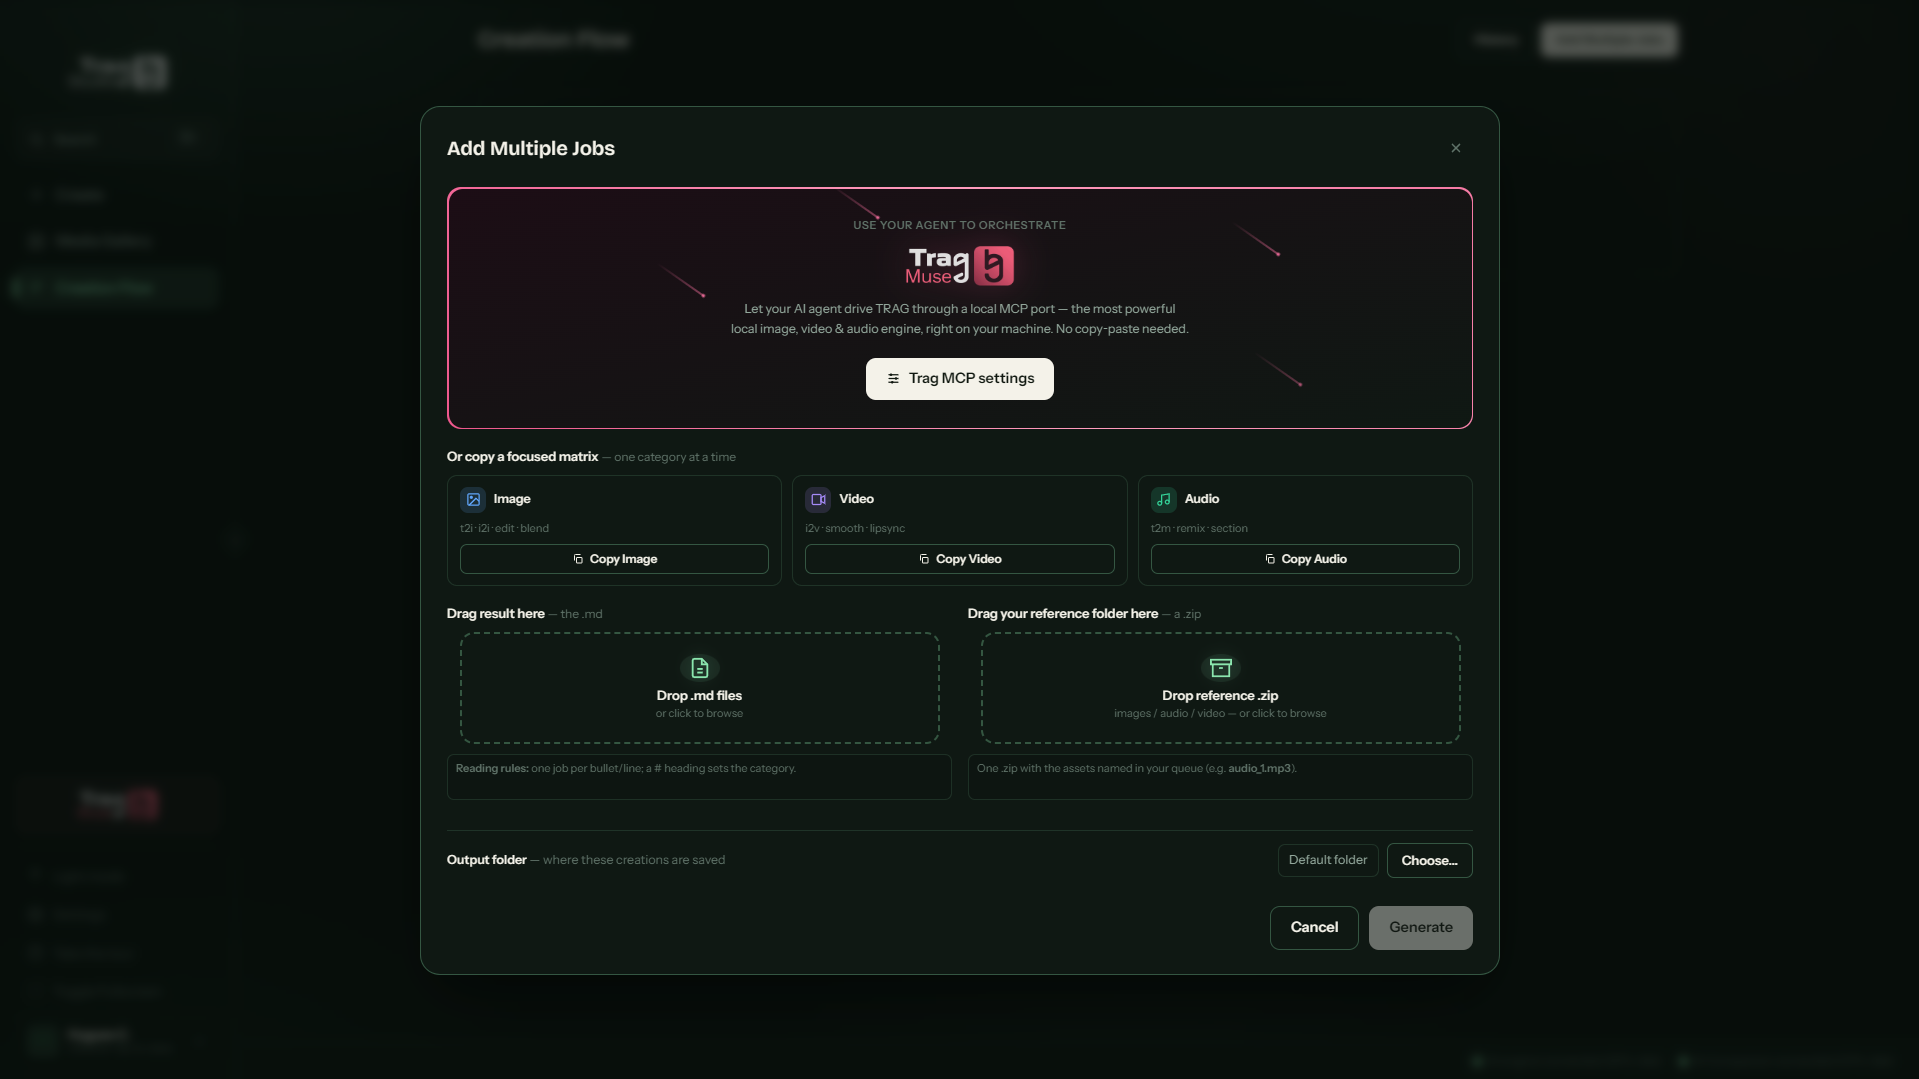
Copy the “matrix” of the category you want — Copy Image, Copy Video or Copy Audio. It's a text template that teaches an AI (ChatGPT, Claude…) how to write your job list.
Have your list written: paste the matrix into your favorite AI along with your ideas, get back a .md file (one job per line, a # heading per category).
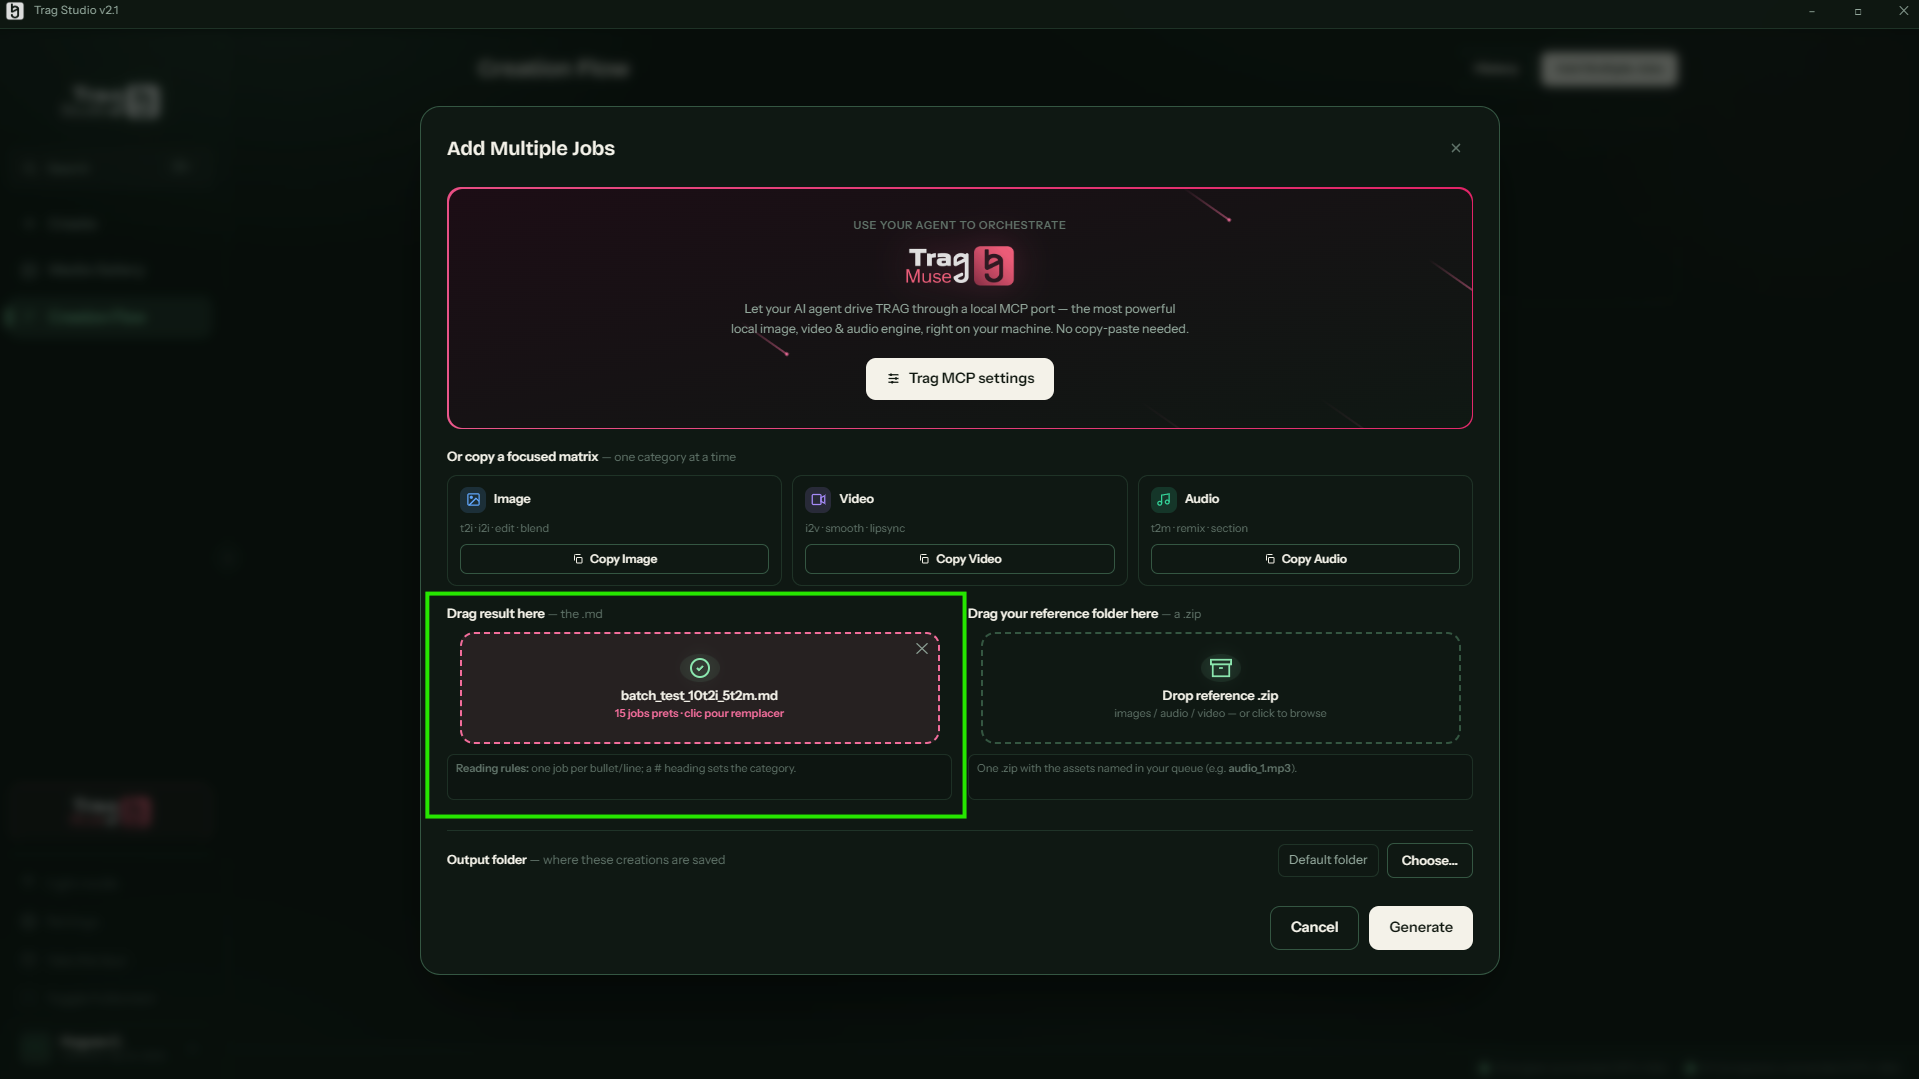
Drop the .md onto the “Drag result here” zone: TRAG reads it and announces “X jobs ready”. If your jobs use files (images, audio…), also drop a .zip with those assets onto the second zone.
Choose the output folder then click Generate: the jobs roll through the Creation Flow on their own, and every render joins the Media Gallery.
The idea: the “Copy Image” matrix acts as a template, and your job list becomes a structured .md file.The .md dropped in: “15 jobs ready” — all that's left is Generate.
The Add Multiple Jobs modal: matrices to copy, the .md drop zone, the .zip zone for assets, and the output folder.
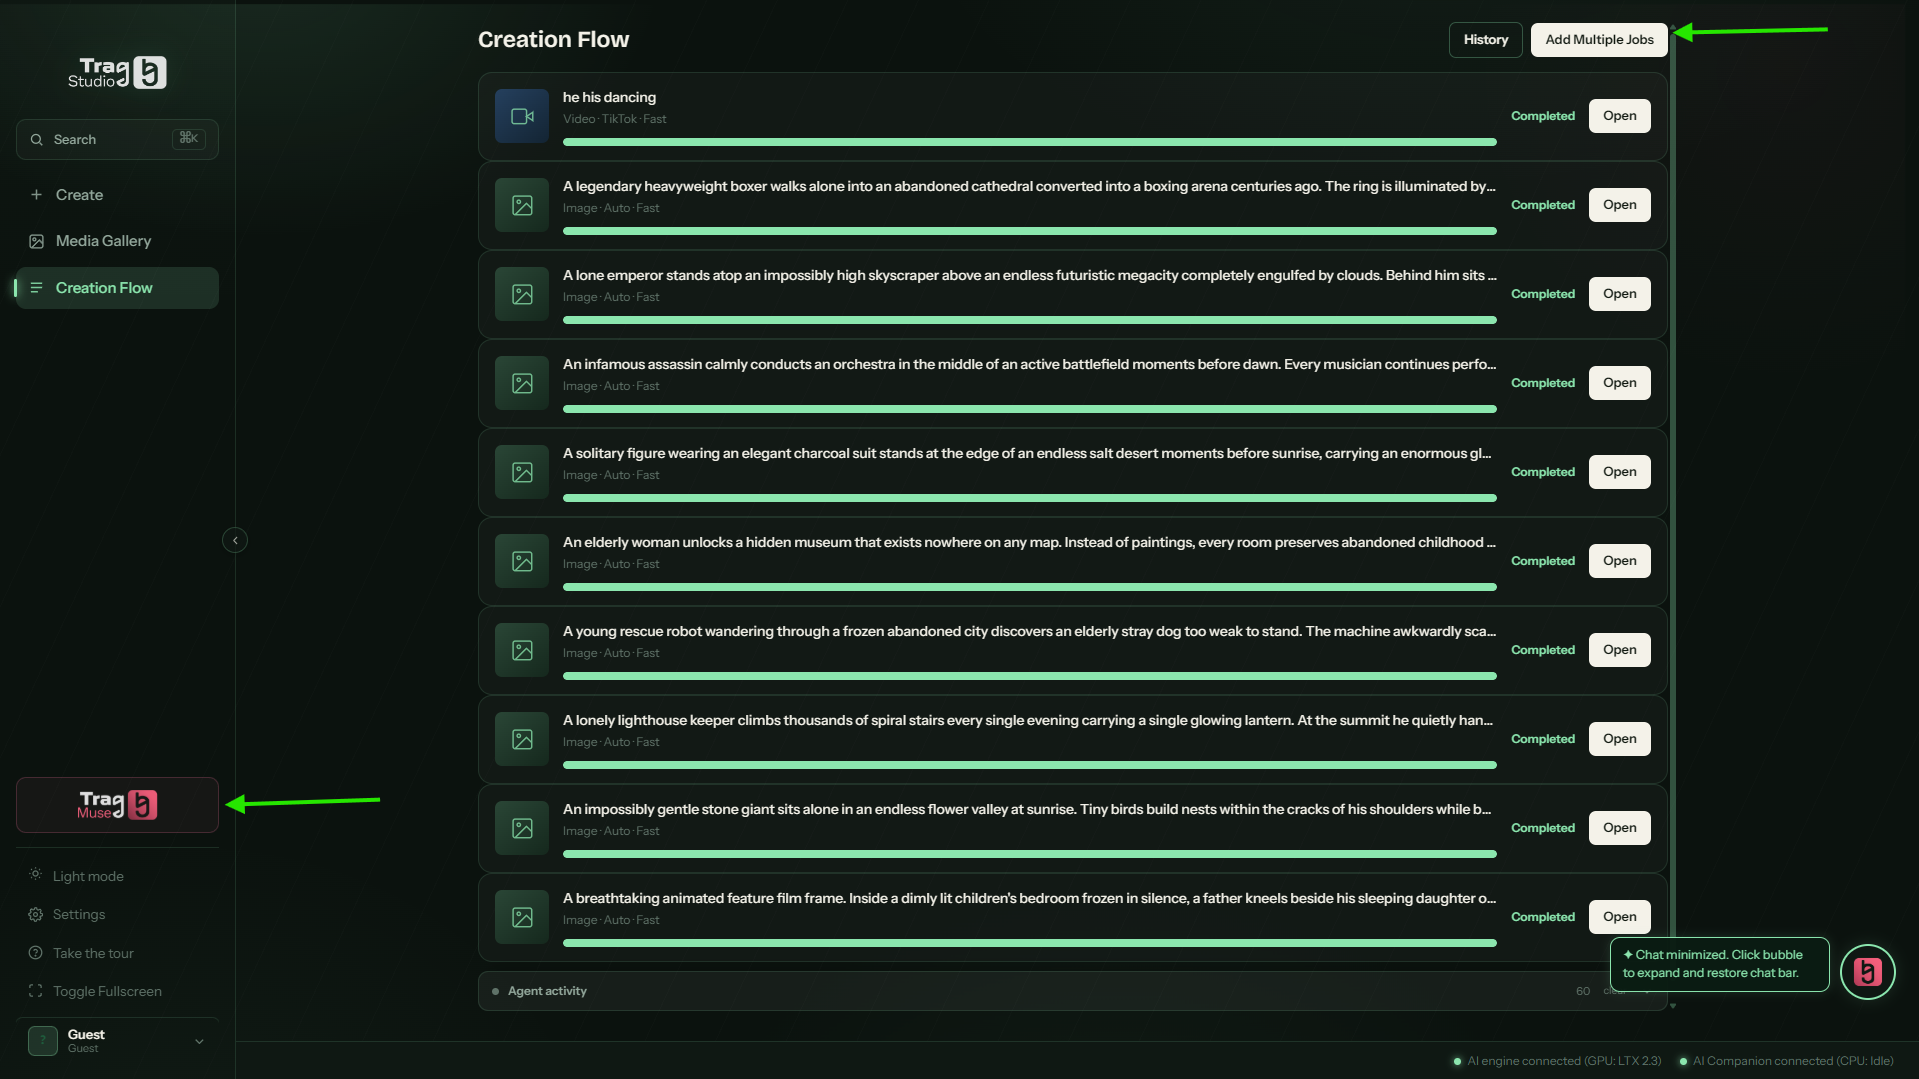
Even simpler with Trag Muse: the fuchsia “Use your agent to orchestrate” banner lets your AI agent drive TRAG directly, no copy-paste — see Trag Muse & Agent Gateway.
A finished batch in the Creation Flow. The arrows point at “Add Multiple Jobs” and the sidebar's Trag Muse shortcut.
09Media Gallery
Every creation — image, video, track — is automatically filed in the Media Gallery. It's your library: find, replay, reuse.
Browse and filter
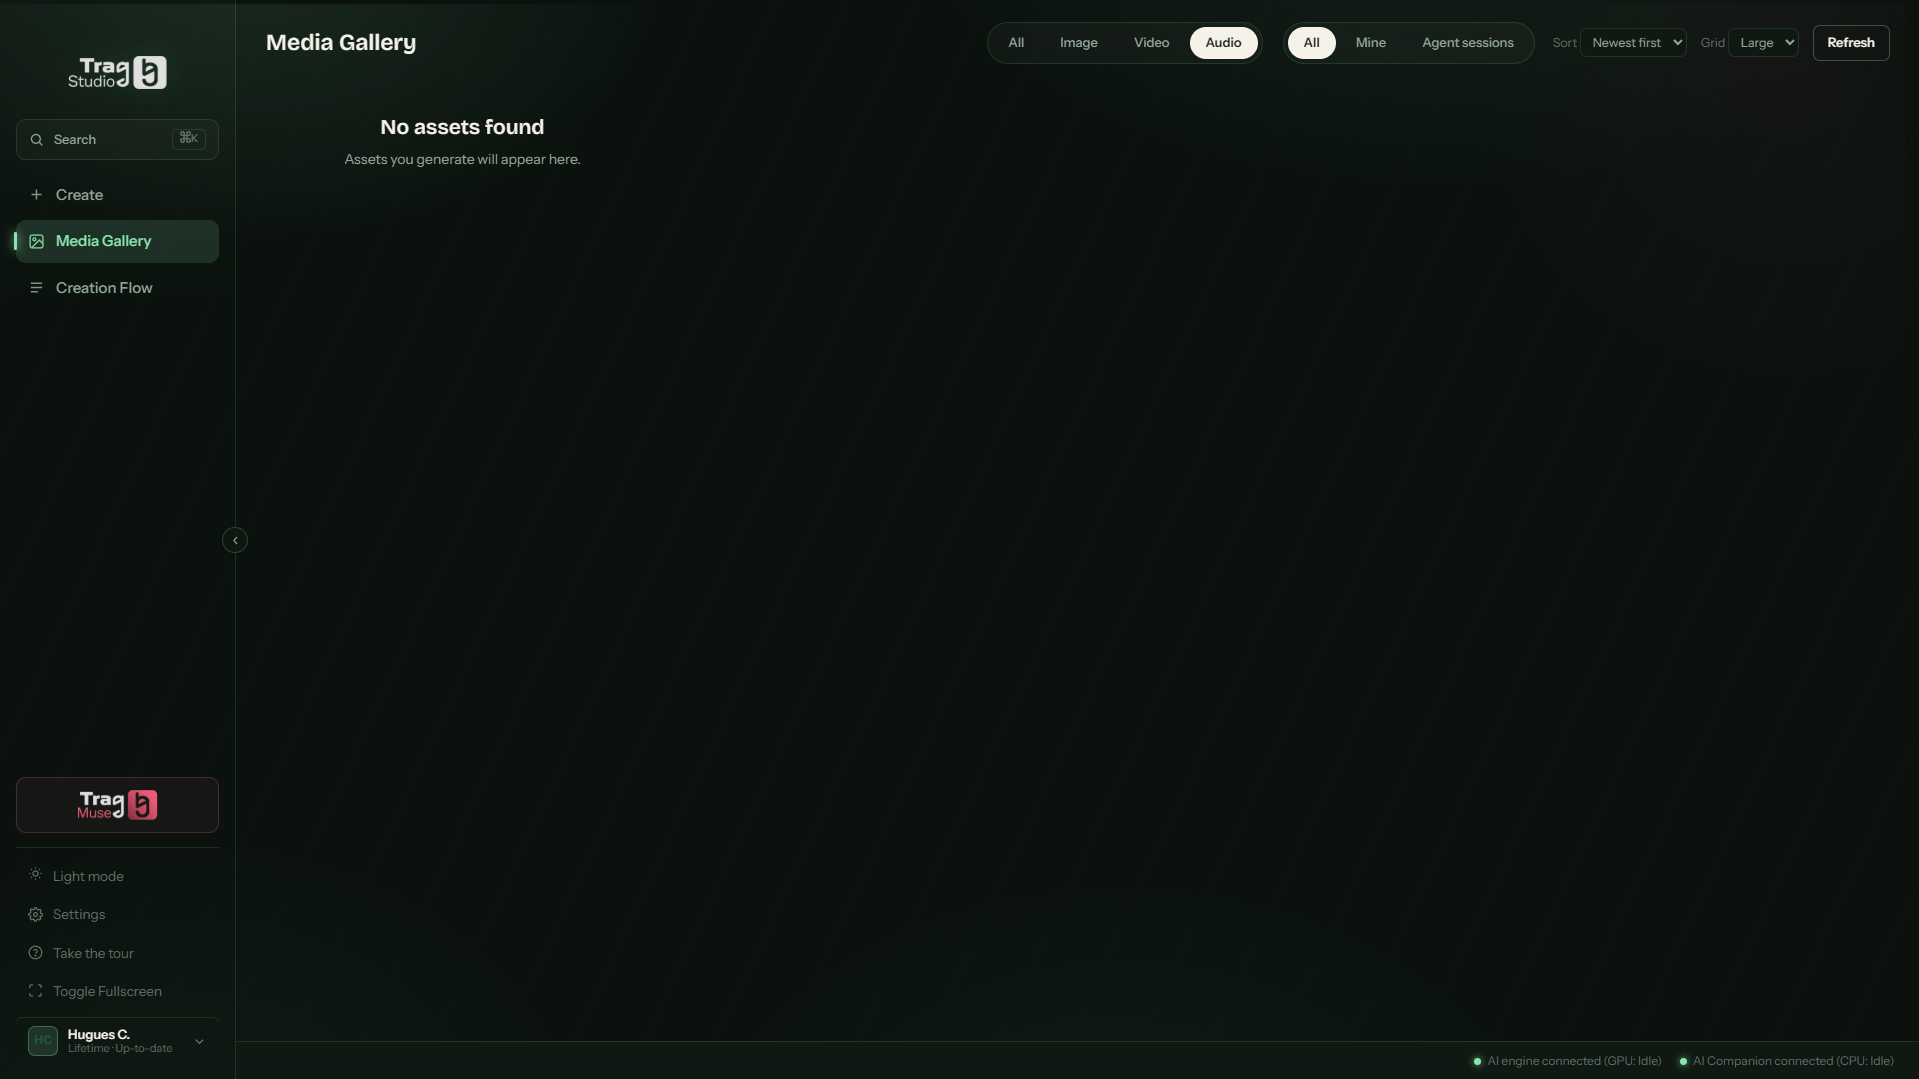
At the top of the gallery: filters by type (All / Image / Video / Audio), by origin (All / Mine / Agent sessions — handy to isolate what an agent created), sorting (Newest first…), grid size and Refresh.
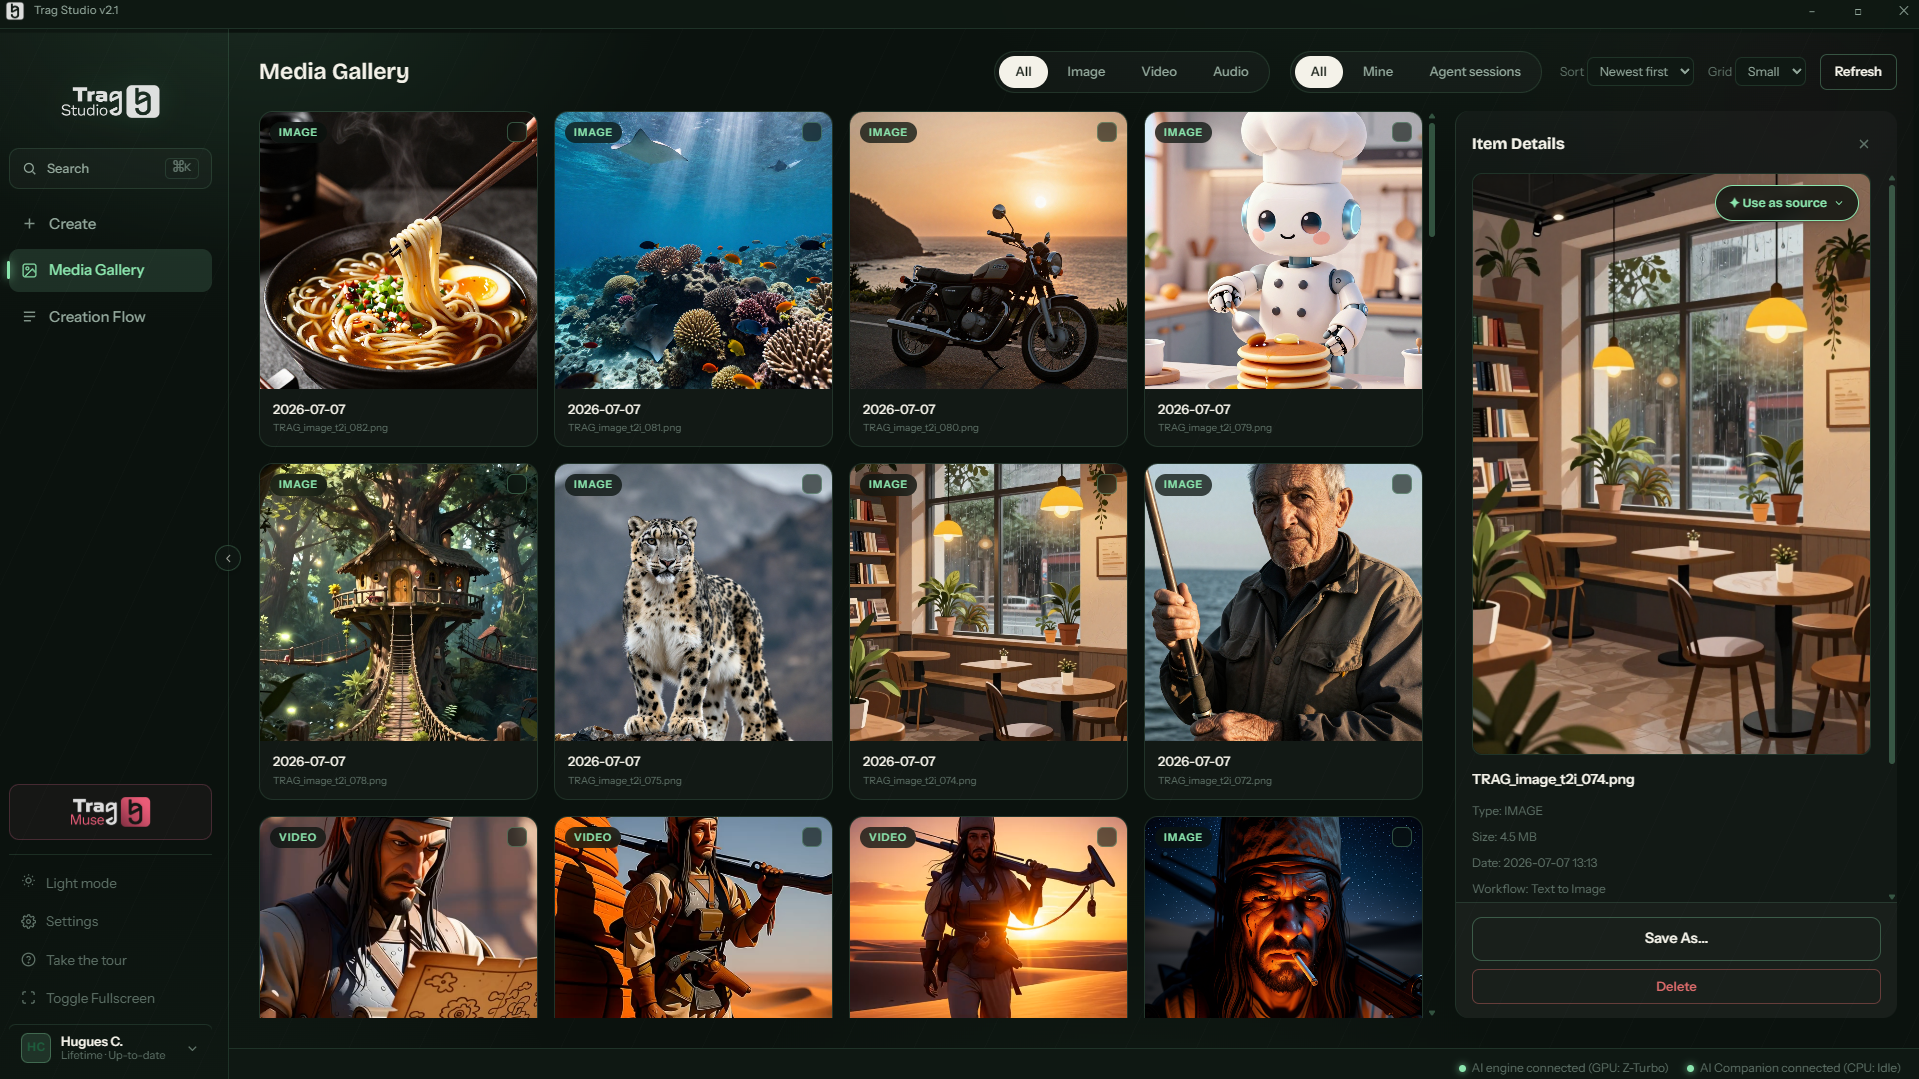
The gallery and its filters — still empty here: “Assets you generate will appear here.”The gallery filled up: click a thumbnail to open its “Item Details” panel.
A media's file card: Item Details
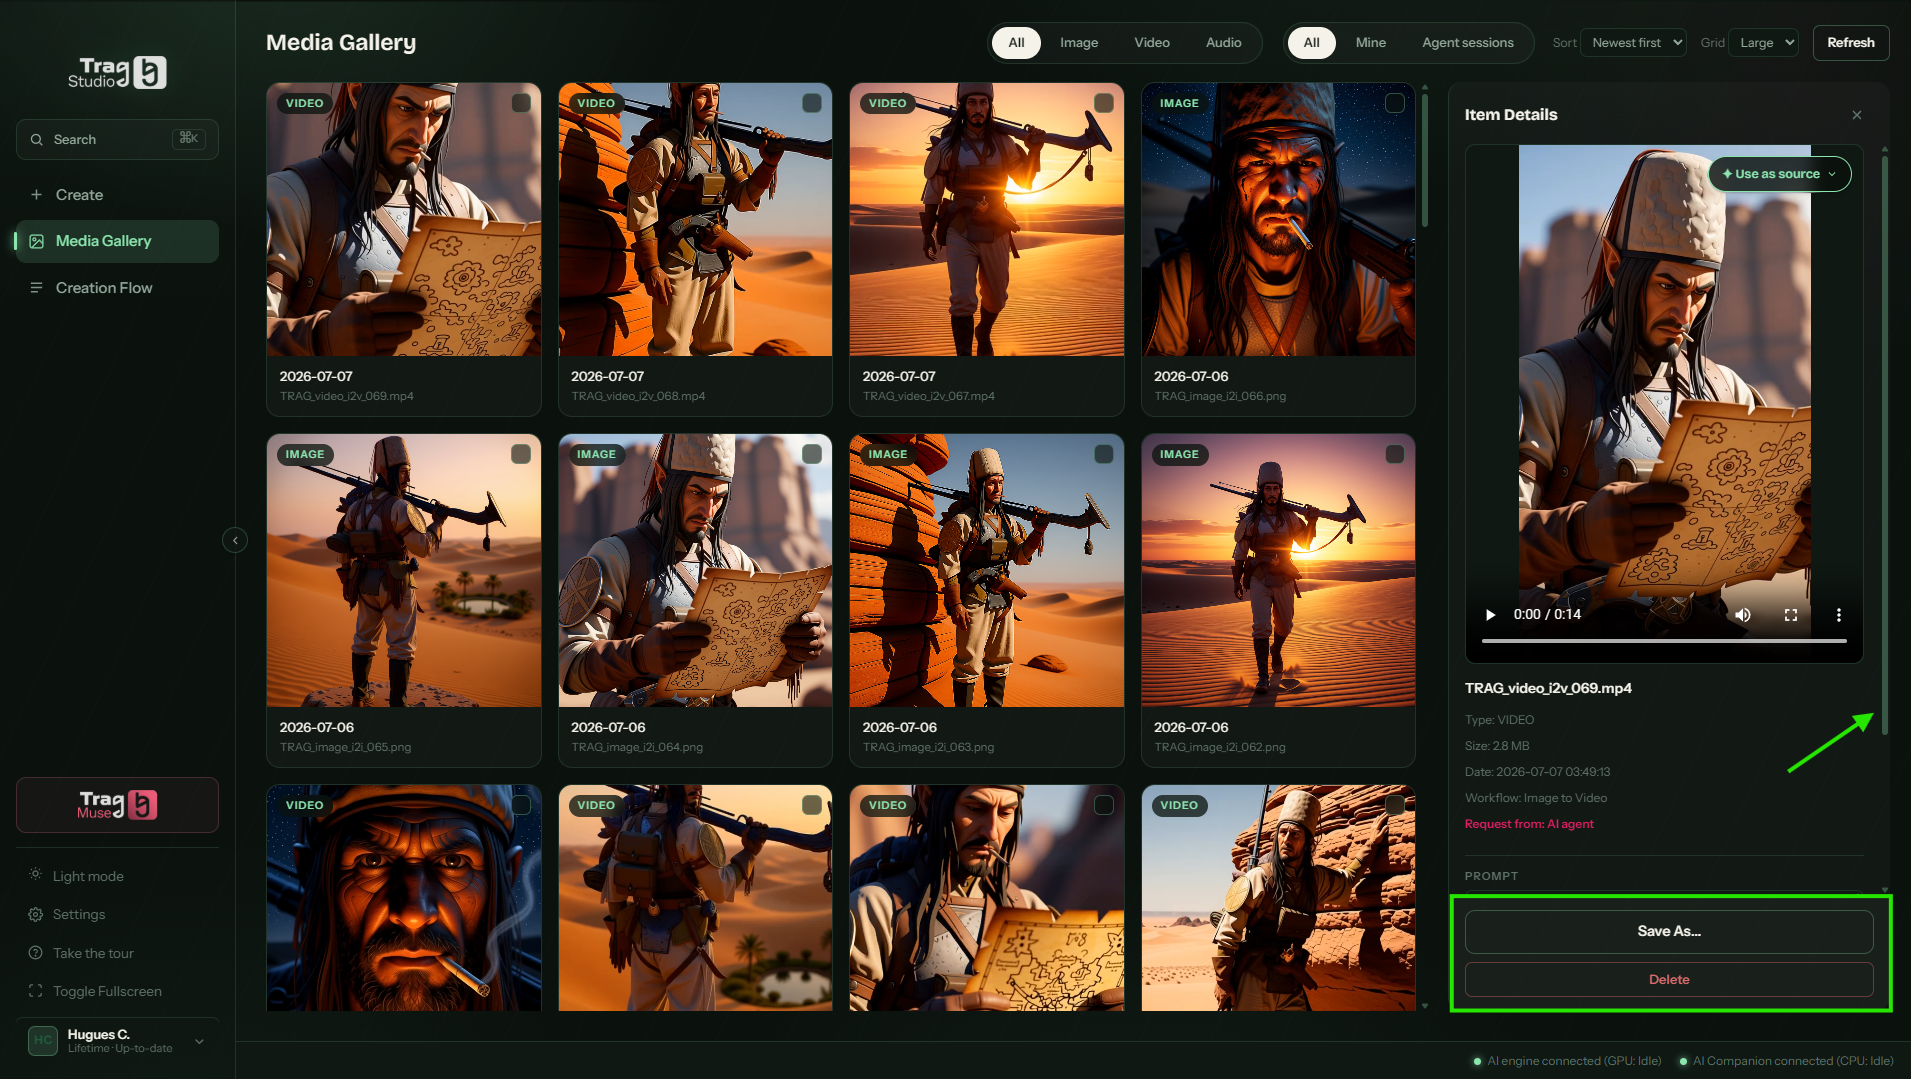
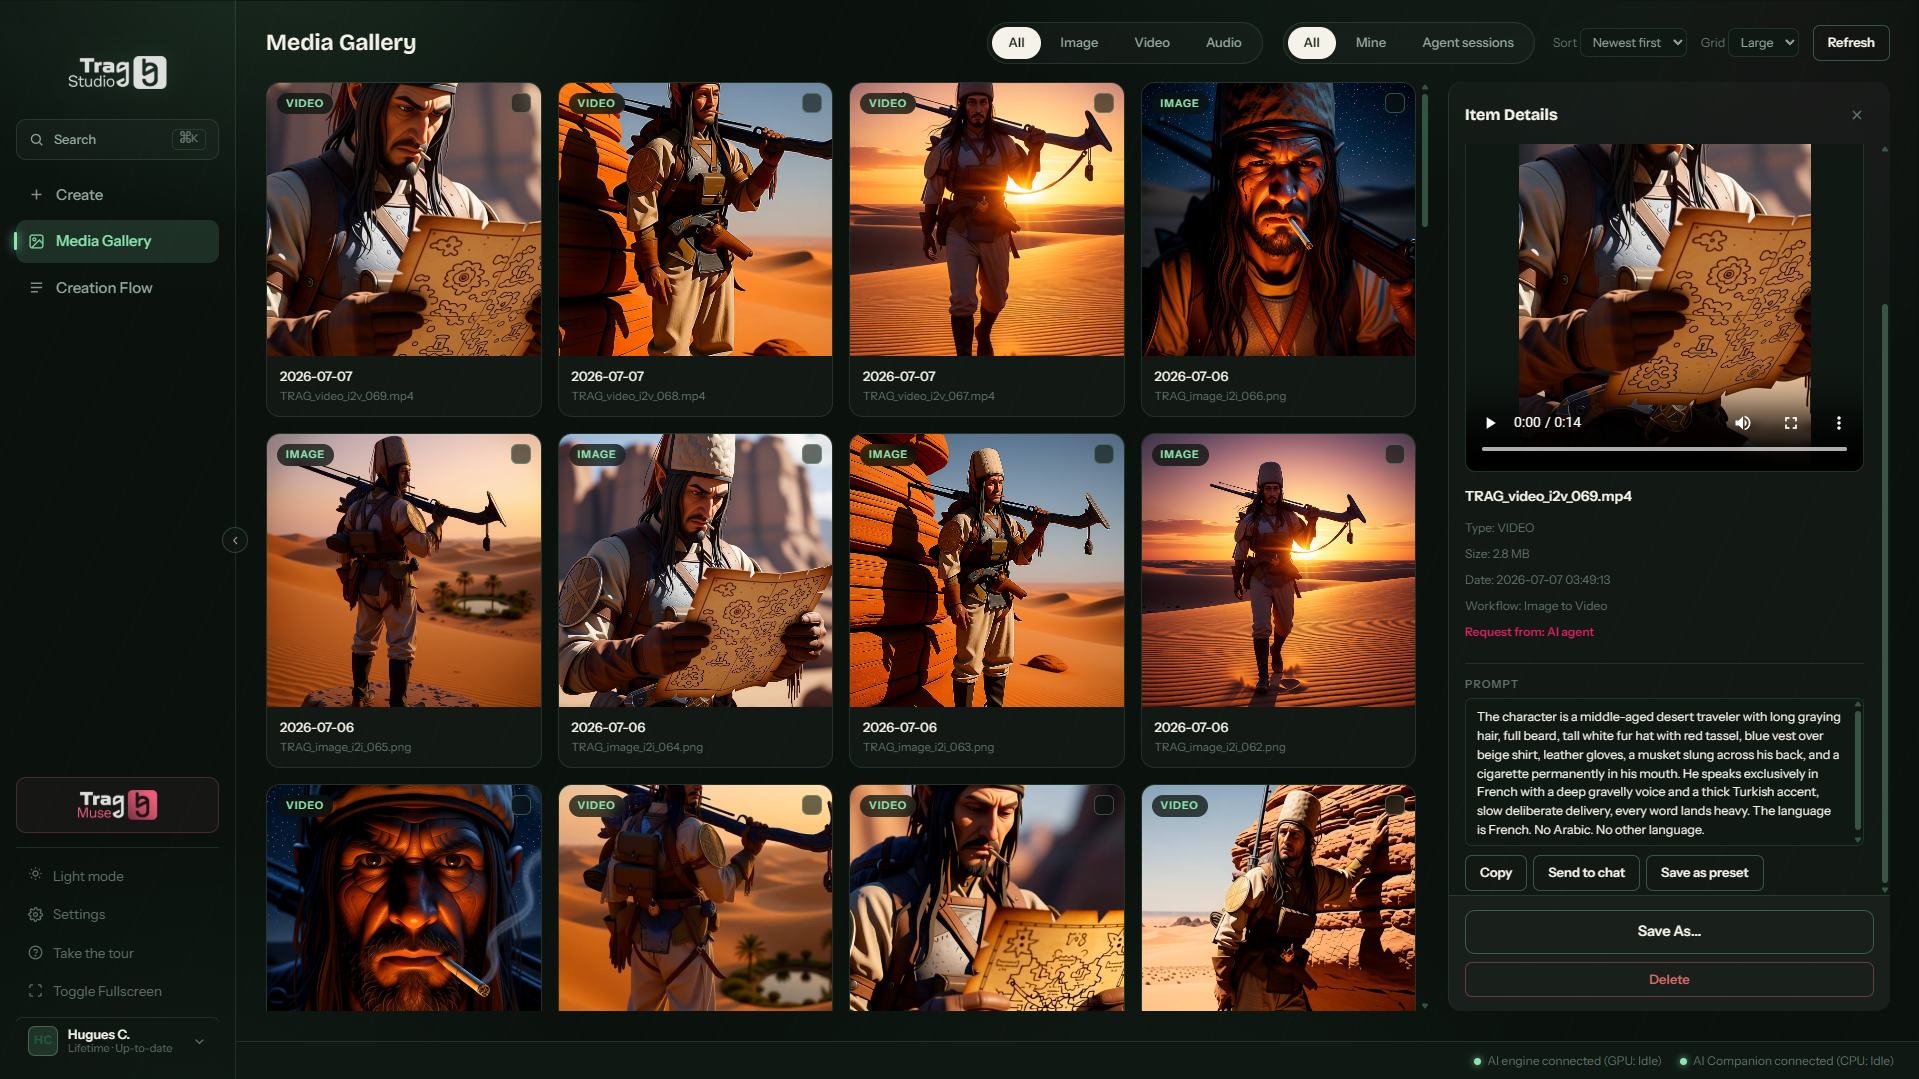
The Item Details panel shows everything worth knowing: preview (or player), file name, type, size, date, source workflow — even “Request from: AI agent” when a creation came from an agent. Further down, the full prompt with three buttons: Copy, Send to chat (send it back to the Main chat bar to rework it) and Save as preset. Finally, Save As… exports the file wherever you like, and Delete removes it.
Item Details: metadata, then “Save As…” and “Delete” at the bottom (scroll the panel).The original prompt, reusable in one click: Copy, Send to chat, Save as preset.
Reuse a creation: Use as source
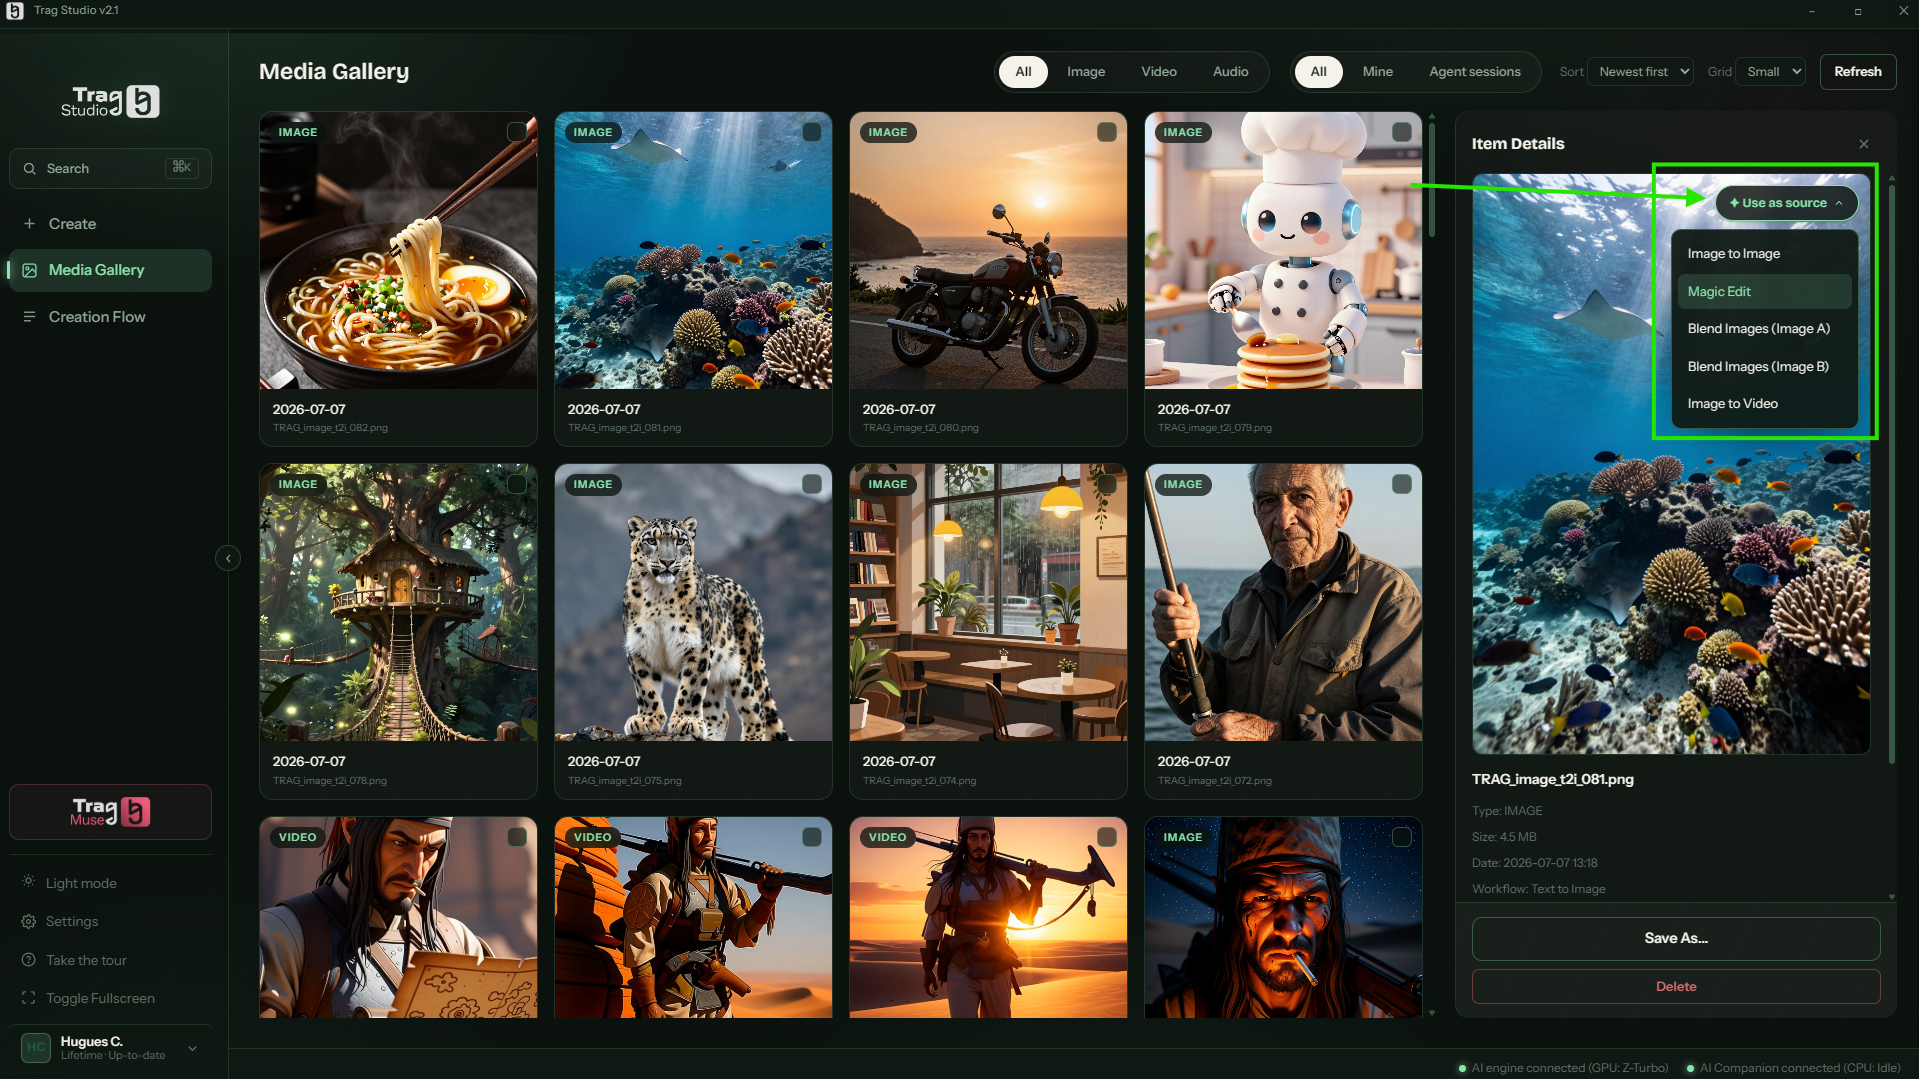
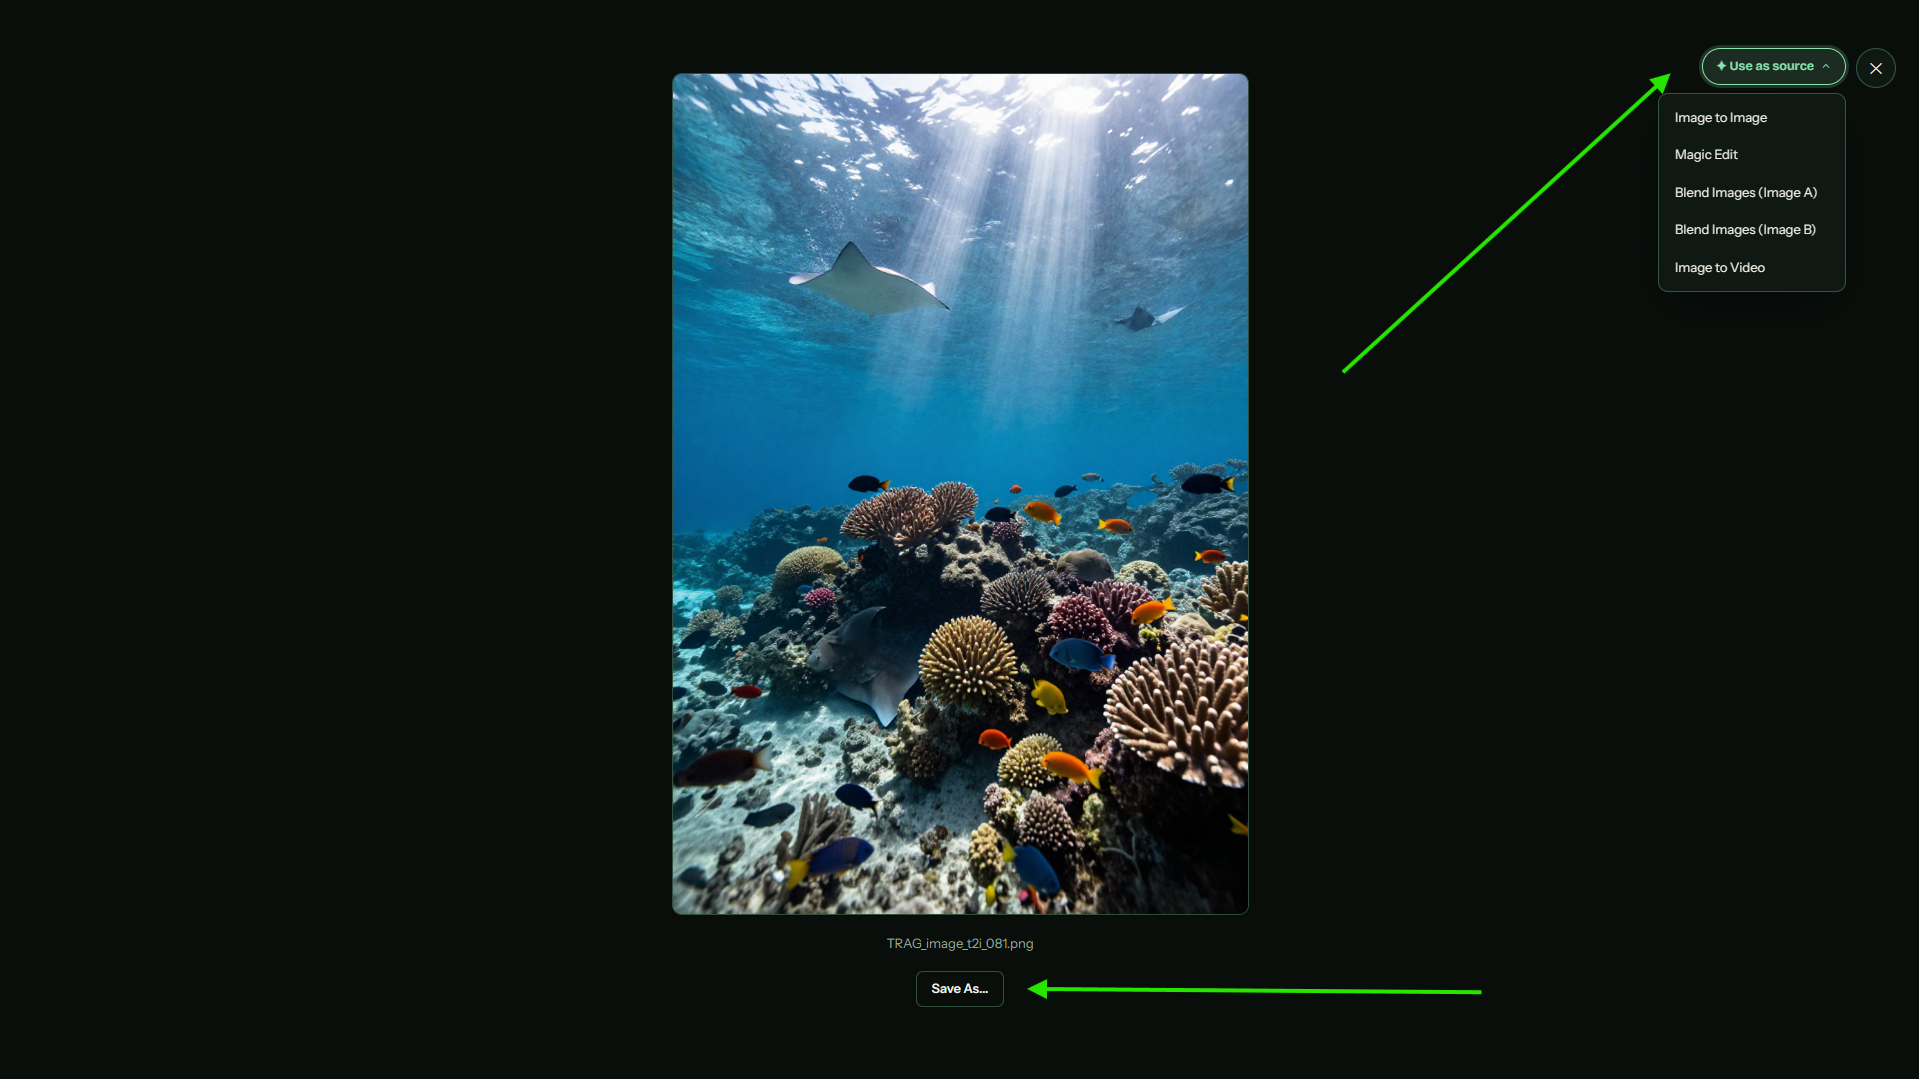
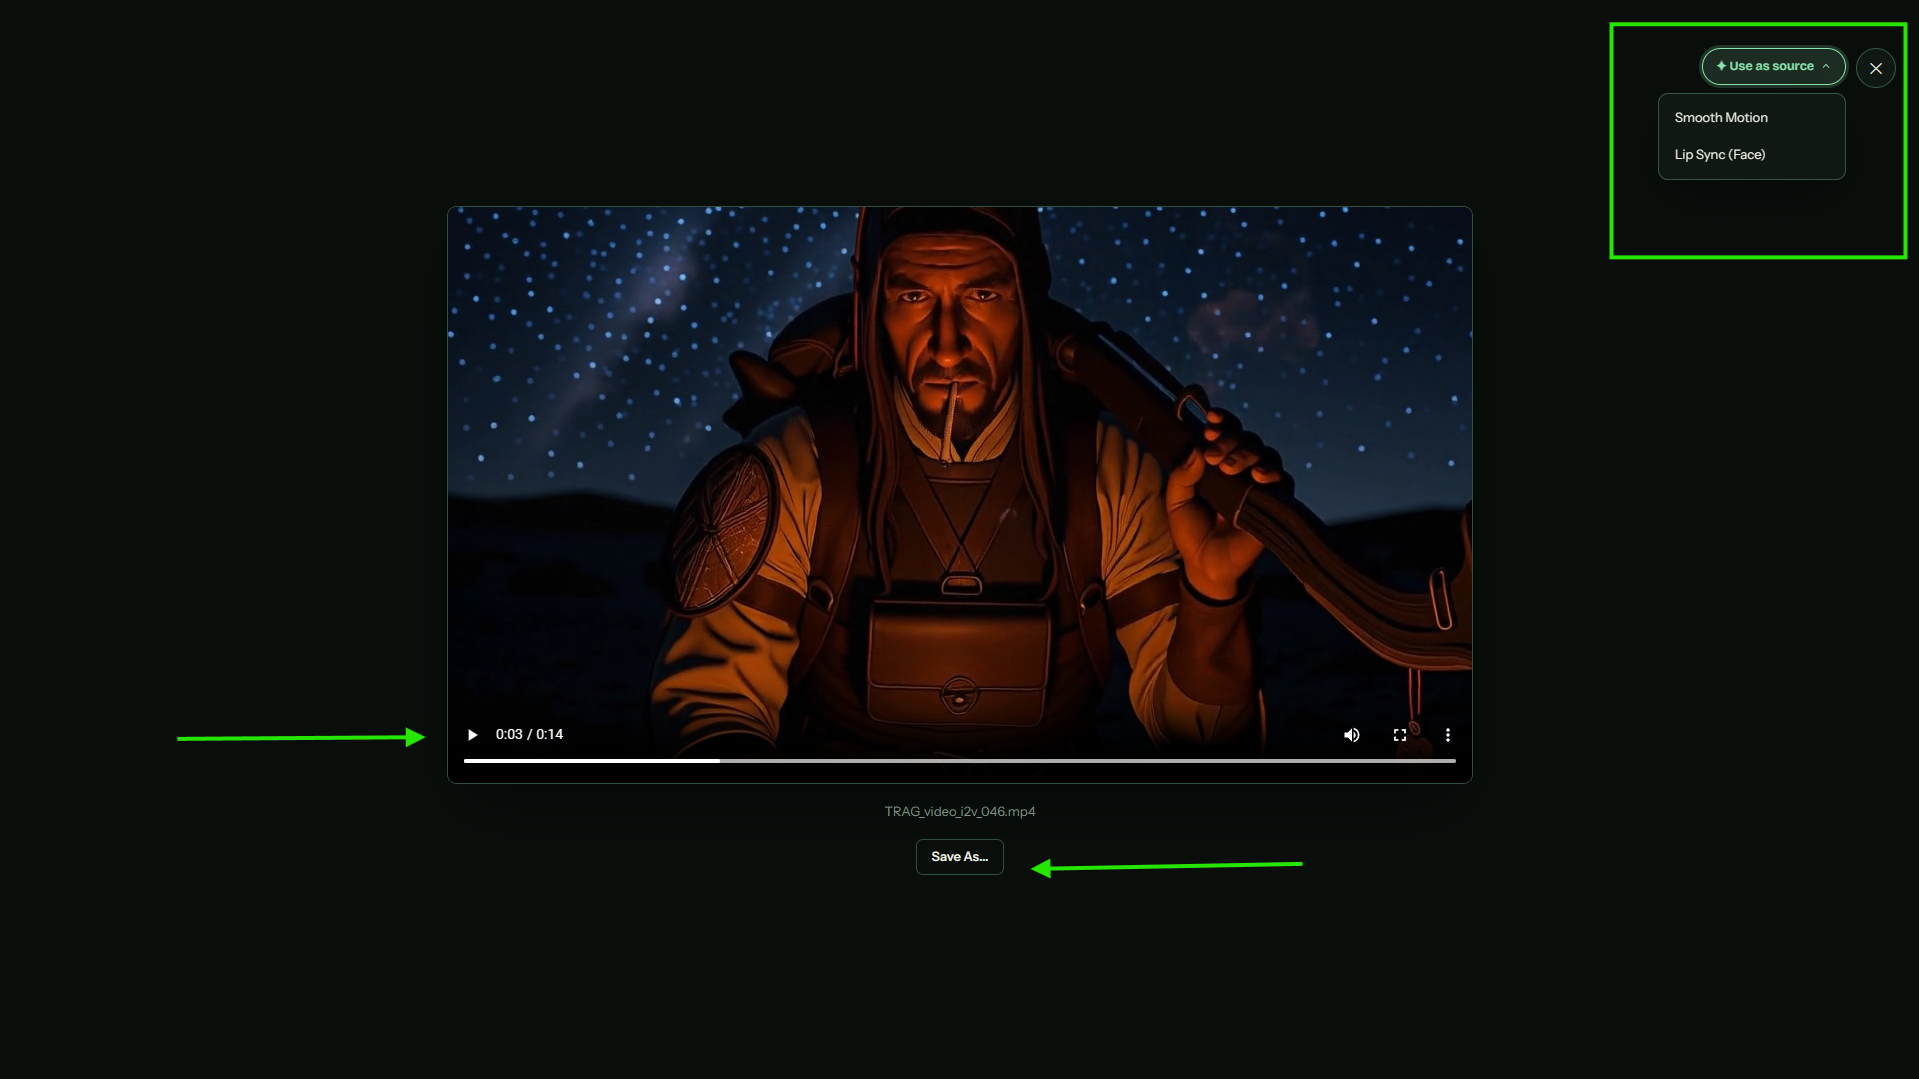
The ✦ Use as source button is the bridge between your workflows: it sends the selected media off as the starting point of a new creation. For an image: Image to Image, Magic Edit, Blend Images (A or B) or Image to Video. For a video: Smooth Motion or Lip Sync (Face). For a track: Remix, Section Edit or Lip Sync (audio).
“Use as source” from an image's card: four possible destinations.The fullscreen viewer offers the same shortcuts: Use as source and Save As….
For a video: built-in playback, then “Use as source” toward Smooth Motion or Lip Sync.
On disk, your creations live in the output folder picked at onboarding (changeable in Settings › Storage), under explicit names like TRAG_image_t2i_082.png — the source workflow is in the name.
10Settings
The sidebar's Settings button opens the preferences, organized by topic: Connection, Storage, Hardware & Models, Preferences and Language.
Folders, hardware and models
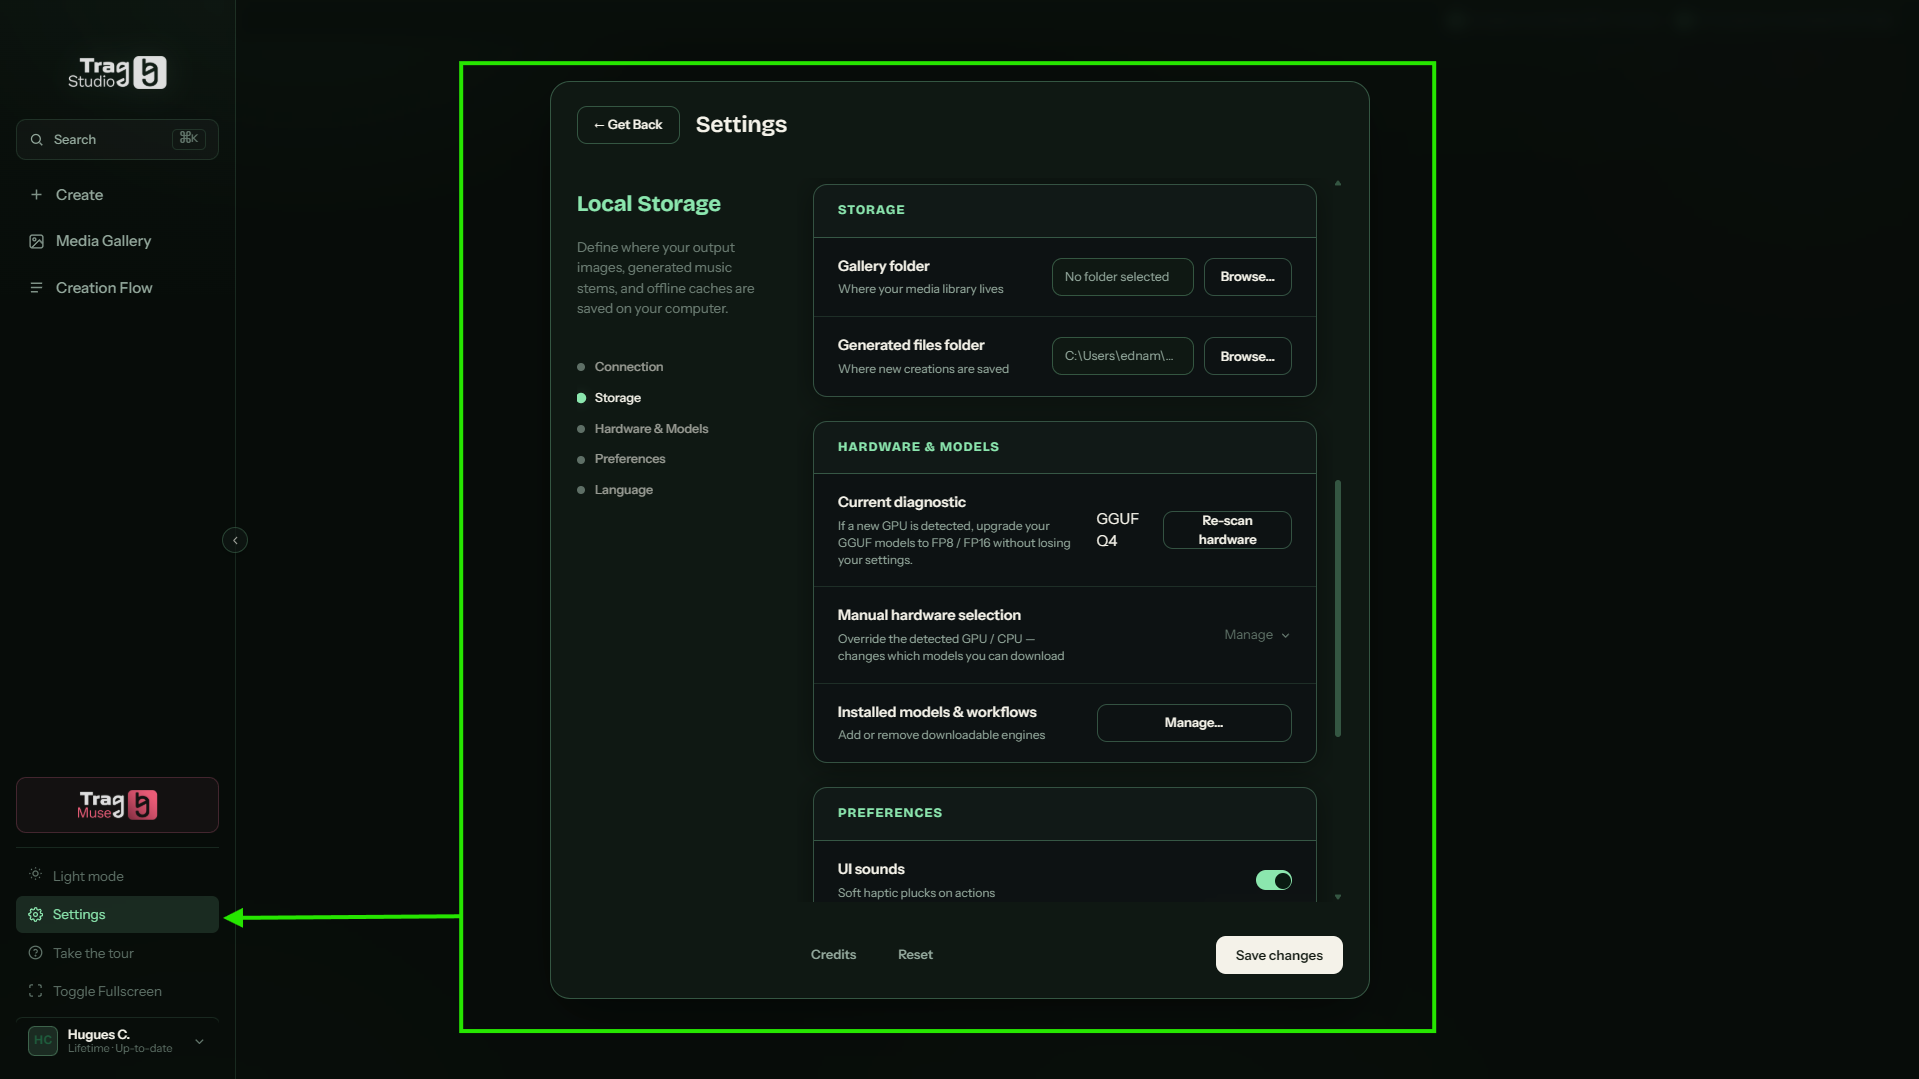
Storage — the Gallery folder (where your library lives) and the Generated files folder (where new creations are saved): two Browse… buttons to change them.
Hardware & Models — the current hardware diagnosis, Re-scan hardware to run detection again, manual selection, and Installed models & workflows to add or remove downloaded engines.
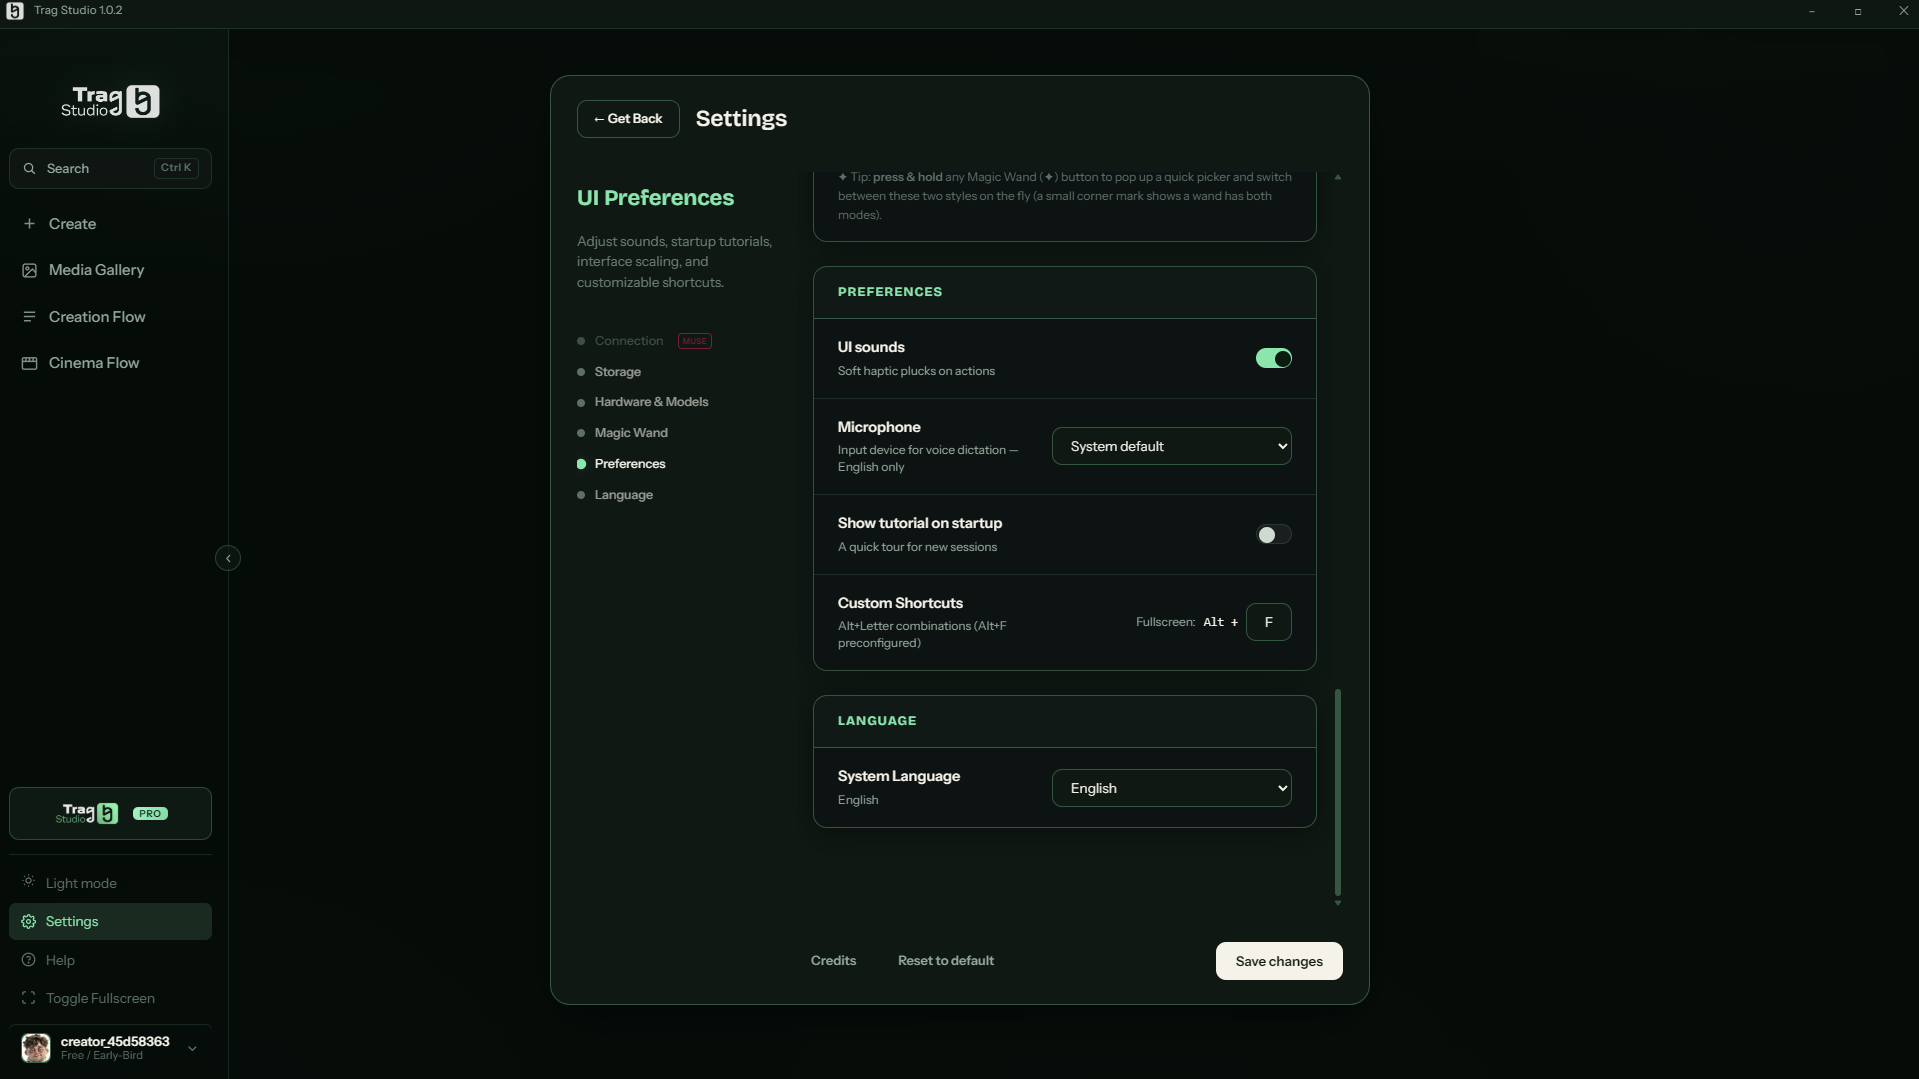
Preferences — interface sounds, the startup tutorial, custom shortcuts (Alt+F toggles fullscreen) and display scale.
Language — the interface language.
At the bottom of the window: Reset restores defaults, Save changes keeps yours.
Settings › Storage & Hardware: output folders and installed model management.Settings › Preferences & Language: sounds, tutorial, shortcuts, language.
Your account, your license
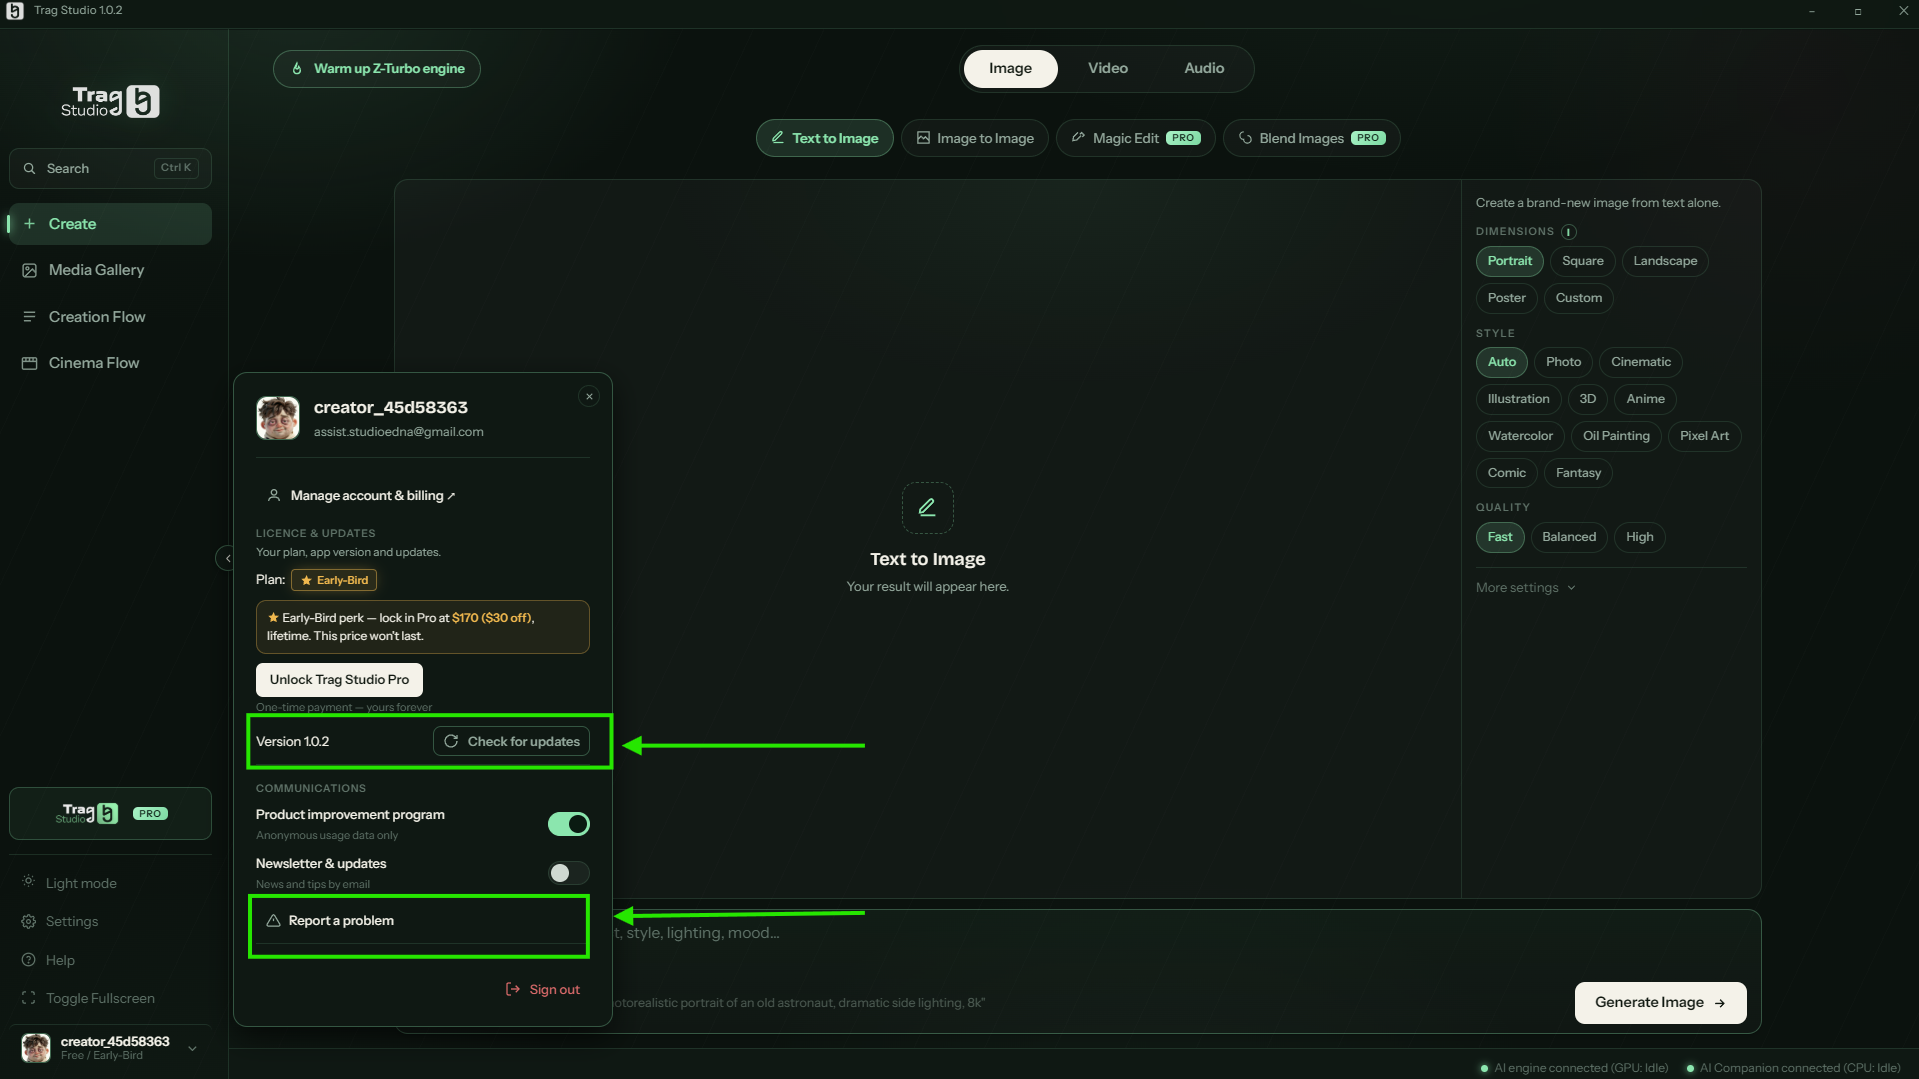
A click on your profile, at the bottom of the sidebar, opens the account panel: Manage account & billing, your plan, the app version with its Check for updates button, your communication preferences — and Report a problem, the direct line when something goes wrong. This is where you check that your Pro license is active.
The account panel: your plan and its Early-Bird perk, the real version with “Check for updates”, and “Report a problem” — both marked in green.
How TRAG keeps itself up to date
TRAG checks silently at startup, then every 6 hours. If there is nothing new, you see nothing.
When a version exists, a discreet banner appears at the bottom left. Never blocking — keep working; Later snoozes it for 24 hours.
One click on Update now: the app closes itself, updates, and relaunches. A patch weighs a few megabytes — not the installer's gigabytes.
Models already downloaded are never re-downloaded by an update.
Prefer to check yourself? Account panel → Check for updates.
Trag Muse & Agent Gateway Muse
Trag Muse turns your workstation into a connected production studio: your agents and your APIs drive TRAG from first idea to final master — while your files, your models and your rendering stay on your own machine.
✦ What Trag Muse will unlock
Direct TRAG from Claude, Codex or any MCP agent — even remotely.
Connect the APIs you use — Seedance, Kling, Nano Banana and more — from the interface you already know.
Turn ideas and storyboards into productions with Creation Flow.
Edit, assemble and refine your media in one connected workspace.
Keep the power local — files, models and rendering on your machine.
Trag Muse is a monthly subscription add-on to Free and Pro — coming soon. The Cinema Flow film timeline and the cloud APIs listed above arrive with it. The Muse window in the app says it best — “join the first wave”: press Keep me posted and you will know the day it opens.
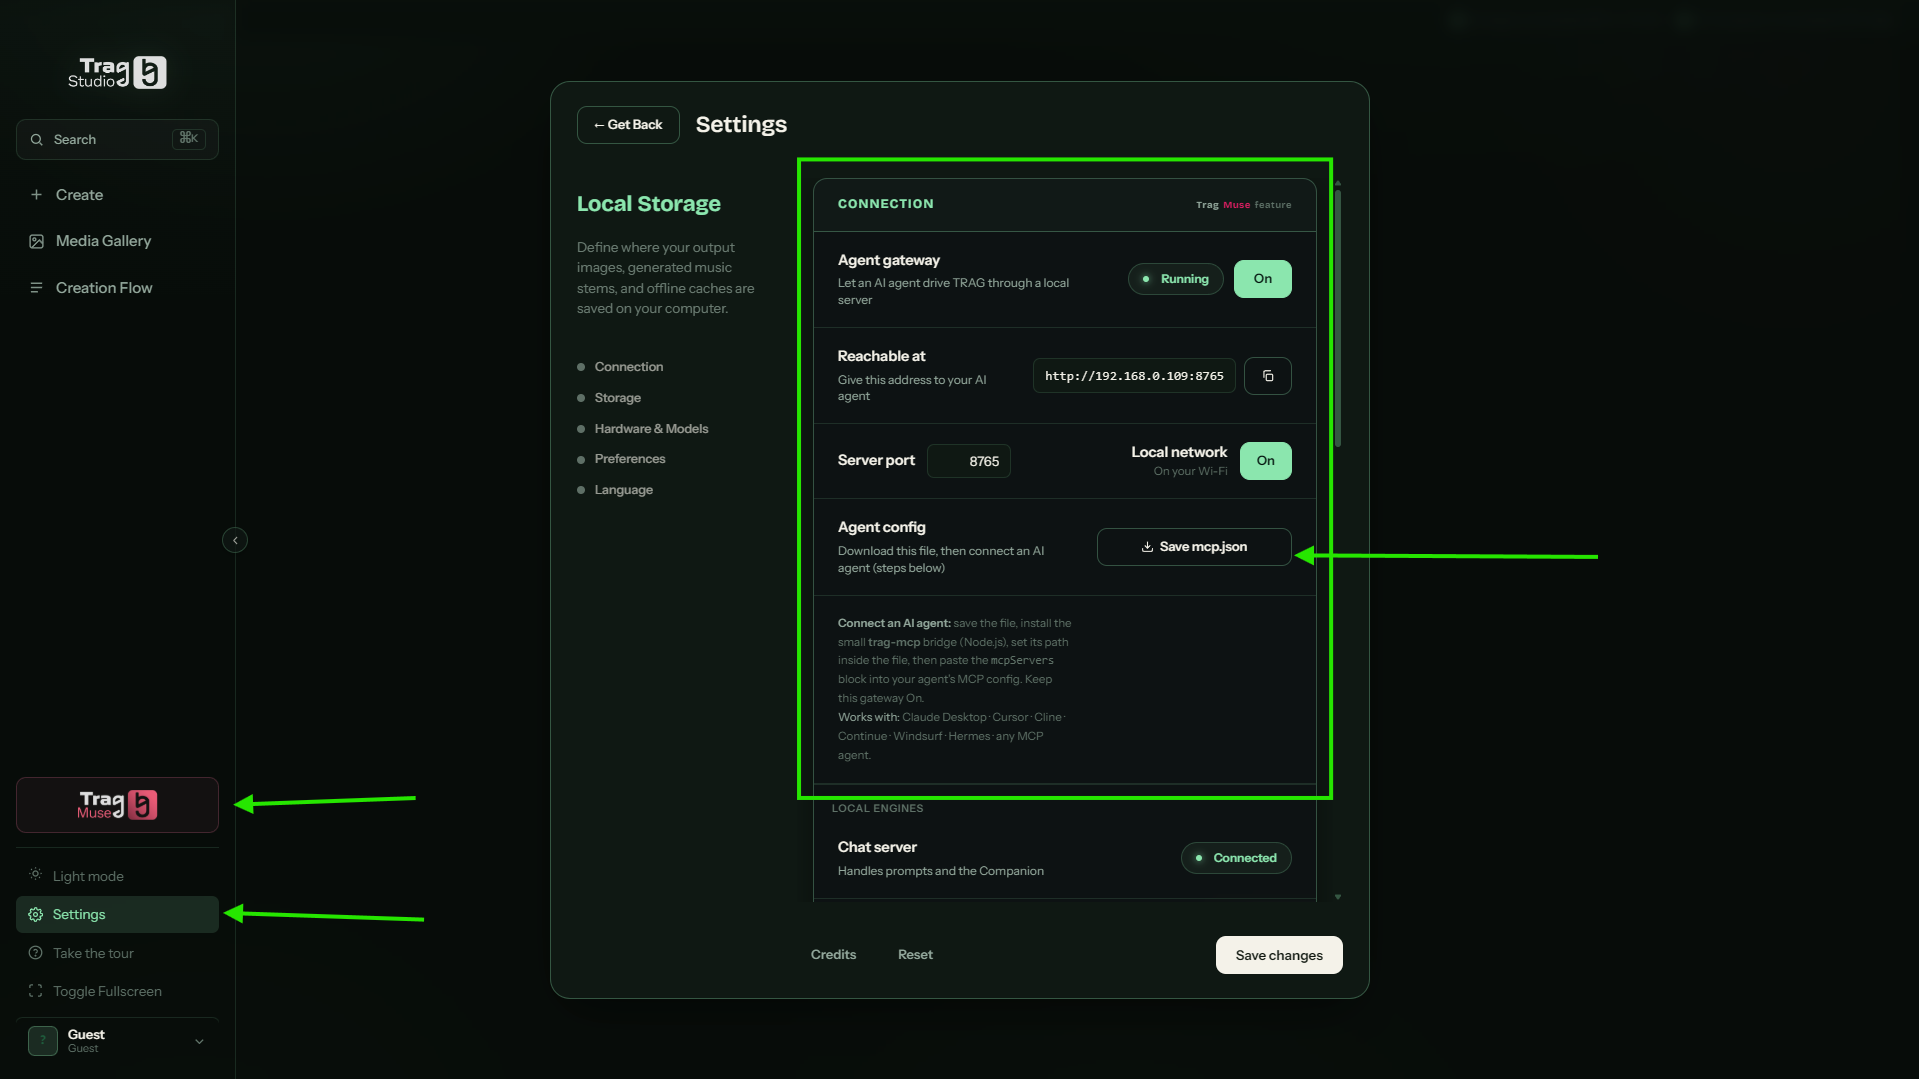
The plumbing behind it is the Agent Gateway, in Settings › Connection — the fuchsia-trimmed section. It stays off until Muse opens; here is what the setup will look like then:
Turn on the Agent gateway (switch to On — the status reads “● Running”).
Note the local address under “Reachable at” (with its copy button) — that's what your agent will use. The Local network option also exposes it to your Wi-Fi if you drive TRAG from another device.
Download the configuration with Save mcp.json, then follow the on-screen hints to plug it into your agent (Claude, Codex…).
Leave the gateway On: your agent can now create in TRAG — its works are tagged “Request from: AI agent” in the gallery, filterable via “Agent sessions”.
Settings › Connection: the Agent gateway running, the address to give your agent, and the “Save mcp.json” button (marked in green).
Clicked “Cancel” on the firewall alert? Nothing is broken
Everything TRAG does on its own — talking to its engines on your machine, downloading models, checking for updates — needs no firewall permission at all. The one and only case that does: being driven from another device on your network. So if you refused the Windows alert, neither downloads nor generation nor updates were harmed. To grant the permission after the fact:
Path 1 — through Windows settings (no command line)
Open Start, type firewall and choose Windows Defender Firewall.
ClickAllow an app or feature through Windows Defender Firewall.
Click Change settings(asks for administrator rights).
Find TRAG Studio in the list. If it is there: tick Private. Do not tick “Public”. If it is not: Allow another app… → Browse… → select TRAG.exe in the installation folder → Add, then tick Private.
Confirm with OK and restart TRAG.
Tick Private (home network) and never Public. A public network is a hotel, an airport, a café — no place to expose your studio.
Path 2 — one command (for those at ease): open a command prompt as administrator, and adapt the path if needed:
Third-party antivirus. Some block the Windows firewall prompt, or the downloader itself. If TRAG cannot download models while your connection works fine, temporarily pause the antivirus, or add the installation folder to its exclusions.
Company or school network. A proxy or filter can block download.trag.studio. The symptom: models never start downloading while the rest of the internet works. Try a home connection or a mobile hotspot, or ask the network administrator to allow that domain.
11Tips for better results
A few habits that change everything, from first prompt to final render.
Precise prompts
Subject + action + mood + lighting. “A lighthouse in a storm, huge waves, dramatic light” will always beat “a lighthouse”. The ✦ suggestions under the prompt bar are good models.
Prompt describes, settings set
Format, duration, quality, style: one click in the right panel. Never in the prompt — you'll avoid muddled results.
Respect the defaults
Default settings are calibrated for your machine (thanks, Studio Index). Change one thing at a time — you'll know what made the difference.
Warm the engine up
One click on Warm up before a session, and the first render starts with zero wait. The green “ready” badge says when.
Source + prompt > settings
To transform an image or a track, the quality of the source and the clarity of the prompt weigh more than any advanced setting.
Short first, long after
In video, validate the idea on a 5 s clip at Fast resolution, then rerun longer and finer. You'll iterate twice as fast.
The Main chat bar, your best ally
Everything goes through the Main chat bar, the single bar at the bottom of the screen. Describe your idea, then let its tools work: the ✦ magic wand rewrites and strengthens your prompt in one click (sharper subject, lighting, mood), the mic takes voice dictation, the paperclip attaches a reference, and the ✦ suggestions underneath show the level of detail that works. From the gallery, “Send to chat” drops an old prompt back into the bar to rework it into something new.
12FAQ — Frequently asked questions
Short answers to the questions we hear most.
Do I need the internet?
No. Once installation and model downloads are done, everything runs offline, locally on your machine. Internet is only needed to download the app, the models and updates.
Are my creations private?
Yes. Generation happens on your GPU; your prompts and files stay on your machine. Nothing is sent to a cloud.
What hardware do I need?
TRAG starts at an NVIDIA RTX 20-series GPU (4 GB), 16 GB of RAM and an Intel Core i5 7th gen or equivalent — see Minimum configuration. During onboarding, TRAG computes your Studio Index and adapts the options to your machine — less power simply means humbler settings, not a locked door.
The engine won't start / my GPU isn't detected
At install time, TRAG checks which CUDA version your graphics driver supports and installs the matching build — there is nothing for you to update. If the engine stays red, open %LOCALAPPDATA%\TRAG Studio\logs\ and look for the engine device= line: it reads cuda (your card is working) or cpu (processor fallback). Send that line to hello@trag.studio — it is all we need to understand what happened.
A firewall window pops up at startup — what should I do?
Click “Allow” only if you want to drive TRAG from another device on the network (Agent Gateway). Otherwise close the window without worry: the app works perfectly without that permission. If you refused it and want to come back to it later, the manual steps are in Trag Muse & Agent Gateway.
How long can a video be?
Duration is set in the video settings (5 s, 10 s, 15 s or Custom). Keep in mind that short clips are faster and more stable — that's the right way to iterate.
Where are my creations saved?
In the output folder chosen at onboarding (changeable in Settings › Storage). They all show up in the Media Gallery too.
What's the difference between Free and Pro?
Free is free and unlimited, but does images only (Text to Image + Image to Image). Pro unlocks everything: Magic Edit, Blend Images, all video, all audio — and downloads all the matching models.
What are the PRO features?
The workflows wearing a PRO badge in the interface: Magic Edit, Blend Images, all video (Image to Video, Smooth Motion, Lip Sync) and all audio (Text to Music, Remix, Section Edit). They activate when you move to Trag Studio Pro.
How do I upgrade to Pro?
Through the web portal: you buy (one-time payment), the key is attached to your profile, then the app unlocks the workflows and offers to download the video and audio models. You can buy Pro right away, or start Free and upgrade later — nothing is lost on the way.
What is Trag Muse?
The connected production studio, arriving as an add-on to Free and Pro: your agents (Claude, Codex or any MCP agent) and your APIs (Seedance, Kling, Nano Banana…) drive TRAG through the Agent Gateway — while everything renders on your machine. It is coming soon: press Keep me posted in the Muse window to join the first wave.
Can I let an AI drive TRAG?
Yes — that is exactly what Trag Muse is for. Through the Agent Gateway, an external agent (Claude, Codex or any MCP agent) connects to your local TRAG and can launch and chain creations — tagged “Request from: AI agent” and filterable in the gallery (“Agent sessions”). Muse is rolling out soon: Keep me posted signs you up for the first wave.
Prompt vs. settings — what's the difference?
The prompt describes the content: subject, mood, dialogue. The settings are technical: format, duration, style, quality. Never put a technical setting in the prompt — the right panel does it better, with zero ambiguity.
Let us know how we can help.
hello@trag.studio is the gate to support — a human reads every message.
Créez des images, des vidéos et de la musique — sur votre PC, rien que pour vous.
TRAG Studio est une application Windows de génération par IA qui tourne 100 % en local, sur la carte graphique de votre machine. Pas de cloud, pas d'abonnement caché, pas de file d'attente : vos idées, vos fichiers, chez vous.
TRAG Studio s'organise autour de trois catégories — Image, Video et Audio — accessibles par les onglets en haut de l'écran. Chaque catégorie regroupe des workflows : des ateliers de création prêts à l'emploi.
Image
Text to Image (créer depuis un texte), Image to Image (transformer une image), Magic EditPro (retoucher une zone peinte) et Blend ImagesPro (fusionner 2-3 images).
Vidéo Pro
Text to Video (un clip depuis un simple prompt), Image to Video (animer une image, avec audio et dialogue synchronisés), Smooth Motion (relier une image de départ à une image de fin) et Lip Sync (synchroniser un visage avec une piste audio).
Audio Pro
Text to Music (composer un morceau, avec paroles optionnelles), Remix (transformer une piste existante) et Section Edit (régénérer un passage précis).
Trag Muse Muse
Le studio de production connecté, bientôt disponible : pilotez TRAG depuis Claude, Codex ou tout agent MCP, et branchez les API que vous utilisez — pendant que tout se rend sur votre machine.
À qui ça s'adresse
Influenceurs & créateurs de contenu
Un clip par jour au format TikTok, YouTube ou Square, du b-roll à la demande, une musique qui vous appartient — le tout en lot pendant la nuit avec Add Multiple Jobs.
Agences digitales
Des visuels prêts-client en volume, sans facturation à l'image ni angoisse de quota — et tout reste sur vos machines : la confidentialité client par construction.
Créateurs d'univers narratifs
Des personnages cohérents grâce à Image to Image et Blend, des scènes mises en mouvement, la bande-son de chaque chapitre — un univers entier depuis un seul bureau.
Studios indé & musiciens
Concept art, animatiques, maquettes sonores et remixes pour itérer vite — essais illimités, zéro facture cloud.
Tout au long de ce guide, vous verrez des captures d'écran de l'application : les encadrés et flèches vert vif y pointent l'élément dont on parle. Cliquez sur n'importe quelle image pour l'agrandir.
Les trois offres : Free, Pro et Trag Muse
TRAG existe en deux éditions, plus une couche d'automatisation optionnelle :
Offre
Prix
Ce que vous pouvez faire
Modèles téléchargés
Trag Studio FreeFree
Gratuit
Image uniquement : Text to Image + Image to Image, usage illimité.
Modèles image seulement
Trag Studio ProPro
Achat unique (portail web)
Tout : image (+ Magic Edit, Blend Images), toute la vidéo, tout l'audio.
Tous les modèles (image + vidéo + audio)
Trag MuseMuse
Add-on — bientôt
Le studio de production connecté : vos agents et vos API pilotent TRAG via l'Agent Gateway. Se combine avec Free ou Pro — rejoignez la première vague depuis l'app.
— (couche logicielle)
Deux parcours possibles, au choix :
Commencer gratuit, passer Pro plus tard. Téléchargez TRAG Studio Free depuis le site, créez des images à volonté… puis, quand l'envie de vidéo ou d'audio arrive, achetez Pro sur le portail web. La clé est rattachée à votre profil : l'application débloque les workflows et propose de télécharger les modèles manquants.
Acheter Pro directement. L'achat dépose la clé dans votre profil ; à la première connexion, l'onboarding installe d'emblée l'expérience complète.
Dans l'application, les workflows réservés portent un badge PRO (par exemple « Magic Edit Pro ») — c'est le repère visuel de cette matrice. Le détail workflow par workflow est rappelé dans la FAQ.
La fenêtre Pro dans l'app : tous les workflows débloqués en un achat unique — avec la remise Early-Bird tant qu'elle dure.
02Installation
L'installation passe par un assistant Windows classique — quelques « Next » et c'est réglé. Voici le parcours exact, écran par écran.
Avant de commencer : l'installeur contient l'application et ses moteurs d'exécution (Python, CUDA, ComfyUI) — pas les modèles d'IA. Ceux-ci se téléchargent ensuite, pendant la première configuration, et uniquement les paquets que vous cochez. L'installation peut tout de même prendre un moment — c'est normal, et ça n'arrive qu'une fois.
Lancez le fichier TRAG_Studio_V1.0_Setup téléchargé depuis le site TRAG (environ 1 Go). Windows demande une confirmation de sécurité : acceptez pour continuer.
Extrayez l'installeur. Une petite fenêtre d'auto-extraction s'ouvre, pointée sur votre dossier Téléchargements. Cliquez sur Extract et laissez faire.
Le fichier téléchargé, prêt à lancer — l'icône verte TRAG dans vos Téléchargements.L'étape d'auto-extraction : cliquez sur « Extract » et laissez finir.
Choisissez vos options dans TRAG Studio Setup. L'installeur s'ouvre sur un seul écran : le dossier d'installation est prérempli dans votre dossier utilisateur (…\AppData\Local\Programs\TRAG Studio — aucun droit administrateur requis), avec deux cases déjà cochées : Raccourci Bureau et Règle Pare-feu. Laissez-les, puis cliquez sur Installer TRAG Studio →.
Laissez l'installeur travailler. Pendant qu'un diaporama présente le studio, la barre raconte précisément ce qui se passe — y compris l'étape où TRAG détecte la version de CUDA que supporte votre pilote graphique et récupère la version correspondante. Rien à faire, sinon attendre.
Un seul écran, trois choix : le dossier, le raccourci Bureau et la règle pare-feu — puis Installer.L'installation se raconte : ici, le pilote CUDA 12.6 est détecté et la version adaptée se télécharge.
Terminez et lancez. « Installation terminée » propose de supprimer le fichier d'installation temporaire (environ 2,5 Go — cochez pour libérer l'espace) et un grand bouton Lancer TRAG Studio →. Au premier démarrage, TRAG vous accueille avec l'écran de connexion — direction la section suivante !
Terminé : libérez le fichier temporaire, puis lancez le studio.
Une alerte du pare-feu Windows peut apparaître au premier lancement. Cliquez « Autoriser » uniquement si vous comptez piloter TRAG depuis un autre appareil du réseau (voir Agent Gateway). Sinon, fermez la fenêtre — TRAG fonctionne parfaitement sans.
03Connexion & première configuration
Au premier lancement, TRAG vous guide en quelques étapes : connexion, détection du matériel, choix des workflows, dossier de sortie. Cinq minutes, montre en main (hors téléchargement des modèles).
Se connecter
L'écran « Welcome back » propose deux portes : Continue with Google, ou l'e-mail et un mot de passe. Avec Google, la connexion se termine dans votre navigateur — TRAG attend, puis reprend automatiquement dès que c'est fait. Pas encore de compte ? « Create one » le crée en un instant.
Votre compte porte votre licence : la clé Pro est rattachée au profil. La connexion est requise — c'est elle qui fait suivre vos achats et vos presets.
Connexion avec Google : terminez dans le navigateur — TRAG enchaîne automatiquement et vous ramène au studio.
L'accueil de l'onboarding
TRAG se présente en une phrase — « Local generative AI, made for everyone. » — et rappelle sa promesse : une interface simple qui fait tourner des moteurs open source puissants sur votre machine, sans téléchargements douteux ni courbe d'apprentissage abrupte. Cliquez sur Get started →.
Bienvenue dans TRAG Studio : tout tourne en local — votre travail ne quitte jamais votre appareil.
La détection matérielle et le Studio Index
Pour proposer les bons réglages, TRAG examine votre machine. Sur « Tell us about your machine », cliquez sur Detect (recommandé) : en une seconde, l'application identifie carte graphique et processeur, note chacun, puis calcule votre Studio Index — l'indice global qui calibre l'application à la puissance de votre PC.
« Detect my hardware » : laissez TRAG scanner GPU et CPU (ou configurez à la main).Le résultat du scan : chaque composant est noté, et le Studio Index résume la puissance globale.
Vous préférez garder la main ? « Set up manually instead » déplie trois sélecteurs — carte graphique, processeur, mémoire — avec l'aperçu « Expected performance » (Image / Video / Audio) en direct. L'option « I don't know my hardware » choisit pour vous des réglages prudents.
La configuration manuelle : GPU, CPU, RAM, et l'aperçu de performance qui se met à jour.
Le sélecteur GPU couvre aussi les cartes pro et stations de travail.Côté processeur : haut de gamme, milieu de gamme ou entrée de gamme.Et côté mémoire : plus de RAM = vidéos plus longues et lots plus grands.
Configuration minimale
TRAG s'adapte à votre machine — et le plancher est plus bas qu'on ne le croit :
Composant
Minimum
Carte graphique
NVIDIA RTX série 20 — 4 Go de VRAM
Mémoire
16 Go de RAM
Processeur
Intel Core i5 (7ᵉ génération) ou équivalent AMD
En dessous, le Studio Index choisira simplement des réglages plus modestes ; au-dessus, chaque gigaoctet de VRAM supplémentaire achète de la vitesse et de la résolution.
Et le plafond est en train de sauter : la nouvelle génération de PC NVIDIA Spark — superpuce GB10 Grace Blackwell, 128 Go de mémoire unifiée, jusqu'à un pétaFLOP de calcul IA sur un bureau — est exactement le matériel pour lequel TRAG a été taillé. Sur un Spark, les lots qui prenaient une soirée prennent une pause café.
Ce que votre machine change concrètement
Au-delà du plancher ci-dessus, trois choses décident du confort de TRAG au quotidien : l'espace disque libre, la mémoire vidéo, et la présence — ou non — d'une carte NVIDIA.
L'espace disque — le vrai premier mur
Les modèles s'installent dans le dossier de l'application, paquet par paquet. Les poids exacts :
Paquet
Poids
Inclus dans
Magic Wand (assistant de prompt)
3,6 Go
tout le monde, automatique
Image — génération
10,9 Go
Free
Image — édition
30,9 Go
Free
Vidéo
47,2 Go
Pro
Audio
19,1 Go
Pro
Total
111,7 Go
Pour installer et faire des images : comptez 50 Go libres.
Pour tout avoir, Pro compris : comptez 120 Go libres.
Sur un portable au petit SSD système, c'est ce point — et non la carte graphique — qui bloque en premier.
Rien n'oblige à tout prendre : cochez ce que vous voulez, ajoutez le reste plus tard sans rien perdre.
Vos créations, elles, vont dans le dossier de sortie choisi à l'étape suivante — ailleurs, et ça compte aussi avec le temps.
L'explorateur Windows compte en gibioctets là où nos chiffres sont en gigaoctets décimaux : un fichier annoncé à 29,15 Go s'affiche « 27,1 Go » dans Windows. Ce n'est pas un téléchargement incomplet.
La VRAM — ce qu'elle achète vraiment
La VRAM décide de la vidéo, pas de l'image. L'image passe confortablement dès 4 Go ; c'est la vidéo qui demande de la marge.
4 Go — l'image sans souci. Vidéo : clips courts, définition modeste.
6 Go — vidéo confortable en clips courts. Mesuré chez un testeur sur RTX 3060 portable : 4,9 Go utilisés sur 6, sans incident.
8 Go et plus — durées plus longues, définitions plus hautes, lots plus grands.
Et comme décrit dans le tour de l'interface, un seul moteur reste chaud à la fois — un choix pour ménager votre carte, pas une limitation.
Pas de carte NVIDIA ? TRAG fonctionne quand même
Sans GPU utilisable, TRAG se replie sur le processeur : le témoin du pied de page l'annonce en ambre, et la génération fonctionne — beaucoup plus lentement. Utilisable pour essayer, pas pour produire. Mieux vaut le dire ici que de laisser croire à une panne.
Choisir ses workflows — et laisser l'écran vérifier votre disque
L'écran des modèles liste les paquets — Image, Video, Audio — avec leurs vraies tailles de téléchargement ; les moteurs de base se téléchargent automatiquement. Comme le dit l'écran : l'image est gratuite, le mouvement et le son sont Pro. Tout paquet est téléchargeable — le tampon PRO dit simplement ce que votre offre peut exécuter.
Trois détails rendent cet écran digne de confiance :
Il relit votre disque à chaque ouverture. Le bandeau du haut l'annonce — « Checking what is already on this machine… », puis le verdict : « Disk checked · 14 of 18 model files verified · 9.4 GB left to download » — avec un bouton Re-check.
Il connaît trois états, pas deux. Un paquet complet et vérifié porte le tampon vert Already downloaded (plus de case — un discret Download again subsiste). Un fichier interrompu passe en ambre avec Check needed et un bouton Redownload. Ce qui est absent garde sa case et son poids restant exact.
Fermer la fenêtre n'annule rien. La carte de téléchargement survit ; repliée, elle garde pourcentage et barre visibles — « Keep working — this continues in the background. »
L'écran des modèles : bandeau de vérification en haut, vraies tailles par paquet, tampons PRO sur Video et Audio, et l'estimation en bas.
Et vous travaillez tôt : dès que l'essentiel est là (environ 14,5 Go), le studio s'ouvre et le reste continue de descendre en arrière-plan. Ajoutez ou retirez des paquets à tout moment via Settings › Hardware & Models — un modèle déjà sur le disque n'est jamais retéléchargé.
Choisir le dossier de sortie
« Where should your creations be saved? » : choisissez le dossier où atterriront images, vidéos et morceaux. Cliquez sur Choose…, sélectionnez (ou créez) un dossier dans l'explorateur Windows, puis validez avec Continue →. Modifiable à tout moment dans Settings.
Le choix du dossier de sortie : cliquez sur « Choose… ».L'explorateur Windows s'ouvre : créez par exemple un dossier « Trag output » dans vos Documents.
Le chemin est renseigné : il ne reste qu'à cliquer sur « Continue → » (repéré en vert).
Dernière ligne droite
TRAG présente trois atouts à retenir — la Main chat bar et sa ✦ magic wand (votre prompt amélioré en un clic), Add Multiple Jobs (lancer tout un lot d'un coup) et la Media Gallery (toutes vos créations, prêtes à être réutilisées). Puis « You're all set » confirme que vos moteurs sont installés : cliquez sur Let's Create →.
Trois choses à explorer dès maintenant — et un indice : un agent IA peut même créer pour vous (Settings › Connection).« You're all set » : tout est installé — place à la création.
Le tour guidé (8 étapes)
À la première ouverture, un court tour guidé illumine une à une les zones clés (choix du mode, workflows, réglages, prompt…). Suivez-le avec Next →, ou passez avec Skip — relançable à tout moment via « Take the tour » dans la barre latérale.
Le tour guidé (étape 1/8) : « Next » pour avancer pas à pas.Pressé ? « Skip » ferme le tour — il reste disponible dans la barre latérale.
04L'interface en un coup d'œil
Tout TRAG tient dans un seul écran, pensé pour créer sans se perdre. Voici la carte du territoire.
Au démarrage, TRAG précharge ses modèles (« Warming up the models »), puis vous dépose dans l'espace Create :
Le lancement : TRAG met ses modèles en route.L'interface principale (ici en Text to Image). L'encadré vert repère le bas de la barre latérale : mode clair, Settings, Help, plein écran et votre compte.Cinema Flow, la timeline film — Storyboard, Script, Film, Edit. Un aperçu de ce qui arrive : visitez, et appuyez sur « Keep me posted ».
La barre latérale (à gauche) — Search (la palette de commandes), Create (l'atelier), Media Gallery (vos créations), Creation Flow (la file de rendus) et Cinema Flow (un aperçu de la timeline film — bientôt), puis en bas : Light mode, Settings, Help, Toggle Fullscreen et votre profil.
Les onglets Image / Video / Audio (en haut, au centre) — la catégorie de création. Chaque catégorie affiche ensuite ses sous-onglets de workflows (Text to Image, Image to Image, Magic Edit, Blend Images…).
Le viewport (au centre) — la scène où votre résultat apparaît, se compare, se rejoue.
Le panneau de réglages (à droite) — les options du workflow en cours : Dimensions, Style, Quality… « More settings » déplie les options avancées.
La Main chat bar (en bas) — décrivez votre idée, puis cliquez sur le grand bouton d'action (Generate Image, Animate Image, Generate Music…). La ✦ magic wand améliore votre prompt en un clic, le micro prend la dictée vocale, et une suggestion d'exemple s'affiche dessous pour vous inspirer.
Le bouton Warm up (en haut à gauche) — préchauffe le moteur de la catégorie active pour supprimer l'attente au premier rendu.
La barre d'état (tout en bas) — la santé des services locaux : « AI engine connected » (le moteur de génération, avec l'activité GPU) et « AI Companion connected » (l'assistant de prompts, côté CPU).
Le bouton Warm up et l'état des moteurs
Chaque catégorie a son moteur, et TRAG n'en garde qu'un seul chaud à la fois pour ménager votre carte graphique. Le badge en haut à gauche dit tout :
Les deux repères de santé : le bouton « Warm up » en haut à gauche, et la barre d'état en bas à droite.
Rouge — Engine offline : le moteur est arrêté. Double-cliquez sur le badge pour le relancer.Orange — Warming : le moteur se met en route (le pourcentage grimpe). Changer de catégorie refroidit l'ancien moteur — un seul reste chaud.Vert — ready : le moteur est chaud, la génération démarre sans attente.
Un quatrième état existe : quand aucun GPU n'est utilisable, le témoin du pied de page passe en ambre et le dit sans détour — « AI engine connected (CPU — no GPU detected) ». C'est le repli processeur décrit en section 03 : tout fonctionne, simplement beaucoup plus lentement.
Clair, sombre… ou Creator
Le premier bouton du bas de la barre latérale bascule l'ambiance : mode clair lumineux, mode sombre profond, et le mode Creator — un noir mat pensé pour créer sans distraction, décliné en accents optionnels (comme « Obsidian Orange »). Un petit toast confirme chaque changement d'apparence.
Le mode clair — même interface, ambiance lumineuse.Le noir mat du mode Creator — ici avec l'accent « Obsidian Orange » ; le toast confirme l'apparence choisie.
La palette de recherche
Le bouton Search de la barre latérale ouvre une palette de commandes : tapez pour filtrer écrans, workflows et actions (« Go to Media Gallery », « Text to Image », « Open Settings »…) et validez avec Entrée. Échap la referme.
La palette de recherche : tout TRAG à portée de clavier.
05Créer une image
L'onglet Image réunit quatre workflows : créer depuis un texte, transformer une image, retoucher une zone précise, ou fusionner plusieurs images.
Le prompt décrit le contenu, les réglages décrivent la technique. Dans le prompt : le sujet, l'ambiance, la lumière. Dans le panneau de droite : le format (Dimensions), le rendu (Style), la finesse (Quality). N'écrivez jamais « 4K » ou « format carré » dans le prompt — un clic dans les réglages fait ça mieux.
Text to Image — créer depuis un texte
« Create a brand-new image from text alone. » Le workflow de départ, et le plus direct :
Onglet Image → sous-onglet Text to Image.
Choisissez vos réglages à droite : Dimensions (Portrait, Square, Landscape, Poster ou Custom) et Style (Auto, Photo, Cinematic, Illustration, 3D, Anime, Watercolor, Oil Painting, Pixel Art, Comic, Fantasy). « More settings » ajoute Custom settings, un curseur Creativity et un prompt négatif.
Décrivez votre image dans la barre du bas — sujet, style, lumière, ambiance.
Cliquez sur Generate Image →. Le résultat s'affiche dans le viewport et rejoint automatiquement la Media Gallery.
Text to Image : réglages à droite, prompt en bas, résultat au centre.Le panneau de réglages en détail : Dimensions, Style, Quality — puis Custom settings, Creativity et Negative prompt sous « More settings ».
Après la génération, deux boutons apparaissent sur le résultat : ✦ Re-use prompt (repartir du même texte) et ✦ Use as source (envoyer l'image vers un autre workflow). La bande Recent Generations sous le viewport garde vos derniers essais à un clic.
Un rendu terminé : « Re-use prompt », « Use as source », et la bande « Recent Generations » pour naviguer entre vos essais.
Image to Image — transformer une image
« Restyle, enhance, mix or upscale an existing image. » Donnez une image de départ, décrivez le changement :
Sous-onglet Image to Image, puis chargez votre image via Source image → Click to choose (ou cochez « Iterate from last result » pour repartir du dernier rendu).
Réglez le Style, la Quality et le facteur Upscale (1x / 1.5x / 2x — idéal pour un agrandissement net).
Décrivez la transformation — « restyle, enhance, upscale… » — puis cliquez sur Transform Image →.
Comparez. Le viewport affiche un curseur Before / After : glissez-le pour balayer entre l'original et le résultat.
Image to Image : les encadrés verts repèrent le sous-onglet et la zone de travail.Les réglages : source, Style, Quality, Upscale — et Similarity to source sous « More settings ».
Génération en cours : la transformation balaie l'image.Le comparateur « Before / After » : glissez la poignée pour peser le changement.
Magic Edit — retoucher une zone peinte Pro
« Paint a region and replace just that part — add, remove or swap objects. » Délicieusement simple : vous peignez la zone à changer, vous dites quoi y mettre, TRAG ne touche à rien d'autre.
Sous-onglet Magic Edit, puis chargez l'image à retoucher (Image to edit → Click to choose).
Choisissez votre masque à droite : Brush (pinceau libre) ou Auto-detect. Ajustez l'Opacity et la Hardness du pinceau si besoin — Brush size et Blending strength vivent sous « More settings ».
Peignez directement sur l'image la zone à modifier — elle se couvre d'un voile de surlignage. « Clear canvas » efface le masque, « Reuse mask » reprend le précédent.
Décrivez le changement dans la barre du bas (ajouter, retirer, remplacer…) puis cliquez sur Apply Edit →. Le comparateur Before / After permet ensuite de vérifier la retouche.
Magic Edit en action : la zone peinte sur l'image, les réglages de masque, et le prompt qui décrit le remplacement — trois repères verts, trois gestes.
Magic Edit au départ : chargez une image, choisissez le mode de masque.Les réglages Magic Edit : Mask (Brush / Auto-detect), Opacity, Hardness — Brush size et Blending strength plus bas.
Après l'édition : le curseur Before / After confirme que seule la zone masquée a changé.
Blend Images — fusionner plusieurs images Pro
« Combine multiple images into one — subject + style, or several references. » Un sujet pris ici, un style pris là : Blend marie deux images (et une troisième en option).
Sous-onglet Blend Images, puis chargez Image A et Image B (« + Add another » pour une image C optionnelle).
Choisissez un Style si vous voulez orienter le rendu.
Décrivez comment les images se combinent — qui fait quoi, dans quelle scène — puis cliquez sur Blend →.
Deux sources chargées (A + B) et un prompt qui raconte la fusion — les trois zones repérées en vert.Le résultat : les personnages des images A et B réunis dans une même scène.
Blend Images au départ : les emplacements A et B attendent vos images.Les réglages : Source Images (A, B, + Add another), Style — et le Blending balance sous « More settings ».
06Créer une vidéo Pro
L'onglet Video crée un clip depuis un simple prompt, anime vos images, relie deux instants en un mouvement fluide, ou fait parler un visage. Les quatre workflows vidéo font partie de l'édition Pro.
En passant sur l'onglet Video, le bouton du haut devient « Warm up LTX 2.3 engine » : cliquez-le avant votre première vidéo pour préchauffer le moteur. Les clips courts sont plus rapides et plus stables — commencez à 5 s.
Text to Video — un clip depuis un simple prompt
« Create a video entirely from a text description. » Aucune image source nécessaire : décrivez la scène et le mouvement, TRAG filme.
Onglet Video → sous-onglet Text to Video.
Choisissez le cadre : Format (TikTok, YouTube, Square ou Custom), Aspect ratio (9:16, 16:9, 1:1, 4:3), Definition (SD 480p → UHD 2160p) et Duration (5s, 10s, 15s ou Custom).
Décrivez le plan — sujet, mouvement de caméra, ambiance — puis cliquez sur le bouton d'action et laissez le moteur filmer.
Les réglages Text to Video : Format, Aspect ratio, Definition, Duration, Style.
Image to Video — animer une image
« Bring a still image to life with motion. » Une image + une description du mouvement = un clip vidéo, avec audio et dialogue synchronisés si vous en décrivez.
Onglet Video → sous-onglet Image to Video, puis chargez votre image (Source image → Click to choose, ou envoyez-en une depuis la Media Gallery avec « Use as source »).
Choisissez le Format — TikTok (vertical), YouTube (16:9), Square ou Custom — et la Duration (5s, 10s, 15s ou Custom). Quality et Smoothness (24 / 30 / 60 FPS) logent sous « More settings ».
Décrivez le mouvement — ce que fait le sujet, la caméra, l'ambiance sonore, voire une réplique à prononcer.
Cliquez sur Animate Image → et laissez le moteur travailler : le clip se joue ensuite directement dans le viewport.
Image to Video : format, durée et résolution à droite, mouvement décrit en bas.Les réglages vidéo : source, Format, Duration — Quality et Smoothness sous « More settings ».
Un clip généré en lecture — la source et le prompt sont repérés en vert.
Smooth Motion — d'une image à l'autre
« Morph a start frame into an end frame with fluid motion. » Donnez l'image de départ et l'image d'arrivée : TRAG invente le mouvement fluide qui les relie.
Sous-onglet Smooth Motion, puis chargez la Start frame et la End frame.
Choisissez le cadre et la fluidité : Format, Duration — et Smoothness (24 / 30 / 60 FPS) sous « More settings ».
Décrivez le mouvement entre la première et la dernière image, puis cliquez sur Generate Motion →.
Smooth Motion : une image de départ, une image de fin — le mouvement s'invente entre les deux.Les réglages : Start frame, End frame, Format, Duration — Quality et Smoothness sous « More settings ».
Lip Sync — faire parler un visage
« Drive a face video or image with an audio track so the lips match. » Un visage (photo ou vidéo) + une piste audio = des lèvres parfaitement synchronisées.
Sous-onglet Lip Sync, puis chargez le Face video/image et l'Audio track. Pas de fichier audio sous la main ? Record from mic enregistre votre voix directement.
Choisissez le cadre : Format et Duration — Quality et Smoothness sous « More settings ».
Ajoutez un prompt optionnel pour guider le rendu, puis cliquez sur Sync Lips →.
Lip Sync : un visage, une piste audio (ou le micro), et la force d'articulation.Les réglages : Face video/image, Audio track, Record from mic, Format et Duration.
07Créer de l'audio Pro
L'onglet Audio compose des morceaux entiers — avec ou sans paroles — remixe vos pistes et régénère un passage précis. Les trois workflows audio font partie de l'édition Pro.
Text to Music — composer un morceau
« Compose music from a description. » Décrivez le morceau, choisissez l'ambiance… et écrivez vos paroles si le cœur vous en dit :
Onglet Audio → sous-onglet Text to Music. Le bouton du haut devient « Warm up ACE-Step 1.5 engine » : un clic pour préchauffer.
Écrivez vos paroles (optionnel) dans l'éditeur Lyrics au centre : structurez-les avec Verse, Chorus et Bridge, choisissez la langue (EN, FR, ES, DE, IT, PT, JA, ZH, KO, RU…). Laissez vide pour un instrumental.
Réglez la musique à droite : Style (Pop, Rap, Afro, Rock, Electronic, Cinematic), Mood (Happy, Epic, Chill… seize ambiances), Key & Scale (le petit clavier de piano !), BPM et Duration (30s, 1m, 2m ou Custom).
Décrivez le morceau dans la barre du bas, puis cliquez sur Generate Music →. La piste apparaît dans un lecteur, prête à l'écoute — et rangée dans la Media Gallery.
Text to Music : l'éditeur de paroles au centre (Verse / Chorus / Bridge), les réglages musicaux à droite.Les réglages musique : Style, Mood, Key & Scale, BPM, Duration — Quality sous « More settings ».
Une fois la piste générée, le bouton ✦ Use as source du lecteur l'envoie en un clic vers Remix this track, Section Edit ou Lip Sync (audio) :
Un morceau généré : le menu « Use as source » enchaîne vers Remix, Section Edit ou Lip Sync.
Remix — transformer une piste
« Transform an existing audio track into a new style. » Votre morceau, un autre habit :
Sous-onglet Remix, puis chargez la piste (Source audio → Click to choose).
Choisissez le Style et le Mood, et dosez Keep Original (sous « More settings ») : plus le pourcentage est haut, plus l'original transparaît.
Décrivez la nouvelle direction — genre, vibe, tempo — puis cliquez sur Remix Track →.
Remix : une piste source, un style cible, et le curseur « Keep Original ».Les réglages Remix : Source audio, Style, Mood, Key & Scale — Keep Original sous « More settings ».
Section Edit — régénérer un passage
« Replace or regenerate a chosen section of a track. » Le refrain vous déçoit ? Régénérez juste lui, sans toucher au reste :
Sous-onglet Section Edit, puis chargez la piste.
Délimitez la Section à retravailler (par exemple 0:12 – 0:24, via « Set range… »).
Choisissez Match : Keep key & tempo pour rester raccord avec le morceau, ou Free pour laisser libre cours.
Décrivez le remplacement puis cliquez sur Repaint Section →.
Section Edit : choisissez la plage à régénérer, gardez (ou non) tonalité et tempo.Les réglages : Source audio, Quality, Match — Keep key & tempo, ou Free.
La barre de prompt en mode Section Edit : décrivez le remplacement, avec la baguette ✦, le micro et la pièce jointe à portée de main.
08Creation Flow & jobs multiples
Le Creation Flow, c'est la tour de contrôle de vos rendus : la file d'attente en temps réel, l'historique de vos créations, et le lancement de lots entiers.
La feature de l'année Exclusif
TRAG est le seul outil du marché avec un système de queue digne de ce nom — pilotable à la main, ou par un agent MCP qui travaille pour vous.
Suivre la file de rendus
Ouvrez Creation Flow depuis la barre latérale (le compteur sur l'icône indique les jobs en attente). Chaque ligne affiche son état — Generating avec pourcentage et temps restant, Waiting avec estimation, puis Completed — et ses boutons Open / Cancel. En haut à droite : History, Add Multiple Jobs, et pendant l'exécution Stop, Pause et Stop all.
La file en action : un job en génération, les suivants en attente, et les commandes History / Add Multiple Jobs / Stop / Pause / Stop all (encadrées en vert).Tout est terminé : chaque ligne passe en « Completed », avec son bouton « Open ».
L'historique des créations
Le bouton History ouvre la Creation History : les statistiques de la session (créations par workflow) et, pour chaque entrée, Use prompt (reprendre le texte), Save preset (mémoriser les réglages) et Open. Export sauvegarde l'historique, Clear le vide.
La Creation History : compteurs par workflow et actions Use prompt / Save preset / Open.Au tout début, l'historique est vide — il se remplit à chaque rendu.
Add Multiple Jobs — lancer un lot d'un coup
Envie de générer dix images et cinq morceaux pendant la pause déjeuner ? Add Multiple Jobs enchaîne toute une liste de créations, automatiquement :
Copiez la « matrice » de la catégorie voulue — Copy Image, Copy Video ou Copy Audio. C'est un gabarit texte qui apprend à une IA (ChatGPT, Claude…) à rédiger votre liste de jobs.
Faites écrire votre liste : collez la matrice dans votre IA préférée avec vos idées, récupérez un fichier .md (un job par ligne, un titre # par catégorie).
Déposez le .md dans la zone « Drag result here » : TRAG le lit et annonce « X jobs prêts ». Si vos jobs utilisent des fichiers (images, audio…), déposez aussi un .zip de ces ressources dans la seconde zone.
Choisissez le dossier de sortie puis cliquez sur Generate : les jobs défilent tout seuls dans le Creation Flow, et chaque rendu rejoint la Media Gallery.
Le principe : la matrice « Copy Image » sert de gabarit, et votre liste devient un .md structuré.Le .md déposé : « 15 jobs prêts » — il n'y a plus qu'à générer.
La modale Add Multiple Jobs : matrices à copier, zone de dépôt .md, zone .zip pour les ressources, et dossier de sortie.
Encore plus simple avec Trag Muse : le bandeau fuchsia « Use your agent to orchestrate » laisse votre agent IA piloter TRAG directement, sans copier-coller — voir Trag Muse & Agent Gateway.
Un lot terminé dans le Creation Flow. Les flèches repèrent « Add Multiple Jobs » et le raccourci Trag Muse de la barre latérale.
09Media Gallery
Chaque création — image, vidéo, morceau — est automatiquement rangée dans la Media Gallery. C'est votre bibliothèque : on y retrouve, on y rejoue, on y réutilise.
Parcourir et filtrer
En haut de la galerie : les filtres par type (All / Image / Video / Audio), par origine (All / Mine / Agent sessions — pratique pour isoler ce qu'un agent a créé), le tri (Newest first…), la taille de grille et Refresh.
La galerie et ses filtres — encore vide ici : « Assets you generate will appear here. »La galerie remplie : cliquez sur une vignette pour ouvrir son panneau « Item Details ».
La fiche d'un média : Item Details
Le panneau Item Details affiche tout ce qu'il faut savoir : aperçu (ou lecteur), nom du fichier, type, taille, date, workflow d'origine — et même « Request from: AI agent » quand la création vient d'un agent. Plus bas, le prompt complet avec trois boutons : Copy, Send to chat (le renvoyer dans la Main chat bar pour le retravailler) et Save as preset. Enfin, Save As… exporte le fichier où vous voulez, et Delete le supprime.
Item Details : métadonnées, puis « Save As… » et « Delete » en bas (pensez à faire défiler le panneau).Le prompt d'origine, réutilisable en un clic : Copy, Send to chat, Save as preset.
Réutiliser une création : Use as source
Le bouton ✦ Use as source est le pont entre vos workflows : il envoie le média sélectionné comme point de départ d'une nouvelle création. Pour une image : Image to Image, Magic Edit, Blend Images (A ou B) ou Image to Video. Pour une vidéo : Smooth Motion ou Lip Sync (Face). Pour un morceau : Remix, Section Edit ou Lip Sync (audio).
« Use as source » depuis la fiche d'une image : quatre destinations possibles.La visionneuse plein écran offre les mêmes raccourcis : Use as source et Save As….
Pour une vidéo : lecture intégrée, puis « Use as source » vers Smooth Motion ou Lip Sync.
Sur le disque, vos créations vivent dans le dossier de sortie choisi à l'onboarding (modifiable dans Settings › Storage), sous des noms explicites comme TRAG_image_t2i_082.png — le workflow d'origine est dans le nom.
10Réglages
Le bouton Settings de la barre latérale ouvre les réglages, organisés en rubriques : Connection, Storage, Hardware & Models, Preferences et Language.
Dossiers, matériel et modèles
Storage — le Gallery folder (où vit votre bibliothèque) et le Generated files folder (où s'enregistrent les nouvelles créations) : deux boutons Browse… pour les changer.
Hardware & Models — le diagnostic matériel courant, Re-scan hardware pour relancer la détection, la sélection manuelle, et Installed models & workflows pour ajouter ou retirer des moteurs téléchargés.
Preferences — les sons d'interface, le tutoriel au démarrage, les raccourcis personnalisés (Alt+F bascule le plein écran) et l'échelle d'affichage.
Language — la langue de l'interface.
En bas de la fenêtre : Reset restaure les valeurs par défaut, Save changes enregistre les vôtres.
Settings › Storage & Hardware : dossiers de sortie et gestion des modèles installés.Settings › Preferences & Language : sons, tutoriel, raccourcis, langue.
Votre compte, votre licence
Un clic sur votre profil, en bas de la barre latérale, ouvre le panneau de compte : Manage account & billing, votre plan, la version de l'app avec son bouton Check for updates, vos préférences de communication — et Report a problem, la ligne directe quand quelque chose cloche. C'est ici que vous vérifiez que votre licence Pro est active.
Le panneau de compte : votre plan et son avantage Early-Bird, la vraie version avec « Check for updates », et « Report a problem » — tous deux repérés en vert.
Comment TRAG se met à jour
TRAG vérifie silencieusement au démarrage, puis toutes les 6 heures. S'il n'y a rien de neuf, vous ne voyez rien.
Quand une version existe, un bandeau discret apparaît en bas à gauche. Jamais bloquant — continuez à travailler ; Later le met en sourdine 24 heures.
Un clic sur Update now : l'application se ferme seule, se met à jour et se relance. Un correctif pèse quelques mégaoctets — pas les gigaoctets de l'installeur.
Les modèles déjà téléchargés ne sont jamais retéléchargés par une mise à jour.
Envie de vérifier vous-même ? Panneau de compte → Check for updates.
Trag Muse & Agent Gateway Muse
Trag Muse transforme votre station de travail en studio de production connecté : vos agents et vos API pilotent TRAG de la première idée au master final — pendant que vos fichiers, vos modèles et vos rendus restent sur votre machine.
✦ Ce que Trag Muse débloquera
Pilotez TRAG depuis Claude, Codex ou tout agent MCP — même à distance.
Branchez les API que vous utilisez — Seedance, Kling, Nano Banana et d'autres — depuis l'interface que vous connaissez déjà.
Transformez idées et storyboards en productions avec Creation Flow.
Montez, assemblez et affinez vos médias dans un espace de travail connecté.
Gardez la puissance en local — fichiers, modèles et rendus sur votre machine.
Trag Muse est un add-on par abonnement mensuel, en supplément de Free et de Pro — bientôt disponible. La timeline de montage Cinema Flow et les API cloud citées plus haut arrivent avec lui. La fenêtre Muse de l'app le dit le mieux — « join the first wave » : appuyez sur Keep me posted et vous saurez le jour de l'ouverture.
La tuyauterie derrière, c'est l'Agent Gateway, dans Settings › Connection — la rubrique au liseré fuchsia. Elle reste désactivée jusqu'à l'ouverture de Muse ; voici à quoi ressemblera la mise en route :
Activez l'Agent gateway (interrupteur On — le statut passe à « ● Running »).
Notez l'adresse locale affichée sous « Reachable at » (avec son bouton copier) — c'est elle que votre agent utilisera. L'option Local network l'expose aussi à votre Wi-Fi si vous pilotez depuis un autre appareil.
Téléchargez la configuration avec Save mcp.json, puis suivez les indications à l'écran pour la brancher dans votre agent (Claude, Codex…).
Laissez la passerelle sur On : votre agent peut désormais créer dans TRAG — ses créations sont marquées « Request from: AI agent » dans la galerie, filtrables via « Agent sessions ».
Settings › Connection : l'Agent gateway en marche, l'adresse à donner à votre agent, et le bouton « Save mcp.json » (repérés en vert).
Vous avez cliqué « Annuler » sur l'alerte du pare-feu ? Rien n'est cassé
Tout ce que TRAG fait par lui-même — parler à ses moteurs sur votre machine, télécharger les modèles, vérifier les mises à jour — ne demande aucune autorisation du pare-feu. Le seul et unique cas qui en demande une : être piloté depuis un autre appareil de votre réseau. Si vous avez refusé l'alerte Windows, ni les téléchargements, ni la génération, ni les mises à jour n'en ont souffert. Pour accorder l'autorisation après coup :
Voie 1 — par les réglages Windows (aucune ligne de commande)
Ouvrez Démarrer, tapez pare-feu et choisissez Pare-feu Windows Defender.
Cliquez surAutoriser une application ou une fonctionnalité via le Pare-feu Windows Defender.
Cliquez sur Modifier les paramètres(demande les droits administrateur).
Cherchez TRAG Studio dans la liste. S'il y est : cochez Privé. Ne cochez pas « Public ». S'il n'y est pas : Autoriser une autre application… → Parcourir… → sélectionnez TRAG.exe dans le dossier d'installation → Ajouter, puis cochez Privé.
Validez par OK et relancez TRAG.
Cochez Privé (réseau domestique) et jamais Public. Un réseau public, c'est un hôtel, un aéroport, un café — on ne veut pas y exposer son studio.
Voie 2 — en une commande (pour les utilisateurs à l'aise) : ouvrez une invite de commandes en administrateur, et adaptez le chemin si besoin :
Antivirus tiers. Certains bloquent l'alerte du pare-feu Windows, ou l'exécution du téléchargeur. Si TRAG ne parvient pas à télécharger les modèles alors que votre connexion fonctionne, suspendez temporairement l'antivirus, ou ajoutez le dossier d'installation à ses exclusions.
Réseau d'entreprise ou d'école. Un proxy ou un filtrage peut bloquer download.trag.studio. Le symptôme : les modèles ne démarrent jamais, alors que le reste d'internet fonctionne. Essayez depuis une connexion domestique ou un partage mobile, ou demandez à l'administrateur réseau d'autoriser ce domaine.
11Astuces pour de meilleurs résultats
Quelques réflexes qui changent tout, du premier prompt au rendu final.
Des prompts précis
Sujet + action + ambiance + lumière. « Un phare sous l'orage, vagues énormes, lumière dramatique » battra toujours « un phare ». Les suggestions ✦ sous la barre de prompt sont de bons modèles.
Le prompt décrit, les réglages règlent
Format, durée, qualité, style : un clic dans le panneau de droite. Jamais dans le prompt — vous éviterez les résultats confus.
Respectez les défauts
Les réglages par défaut sont calibrés pour votre machine (merci le Studio Index). Changez une chose à la fois : vous saurez ce qui a fait la différence.
Préchauffez le moteur
Un clic sur Warm up avant une session, et le premier rendu part sans attente. Le badge vert « ready » vous dit quand.
Source + prompt > réglages
Pour transformer une image ou une piste, la qualité de la source et la clarté du prompt pèsent plus que n'importe quel réglage avancé.
Court d'abord, long ensuite
En vidéo, validez l'idée sur un clip de 5 s en résolution Fast, puis relancez en plus long et plus fin. Vous itérerez deux fois plus vite.
La Main chat bar, votre meilleure alliée
Tout passe par la Main chat bar, la barre unique en bas de l'écran. Décrivez votre idée, puis laissez ses outils travailler : la ✦ magic wand réécrit et muscle votre prompt en un clic (sujet précisé, lumière, ambiance), le micro prend la dictée vocale, le trombone joint une référence, et les suggestions ✦ affichées dessous montrent le niveau de détail qui fonctionne. Depuis la galerie, « Send to chat » y renvoie un ancien prompt pour le retravailler en une nouvelle version.
12FAQ — Questions fréquentes
Les réponses courtes aux questions qu'on nous pose le plus.
Ai-je besoin d'internet ?
Non. Une fois l'installation et le téléchargement des modèles terminés, tout fonctionne hors-ligne, en local. Internet ne sert qu'à télécharger l'application, les modèles et les mises à jour.
Mes créations sont-elles privées ?
Oui. La génération se fait sur votre GPU ; vos prompts et vos fichiers restent sur votre machine. Rien n'est envoyé dans le cloud.
De quel matériel ai-je besoin ?
TRAG démarre dès une NVIDIA RTX série 20 (4 Go), 16 Go de RAM et un Intel Core i5 7ᵉ génération ou équivalent — voir Configuration minimale. À l'onboarding, TRAG calcule votre Studio Index et adapte les options à votre machine — moins de puissance signifie simplement des réglages plus modestes, pas une porte fermée.
Le moteur ne démarre pas / mon GPU n'est pas détecté
À l'installation, TRAG regarde quelle version de CUDA votre pilote graphique supporte et installe la version correspondante — vous n'avez rien à mettre à jour. Si le moteur reste rouge, ouvrez %LOCALAPPDATA%\TRAG Studio\logs\ et cherchez la ligne engine device= : elle dit cuda (votre carte travaille) ou cpu (repli processeur). Envoyez-nous cette ligne à hello@trag.studio — elle nous suffit pour comprendre.
Une fenêtre de pare-feu apparaît au démarrage — que faire ?
Cliquez « Autoriser » seulement si vous voulez piloter TRAG depuis un autre appareil du réseau (Agent Gateway). Sinon, fermez la fenêtre sans crainte : l'application fonctionne parfaitement sans. Si vous avez refusé et souhaitez y revenir, la marche à suivre manuelle est dans Trag Muse & Agent Gateway.
Combien de temps peut durer une vidéo ?
La durée se règle dans les paramètres vidéo (5 s, 10 s, 15 s ou Custom). Gardez en tête que les clips courts sont plus rapides et plus stables — c'est la bonne façon d'itérer.
Où sont enregistrées mes créations ?
Dans le dossier de sortie choisi à l'onboarding (modifiable dans Settings › Storage). Elles apparaissent toutes aussi dans la Media Gallery.
Quelle est la différence entre Free et Pro ?
Free est gratuit et illimité, mais fait uniquement de l'image (Text to Image + Image to Image). Pro débloque tout : Magic Edit, Blend Images, toute la vidéo, tout l'audio — et télécharge tous les modèles correspondants.
C'est quoi, les fonctions PRO ?
Les workflows marqués d'un badge PRO dans l'interface : Magic Edit, Blend Images, toute la vidéo (Image to Video, Smooth Motion, Lip Sync) et tout l'audio (Text to Music, Remix, Section Edit). Ils s'activent en passant à Trag Studio Pro.
Comment passer à Pro ?
Depuis le portail web : vous achetez (paiement unique), la clé est rattachée à votre profil, puis l'application débloque les workflows et propose de télécharger les modèles vidéo et audio. Vous pouvez acheter Pro directement, ou commencer en Free et passer Pro plus tard — rien n'est perdu en route.
C'est quoi, Trag Muse ?
Le studio de production connecté, à venir en add-on de Free et de Pro : vos agents (Claude, Codex ou tout agent MCP) et vos API (Seedance, Kling, Nano Banana…) pilotent TRAG via l'Agent Gateway — pendant que tout se rend sur votre machine. C'est bientôt disponible : appuyez sur Keep me posted dans la fenêtre Muse pour rejoindre la première vague.
Puis-je laisser une IA piloter TRAG ?
Oui — c'est exactement le rôle de Trag Muse. Via l'Agent Gateway, un agent externe (Claude, Codex ou tout agent MCP) se connecte à votre TRAG local et peut lancer et enchaîner des créations — marquées « Request from: AI agent » et filtrables dans la galerie (« Agent sessions »). Muse arrive bientôt : Keep me posted vous inscrit à la première vague.
Quelle différence entre le prompt et les réglages ?
Le prompt décrit le contenu : sujet, ambiance, dialogue. Les réglages sont techniques : format, durée, style, qualité. Ne mettez jamais un réglage technique dans le prompt — le panneau de droite fait ça mieux, sans ambiguïté.
Dites-nous comment on peut vous aider.
hello@trag.studio est la porte d'entrée du support — un humain lit chaque message.
Crea imágenes, vídeos y música — en tu PC, solo para ti.
TRAG Studio es una aplicación de Windows para generación con IA que funciona 100 % en local, sobre la tarjeta gráfica de tu máquina. Sin nube, sin suscripciones ocultas, sin colas de espera: tus ideas, tus archivos, en tu casa.
✦ Generación ilimitada 100 % privado y sin conexión Imagen Vídeo Audio 11 workflows creativos
TRAG Studio se organiza en tres categorías — Image, Video y Audio — accesibles desde las pestañas de la parte superior. Cada categoría reúne workflows: talleres de creación listos para usar.
Imagen
Text to Image (crear desde un texto), Image to Image (transformar una imagen), Magic EditPro (retocar una zona pintada) y Blend ImagesPro (fusionar 2-3 imágenes).
Vídeo Pro
Text to Video (un clip desde un simple prompt), Image to Video (animar una imagen, con audio y diálogo sincronizados), Smooth Motion (unir un fotograma inicial y uno final) y Lip Sync (sincronizar un rostro con una pista de audio).
Audio Pro
Text to Music (componer una pista, con letra opcional), Remix (transformar una pista existente) y Section Edit (regenerar un pasaje concreto).
Trag Muse Muse
El estudio de producción conectado, disponible pronto: dirige TRAG desde Claude, Codex o cualquier agente MCP, y conecta las API que usas — mientras todo se renderiza en tu máquina.
Para quién es
Influencers y creadores de contenido
Un clip diario en formato TikTok, YouTube o Square, b-roll a demanda, música que te pertenece — todo en lote durante la noche con Add Multiple Jobs.
Agencias digitales
Visuales listos para cliente en volumen, sin tarifa por imagen ni ansiedad de cuotas — y todo se queda en vuestras máquinas: confidencialidad por diseño.
Creadores de universos narrativos
Personajes coherentes con Image to Image y Blend, escenas puestas en movimiento, la banda sonora de cada capítulo — un universo entero desde un solo escritorio.
Estudios indie y músicos
Concept art, animáticas, maquetas sonoras y remezclas para iterar rápido — intentos ilimitados, cero factura de nube.
A lo largo de esta guía verás capturas de pantalla de la aplicación: los recuadros y flechas verde brillante señalan el elemento del que se habla. Haz clic en cualquier imagen para ampliarla.
Las tres ofertas: Free, Pro y Trag Muse
TRAG existe en dos ediciones, más una capa de automatización opcional:
Oferta
Precio
Qué puedes hacer
Modelos descargados
Trag Studio FreeFree
Gratis
Solo imagen: Text to Image + Image to Image, uso ilimitado.
Solo modelos de imagen
Trag Studio ProPro
Compra única (portal web)
Todo: imagen (+ Magic Edit, Blend Images), todo el vídeo, todo el audio.
Todos los modelos (imagen + vídeo + audio)
Trag MuseMuse
Add-on — pronto
El estudio de producción conectado: tus agentes y tus API dirigen TRAG vía el Agent Gateway. Se combina con Free o Pro — únete a la primera ola desde la app.
— (capa de software)
Dos caminos posibles, tú eliges:
Empezar gratis y pasar a Pro después. Descarga TRAG Studio Free desde la web, crea imágenes a voluntad… y cuando llegue el gusanillo del vídeo o del audio, compra Pro en el portal web. La clave queda vinculada a tu perfil: la aplicación desbloquea los workflows y ofrece descargar los modelos que falten.
Comprar Pro directamente. La compra deposita la clave en tu perfil; en el primer inicio de sesión, el onboarding instala de entrada la experiencia completa.
Dentro de la aplicación, los workflows reservados llevan una insignia PRO (por ejemplo “Magic Edit Pro”) — es la marca visual de esta matriz. El detalle workflow a workflow se repasa en las FAQ.
La ventana Pro en la app: todos los workflows desbloqueados con un pago único — y el descuento Early-Bird mientras dure.
02Instalación
La instalación usa un asistente clásico de Windows: unos cuantos “Next” y listo. Este es el recorrido exacto, pantalla a pantalla.
Antes de empezar: el instalador contiene la aplicación y sus motores de ejecución (Python, CUDA, ComfyUI) — no los modelos de IA. Esos se descargan después, durante la primera configuración, y solo los paquetes que marques. Instalar puede llevar igualmente un momento — es normal, y solo ocurre una vez.
Ejecuta el archivo TRAG_Studio_V1.0_Setup descargado desde la web de TRAG (alrededor de 1 GB). Windows pide una confirmación de seguridad: acéptala para continuar.
Extrae el instalador. Se abre una pequeña ventana de autoextracción, apuntando a tu carpeta de Descargas. Pulsa Extract y deja que termine.
El archivo descargado, listo para ejecutar — el icono verde de TRAG en tus Descargas.La autoextracción: pulsa “Extract” y deja que acabe.
Elige tus opciones en TRAG Studio Setup. El instalador se abre en una sola pantalla: la carpeta de instalación viene prellenada en tu carpeta de usuario (…\AppData\Local\Programs\TRAG Studio — sin derechos de administrador), con dos casillas ya marcadas: acceso directo en el escritorio y regla del firewall. Déjalas y pulsa Instalar TRAG Studio →.
Deja trabajar al instalador. Mientras un carrusel presenta el estudio, la barra cuenta exactamente qué pasa — incluida la etapa en la que TRAG detecta qué versión de CUDA soporta tu controlador gráfico y trae la variante correspondiente. Nada que hacer, salvo esperar.
Una pantalla, tres decisiones: la carpeta, el acceso directo y la regla del firewall — y luego Instalar.La instalación se narra sola: aquí, se detectó el controlador CUDA 12.6 y baja la variante adecuada.
Termina y lanza. “Installation terminée” ofrece borrar el archivo temporal de instalación (unos 2,5 GB — márcalo para liberar el espacio) y un gran botón Lanzar TRAG Studio →. En el primer arranque, TRAG te recibe con la pantalla de inicio de sesión — ¡a la siguiente sección!
Hecho: libera el archivo temporal y lanza el estudio.
En el primer arranque puede aparecer un aviso del Firewall de Windows. Haz clic en “Permitir” solo si piensas dirigir TRAG desde otro dispositivo de tu red (ver Agent Gateway). Si no, cierra la ventana — TRAG funciona perfectamente sin ello.
03Inicio de sesión y primera configuración
En el primer arranque, TRAG te guía en pocos pasos: inicio de sesión, detección del hardware, elección de workflows, carpeta de salida. Cinco minutos (aparte de la descarga de modelos).
Inicia sesión
La pantalla “Welcome back” ofrece dos puertas: Continue with Google, o correo y contraseña. Con Google, el inicio de sesión termina en tu navegador — TRAG espera y continúa automáticamente en cuanto acabas. ¿Sin cuenta aún? “Create one” la crea al momento.
Tu cuenta lleva tu licencia: la clave Pro está vinculada al perfil. Iniciar sesión es necesario — es lo que hace que tus compras y tus presets te sigan.
Inicio con Google: termina en el navegador — TRAG retoma automáticamente y te devuelve al estudio.
La bienvenida del onboarding
TRAG se presenta en una frase — “Local generative AI, made for everyone.” — y recuerda su promesa: una interfaz sencilla que ejecuta potentes motores open source en tu máquina, sin descargas dudosas ni curvas de aprendizaje empinadas. Haz clic en Get started →.
Bienvenido a TRAG Studio: todo funciona en local — tu trabajo nunca sale de tu equipo.
La detección de hardware y el Studio Index
Para proponerte los ajustes adecuados, TRAG examina tu máquina. En “Tell us about your machine”, haz clic en Detect (recomendado): en un segundo, la aplicación identifica tu tarjeta gráfica y tu procesador, puntúa cada uno y calcula tu Studio Index — el índice global que calibra la aplicación a la potencia de tu PC.
“Detect my hardware”: deja que TRAG escanee tu GPU y CPU (o configúralo a mano).El resultado del escaneo: cada componente recibe su nota, y el Studio Index resume la potencia global.
¿Prefieres mantener el control? “Set up manually instead” despliega tres selectores — tarjeta gráfica, procesador, memoria — con la vista previa “Expected performance” (Image / Video / Audio) en directo. La opción “I don't know my hardware” elige por ti ajustes prudentes.
La configuración manual: GPU, CPU, RAM, y la vista previa de rendimiento que se actualiza.
El selector de GPU también cubre tarjetas profesionales y de estación de trabajo.En el procesador: gama alta, media o de entrada.Y en memoria: más RAM = vídeos más largos y lotes más grandes.
Requisitos mínimos
TRAG se adapta a tu máquina — y el suelo está más bajo de lo que crees:
Componente
Mínimo
Tarjeta gráfica
NVIDIA RTX serie 20 — 4 GB de VRAM
Memoria
16 GB de RAM
Procesador
Intel Core i5 (7.ª generación) o equivalente AMD
Por debajo, el Studio Index elegirá ajustes más modestos; por encima, cada gigabyte extra de VRAM compra velocidad y resolución.
Y el techo está a punto de volar: la nueva generación de PC NVIDIA Spark — superchip GB10 Grace Blackwell, 128 GB de memoria unificada, hasta un petaFLOP de cómputo IA en un escritorio — es exactamente el hardware para el que TRAG fue tallado. En un Spark, los lotes que llevaban una tarde llevan un café.
Lo que tu máquina cambia en concreto
Más allá del suelo anterior, tres cosas deciden lo cómodo que resulta TRAG a diario: el espacio libre en disco, la memoria de vídeo, y que haya — o no — una tarjeta NVIDIA.
El espacio en disco — el primer muro real
Los modelos se instalan dentro de la carpeta de la aplicación, paquete a paquete. Los pesos exactos:
Paquete
Peso
Incluido en
Magic Wand (asistente de prompts)
3,6 GB
todos, automático
Imagen — generación
10,9 GB
Free
Imagen — edición
30,9 GB
Free
Vídeo
47,2 GB
Pro
Audio
19,1 GB
Pro
Total
111,7 GB
Para instalar y hacer imágenes: cuenta con 50 GB libres.
Para tenerlo todo, Pro incluido: cuenta con 120 GB libres.
En un portátil con un SSD de sistema pequeño, esto — y no la tarjeta gráfica — es lo que bloquea primero.
Nada obliga a llevárselo todo: marca lo que quieras y añade el resto más tarde sin perder nada.
Tus creaciones, en cambio, van a la carpeta de salida del paso siguiente — en otro sitio, y con el tiempo también cuenta.
El explorador de Windows cuenta en gibibytes donde nuestras cifras son gigabytes decimales: un archivo anunciado a 29,15 GB aparece como “27,1 GB” en Windows. No es una descarga incompleta.
La VRAM — lo que compra de verdad
La VRAM decide el vídeo, no la imagen. La imagen va cómoda desde 4 GB; es el vídeo el que pide margen.
6 GB — vídeo cómodo en clips cortos. Medido en el portátil de un tester con RTX 3060: 4,9 GB usados de 6, sin incidentes.
8 GB o más — duraciones más largas, definiciones más altas, lotes más grandes.
Y como se cuenta en el recorrido de la interfaz, solo un motor permanece caliente a la vez — una elección para cuidar tu tarjeta, no una limitación.
¿Sin tarjeta NVIDIA? TRAG funciona igual
Sin GPU utilizable, TRAG se repliega al procesador: el indicador del pie de página lo anuncia en ámbar, y la generación funciona — mucho más despacio. Sirve para probar, no para producir. Mejor decirlo aquí que dejar que alguien lo tome por una avería.
Elige tus workflows — y deja que la pantalla revise tu disco
La pantalla de modelos lista los paquetes — Image, Video, Audio — con sus tamaños reales; los motores base se descargan automáticamente. Como dice la propia pantalla: la imagen es gratis, el movimiento y el sonido son Pro. Todo paquete puede descargarse — el sello PRO solo dice qué puede ejecutar tu plan.
Tres detalles hacen fiable esta pantalla:
Relee tu disco cada vez que se abre. El banner superior lo anuncia — “Checking what is already on this machine…”, y luego el veredicto: “Disk checked · 14 of 18 model files verified · 9.4 GB left to download” — con un botón Re-check.
Conoce tres estados, no dos. Un paquete completo y verificado lleva el sello verde Already downloaded (sin casilla — queda un discreto Download again). Un archivo interrumpido pasa a ámbar con Check needed y un botón Redownload. Lo ausente conserva su casilla y su peso restante exacto.
Cerrar la ventana no cancela nada. La tarjeta de descarga sobrevive; plegada, mantiene porcentaje y barra visibles — “Keep working — this continues in the background.”
La pantalla de modelos: banner de verificación arriba, tamaños reales por paquete, sellos PRO en Video y Audio, y la estimación abajo.
Y trabajas pronto: en cuanto lo esencial está (unos 14,5 GB), el estudio se abre y el resto sigue bajando en segundo plano. Añade o quita paquetes cuando quieras vía Settings › Hardware & Models — un modelo ya en disco nunca se vuelve a descargar.
Elige la carpeta de salida
“Where should your creations be saved?”: elige la carpeta donde aterrizarán imágenes, vídeos y pistas. Haz clic en Choose…, selecciona (o crea) una carpeta en el explorador de Windows y confirma con Continue →. Se puede cambiar en cualquier momento en Settings.
La elección de la carpeta de salida: haz clic en “Choose…”.Se abre el explorador de Windows: crea, por ejemplo, una carpeta “Trag output” en tus Documentos.
La ruta está definida: solo queda “Continue →” (marcado en verde).
Recta final
TRAG muestra tres bazas que conviene recordar — la Main chat bar y su ✦ magic wand (tu prompt mejorado en un clic), Add Multiple Jobs (lanzar todo un lote de una vez) y la Media Gallery (todas tus creaciones, listas para reutilizar). Después, “You're all set” confirma que tus motores están instalados: haz clic en Let's Create →.
Tres cosas que explorar desde ya — y una pista: un agente de IA puede incluso crear por ti (Settings › Connection).“You're all set”: todo instalado — a crear.
El tour guiado (8 pasos)
En la primera apertura, un breve tour guiado ilumina una a una las zonas clave (elección de modo, workflows, ajustes, prompt…). Síguelo con Next →, o sáltalo con Skip — se puede relanzar en cualquier momento con “Take the tour” en la barra lateral.
El tour guiado (paso 1 de 8): “Next” avanza paso a paso.¿Con prisa? “Skip” cierra el tour — sigue disponible en la barra lateral.
04La interfaz de un vistazo
Todo TRAG cabe en una sola pantalla, pensada para crear sin perderse. Este es el mapa.
Al arrancar, TRAG precarga sus modelos (“Warming up the models”) y te deja en el espacio Create:
El arranque: TRAG pone sus modelos en marcha.La interfaz principal (aquí en Text to Image). El recuadro verde señala la parte baja de la barra lateral: modo claro, Settings, Help, pantalla completa y tu cuenta.Cinema Flow, la línea de tiempo de cine — Storyboard, Script, Film, Edit. Un adelanto de lo que viene: pasea y pulsa “Keep me posted”.
La barra lateral (izquierda) — Search (la paleta de comandos), Create (el taller), Media Gallery (tus creaciones), Creation Flow (la cola de render) y Cinema Flow (un adelanto de la línea de tiempo de cine — pronto), y abajo: Light mode, Settings, Help, Toggle Fullscreen y tu perfil.
Las pestañas Image / Video / Audio (arriba, centro) — la categoría de creación. Cada categoría muestra después sus subpestañas de workflows (Text to Image, Image to Image, Magic Edit, Blend Images…).
El viewport (centro) — el escenario donde tu resultado aparece, se compara, se reproduce.
El panel de ajustes (derecha) — las opciones del workflow activo: Dimensions, Style, Quality… “More settings” despliega las avanzadas.
La Main chat bar (abajo) — describe tu idea y pulsa el gran botón de acción (Generate Image, Animate Image, Generate Music…). La ✦ magic wand mejora tu prompt en un clic, el micrófono toma dictado por voz, y debajo aparece una sugerencia de ejemplo para inspirarte.
El botón Warm up (arriba a la izquierda) — precalienta el motor de la categoría activa para eliminar la espera del primer render.
La barra de estado (abajo del todo) — la salud de los servicios locales: “AI engine connected” (el motor de generación, con actividad GPU) y “AI Companion connected” (el asistente de prompts, en CPU).
El botón Warm up y el estado de los motores
Cada categoría tiene su motor, y TRAG solo mantiene uno caliente a la vez para cuidar tu tarjeta gráfica. La insignia de arriba a la izquierda lo cuenta todo:
Los dos indicadores de salud: el botón “Warm up” arriba a la izquierda, y la barra de estado abajo a la derecha.
Rojo — Engine offline: el motor está parado. Doble clic en la insignia para relanzarlo.Naranja — Warming: el motor arranca (el porcentaje sube). Cambiar de categoría enfría el motor anterior — solo uno permanece caliente.Verde — ready: el motor está caliente; la generación empieza al instante.
Existe un cuarto estado: cuando ninguna GPU es utilizable, el indicador del pie pasa a ámbar y lo dice sin rodeos — “AI engine connected (CPU — no GPU detected)”. Es el repliegue al procesador de la sección 03: todo funciona, solo que mucho más despacio.
Claro, oscuro… o Creator
El primer botón de la parte baja de la barra lateral cambia el ambiente: un modo claro limpio, un modo oscuro profundo, y el modo Creator — un negro mate pensado para crear sin distracciones, con acentos opcionales (como “Obsidian Orange”). Un pequeño aviso confirma cada cambio de apariencia.
El modo claro — la misma interfaz, ambiente luminoso.El negro mate del modo Creator — aquí con el acento “Obsidian Orange”; el aviso confirma la apariencia elegida.
La paleta de búsqueda
El botón Search de la barra lateral abre una paleta de comandos: escribe para filtrar pantallas, workflows y acciones (“Go to Media Gallery”, “Text to Image”, “Open Settings”…) y confirma con Intro. Esc la cierra.
La paleta de búsqueda: todo TRAG al alcance del teclado.
05Crear imágenes
La pestaña Image reúne cuatro workflows: crear desde un texto, transformar una imagen, retocar una zona exacta, o fusionar varias imágenes en una.
El prompt describe el contenido; los ajustes describen la técnica. En el prompt: sujeto, ambiente, luz. En el panel derecho: el formato (Dimensions), el acabado (Style), la finura (Quality). Nunca escribas “4K” o “formato cuadrado” en el prompt — un clic en los ajustes lo hace mejor.
Text to Image — crear desde un texto
“Create a brand-new image from text alone.” El workflow inicial, y el más directo:
Pestaña Image → subpestaña Text to Image.
Elige tus ajustes a la derecha: Dimensions (Portrait, Square, Landscape, Poster o Custom) y Style (Auto, Photo, Cinematic, Illustration, 3D, Anime, Watercolor, Oil Painting, Pixel Art, Comic, Fantasy). “More settings” añade Custom settings, un dial de Creativity y un prompt negativo.
Describe tu imagen en la barra inferior — sujeto, estilo, luz, ambiente.
Haz clic en Generate Image →. El resultado aparece en el viewport y entra automáticamente en la Media Gallery.
Text to Image: ajustes a la derecha, prompt abajo, resultado en el centro.El panel de ajustes en detalle: Dimensions, Style, Quality — y Custom settings, Creativity y Negative prompt bajo “More settings”.
Tras la generación, dos botones aparecen sobre el resultado: ✦ Re-use prompt (volver a partir del mismo texto) y ✦ Use as source (enviar la imagen a otro workflow). La banda Recent Generations bajo el viewport guarda tus últimos intentos a un clic.
Un render terminado: “Re-use prompt”, “Use as source”, y la banda “Recent Generations” para saltar entre intentos.
Image to Image — transformar una imagen
“Restyle, enhance, mix or upscale an existing image.” Entrega una imagen de partida y describe el cambio:
Subpestaña Image to Image, luego carga tu imagen con Source image → Click to choose (o marca “Iterate from last result” para partir del último render).
Ajusta el Style, la Quality y el factor Upscale (1x / 1.5x / 2x — ideal para una ampliación nítida).
Describe la transformación — “restyle, enhance, upscale…” — y haz clic en Transform Image →.
Compara. El viewport muestra un deslizador Before / After: arrástralo para barrer entre original y resultado.
Image to Image: los recuadros verdes señalan la subpestaña y la zona de trabajo.Los ajustes: fuente, Style, Quality, Upscale — y Similarity to source bajo “More settings”.
Generación en curso: la transformación barre la imagen.El comparador “Before / After”: arrastra el tirador para sopesar el cambio.
Magic Edit — retocar una zona pintada Pro
“Paint a region and replace just that part — add, remove or swap objects.” Deliciosamente simple: pintas la zona a cambiar, dices qué va ahí, y TRAG no toca nada más.
Subpestaña Magic Edit, luego carga la imagen a retocar (Image to edit → Click to choose).
Elige tu máscara a la derecha: Brush (pincel libre) o Auto-detect. Ajusta la Opacity y la Hardness del pincel si hace falta — Brush size y Blending strength viven bajo “More settings”.
Pinta directamente sobre la imagen la zona a modificar — se cubre con un velo resaltado. “Clear canvas” borra la máscara, “Reuse mask” recupera la anterior.
Describe el cambio en la barra inferior (añadir, quitar, sustituir…) y haz clic en Apply Edit →. El comparador Before / After permite luego verificar el retoque.
Magic Edit en acción: la zona pintada sobre la imagen, los ajustes de máscara, y el prompt que describe la sustitución — tres marcas verdes, tres gestos.
Magic Edit al inicio: carga una imagen, elige el modo de máscara.Los ajustes de Magic Edit: Mask (Brush / Auto-detect), Opacity, Hardness — Brush size y Blending strength más abajo.
Tras la edición: el deslizador Before / After confirma que solo cambió la zona enmascarada.
Blend Images — fusionar varias imágenes Pro
“Combine multiple images into one — subject + style, or several references.” Un sujeto de aquí, un estilo de allá: Blend casa dos imágenes (y una tercera opcional).
Subpestaña Blend Images, luego carga Image A e Image B (“+ Add another” para una C opcional).
Elige un Style si quieres orientar el acabado.
Describe cómo se combinan las imágenes — quién hace qué, en qué escena — y haz clic en Blend →.
Dos fuentes cargadas (A + B) y un prompt que narra la fusión — las tres zonas marcadas en verde.El resultado: los personajes de las imágenes A y B reunidos en una misma escena.
Blend Images al inicio: las casillas A y B esperan tus imágenes.Los ajustes: Source Images (A, B, + Add another), Style — y el Blending balance bajo “More settings”.
06Crear vídeos Pro
La pestaña Video crea un clip desde un simple prompt, anima tus imágenes, une dos instantes con un movimiento fluido, o hace hablar a un rostro. Los cuatro workflows de vídeo pertenecen a la edición Pro.
Al pasar a la pestaña Video, el botón superior se convierte en “Warm up LTX 2.3 engine”: púlsalo antes de tu primer vídeo para precalentar el motor. Los clips cortos son más rápidos y estables — empieza con 5 s.
Text to Video — un clip desde un simple prompt
“Create a video entirely from a text description.” Sin imagen de origen: describe la escena y el movimiento, y TRAG filma.
Pestaña Video → subpestaña Text to Video.
Elige el encuadre: Format (TikTok, YouTube, Square o Custom), Aspect ratio (9:16, 16:9, 1:1, 4:3), Definition (SD 480p → UHD 2160p) y Duration (5s, 10s, 15s o Custom).
Describe el plano — sujeto, movimiento de cámara, ambiente — y pulsa el botón de acción para dejar filmar al motor.
Los ajustes de Text to Video: Format, Aspect ratio, Definition, Duration, Style.
Image to Video — animar una imagen
“Bring a still image to life with motion.” Una imagen + una descripción del movimiento = un clip de vídeo, con audio y diálogo sincronizados si los describes.
Pestaña Video → subpestaña Image to Video, luego carga tu imagen (Source image → Click to choose, o envía una desde la Media Gallery con “Use as source”).
Elige el Format — TikTok (vertical), YouTube (16:9), Square o Custom — y la Duration (5s, 10s, 15s o Custom). Quality y Smoothness (24 / 30 / 60 FPS) están bajo “More settings”.
Describe el movimiento — qué hace el sujeto, la cámara, el ambiente sonoro, incluso una frase que pronunciar.
Haz clic en Animate Image → y deja trabajar al motor: el clip se reproduce después directamente en el viewport.
Image to Video: formato, duración y resolución a la derecha, movimiento descrito abajo.Los ajustes de vídeo: fuente, Format, Duration — Quality y Smoothness bajo “More settings”.
Un clip generado en reproducción — la fuente y el prompt marcados en verde.
Smooth Motion — de una imagen a otra
“Morph a start frame into an end frame with fluid motion.” Entrega la imagen inicial y la final: TRAG inventa el movimiento fluido que las une.
Subpestaña Smooth Motion, luego carga el Start frame y el End frame.
Elige el encuadre y la fluidez: Format, Duration — y Smoothness (24 / 30 / 60 FPS) bajo “More settings”.
Describe el movimiento del primer al último fotograma, y haz clic en Generate Motion →.
Smooth Motion: un fotograma inicial, uno final — el movimiento se inventa entre ambos.Los ajustes: Start frame, End frame, Format, Duration — Quality y Smoothness bajo “More settings”.
Lip Sync — hacer hablar a un rostro
“Drive a face video or image with an audio track so the lips match.” Un rostro (foto o vídeo) + una pista de audio = labios perfectamente sincronizados.
Subpestaña Lip Sync, luego carga el Face video/image y la Audio track. ¿Sin archivo de audio a mano? Record from mic graba tu voz al momento.
Elige el encuadre: Format y Duration — Quality y Smoothness bajo “More settings”.
Añade un prompt opcional para guiar el resultado, y haz clic en Sync Lips →.
Lip Sync: un rostro, una pista de audio (o el micro), y la fuerza de articulación.Los ajustes: Face video/image, Audio track, Record from mic, Format y Duration.
07Crear audio Pro
La pestaña Audio compone piezas enteras — con o sin letra — remezcla tus pistas y regenera un pasaje exacto. Los tres workflows de audio pertenecen a la edición Pro.
Text to Music — componer una pista
“Compose music from a description.” Describe la pieza, fija el ambiente… y escribe la letra si te apetece:
Pestaña Audio → subpestaña Text to Music. El botón superior se convierte en “Warm up ACE-Step 1.5 engine”: un clic para precalentar.
Escribe tu letra (opcional) en el editor Lyrics central: estructúrala con Verse, Chorus y Bridge, elige el idioma (EN, FR, ES, DE, IT, PT, JA, ZH, KO, RU…). Déjalo vacío para un instrumental.
Da forma a la música a la derecha: Style (Pop, Rap, Afro, Rock, Electronic, Cinematic), Mood (Happy, Epic, Chill… dieciséis ambientes), Key & Scale (¡el pequeño teclado de piano!), BPM y Duration (30s, 1m, 2m o Custom).
Describe la pieza en la barra inferior y haz clic en Generate Music →. La pista aparece en un reproductor, lista para escuchar — y archivada en la Media Gallery.
Text to Music: el editor de letra en el centro (Verse / Chorus / Bridge), los ajustes musicales a la derecha.Los ajustes de música: Style, Mood, Key & Scale, BPM, Duration — Quality bajo “More settings”.
Una vez generada la pista, el botón ✦ Use as source del reproductor la envía en un clic hacia Remix this track, Section Edit o Lip Sync (audio):
Una pista generada: el menú “Use as source” encadena hacia Remix, Section Edit o Lip Sync.
Remix — transformar una pista
“Transform an existing audio track into a new style.” Tu canción, con otro traje:
Subpestaña Remix, luego carga la pista (Source audio → Click to choose).
Elige el Style y el Mood, y dosifica Keep Original (bajo “More settings”): cuanto más alto el porcentaje, más se trasluce el original.
Describe la nueva dirección — género, vibra, tempo — y haz clic en Remix Track →.
Remix: una pista fuente, un estilo objetivo, y el dial “Keep Original”.Los ajustes de Remix: Source audio, Style, Mood, Key & Scale — Keep Original bajo “More settings”.
Section Edit — regenerar un pasaje
“Replace or regenerate a chosen section of a track.” ¿El estribillo no convence? Regenera solo eso, sin tocar el resto:
Subpestaña Section Edit, luego carga la pista.
Delimita la Section a retrabajar (por ejemplo 0:12 – 0:24, con “Set range…”).
Elige Match: Keep key & tempo para mantenerte a tono con el resto de la pieza, o Free para soltar amarras.
Describe el reemplazo y haz clic en Repaint Section →.
Section Edit: elige el rango a regenerar, conserva (o no) tonalidad y tempo.Los ajustes: Source audio, Quality, Match — Keep key & tempo, o Free.
La barra de prompt en modo Section Edit: describe el reemplazo, con la varita ✦, el micro y el adjunto a mano.
08Creation Flow y lotes de jobs
El Creation Flow es tu torre de control de renders: la cola en tiempo real, el historial de todo lo creado, y el lanzamiento de lotes enteros.
La feature del año Exclusivo
TRAG es la única herramienta del mercado con un sistema de cola digno de ese nombre — manéjalo a mano, o deja que un agente MCP lo lleve por ti.
Seguir la cola de render
Abre Creation Flow desde la barra lateral (el contador del icono indica los jobs en espera). Cada fila muestra su estado — Generating con porcentaje y tiempo restante, Waiting con estimación, luego Completed — y sus botones Open / Cancel. Arriba a la derecha: History, Add Multiple Jobs, y durante la ejecución Stop, Pause y Stop all.
La cola en acción: un job generándose, los siguientes en espera, y los mandos History / Add Multiple Jobs / Stop / Pause / Stop all (recuadrados en verde).Todo terminado: cada fila pasa a “Completed”, con su botón “Open”.
El historial de creaciones
El botón History abre la Creation History: estadísticas de la sesión (creaciones por workflow) y, por cada entrada, Use prompt (retomar el texto), Save preset (memorizar los ajustes) y Open. Export guarda el historial, Clear lo vacía.
La Creation History: contadores por workflow y acciones Use prompt / Save preset / Open.Al principio el historial está vacío — se llena con cada render.
Add Multiple Jobs — lanzar todo un lote
¿Te apetece generar diez imágenes y cinco pistas durante la pausa de la comida? Add Multiple Jobs encadena toda una lista de creaciones, automáticamente:
Copia la “matriz” de la categoría deseada — Copy Image, Copy Video o Copy Audio. Es una plantilla de texto que enseña a una IA (ChatGPT, Claude…) a redactar tu lista de jobs.
Haz que te escriban la lista: pega la matriz en tu IA favorita junto con tus ideas, y recupera un archivo .md (un job por línea, un título # por categoría).
Suelta el .md en la zona “Drag result here”: TRAG lo lee y anuncia “X jobs ready”. Si tus jobs usan archivos (imágenes, audio…), suelta también un .zip con esos recursos en la segunda zona.
Elige la carpeta de salida y haz clic en Generate: los jobs desfilan solos por el Creation Flow, y cada render entra en la Media Gallery.
La idea: la matriz “Copy Image” sirve de plantilla, y tu lista se convierte en un .md estructurado.El .md soltado: “15 jobs ready” — solo queda generar.
La modal Add Multiple Jobs: matrices para copiar, zona de arrastre .md, zona .zip para recursos, y carpeta de salida.
Aún más simple con Trag Muse: el banner fucsia “Use your agent to orchestrate” deja que tu agente de IA dirija TRAG directamente, sin copiar y pegar — ver Trag Muse y Agent Gateway.
Un lote terminado en el Creation Flow. Las flechas señalan “Add Multiple Jobs” y el atajo Trag Muse de la barra lateral.
09Media Gallery
Cada creación — imagen, vídeo, pista — se archiva automáticamente en la Media Gallery. Es tu biblioteca: ahí se encuentra, se reproduce, se reutiliza.
Explorar y filtrar
En lo alto de la galería: filtros por tipo (All / Image / Video / Audio), por origen (All / Mine / Agent sessions — útil para aislar lo que creó un agente), orden (Newest first…), tamaño de cuadrícula y Refresh.
La galería y sus filtros — aún vacía aquí: “Assets you generate will appear here.”La galería llena: haz clic en una miniatura para abrir su panel “Item Details”.
La ficha de un medio: Item Details
El panel Item Details muestra todo lo que hay que saber: vista previa (o reproductor), nombre de archivo, tipo, tamaño, fecha, workflow de origen — incluso “Request from: AI agent” cuando la creación viene de un agente. Más abajo, el prompt completo con tres botones: Copy, Send to chat (devolverlo a la Main chat bar para retrabajarlo) y Save as preset. Por último, Save As… exporta el archivo donde quieras, y Delete lo elimina.
Item Details: metadatos, y “Save As…” y “Delete” abajo (desplaza el panel).El prompt original, reutilizable en un clic: Copy, Send to chat, Save as preset.
Reutilizar una creación: Use as source
El botón ✦ Use as source es el puente entre tus workflows: envía el medio seleccionado como punto de partida de una nueva creación. Para una imagen: Image to Image, Magic Edit, Blend Images (A o B) o Image to Video. Para un vídeo: Smooth Motion o Lip Sync (Face). Para una pista: Remix, Section Edit o Lip Sync (audio).
“Use as source” desde la ficha de una imagen: cuatro destinos posibles.El visor a pantalla completa ofrece los mismos atajos: Use as source y Save As….
Para un vídeo: reproducción integrada, y “Use as source” hacia Smooth Motion o Lip Sync.
En el disco, tus creaciones viven en la carpeta de salida elegida en el onboarding (modificable en Settings › Storage), con nombres explícitos como TRAG_image_t2i_082.png — el workflow de origen va en el nombre.
10Ajustes
El botón Settings de la barra lateral abre las preferencias, organizadas por secciones: Connection, Storage, Hardware & Models, Preferences y Language.
Carpetas, hardware y modelos
Storage — el Gallery folder (donde vive tu biblioteca) y el Generated files folder (donde se guardan las nuevas creaciones): dos botones Browse… para cambiarlos.
Hardware & Models — el diagnóstico actual, Re-scan hardware para relanzar la detección, la selección manual, e Installed models & workflows para añadir o quitar motores descargados.
Preferences — los sonidos de interfaz, el tutorial de arranque, los atajos personalizados (Alt+F alterna la pantalla completa) y la escala de visualización.
Language — el idioma de la interfaz.
Abajo: Reset restaura los valores por defecto, Save changes guarda los tuyos.
Settings › Storage & Hardware: carpetas de salida y gestión de modelos instalados.Settings › Preferences & Language: sonidos, tutorial, atajos, idioma.
Tu cuenta, tu licencia
Un clic en tu perfil, al pie de la barra lateral, abre el panel de cuenta: Manage account & billing, tu plan, la versión de la app con su botón Check for updates, tus preferencias de comunicación — y Report a problem, la línea directa cuando algo falla. Aquí compruebas que tu licencia Pro está activa.
El panel de cuenta: tu plan y su ventaja Early-Bird, la versión real con “Check for updates”, y “Report a problem” — ambos marcados en verde.
Cómo se actualiza TRAG
TRAG comprueba en silencio al arrancar, y luego cada 6 horas. Si no hay nada nuevo, no ves nada.
Cuando existe una versión, aparece un banner discreto abajo a la izquierda. Nunca bloqueante — sigue trabajando; Later lo silencia 24 horas.
Un clic en Update now: la aplicación se cierra sola, se actualiza y se relanza. Un parche pesa unos megabytes — no los gigabytes del instalador.
Los modelos ya descargados nunca se vuelven a descargar con una actualización.
¿Prefieres comprobarlo tú? Panel de cuenta → Check for updates.
Trag Muse y Agent Gateway Muse
Trag Muse convierte tu estación de trabajo en un estudio de producción conectado: tus agentes y tus API dirigen TRAG de la primera idea al máster final — mientras tus archivos, tus modelos y tus renders se quedan en tu máquina.
✦ Lo que Trag Muse desbloqueará
Dirige TRAG desde Claude, Codex o cualquier agente MCP — incluso en remoto.
Conecta las API que usas — Seedance, Kling, Nano Banana y más — desde la interfaz que ya conoces.
Convierte ideas y storyboards en producciones con Creation Flow.
Monta, ensambla y refina tus medios en un espacio de trabajo conectado.
Mantén la potencia en local — archivos, modelos y render en tu máquina.
Disponible pronto, como add-on de Free y de Pro. La ventana Muse de la app lo dice mejor — “join the first wave”: pulsa Keep me posted y sabrás el día de la apertura.
La fontanería detrás es el Agent Gateway, en Settings › Connection — la sección con ribete fucsia. Cuando tu acceso se abra, la puesta en marcha cabe en cuatro gestos:
Activa el Agent gateway (interruptor en On — el estado pasa a “● Running”).
Anota la dirección local mostrada bajo “Reachable at” (con su botón de copiar) — es la que usará tu agente. La opción Local network la expone también a tu Wi-Fi si diriges TRAG desde otro dispositivo.
Descarga la configuración con Save mcp.json, y sigue las indicaciones en pantalla para conectarla a tu agente (Claude, Codex…).
Deja la pasarela en On: tu agente ya puede crear en TRAG — sus obras se marcan “Request from: AI agent” en la galería, filtrables con “Agent sessions”.
Settings › Connection: el Agent gateway en marcha, la dirección para tu agente, y el botón “Save mcp.json” (marcados en verde).
¿Pulsaste “Cancelar” en la alerta del firewall? No se rompió nada
Todo lo que TRAG hace por sí mismo — hablar con sus motores en tu máquina, descargar modelos, comprobar actualizaciones — no necesita permiso alguno del firewall. El único caso que sí: ser dirigido desde otro dispositivo de tu red. Si rechazaste la alerta de Windows, ni las descargas, ni la generación, ni las actualizaciones sufrieron. Para conceder el permiso a posteriori:
Vía 1 — por los ajustes de Windows (sin línea de comandos)
Abre Inicio, escribe firewall y elige Firewall de Windows Defender.
PulsaPermitir una aplicación o característica a través de Firewall de Windows Defender.
Pulsa Cambiar configuración(pide derechos de administrador).
Busca TRAG Studio en la lista. Si está: marca Privada. No marques “Pública”. Si no está: Permitir otra aplicación… → Examinar… → selecciona TRAG.exe en la carpeta de instalación → Agregar, y marca Privada.
Valida con Aceptar y reinicia TRAG.
Marca Privada (red doméstica) y nunca Pública. Una red pública es un hotel, un aeropuerto, una cafetería — no es sitio para exponer tu estudio.
Vía 2 — en un comando (para quien esté cómodo): abre un símbolo del sistema como administrador y adapta la ruta si hace falta:
Antivirus de terceros. Algunos bloquean la alerta del firewall de Windows, o el propio descargador. Si TRAG no logra descargar modelos con la conexión funcionando, pausa temporalmente el antivirus, o añade la carpeta de instalación a sus exclusiones.
Red de empresa o de escuela. Un proxy o un filtrado puede bloquear download.trag.studio. El síntoma: los modelos nunca empiezan a bajar mientras el resto de internet funciona. Prueba desde una conexión doméstica o compartiendo datos del móvil, o pide al administrador de red que autorice ese dominio.
11Consejos para mejores resultados
Unos cuantos reflejos que lo cambian todo, del primer prompt al render final.
Prompts precisos
Sujeto + acción + ambiente + luz. “Un faro bajo la tormenta, olas enormes, luz dramática” siempre ganará a “un faro”. Las sugerencias ✦ bajo la barra de prompt son buenos modelos.
El prompt describe, los ajustes ajustan
Formato, duración, calidad, estilo: un clic en el panel derecho. Nunca en el prompt — evitarás resultados confusos.
Respeta los valores por defecto
Los ajustes por defecto están calibrados para tu máquina (gracias, Studio Index). Cambia una cosa cada vez: sabrás qué marcó la diferencia.
Precalienta el motor
Un clic en Warm up antes de la sesión, y el primer render sale sin espera. La insignia verde “ready” avisa cuándo.
Fuente + prompt > ajustes
Para transformar una imagen o una pista, la calidad de la fuente y la claridad del prompt pesan más que cualquier ajuste avanzado.
Corto primero, largo después
En vídeo, valida la idea con un clip de 5 s en resolución Fast, y relanza más largo y fino. Iterarás el doble de rápido.
La Main chat bar, tu mejor aliada
Todo pasa por la Main chat bar, la barra única de la parte baja de la pantalla. Describe tu idea y deja que sus herramientas trabajen: la ✦ magic wand reescribe y refuerza tu prompt en un clic (sujeto más preciso, luz, ambiente), el micrófono toma dictado por voz, el clip adjunta una referencia, y las sugerencias ✦ de debajo muestran el nivel de detalle que funciona. Desde la galería, “Send to chat” devuelve un prompt antiguo a la barra para retrabajarlo en una nueva versión.
12FAQ — Preguntas frecuentes
Respuestas cortas a las preguntas que más nos hacen.
¿Necesito internet?
No. Una vez terminadas la instalación y la descarga de modelos, todo funciona sin conexión, en local. Internet solo sirve para descargar la aplicación, los modelos y las actualizaciones.
¿Mis creaciones son privadas?
Sí. La generación ocurre en tu GPU; tus prompts y archivos se quedan en tu máquina. Nada se envía a la nube.
¿Qué hardware necesito?
TRAG arranca desde una NVIDIA RTX serie 20 (4 GB), 16 GB de RAM y un Intel Core i5 de 7.ª generación o equivalente — ver Requisitos mínimos. En el onboarding, TRAG calcula tu Studio Index y adapta las opciones a tu máquina — menos potencia significa simplemente ajustes más modestos, no una puerta cerrada.
El motor no arranca / mi GPU no se detecta
Al instalar, TRAG comprueba qué versión de CUDA soporta tu controlador gráfico e instala la variante correspondiente — no tienes que actualizar nada. Si el motor sigue en rojo, abre %LOCALAPPDATA%\TRAG Studio\logs\ y busca la línea engine device=: dice cuda (tu tarjeta trabaja) o cpu (repliegue al procesador). Envíanos esa línea a hello@trag.studio — nos basta para entender qué pasó.
Aparece una ventana del firewall al arrancar, ¿qué hago?
Haz clic en “Permitir” solo si quieres dirigir TRAG desde otro dispositivo de la red (Agent Gateway). Si no, cierra la ventana sin miedo: la aplicación funciona perfectamente sin ese permiso. Si lo rechazaste y quieres volver sobre ello, los pasos manuales están en Trag Muse y Agent Gateway.
¿Cuánto puede durar un vídeo?
La duración se fija en los ajustes de vídeo (5 s, 10 s, 15 s o Custom). Ten presente que los clips cortos son más rápidos y estables — es la buena manera de iterar.
¿Dónde se guardan mis creaciones?
En la carpeta de salida elegida en el onboarding (modificable en Settings › Storage). Todas aparecen también en la Media Gallery.
¿Qué diferencia hay entre Free y Pro?
Free es gratis e ilimitado, pero hace solo imagen (Text to Image + Image to Image). Pro desbloquea todo: Magic Edit, Blend Images, todo el vídeo, todo el audio — y descarga todos los modelos correspondientes.
¿Qué son las funciones PRO?
Los workflows con insignia PRO en la interfaz: Magic Edit, Blend Images, todo el vídeo (Image to Video, Smooth Motion, Lip Sync) y todo el audio (Text to Music, Remix, Section Edit). Se activan al pasar a Trag Studio Pro.
¿Cómo paso a Pro?
Desde el portal web: compras (pago único), la clave se vincula a tu perfil, y la aplicación desbloquea los workflows y ofrece descargar los modelos de vídeo y audio. Puedes comprar Pro directamente, o empezar en Free y subir después — nada se pierde por el camino.
¿Qué es Trag Muse?
El estudio de producción conectado, que llega como add-on de Free y de Pro: tus agentes (Claude, Codex o cualquier agente MCP) y tus API (Seedance, Kling, Nano Banana…) dirigen TRAG vía el Agent Gateway — mientras todo se renderiza en tu máquina. Está al llegar: pulsa Keep me posted en la ventana Muse para unirte a la primera ola.
¿Puedo dejar que una IA dirija TRAG?
Sí — para eso existe Trag Muse. A través del Agent Gateway, un agente externo (Claude, Codex o cualquier agente MCP) se conecta a tu TRAG local y puede lanzar y encadenar creaciones — marcadas “Request from: AI agent” y filtrables en la galería (“Agent sessions”). Muse llega pronto: Keep me posted te apunta a la primera ola.
¿Prompt o ajustes? ¿Cuál es la diferencia?
El prompt describe el contenido: sujeto, ambiente, diálogo. Los ajustes son técnicos: formato, duración, estilo, calidad. Nunca pongas un ajuste técnico en el prompt — el panel derecho lo hace mejor, sin ambigüedad.
Cuéntanos cómo podemos ayudarte.
hello@trag.studio es la puerta del soporte — un humano lee cada mensaje.
Crie imagens, vídeos e música — no seu PC, só para você.
O TRAG Studio é uma aplicação Windows de geração por IA que funciona 100 % localmente, na placa gráfica da sua máquina. Sem nuvem, sem assinatura escondida, sem fila de espera: as suas ideias, os seus ficheiros, em sua casa.
O TRAG Studio organiza-se em três categorias — Image, Video e Audio — acessíveis pelas abas no topo do ecrã. Cada categoria reúne workflows: ateliês de criação prontos a usar.
Imagem
Text to Image (criar a partir de texto), Image to Image (transformar uma imagem), Magic EditPro (retocar uma zona pintada) e Blend ImagesPro (fundir 2-3 imagens).
Vídeo Pro
Text to Video (um clipe a partir de um simples prompt), Image to Video (animar uma imagem, com áudio e diálogo sincronizados), Smooth Motion (ligar um quadro inicial a um final) e Lip Sync (sincronizar um rosto com uma faixa de áudio).
Áudio Pro
Text to Music (compor uma faixa, com letra opcional), Remix (transformar uma faixa existente) e Section Edit (regenerar um trecho preciso).
Trag Muse Muse
O estúdio de produção ligado, disponível em breve: conduza o TRAG a partir do Claude, do Codex ou de qualquer agente MCP, e ligue as API que usa — enquanto tudo é renderizado na sua máquina.
Para quem é
Influenciadores e criadores de conteúdo
Um clipe por dia em formato TikTok, YouTube ou Square, b-roll a pedido, música que lhe pertence — tudo em lote durante a noite com Add Multiple Jobs.
Agências digitais
Visuais prontos para o cliente em volume, sem tarifa por imagem nem ansiedade de quotas — e tudo fica nas vossas máquinas: confidencialidade por construção.
Criadores de universos narrativos
Personagens coerentes com Image to Image e Blend, cenas postas em movimento, a banda sonora de cada capítulo — um universo inteiro a partir de uma só secretária.
Estúdios indie e músicos
Concept art, animáticas, maquetas sonoras e remisturas para iterar depressa — tentativas ilimitadas, zero fatura de nuvem.
Ao longo deste guia verá capturas de ecrã da aplicação: os retângulos e setas verde-vivo apontam para o elemento em causa. Clique em qualquer imagem para ampliá-la.
As três ofertas: Free, Pro e Trag Muse
O TRAG existe em duas edições, mais uma camada de automatização opcional:
Oferta
Preço
O que pode fazer
Modelos descarregados
Trag Studio FreeFree
Grátis
Só imagem: Text to Image + Image to Image, uso ilimitado.
Só modelos de imagem
Trag Studio ProPro
Compra única (portal web)
Tudo: imagem (+ Magic Edit, Blend Images), todo o vídeo, todo o áudio.
Todos os modelos (imagem + vídeo + áudio)
Trag MuseMuse
Add-on — em breve
O estúdio de produção ligado: os seus agentes e as suas API conduzem o TRAG via Agent Gateway. Combina-se com Free ou Pro — junte-se à primeira vaga a partir da app.
— (camada de software)
Dois caminhos possíveis, à sua escolha:
Começar grátis e passar a Pro depois. Descarregue o TRAG Studio Free no site, crie imagens à vontade… e quando o vídeo ou o áudio chamarem, compre o Pro no portal web. A chave fica ligada ao seu perfil: a aplicação desbloqueia os workflows e propõe descarregar os modelos em falta.
Comprar o Pro diretamente. A compra coloca a chave no seu perfil; no primeiro início de sessão, o onboarding instala logo a experiência completa.
Na aplicação, os workflows reservados exibem um selo PRO (por exemplo “Magic Edit Pro”) — é a marca visual desta matriz. O detalhe workflow a workflow está recapitulado nas FAQ.
A janela Pro na app: todos os workflows desbloqueados num pagamento único — com o desconto Early-Bird enquanto durar.
02Instalação
A instalação usa um assistente Windows clássico — alguns “Next” e está feito. Eis o percurso exato, ecrã a ecrã.
Antes de começar: o instalador contém a aplicação e os seus motores de execução (Python, CUDA, ComfyUI) — não os modelos de IA. Esses descarregam-se depois, durante a primeira configuração, e apenas os pacotes que marcar. Instalar pode ainda assim demorar um momento — é normal, e só acontece uma vez.
Execute o ficheiro TRAG_Studio_V1.0_Setup descarregado do site TRAG (cerca de 1 GB). O Windows pede uma confirmação de segurança: aceite para continuar.
Extraia o instalador. Abre-se uma pequena janela de autoextração, apontada à sua pasta de Transferências. Clique em Extract e deixe terminar.
O ficheiro descarregado, pronto a executar — o ícone verde TRAG nas suas Transferências.A autoextração: clique em “Extract” e deixe acabar.
Escolha as opções no TRAG Studio Setup. O instalador abre num único ecrã: a pasta de instalação vem preenchida na sua pasta de utilizador (…\AppData\Local\Programs\TRAG Studio — sem direitos de administrador), com duas caixas já marcadas: atalho no ambiente de trabalho e regra da firewall. Deixe-as e clique em Instalar TRAG Studio →.
Deixe o instalador trabalhar. Enquanto um diaporama apresenta o estúdio, a barra conta exatamente o que se passa — incluindo a etapa em que o TRAG deteta que versão de CUDA o seu driver gráfico suporta e vai buscar a variante certa. Nada a fazer, senão esperar.
Um só ecrã, três escolhas: a pasta, o atalho e a regra da firewall — depois Instalar.A instalação narra-se: aqui, o driver CUDA 12.6 foi detetado e a variante certa está a descer.
Termine e lance. “Installation terminée” propõe apagar o ficheiro temporário de instalação (cerca de 2,5 GB — marque para libertar o espaço) e um grande botão Lançar TRAG Studio →. No primeiro arranque, o TRAG recebe-o com o ecrã de início de sessão — rumo à secção seguinte!
Feito: liberte o ficheiro temporário e lance o estúdio.
No primeiro arranque pode surgir um aviso da Firewall do Windows. Clique em “Permitir” apenas se pensa conduzir o TRAG a partir de outro dispositivo da rede (ver Agent Gateway). Caso contrário, feche a janela — o TRAG funciona perfeitamente sem isso.
03Início de sessão e primeira configuração
No primeiro arranque, o TRAG guia-o em poucos passos: início de sessão, deteção do hardware, escolha dos workflows, pasta de saída. Cinco minutos (fora o download dos modelos).
Iniciar sessão
O ecrã “Welcome back” oferece duas portas: Continue with Google, ou e-mail e palavra-passe. Com o Google, o início de sessão termina no seu navegador — o TRAG espera e retoma automaticamente assim que acabar. Ainda sem conta? “Create one” cria-a num instante.
A sua conta transporta a sua licença: a chave Pro está ligada ao perfil. Iniciar sessão é necessário — é o que faz as suas compras e presets seguirem consigo.
Início com Google: termine no navegador — o TRAG retoma automaticamente e devolve-o ao estúdio.
As boas-vindas do onboarding
O TRAG apresenta-se numa frase — “Local generative AI, made for everyone.” — e reafirma a promessa: uma interface simples a correr motores open source potentes na sua máquina, sem downloads duvidosos nem curvas de aprendizagem íngremes. Clique em Get started →.
Bem-vindo ao TRAG Studio: tudo corre localmente — o seu trabalho nunca sai do seu equipamento.
A deteção de hardware e o Studio Index
Para propor os ajustes certos, o TRAG examina a sua máquina. Em “Tell us about your machine”, clique em Detect (recomendado): num segundo, a aplicação identifica a placa gráfica e o processador, atribui uma nota a cada um e calcula o seu Studio Index — o índice global que calibra a aplicação à força do seu PC.
“Detect my hardware”: deixe o TRAG examinar a GPU e o CPU (ou configure manualmente).O resultado do scan: cada componente recebe a sua nota, e o Studio Index resume a potência global.
Prefere manter o controlo? “Set up manually instead” abre três seletores — placa gráfica, processador, memória — com a pré-visualização “Expected performance” (Image / Video / Audio) em direto. A opção “I don't know my hardware” escolhe por si ajustes prudentes.
A configuração manual: GPU, CPU, RAM, e a pré-visualização de desempenho a atualizar-se.
O seletor de GPU cobre também placas profissionais e de estação de trabalho.No processador: topo de gama, gama média ou de entrada.E na memória: mais RAM = vídeos mais longos e lotes maiores.
Requisitos mínimos
O TRAG adapta-se à sua máquina — e o piso é mais baixo do que se pensa:
Componente
Mínimo
Placa gráfica
NVIDIA RTX série 20 — 4 GB de VRAM
Memória
16 GB de RAM
Processador
Intel Core i5 (7.ª geração) ou equivalente AMD
Abaixo disso, o Studio Index escolherá ajustes mais modestos; acima, cada gigabyte extra de VRAM compra velocidade e resolução.
E o teto está prestes a rebentar: a nova geração de PC NVIDIA Spark — superchip GB10 Grace Blackwell, 128 GB de memória unificada, até um petaFLOP de cálculo de IA numa secretária — é exatamente o hardware para o qual o TRAG foi talhado. Num Spark, os lotes que levavam um serão levam uma pausa para café.
O que a sua máquina muda em concreto
Para lá do piso acima, três coisas decidem o conforto do TRAG no dia a dia: o espaço livre em disco, a memória de vídeo, e a presença — ou não — de uma placa NVIDIA.
O espaço em disco — o primeiro muro real
Os modelos instalam-se dentro da pasta da aplicação, pacote a pacote. Os pesos exatos:
Pacote
Peso
Incluído em
Magic Wand (assistente de prompts)
3,6 GB
todos, automático
Imagem — geração
10,9 GB
Free
Imagem — edição
30,9 GB
Free
Vídeo
47,2 GB
Pro
Áudio
19,1 GB
Pro
Total
111,7 GB
Para instalar e fazer imagens: conte com 50 GB livres.
Para ter tudo, Pro incluído: conte com 120 GB livres.
Num portátil com um SSD de sistema pequeno, é este ponto — e não a placa gráfica — que bloqueia primeiro.
Nada obriga a levar tudo: marque o que quiser e acrescente o resto mais tarde sem perder nada.
As suas criações, essas, vão para a pasta de saída escolhida no passo seguinte — noutro sítio, e com o tempo também conta.
O explorador do Windows conta em gibibytes onde os nossos números são gigabytes decimais: um ficheiro anunciado a 29,15 GB aparece como “27,1 GB” no Windows. Não é um download incompleto.
A VRAM — o que ela compra de verdade
A VRAM decide o vídeo, não a imagem. A imagem corre confortável desde 4 GB; é o vídeo que pede folga.
6 GB — vídeo confortável em clipes curtos. Medido no portátil de um tester com RTX 3060: 4,9 GB usados em 6, sem incidentes.
8 GB ou mais — durações mais longas, definições mais altas, lotes maiores.
E como se conta na visita à interface, só um motor fica quente de cada vez — uma escolha para poupar a sua placa, não uma limitação.
Sem placa NVIDIA? O TRAG funciona na mesma
Sem GPU utilizável, o TRAG recorre ao processador: o indicador do rodapé anuncia-o em âmbar, e a geração funciona — muito mais devagar. Serve para experimentar, não para produzir. Melhor dizê-lo aqui do que deixar alguém pensar numa avaria.
Escolher os workflows — e deixar o ecrã verificar o disco
O ecrã de modelos lista os pacotes — Image, Video, Audio — com os seus tamanhos reais; os motores base descarregam-se automaticamente. Como diz o próprio ecrã: a imagem é grátis, o movimento e o som são Pro. Todo o pacote pode ser descarregado — o selo PRO diz apenas o que o seu plano consegue executar.
Três detalhes tornam este ecrã digno de confiança:
Relê o disco a cada abertura. A faixa no topo anuncia-o — “Checking what is already on this machine…”, e depois o veredicto: “Disk checked · 14 of 18 model files verified · 9.4 GB left to download” — com um botão Re-check.
Conhece três estados, não dois. Um pacote completo e verificado usa o selo verde Already downloaded (sem caixa — resta um discreto Download again). Um ficheiro interrompido passa a âmbar com Check needed e um botão Redownload. O que está ausente mantém a caixa e o peso restante exato.
Fechar a janela não cancela nada. O cartão de transferência sobrevive; recolhido, mantém percentagem e barra visíveis — “Keep working — this continues in the background.”
O ecrã de modelos: faixa de verificação no topo, tamanhos reais por pacote, selos PRO em Video e Audio, e a estimativa em baixo.
E trabalha cedo: assim que o essencial chega (cerca de 14,5 GB), o estúdio abre e o resto continua a descer em segundo plano. Acrescente ou retire pacotes quando quiser via Settings › Hardware & Models — um modelo já no disco nunca é descarregado de novo.
Escolher a pasta de saída
“Where should your creations be saved?”: escolha a pasta onde vão aterrar imagens, vídeos e faixas. Clique em Choose…, selecione (ou crie) uma pasta no explorador do Windows e confirme com Continue →. Pode mudá-la a qualquer momento em Settings.
A escolha da pasta de saída: clique em “Choose…”.O explorador do Windows abre-se: crie, por exemplo, uma pasta “Trag output” nos seus Documentos.
O caminho está definido: falta só “Continue →” (assinalado a verde).
Reta final
O TRAG mostra três trunfos a reter — a Main chat bar e a sua ✦ magic wand (o seu prompt melhorado num clique), Add Multiple Jobs (lançar um lote inteiro de uma vez) e a Media Gallery (todas as suas criações, prontas a reutilizar). Depois, “You're all set” confirma que os motores estão instalados: clique em Let's Create →.
Três coisas a explorar já — e uma pista: um agente de IA pode até criar por si (Settings › Connection).“You're all set”: tudo instalado — mãos à obra.
A visita guiada (8 passos)
Na primeira abertura, uma curta visita guiada ilumina uma a uma as zonas-chave (escolha do modo, workflows, ajustes, prompt…). Siga com Next →, ou salte com Skip — pode relançá-la a qualquer momento com “Take the tour” na barra lateral.
A visita guiada (passo 1 de 8): “Next” avança passo a passo.Com pressa? “Skip” fecha a visita — fica disponível na barra lateral.
04A interface num relance
Todo o TRAG cabe num só ecrã, pensado para criar sem se perder. Eis o mapa.
Ao arrancar, o TRAG pré-carrega os modelos (“Warming up the models”) e deixa-o no espaço Create:
O arranque: o TRAG põe os modelos a funcionar.A interface principal (aqui em Text to Image). O retângulo verde assinala o fundo da barra lateral: modo claro, Settings, Help, ecrã inteiro e a sua conta.Cinema Flow, a timeline de cinema — Storyboard, Script, Film, Edit. Uma antevisão do que vem aí: passeie e carregue em “Keep me posted”.
A barra lateral (esquerda) — Search (a paleta de comandos), Create (o ateliê), Media Gallery (as suas criações), Creation Flow (a fila de render) e Cinema Flow (uma antevisão da timeline de cinema — em breve), e em baixo: Light mode, Settings, Help, Toggle Fullscreen e o seu perfil.
As abas Image / Video / Audio (topo, centro) — a categoria de criação. Cada categoria mostra depois as suas subabas de workflows (Text to Image, Image to Image, Magic Edit, Blend Images…).
O viewport (centro) — o palco onde o resultado aparece, se compara, se repete.
O painel de ajustes (direita) — as opções do workflow ativo: Dimensions, Style, Quality… “More settings” abre as avançadas.
A Main chat bar (fundo) — descreva a sua ideia e carregue no grande botão de ação (Generate Image, Animate Image, Generate Music…). A ✦ magic wand melhora o seu prompt num clique, o microfone aceita ditado por voz, e por baixo surge uma sugestão de exemplo para inspirar.
O botão Warm up (canto superior esquerdo) — pré-aquece o motor da categoria ativa para eliminar a espera do primeiro render.
A barra de estado (mesmo em baixo) — a saúde dos serviços locais: “AI engine connected” (o motor de geração, com atividade GPU) e “AI Companion connected” (o assistente de prompts, em CPU).
O botão Warm up e o estado dos motores
Cada categoria tem o seu motor, e o TRAG mantém só um quente de cada vez para poupar a sua placa gráfica. O selo no canto superior esquerdo conta tudo:
Os dois indicadores de saúde: o botão “Warm up” em cima à esquerda, e a barra de estado em baixo à direita.
Vermelho — Engine offline: o motor está parado. Duplo clique no selo para o relançar.Laranja — Warming: o motor arranca (a percentagem sobe). Mudar de categoria arrefece o motor anterior — só um fica quente.Verde — ready: o motor está quente; a geração começa de imediato.
Existe um quarto estado: quando nenhuma GPU é utilizável, o indicador do rodapé passa a âmbar e di-lo sem rodeios — “AI engine connected (CPU — no GPU detected)”. É o recurso ao processador da secção 03: tudo funciona, só que muito mais devagar.
Claro, escuro… ou Creator
O primeiro botão do fundo da barra lateral troca o ambiente: um modo claro limpo, um modo escuro profundo, e o modo Creator — um preto mate pensado para criar sem distrações, com acentos opcionais (como “Obsidian Orange”). Um pequeno aviso confirma cada mudança de aparência.
O modo claro — a mesma interface, ambiente luminoso.O preto mate do modo Creator — aqui com o acento “Obsidian Orange”; o aviso confirma a aparência escolhida.
A paleta de pesquisa
O botão Search da barra lateral abre uma paleta de comandos: escreva para filtrar ecrãs, workflows e ações (“Go to Media Gallery”, “Text to Image”, “Open Settings”…) e confirme com Enter. Esc fecha-a.
A paleta de pesquisa: todo o TRAG ao alcance do teclado.
05Criar imagens
A aba Image reúne quatro workflows: criar a partir de texto, transformar uma imagem, retocar uma zona exata, ou fundir várias imagens numa só.
O prompt descreve o conteúdo; os ajustes descrevem a técnica. No prompt: sujeito, ambiente, luz. No painel direito: o formato (Dimensions), o acabamento (Style), a finura (Quality). Nunca escreva “4K” ou “formato quadrado” no prompt — um clique nos ajustes faz melhor.
Text to Image — criar a partir de texto
“Create a brand-new image from text alone.” O workflow inicial, e o mais direto:
Aba Image → subaba Text to Image.
Escolha os ajustes à direita: Dimensions (Portrait, Square, Landscape, Poster ou Custom) e Style (Auto, Photo, Cinematic, Illustration, 3D, Anime, Watercolor, Oil Painting, Pixel Art, Comic, Fantasy). “More settings” acrescenta Custom settings, um dial de Creativity e um prompt negativo.
Descreva a sua imagem na barra inferior — sujeito, estilo, luz, ambiente.
Clique em Generate Image →. O resultado surge no viewport e entra automaticamente na Media Gallery.
Text to Image: ajustes à direita, prompt em baixo, resultado ao centro.O painel de ajustes em detalhe: Dimensions, Style, Quality — depois Custom settings, Creativity e Negative prompt sob “More settings”.
Depois da geração, dois botões aparecem sobre o resultado: ✦ Re-use prompt (recomeçar do mesmo texto) e ✦ Use as source (enviar a imagem para outro workflow). A faixa Recent Generations sob o viewport guarda as últimas tentativas a um clique.
Um render terminado: “Re-use prompt”, “Use as source”, e a faixa “Recent Generations” para saltar entre tentativas.
Image to Image — transformar uma imagem
“Restyle, enhance, mix or upscale an existing image.” Entregue uma imagem de partida e descreva a mudança:
Subaba Image to Image, depois carregue a imagem com Source image → Click to choose (ou marque “Iterate from last result” para partir do último render).
Ajuste o Style, a Quality e o fator Upscale (1x / 1.5x / 2x — ideal para uma ampliação nítida).
Descreva a transformação — “restyle, enhance, upscale…” — e clique em Transform Image →.
Compare. O viewport mostra um cursor Before / After: arraste-o para varrer entre original e resultado.
Image to Image: os retângulos verdes assinalam a subaba e a zona de trabalho.Os ajustes: fonte, Style, Quality, Upscale — e Similarity to source sob “More settings”.
Geração em curso: a transformação varre a imagem.O comparador “Before / After”: arraste a pega para pesar a mudança.
Magic Edit — retocar uma zona pintada Pro
“Paint a region and replace just that part — add, remove or swap objects.” Deliciosamente simples: pinta a zona a mudar, diz o que vai lá, e o TRAG não toca em mais nada.
Subaba Magic Edit, depois carregue a imagem a retocar (Image to edit → Click to choose).
Escolha a máscara à direita: Brush (pincel livre) ou Auto-detect. Ajuste a Opacity e a Hardness do pincel se necessário — Brush size e Blending strength vivem sob “More settings”.
Pinte diretamente sobre a imagem a zona a modificar — cobre-se com um véu realçado. “Clear canvas” apaga a máscara, “Reuse mask” recupera a anterior.
Descreva a mudança na barra inferior (acrescentar, retirar, substituir…) e clique em Apply Edit →. O comparador Before / After permite depois verificar o retoque.
Magic Edit em ação: a zona pintada na imagem, os ajustes de máscara, e o prompt que descreve a substituição — três marcas verdes, três gestos.
Magic Edit no início: carregue uma imagem, escolha o modo de máscara.Os ajustes do Magic Edit: Mask (Brush / Auto-detect), Opacity, Hardness — Brush size e Blending strength mais abaixo.
Depois da edição: o cursor Before / After confirma que só a zona mascarada mudou.
Blend Images — fundir várias imagens Pro
“Combine multiple images into one — subject + style, or several references.” Um sujeito daqui, um estilo dali: o Blend casa duas imagens (e uma terceira opcional).
Subaba Blend Images, depois carregue Image A e Image B (“+ Add another” para uma C opcional).
Escolha um Style se quiser orientar o acabamento.
Descreva como as imagens se combinam — quem faz o quê, em que cena — e clique em Blend →.
Duas fontes carregadas (A + B) e um prompt que conta a fusão — as três zonas marcadas a verde.O resultado: as personagens das imagens A e B reunidas na mesma cena.
Blend Images no início: os lugares A e B esperam as suas imagens.Os ajustes: Source Images (A, B, + Add another), Style — e o Blending balance sob “More settings”.
06Criar vídeos Pro
A aba Video cria um clipe a partir de um simples prompt, anima as suas imagens, liga dois instantes com um movimento fluido, ou põe um rosto a falar. Os quatro workflows de vídeo pertencem à edição Pro.
Ao passar à aba Video, o botão do topo torna-se “Warm up LTX 2.3 engine”: clique nele antes do primeiro vídeo para pré-aquecer o motor. Os clipes curtos são mais rápidos e estáveis — comece com 5 s.
Text to Video — um clipe a partir de um simples prompt
“Create a video entirely from a text description.” Sem imagem de origem: descreva a cena e o movimento, e o TRAG filma.
Aba Video → subaba Text to Video.
Escolha o enquadramento: Format (TikTok, YouTube, Square ou Custom), Aspect ratio (9:16, 16:9, 1:1, 4:3), Definition (SD 480p → UHD 2160p) e Duration (5s, 10s, 15s ou Custom).
Descreva o plano — sujeito, movimento de câmara, ambiente — e clique no botão de ação para deixar o motor filmar.
Os ajustes Text to Video: Format, Aspect ratio, Definition, Duration, Style.
Image to Video — animar uma imagem
“Bring a still image to life with motion.” Uma imagem + uma descrição do movimento = um clipe de vídeo, com áudio e diálogo sincronizados se os descrever.
Aba Video → subaba Image to Video, depois carregue a imagem (Source image → Click to choose, ou envie uma da Media Gallery com “Use as source”).
Escolha o Format — TikTok (vertical), YouTube (16:9), Square ou Custom — e a Duration (5s, 10s, 15s ou Custom). Quality e Smoothness (24 / 30 / 60 FPS) moram sob “More settings”.
Descreva o movimento — o que faz o sujeito, a câmara, o ambiente sonoro, até uma fala a pronunciar.
Clique em Animate Image → e deixe o motor trabalhar: o clipe é depois reproduzido diretamente no viewport.
Image to Video: formato, duração e resolução à direita, movimento descrito em baixo.Os ajustes de vídeo: fonte, Format, Duration — Quality e Smoothness sob “More settings”.
Um clipe gerado em reprodução — a fonte e o prompt assinalados a verde.
Smooth Motion — de uma imagem à outra
“Morph a start frame into an end frame with fluid motion.” Entregue a imagem inicial e a final: o TRAG inventa o movimento fluido que as liga.
Subaba Smooth Motion, depois carregue o Start frame e o End frame.
Escolha o enquadramento e a fluidez: Format, Duration — e Smoothness (24 / 30 / 60 FPS) sob “More settings”.
Descreva o movimento do primeiro ao último quadro, e clique em Generate Motion →.
Smooth Motion: um quadro inicial, um final — o movimento inventa-se entre os dois.Os ajustes: Start frame, End frame, Format, Duration — Quality e Smoothness sob “More settings”.
Lip Sync — pôr um rosto a falar
“Drive a face video or image with an audio track so the lips match.” Um rosto (foto ou vídeo) + uma faixa de áudio = lábios perfeitamente sincronizados.
Subaba Lip Sync, depois carregue o Face video/image e a Audio track. Sem ficheiro de áudio à mão? Record from mic grava a sua voz na hora.
Escolha o enquadramento: Format e Duration — Quality e Smoothness sob “More settings”.
Acrescente um prompt opcional para guiar o resultado, e clique em Sync Lips →.
Lip Sync: um rosto, uma faixa de áudio (ou o micro), e a força de articulação.Os ajustes: Face video/image, Audio track, Record from mic, Format e Duration.
07Criar áudio Pro
A aba Audio compõe faixas inteiras — com ou sem letra — remistura as suas músicas e regenera um trecho exato. Os três workflows de áudio pertencem à edição Pro.
Text to Music — compor uma faixa
“Compose music from a description.” Descreva a peça, defina o ambiente… e escreva a letra se lhe apetecer:
Aba Audio → subaba Text to Music. O botão do topo torna-se “Warm up ACE-Step 1.5 engine”: um clique para pré-aquecer.
Escreva a letra (opcional) no editor Lyrics central: estruture-a com Verse, Chorus e Bridge, escolha o idioma (EN, FR, ES, DE, IT, PT, JA, ZH, KO, RU…). Deixe vazio para um instrumental.
Dê forma à música à direita: Style (Pop, Rap, Afro, Rock, Electronic, Cinematic), Mood (Happy, Epic, Chill… dezasseis ambientes), Key & Scale (o pequeno teclado de piano!), BPM e Duration (30s, 1m, 2m ou Custom).
Descreva a peça na barra inferior e clique em Generate Music →. A faixa aparece num leitor, pronta a ouvir — e arquivada na Media Gallery.
Text to Music: o editor de letra ao centro (Verse / Chorus / Bridge), os ajustes musicais à direita.Os ajustes de música: Style, Mood, Key & Scale, BPM, Duration — Quality sob “More settings”.
Gerada a faixa, o botão ✦ Use as source do leitor envia-a num clique para Remix this track, Section Edit ou Lip Sync (áudio):
Uma faixa gerada: o menu “Use as source” encadeia para Remix, Section Edit ou Lip Sync.
Remix — transformar uma faixa
“Transform an existing audio track into a new style.” A sua música, com outra roupa:
Subaba Remix, depois carregue a faixa (Source audio → Click to choose).
Escolha o Style e o Mood, e doseie Keep Original (sob “More settings”): quanto mais alta a percentagem, mais o original transparece.
Descreva a nova direção — género, vibe, tempo — e clique em Remix Track →.
Remix: uma faixa fonte, um estilo alvo, e o dial “Keep Original”.Os ajustes do Remix: Source audio, Style, Mood, Key & Scale — Keep Original sob “More settings”.
Section Edit — regenerar um trecho
“Replace or regenerate a chosen section of a track.” O refrão não convence? Regenere só ele, sem tocar no resto:
Subaba Section Edit, depois carregue a faixa.
Delimite a Section a retrabalhar (por exemplo 0:12 – 0:24, com “Set range…”).
Escolha Match: Keep key & tempo para ficar afinado com o resto da peça, ou Free para soltar as amarras.
Descreva a substituição e clique em Repaint Section →.
Section Edit: escolha o intervalo a regenerar, mantenha (ou não) tonalidade e tempo.Os ajustes: Source audio, Quality, Match — Keep key & tempo, ou Free.
A barra de prompt em modo Section Edit: descreva a substituição, com a varinha ✦, o micro e o anexo à mão.
08Creation Flow e lotes de jobs
O Creation Flow é a sua torre de controlo de renders: a fila em tempo real, o histórico de tudo o que criou, e o lançamento de lotes inteiros.
A feature do ano Exclusivo
O TRAG é a única ferramenta do mercado com um sistema de fila digno desse nome — conduza-o à mão, ou deixe um agente MCP trabalhar por si.
Seguir a fila de render
Abra o Creation Flow na barra lateral (o contador do ícone indica os jobs em espera). Cada linha mostra o estado — Generating com percentagem e tempo restante, Waiting com estimativa, depois Completed — e os botões Open / Cancel. Em cima à direita: History, Add Multiple Jobs, e durante a execução Stop, Pause e Stop all.
A fila em ação: um job a gerar, os seguintes em espera, e os comandos History / Add Multiple Jobs / Stop / Pause / Stop all (emoldurados a verde).Tudo terminado: cada linha passa a “Completed”, com o seu botão “Open”.
O histórico de criações
O botão History abre a Creation History: estatísticas da sessão (criações por workflow) e, por entrada, Use prompt (retomar o texto), Save preset (memorizar os ajustes) e Open. Export guarda o histórico, Clear esvazia-o.
A Creation History: contadores por workflow e ações Use prompt / Save preset / Open.No início o histórico está vazio — enche-se a cada render.
Add Multiple Jobs — lançar um lote inteiro
Apetece-lhe gerar dez imagens e cinco faixas durante o almoço? O Add Multiple Jobs encadeia toda uma lista de criações, automaticamente:
Copie a “matriz” da categoria desejada — Copy Image, Copy Video ou Copy Audio. É um molde de texto que ensina uma IA (ChatGPT, Claude…) a redigir a sua lista de jobs.
Mande escrever a lista: cole a matriz na sua IA favorita com as suas ideias, e recupere um ficheiro .md (um job por linha, um título # por categoria).
Largue o .md na zona “Drag result here”: o TRAG lê-o e anuncia “X jobs ready”. Se os jobs usam ficheiros (imagens, áudio…), largue também um .zip com esses recursos na segunda zona.
Escolha a pasta de saída e clique em Generate: os jobs desfilam sozinhos no Creation Flow, e cada render entra na Media Gallery.
A ideia: a matriz “Copy Image” serve de molde, e a sua lista torna-se um .md estruturado.O .md largado: “15 jobs ready” — falta só gerar.
A modal Add Multiple Jobs: matrizes a copiar, zona de largada .md, zona .zip para recursos, e pasta de saída.
Ainda mais simples com o Trag Muse: a faixa fúchsia “Use your agent to orchestrate” deixa o seu agente de IA conduzir o TRAG diretamente, sem copiar-colar — ver Trag Muse e Agent Gateway.
Um lote terminado no Creation Flow. As setas apontam para “Add Multiple Jobs” e o atalho Trag Muse da barra lateral.
09Media Gallery
Cada criação — imagem, vídeo, faixa — é automaticamente arquivada na Media Gallery. É a sua biblioteca: encontra-se, reproduz-se, reutiliza-se.
Percorrer e filtrar
No topo da galeria: filtros por tipo (All / Image / Video / Audio), por origem (All / Mine / Agent sessions — útil para isolar o que um agente criou), ordenação (Newest first…), tamanho da grelha e Refresh.
A galeria e os seus filtros — ainda vazia aqui: “Assets you generate will appear here.”A galeria cheia: clique numa miniatura para abrir o painel “Item Details”.
A ficha de um média: Item Details
O painel Item Details mostra tudo o que interessa: pré-visualização (ou leitor), nome do ficheiro, tipo, tamanho, data, workflow de origem — e até “Request from: AI agent” quando a criação veio de um agente. Mais abaixo, o prompt completo com três botões: Copy, Send to chat (devolvê-lo à Main chat bar para o retrabalhar) e Save as preset. Por fim, Save As… exporta o ficheiro para onde quiser, e Delete elimina-o.
Item Details: metadados, e “Save As…” e “Delete” em baixo (deslize o painel).O prompt original, reutilizável num clique: Copy, Send to chat, Save as preset.
Reutilizar uma criação: Use as source
O botão ✦ Use as source é a ponte entre os seus workflows: envia o média selecionado como ponto de partida de uma nova criação. Para uma imagem: Image to Image, Magic Edit, Blend Images (A ou B) ou Image to Video. Para um vídeo: Smooth Motion ou Lip Sync (Face). Para uma faixa: Remix, Section Edit ou Lip Sync (áudio).
“Use as source” a partir da ficha de uma imagem: quatro destinos possíveis.O visualizador em ecrã inteiro oferece os mesmos atalhos: Use as source e Save As….
Para um vídeo: reprodução integrada, e “Use as source” para Smooth Motion ou Lip Sync.
No disco, as suas criações vivem na pasta de saída escolhida no onboarding (alterável em Settings › Storage), com nomes explícitos como TRAG_image_t2i_082.png — o workflow de origem vai no nome.
10Definições
O botão Settings da barra lateral abre as preferências, organizadas por secções: Connection, Storage, Hardware & Models, Preferences e Language.
Pastas, hardware e modelos
Storage — a Gallery folder (onde vive a biblioteca) e a Generated files folder (onde se guardam as novas criações): dois botões Browse… para as mudar.
Hardware & Models — o diagnóstico atual, Re-scan hardware para repetir a deteção, a seleção manual, e Installed models & workflows para acrescentar ou retirar motores descarregados.
Preferences — os sons da interface, o tutorial de arranque, os atalhos personalizados (Alt+F alterna o ecrã inteiro) e a escala de visualização.
Language — o idioma da interface.
No fundo da janela: Reset repõe os valores por defeito, Save changes guarda os seus.
Settings › Storage & Hardware: pastas de saída e gestão dos modelos instalados.Settings › Preferences & Language: sons, tutorial, atalhos, idioma.
A sua conta, a sua licença
Um clique no seu perfil, no fundo da barra lateral, abre o painel de conta: Manage account & billing, o seu plano, a versão da app com o botão Check for updates, as preferências de comunicação — e Report a problem, a linha direta quando algo falha. É aqui que verifica se a licença Pro está ativa.
O painel de conta: o seu plano e a vantagem Early-Bird, a versão real com “Check for updates”, e “Report a problem” — ambos assinalados a verde.
Como o TRAG se atualiza
O TRAG verifica em silêncio ao arrancar, e depois a cada 6 horas. Se não houver nada de novo, não vê nada.
Quando existe uma versão, aparece uma faixa discreta em baixo à esquerda. Nunca bloqueante — continue a trabalhar; Later silencia-a por 24 horas.
Um clique em Update now: a aplicação fecha-se sozinha, atualiza-se e relança-se. Um patch pesa uns megabytes — não os gigabytes do instalador.
Os modelos já descarregados nunca voltam a ser descarregados por uma atualização.
Prefere verificar por si? Painel de conta → Check for updates.
Trag Muse e Agent Gateway Muse
O Trag Muse transforma a sua estação de trabalho num estúdio de produção ligado: os seus agentes e as suas API conduzem o TRAG da primeira ideia ao master final — enquanto os seus ficheiros, modelos e renders ficam na sua máquina.
✦ O que o Trag Muse vai desbloquear
Conduza o TRAG a partir do Claude, do Codex ou de qualquer agente MCP — até à distância.
Ligue as API que usa — Seedance, Kling, Nano Banana e mais — a partir da interface que já conhece.
Transforme ideias e storyboards em produções com o Creation Flow.
Monte, componha e refine os seus médias num espaço de trabalho ligado.
Mantenha a potência local — ficheiros, modelos e render na sua máquina.
Em breve, como add-on do Free e do Pro. A janela Muse da app di-lo melhor — “join the first wave”: carregue em Keep me posted e saberá o dia da abertura.
A canalização por trás é o Agent Gateway, em Settings › Connection — a secção com friso fúchsia. Quando o seu acesso abrir, a instalação cabe em quatro gestos:
Ative o Agent gateway (interruptor em On — o estado passa a “● Running”).
Anote o endereço local mostrado sob “Reachable at” (com o botão de copiar) — é o que o seu agente usará. A opção Local network expõe-no também ao Wi-Fi, se conduzir o TRAG de outro dispositivo.
Descarregue a configuração com Save mcp.json, e siga as indicações no ecrã para a ligar ao seu agente (Claude, Codex…).
Deixe a passagem em On: o seu agente já pode criar no TRAG — as obras dele ficam marcadas “Request from: AI agent” na galeria, filtráveis com “Agent sessions”.
Settings › Connection: o Agent gateway em funcionamento, o endereço a dar ao agente, e o botão “Save mcp.json” (assinalados a verde).
Clicou em “Cancelar” no alerta da firewall? Nada se partiu
Tudo o que o TRAG faz por si próprio — falar com os seus motores na sua máquina, descarregar modelos, verificar atualizações — não precisa de qualquer autorização da firewall. O único caso que precisa: ser conduzido a partir de outro dispositivo da sua rede. Se recusou o alerta do Windows, nem os downloads, nem a geração, nem as atualizações sofreram. Para conceder a autorização depois:
Via 1 — pelas definições do Windows (sem linha de comandos)
Abra Iniciar, escreva firewall e escolha Firewall do Windows Defender.
Clique emPermitir uma aplicação ou funcionalidade através da Firewall do Windows Defender.
Clique em Alterar definições(pede direitos de administrador).
Procure TRAG Studio na lista. Se lá estiver: marque Privada. Não marque “Pública”. Se não estiver: Permitir outra aplicação… → Procurar… → selecione TRAG.exe na pasta de instalação → Adicionar, e marque Privada.
Valide com OK e reinicie o TRAG.
Marque Privada (rede doméstica) e nunca Pública. Uma rede pública é um hotel, um aeroporto, um café — não é lugar para expor o seu estúdio.
Via 2 — num só comando (para quem estiver à vontade): abra uma linha de comandos como administrador e adapte o caminho se necessário:
Antivírus de terceiros. Alguns bloqueiam o alerta da firewall do Windows, ou o próprio descarregador. Se o TRAG não conseguir descarregar modelos com a ligação a funcionar, suspenda temporariamente o antivírus, ou acrescente a pasta de instalação às exclusões.
Rede de empresa ou de escola. Um proxy ou uma filtragem pode bloquear download.trag.studio. O sintoma: os modelos nunca começam a descer, enquanto o resto da internet funciona. Tente a partir de uma ligação doméstica ou de partilha móvel, ou peça ao administrador de rede para autorizar esse domínio.
11Dicas para melhores resultados
Alguns reflexos que mudam tudo, do primeiro prompt ao render final.
Prompts precisos
Sujeito + ação + ambiente + luz. “Um farol na tempestade, ondas enormes, luz dramática” ganhará sempre a “um farol”. As sugestões ✦ sob a barra de prompt são bons modelos.
O prompt descreve, os ajustes ajustam
Formato, duração, qualidade, estilo: um clique no painel direito. Nunca no prompt — evitará resultados confusos.
Respeite os valores por defeito
Os ajustes por defeito estão calibrados para a sua máquina (obrigado, Studio Index). Mude uma coisa de cada vez: saberá o que fez a diferença.
Pré-aqueça o motor
Um clique em Warm up antes da sessão, e o primeiro render parte sem espera. O selo verde “ready” avisa quando.
Fonte + prompt > ajustes
Para transformar uma imagem ou uma faixa, a qualidade da fonte e a clareza do prompt pesam mais do que qualquer ajuste avançado.
Curto primeiro, longo depois
Em vídeo, valide a ideia num clipe de 5 s em resolução Fast, e relance mais longo e fino. Iterará duas vezes mais depressa.
A Main chat bar, a sua melhor aliada
Tudo passa pela Main chat bar, a barra única no fundo do ecrã. Descreva a sua ideia e deixe as ferramentas trabalhar: a ✦ magic wand reescreve e reforça o seu prompt num clique (sujeito mais preciso, luz, ambiente), o microfone aceita ditado por voz, o clipe anexa uma referência, e as sugestões ✦ por baixo mostram o nível de detalhe que funciona. A partir da galeria, “Send to chat” devolve um prompt antigo à barra para o retrabalhar numa nova versão.
12FAQ — Perguntas frequentes
Respostas curtas às perguntas que mais ouvimos.
Preciso de internet?
Não. Terminadas a instalação e a descarga dos modelos, tudo funciona offline, localmente. A internet só serve para descarregar a aplicação, os modelos e as atualizações.
As minhas criações são privadas?
Sim. A geração acontece na sua GPU; os seus prompts e ficheiros ficam na sua máquina. Nada é enviado para uma nuvem.
Que hardware preciso?
O TRAG arranca a partir de uma NVIDIA RTX série 20 (4 GB), 16 GB de RAM e um Intel Core i5 de 7.ª geração ou equivalente — ver Requisitos mínimos. No onboarding, o TRAG calcula o seu Studio Index e adapta as opções à sua máquina — menos potência significa apenas ajustes mais modestos, não uma porta fechada.
O motor não arranca / a GPU não é detetada
Na instalação, o TRAG verifica que versão de CUDA o seu driver gráfico suporta e instala a variante correspondente — não tem nada para atualizar. Se o motor ficar vermelho, abra %LOCALAPPDATA%\TRAG Studio\logs\ e procure a linha engine device=: diz cuda (a sua placa está a trabalhar) ou cpu (recurso ao processador). Envie-nos essa linha para hello@trag.studio — chega-nos para perceber o que aconteceu.
Aparece uma janela da firewall no arranque — que fazer?
Clique em “Permitir” apenas se quiser conduzir o TRAG a partir de outro dispositivo da rede (Agent Gateway). Caso contrário, feche a janela sem receio: a aplicação funciona perfeitamente sem essa permissão. Se recusou e quiser voltar atrás, os passos manuais estão em Trag Muse e Agent Gateway.
Quanto pode durar um vídeo?
A duração define-se nos ajustes de vídeo (5 s, 10 s, 15 s ou Custom). Lembre-se de que os clipes curtos são mais rápidos e estáveis — é a boa maneira de iterar.
Onde são guardadas as minhas criações?
Na pasta de saída escolhida no onboarding (alterável em Settings › Storage). Aparecem todas também na Media Gallery.
Qual é a diferença entre Free e Pro?
O Free é grátis e ilimitado, mas faz só imagem (Text to Image + Image to Image). O Pro desbloqueia tudo: Magic Edit, Blend Images, todo o vídeo, todo o áudio — e descarrega todos os modelos correspondentes.
O que são as funções PRO?
Os workflows com selo PRO na interface: Magic Edit, Blend Images, todo o vídeo (Image to Video, Smooth Motion, Lip Sync) e todo o áudio (Text to Music, Remix, Section Edit). Ativam-se ao passar para o Trag Studio Pro.
Como passo a Pro?
Pelo portal web: compra (pagamento único), a chave fica ligada ao seu perfil, e a aplicação desbloqueia os workflows e propõe descarregar os modelos de vídeo e áudio. Pode comprar o Pro logo, ou começar no Free e subir depois — nada se perde pelo caminho.
O que é o Trag Muse?
O estúdio de produção ligado, que chega como add-on do Free e do Pro: os seus agentes (Claude, Codex ou qualquer agente MCP) e as suas API (Seedance, Kling, Nano Banana…) conduzem o TRAG via Agent Gateway — enquanto tudo é renderizado na sua máquina. Está a chegar: carregue em Keep me posted na janela Muse para se juntar à primeira vaga.
Posso deixar uma IA conduzir o TRAG?
Sim — é exatamente para isso que serve o Trag Muse. Através do Agent Gateway, um agente externo (Claude, Codex ou qualquer agente MCP) liga-se ao seu TRAG local e pode lançar e encadear criações — marcadas “Request from: AI agent” e filtráveis na galeria (“Agent sessions”). O Muse chega em breve: Keep me posted inscreve-o na primeira vaga.
Prompt ou ajustes — qual é a diferença?
O prompt descreve o conteúdo: sujeito, ambiente, diálogo. Os ajustes são técnicos: formato, duração, estilo, qualidade. Nunca ponha um ajuste técnico no prompt — o painel direito fá-lo melhor, sem ambiguidade.
Diga-nos como podemos ajudar.
hello@trag.studio é a porta de entrada do suporte — um humano lê cada mensagem.
Erstellen Sie Bilder, Videos und Musik — auf Ihrem PC, nur für Sie.
TRAG Studio ist eine Windows-Anwendung für KI-Generierung, die zu 100 % lokal auf der Grafikkarte Ihres Rechners läuft. Keine Cloud, kein verstecktes Abo, keine Warteschlange: Ihre Ideen, Ihre Dateien, bei Ihnen zu Hause.
TRAG Studio ist in drei Kategorien gegliedert — Image, Video und Audio — erreichbar über die Tabs am oberen Bildschirmrand. Jede Kategorie bündelt Workflows: einsatzbereite Kreativwerkstätten.
Bild
Text to Image (aus Text erschaffen), Image to Image (ein Bild umwandeln), Magic EditPro (einen gemalten Bereich retuschieren) und Blend ImagesPro (2-3 Bilder verschmelzen).
Video Pro
Text to Video (ein Clip aus einem einfachen Prompt), Image to Video (ein Standbild animieren, mit synchronem Audio und Dialog), Smooth Motion (Start- und Endbild verbinden) und Lip Sync (ein Gesicht mit einer Tonspur synchronisieren).
Audio Pro
Text to Music (einen Track komponieren, mit optionalem Songtext), Remix (einen bestehenden Track umgestalten) und Section Edit (eine genaue Passage neu generieren).
Trag Muse Muse
Das vernetzte Produktionsstudio, bald verfügbar: Steuern Sie TRAG aus Claude, Codex oder jedem MCP-Agenten heraus und verbinden Sie die APIs, die Sie nutzen — während alles auf Ihrem Rechner gerendert wird.
Für wen es ist
Influencer & Content-Creator
Täglich ein Clip im TikTok-, YouTube- oder Square-Format, B-Roll auf Abruf, Musik, die Ihnen gehört — über Nacht gestapelt mit Add Multiple Jobs.
Digitalagenturen
Kundenfertige Visuals in Menge, ohne Preis pro Bild und ohne Kontingent-Sorgen — und alles bleibt auf Ihren Maschinen: Vertraulichkeit per Konstruktion.
Erbauer erzählerischer Welten
Konsistente Figuren dank Image to Image und Blend, in Bewegung gesetzte Szenen, der Soundtrack jedes Kapitels — ein ganzes Universum von einem Schreibtisch aus.
Indie-Studios & Musiker
Concept Art, Animatics, Sound-Skizzen und Remixe für schnelles Iterieren — unbegrenzte Versuche, null Cloud-Rechnung.
In diesem Handbuch sehen Sie durchgehend Screenshots der Anwendung: Die leuchtend grünen Rahmen und Pfeile darin zeigen auf das jeweils besprochene Element. Klicken Sie auf ein Bild, um es zu vergrößern.
Die drei Angebote: Free, Pro und Trag Muse
TRAG gibt es in zwei Editionen, plus einer optionalen Automatisierungsschicht:
Angebot
Preis
Was Sie tun können
Heruntergeladene Modelle
Trag Studio FreeFree
Kostenlos
Nur Bild: Text to Image + Image to Image, unbegrenzte Nutzung.
Nur Bildmodelle
Trag Studio ProPro
Einmalkauf (Web-Portal)
Alles: Bild (+ Magic Edit, Blend Images), das gesamte Video, das gesamte Audio.
Alle Modelle (Bild + Video + Audio)
Trag MuseMuse
Add-on — bald
Das vernetzte Produktionsstudio: Ihre Agenten und Ihre APIs steuern TRAG über das Agent Gateway. Kombinierbar mit Free oder Pro — treten Sie der ersten Welle aus der App heraus bei.
— (Software-Schicht)
Zwei mögliche Wege, ganz nach Wunsch:
Kostenlos starten, später auf Pro wechseln. Laden Sie TRAG Studio Free von der Website, erstellen Sie Bilder nach Herzenslust… und wenn Video oder Audio rufen, kaufen Sie Pro im Web-Portal. Der Schlüssel ist an Ihr Profil gebunden: Die App schaltet die Workflows frei und bietet an, die fehlenden Modelle herunterzuladen.
Pro direkt kaufen. Der Kauf legt den Schlüssel in Ihr Profil; bei der ersten Anmeldung installiert das Onboarding gleich das komplette Erlebnis.
In der App tragen die vorbehaltenen Workflows ein PRO-Abzeichen (z. B. „Magic Edit Pro“) — das ist die sichtbare Markierung dieser Matrix. Die Workflow-für-Workflow-Übersicht finden Sie in den FAQ.
Das Pro-Fenster in der App: alle Workflows freigeschaltet mit einer Einmalzahlung — samt Early-Bird-Rabatt, solange er läuft.
02Installation
Die Installation nutzt einen klassischen Windows-Assistenten — ein paar Klicks auf „Next“ und fertig. Hier der genaue Ablauf, Bildschirm für Bildschirm.
Bevor Sie beginnen: Der Installer enthält die Anwendung und ihre Ausführungs-Engines (Python, CUDA, ComfyUI) — nicht die KI-Modelle. Diese laden erst danach, bei der Ersteinrichtung, und nur die Pakete, die Sie anhaken. Die Installation kann trotzdem einen Moment dauern — das ist normal und passiert nur einmal.
Starten Sie die Datei TRAG_Studio_V1.0_Setup, die Sie von der TRAG-Website geladen haben (rund 1 GB). Windows fragt nach einer Sicherheitsbestätigung: Akzeptieren Sie, um fortzufahren.
Entpacken Sie den Installer. Ein kleines Selbstentpacker-Fenster öffnet sich, auf Ihren Downloads-Ordner gerichtet. Klicken Sie auf Extract und lassen Sie es durchlaufen.
Die geladene Datei, startbereit — das grüne TRAG-Symbol in Ihren Downloads.Das Selbstentpacken: „Extract“ klicken und durchlaufen lassen.
Treffen Sie Ihre Wahl im TRAG Studio Setup. Der Installer öffnet sich auf einem einzigen Bildschirm: Der Installationsordner ist mit Ihrem Benutzerordner vorausgefüllt (…\AppData\Local\Programs\TRAG Studio — keine Administratorrechte nötig), dazu zwei bereits gesetzte Häkchen: Desktop-Verknüpfung und Firewall-Regel. Lassen Sie beide stehen und klicken Sie auf TRAG Studio installieren →.
Lassen Sie den Installer arbeiten. Während eine Diashow das Studio vorstellt, erzählt die Leiste genau, was passiert — einschließlich des Schritts, in dem TRAG erkennt, welche CUDA-Version Ihr Grafiktreiber unterstützt, und die passende Variante lädt. Nichts zu tun, außer zu warten.
Ein Bildschirm, drei Entscheidungen: der Ordner, die Verknüpfung, die Firewall-Regel — dann Installieren.Die Installation erzählt sich selbst: Hier wurde der CUDA-12.6-Treiber erkannt, die passende Variante lädt.
Abschließen und starten. „Installation terminée“ bietet an, die temporäre Installationsdatei zu löschen (rund 2,5 GB — anhaken, um den Platz freizugeben), plus einen großen Knopf TRAG Studio starten →. Beim ersten Start begrüßt Sie TRAG mit dem Anmeldebildschirm — auf zur nächsten Sektion!
Geschafft: Geben Sie die temporäre Datei frei und starten Sie das Studio.
Beim ersten Start kann eine Meldung der Windows-Firewall erscheinen. Klicken Sie nur dann auf „Zulassen“, wenn Sie TRAG von einem anderen Gerät im Netzwerk steuern möchten (siehe Agent Gateway). Andernfalls schließen Sie das Fenster — TRAG läuft auch ohne einwandfrei.
03Anmeldung & Ersteinrichtung
Beim ersten Start führt TRAG Sie in wenigen Schritten durch die Einrichtung: Anmeldung, Hardware-Erkennung, Workflow-Auswahl, Ausgabeordner. Fünf Minuten (ohne Modell-Downloads).
Anmelden
Der Bildschirm „Welcome back“ bietet zwei Türen: Continue with Google oder E-Mail und Passwort. Mit Google endet die Anmeldung in Ihrem Browser — TRAG wartet und macht automatisch weiter, sobald Sie fertig sind. Noch kein Konto? „Create one“ erledigt das im Nu.
Ihr Konto trägt Ihre Lizenz: Der Pro-Schlüssel ist an das Profil gebunden. Anmelden ist nötig — genau das lässt Ihre Käufe und Presets mit Ihnen wandern.
Anmeldung mit Google: im Browser abschließen — TRAG macht automatisch weiter und bringt Sie zurück ins Studio.
Die Onboarding-Begrüßung
TRAG stellt sich in einem Satz vor — „Local generative AI, made for everyone.“ — und bekräftigt sein Versprechen: eine einfache Oberfläche, die starke Open-Source-Engines auf Ihrem Rechner betreibt, ohne dubiose Downloads und ohne steile Lernkurve. Klicken Sie auf Get started →.
Willkommen bei TRAG Studio: Alles läuft lokal — Ihre Arbeit verlässt nie Ihr Gerät.
Die Hardware-Erkennung und der Studio Index
Um passende Voreinstellungen vorzuschlagen, sieht sich TRAG Ihren Rechner an. Klicken Sie bei „Tell us about your machine“ auf Detect (empfohlen): In einer Sekunde erkennt die App Grafikkarte und Prozessor, bewertet beide und berechnet Ihren Studio Index — den Gesamtwert, der die App auf die Kraft Ihres PCs kalibriert.
„Detect my hardware“: Lassen Sie TRAG GPU und CPU scannen (oder richten Sie es manuell ein).Das Scan-Ergebnis: Jede Komponente erhält ihre Note, der Studio Index fasst die Gesamtleistung zusammen.
Sie behalten lieber die Kontrolle? „Set up manually instead“ öffnet drei Auswahlfelder — Grafikkarte, Prozessor, Arbeitsspeicher — mit der Live-Vorschau „Expected performance“ (Image / Video / Audio). Die Option „I don't know my hardware“ wählt für Sie vorsichtige Einstellungen.
Die manuelle Einrichtung: GPU, CPU, RAM und die Leistungsvorschau, die sich live aktualisiert.
Die GPU-Auswahl deckt auch Profi- und Workstation-Karten ab.Beim Prozessor: High-End, Mittelklasse oder Einstieg.Und beim Speicher: mehr RAM = längere Videos und größere Stapel.
Mindestanforderungen
TRAG passt sich Ihrer Maschine an — und der Einstieg liegt tiefer, als man denkt:
Komponente
Minimum
Grafikkarte
NVIDIA RTX 20er-Serie — 4 GB VRAM
Arbeitsspeicher
16 GB RAM
Prozessor
Intel Core i5 (7. Generation) oder AMD-Äquivalent
Darunter wählt der Studio Index einfach bescheidenere Einstellungen; darüber kauft jedes zusätzliche Gigabyte VRAM Geschwindigkeit und Auflösung.
Und die Decke fliegt gerade weg: Die neue Generation der NVIDIA-Spark-PCs — GB10-Grace-Blackwell-Superchip, 128 GB einheitlicher Speicher, bis zu ein PetaFLOP KI-Rechenleistung auf dem Schreibtisch — ist genau die Hardware, für die TRAG gebaut wurde. Auf einem Spark dauert ein Stapel, der einen Abend brauchte, eine Kaffeepause.
Was Ihre Maschine konkret verändert
Jenseits des Einstiegs oben entscheiden drei Dinge darüber, wie sich TRAG im Alltag anfühlt: freier Speicherplatz, Videospeicher, und ob überhaupt eine NVIDIA-Karte vorhanden ist.
Der Speicherplatz — die echte erste Mauer
Die Modelle installieren sich im Anwendungsordner, Paket für Paket. Die genauen Gewichte:
Paket
Größe
Enthalten in
Magic Wand (Prompt-Assistent)
3,6 GB
alle, automatisch
Bild — Generierung
10,9 GB
Free
Bild — Bearbeitung
30,9 GB
Free
Video
47,2 GB
Pro
Audio
19,1 GB
Pro
Gesamt
111,7 GB
Zum Installieren und Bilderzeugen: rechnen Sie mit 50 GB frei.
Für alles, Pro eingeschlossen: rechnen Sie mit 120 GB frei.
Auf einem Laptop mit kleiner System-SSD blockiert dieser Punkt — nicht die Grafikkarte — als Erstes.
Niemand muss alles nehmen: Haken Sie an, was Sie möchten, und ergänzen Sie den Rest später, ohne etwas zu verlieren.
Ihre Kreationen wandern dagegen in den Ausgabeordner des nächsten Schritts — woanders hin, und auch das summiert sich mit der Zeit.
Der Windows-Explorer zählt in Gibibyte, wo unsere Zahlen dezimale Gigabyte sind: Eine mit 29,15 GB angekündigte Datei erscheint in Windows als „27,1 GB“. Das ist kein unvollständiger Download.
Der VRAM — was er wirklich kauft
VRAM entscheidet über Video, nicht über Bild. Bild läuft ab 4 GB bequem; Video ist es, das Spielraum braucht.
4 GB — Bilder ohne Sorgen. Video: kurze Clips in bescheidener Auflösung.
6 GB — komfortables Video in kurzen Clips. Gemessen auf dem Laptop eines Testers mit RTX 3060: 4,9 GB von 6 belegt, ohne Zwischenfall.
8 GB und mehr — längere Dauern, höhere Auflösungen, größere Stapel.
Und wie in der Oberflächen-Tour beschrieben, bleibt immer nur eine Engine warm — eine Entscheidung, um Ihre Karte zu schonen, keine Einschränkung.
Keine NVIDIA-Karte? TRAG läuft trotzdem
Ohne nutzbare GPU weicht TRAG auf den Prozessor aus: Die Anzeige in der Fußleiste meldet es in Bernstein, und die Generierung funktioniert — nur deutlich langsamer. Gut zum Ausprobieren, nicht zum Produzieren. Besser hier gesagt, als dass es jemand für einen Defekt hält.
Workflows wählen — und den Bildschirm die Festplatte prüfen lassen
Der Modell-Bildschirm listet die Pakete — Image, Video, Audio — mit ihren echten Größen; die Basis-Engines laden automatisch. Wie der Bildschirm selbst sagt: Bild ist gratis, Bewegung und Klang sind Pro. Jedes Paket lässt sich herunterladen — das PRO-Siegel sagt nur, was Ihr Plan ausführen kann.
Drei Details machen diesen Bildschirm vertrauenswürdig:
Er liest bei jedem Öffnen die Festplatte neu. Das Banner oben kündigt es an — „Checking what is already on this machine…“, dann das Urteil: „Disk checked · 14 of 18 model files verified · 9.4 GB left to download“ — mit einem Re-check-Knopf.
Er kennt drei Zustände, nicht zwei. Ein vollständiges, verifiziertes Paket trägt das grüne Siegel Already downloaded (kein Häkchen mehr — nur ein dezentes Download again). Eine unterbrochene Datei wechselt zu Bernstein mit Check needed und einem Redownload-Knopf. Was fehlt, behält Häkchen und exakte Restgröße.
Das Fenster zu schließen bricht nichts ab. Die Download-Karte überlebt; eingeklappt bleibt sie mit Prozentwert und Balken sichtbar — „Keep working — this continues in the background.“
Der Modell-Bildschirm: Prüf-Banner oben, echte Größen je Paket, PRO-Siegel auf Video und Audio, die Schätzung unten.
Und Sie arbeiten früh: Sobald das Nötigste da ist (rund 14,5 GB), öffnet sich das Studio, der Rest lädt im Hintergrund weiter. Pakete fügen Sie jederzeit über Settings › Hardware & Models hinzu oder entfernen sie — ein Modell, das schon auf der Platte liegt, wird nie erneut geladen.
Den Ausgabeordner wählen
„Where should your creations be saved?“: Wählen Sie den Ordner, in dem Bilder, Videos und Tracks landen. Klicken Sie auf Choose…, wählen (oder erstellen) Sie im Windows-Explorer einen Ordner und bestätigen Sie mit Continue →. Jederzeit in den Settings änderbar.
Die Wahl des Ausgabeordners: Klicken Sie auf „Choose…“.Der Windows-Explorer öffnet sich: Erstellen Sie z. B. einen Ordner „Trag output“ in Ihren Dokumenten.
Der Pfad steht: Es fehlt nur noch „Continue →“ (grün markiert).
Zielgerade
TRAG zeigt drei Trümpfe, die man sich merken sollte — die Main chat bar mit ihrer ✦ magic wand (Ihr Prompt mit einem Klick verbessert), Add Multiple Jobs (einen ganzen Stapel auf einmal starten) und die Media Gallery (alle Kreationen, bereit zur Wiederverwendung). Dann bestätigt „You're all set“, dass die Engines installiert sind: Klicken Sie auf Let's Create →.
Drei Dinge zum sofortigen Erkunden — und ein Hinweis: Ein KI-Agent kann sogar für Sie erstellen (Settings › Connection).„You're all set“: Alles installiert — ans Werk.
Die geführte Tour (8 Schritte)
Beim ersten Öffnen beleuchtet eine kurze geführte Tour nacheinander die Schlüsselbereiche (Moduswahl, Workflows, Einstellungen, Prompt…). Folgen Sie mit Next → oder überspringen Sie mit Skip — jederzeit neu startbar über „Take the tour“ in der Seitenleiste.
Die geführte Tour (Schritt 1 von 8): „Next“ führt Schritt für Schritt weiter.In Eile? „Skip“ schließt die Tour — sie bleibt in der Seitenleiste verfügbar.
04Die Oberfläche auf einen Blick
Das ganze TRAG passt auf einen Bildschirm, gebaut, damit man sich nie verirrt. Hier die Landkarte.
Beim Start lädt TRAG seine Modelle vor („Warming up the models“) und setzt Sie dann im Bereich Create ab:
Der Start: TRAG bringt seine Modelle in Gang.Die Hauptoberfläche (hier in Text to Image). Der grüne Rahmen markiert das untere Ende der Seitenleiste: heller Modus, Settings, Help, Vollbild und Ihr Konto.Cinema Flow, die Kino-Timeline — Storyboard, Script, Film, Edit. Eine Vorschau auf das, was kommt: stöbern und „Keep me posted“ drücken.
Die Seitenleiste (links) — Search (die Befehlspalette), Create (die Werkstatt), Media Gallery (Ihre Kreationen), Creation Flow (die Render-Warteschlange) und Cinema Flow (eine Vorschau der Kino-Timeline — bald), und unten: Light mode, Settings, Help, Toggle Fullscreen und Ihr Profil.
Die Tabs Image / Video / Audio (oben, Mitte) — die Kreationskategorie. Jede Kategorie zeigt dann ihre Workflow-Untertabs (Text to Image, Image to Image, Magic Edit, Blend Images…).
Der Viewport (Mitte) — die Bühne, auf der Ihr Ergebnis erscheint, sich vergleicht, sich abspielt.
Das Einstellungs-Panel (rechts) — die Optionen des aktiven Workflows: Dimensions, Style, Quality… „More settings“ öffnet die erweiterten.
Die Main chat bar (unten) — beschreiben Sie Ihre Idee und drücken Sie den großen Aktionsknopf (Generate Image, Animate Image, Generate Music…). Die ✦ magic wand verbessert Ihren Prompt mit einem Klick, das Mikrofon nimmt Diktate auf, und darunter steht ein Beispielvorschlag zur Inspiration.
Der Warm-up-Knopf (oben links) — heizt die Engine der aktiven Kategorie vor, damit der erste Render ohne Wartezeit startet.
Die Statusleiste (ganz unten) — die Gesundheit der lokalen Dienste: „AI engine connected“ (die Generierungs-Engine, mit GPU-Aktivität) und „AI Companion connected“ (der Prompt-Assistent, auf CPU).
Der Warm-up-Knopf und der Engine-Status
Jede Kategorie hat ihre Engine, und TRAG hält nur eine zugleich warm, um Ihre Grafikkarte zu schonen. Das Abzeichen oben links erzählt alles:
Die zwei Gesundheitsanzeigen: der „Warm up“-Knopf oben links und die Statusleiste unten rechts.
Rot — Engine offline: Die Engine steht. Doppelklick auf das Abzeichen startet sie neu.Orange — Warming: Die Engine fährt hoch (der Prozentwert steigt). Ein Kategorienwechsel kühlt die vorherige Engine ab — nur eine bleibt warm.Grün — ready: Die Engine ist warm; die Generierung startet sofort.
Es gibt einen vierten Zustand: Ist keine GPU nutzbar, wechselt die Anzeige in der Fußleiste zu Bernstein und sagt es ohne Umschweife — „AI engine connected (CPU — no GPU detected)“. Das ist der Prozessor-Ausweg aus Sektion 03: Alles funktioniert, nur deutlich langsamer.
Hell, dunkel… oder Creator
Der erste Knopf unten in der Seitenleiste wechselt die Stimmung: ein sauberer heller Modus, ein tiefer dunkler Modus und der Creator-Modus — ein mattes Schwarz fürs Erschaffen ohne Ablenkung, mit optionalen Akzenten (wie „Obsidian Orange“). Ein kleiner Toast bestätigt jeden Wechsel der Erscheinung.
Der helle Modus — dieselbe Oberfläche, lichte Stimmung.Das matte Schwarz des Creator-Modus — hier mit dem Akzent „Obsidian Orange“; der Toast bestätigt die gewählte Erscheinung.
Die Suchpalette
Der Search-Knopf der Seitenleiste öffnet eine Befehlspalette: Tippen Sie, um Bildschirme, Workflows und Aktionen zu filtern („Go to Media Gallery“, „Text to Image“, „Open Settings“…), und bestätigen Sie mit Enter. Esc schließt sie.
Die Suchpalette: das ganze TRAG in Tastaturreichweite.
05Bilder erstellen
Der Tab Image versammelt vier Workflows: aus Text erschaffen, ein Bild umwandeln, eine exakte Stelle retuschieren oder mehrere Bilder zu einem verschmelzen.
Der Prompt beschreibt den Inhalt; die Einstellungen beschreiben die Technik. Im Prompt: Motiv, Stimmung, Licht. Im rechten Panel: das Format (Dimensions), der Look (Style), die Feinheit (Quality). Schreiben Sie nie „4K“ oder „quadratisch“ in den Prompt — ein Klick in den Einstellungen macht das besser.
Text to Image — aus Text erschaffen
„Create a brand-new image from text alone.“ Der Start-Workflow, und der direkteste:
Tab Image → Untertab Text to Image.
Wählen Sie Ihre Einstellungen rechts: Dimensions (Portrait, Square, Landscape, Poster oder Custom) und Style (Auto, Photo, Cinematic, Illustration, 3D, Anime, Watercolor, Oil Painting, Pixel Art, Comic, Fantasy). „More settings“ ergänzt Custom settings, einen Creativity-Regler und einen negativen Prompt.
Beschreiben Sie Ihr Bild in der unteren Leiste — Motiv, Stil, Licht, Stimmung.
Klicken Sie auf Generate Image →. Das Ergebnis erscheint im Viewport und wandert automatisch in die Media Gallery.
Text to Image: Einstellungen rechts, Prompt unten, Ergebnis in der Mitte.Das Einstellungs-Panel im Detail: Dimensions, Style, Quality — dann Custom settings, Creativity und Negative prompt unter „More settings“.
Nach der Generierung erscheinen zwei Knöpfe auf dem Ergebnis: ✦ Re-use prompt (mit demselben Text neu starten) und ✦ Use as source (das Bild in einen anderen Workflow schicken). Der Streifen Recent Generations unter dem Viewport hält die letzten Versuche einen Klick entfernt.
Ein fertiger Render: „Re-use prompt“, „Use as source“ und der „Recent Generations“-Streifen zum Springen zwischen Versuchen.
Image to Image — ein Bild umwandeln
„Restyle, enhance, mix or upscale an existing image.“ Ein Ausgangsbild hergeben, die Änderung beschreiben:
Untertab Image to Image, dann Ihr Bild laden über Source image → Click to choose (oder „Iterate from last result“ anhaken, um auf dem letzten Render aufzubauen).
Stellen Sie den Style, die Quality und den Faktor Upscale ein (1x / 1.5x / 2x — ideal für eine scharfe Vergrößerung).
Beschreiben Sie die Umwandlung — „restyle, enhance, upscale…“ — und klicken Sie auf Transform Image →.
Vergleichen Sie. Der Viewport zeigt einen Before / After-Regler: Ziehen Sie ihn, um zwischen Original und Ergebnis zu wischen.
Image to Image: Die grünen Rahmen markieren den Untertab und den Arbeitsbereich.Die Einstellungen: Quelle, Style, Quality, Upscale — und Similarity to source unter „More settings“.
Mitten in der Generierung: Die Umwandlung fegt über das Bild.Der „Before / After“-Vergleich: Ziehen Sie den Griff, um die Änderung abzuwägen.
Magic Edit — eine gemalte Stelle retuschieren Pro
„Paint a region and replace just that part — add, remove or swap objects.“ Herrlich einfach: Sie malen den zu ändernden Bereich, sagen, was dort hin soll, und TRAG rührt nichts anderes an.
Untertab Magic Edit, dann das zu retuschierende Bild laden (Image to edit → Click to choose).
Wählen Sie Ihre Maske rechts: Brush (freier Pinsel) oder Auto-detect. Passen Sie bei Bedarf Opacity und Hardness des Pinsels an — Brush size und Blending strength wohnen unter „More settings“.
Malen Sie direkt auf dem Bild den zu ändernden Bereich — er überzieht sich mit einem Schleier. „Clear canvas“ löscht die Maske, „Reuse mask“ holt die vorige zurück.
Beschreiben Sie die Änderung in der unteren Leiste (hinzufügen, entfernen, ersetzen…) und klicken Sie auf Apply Edit →. Der Before-/After-Vergleich erlaubt anschließend die Kontrolle der Retusche.
Magic Edit in Aktion: der gemalte Bereich auf dem Bild, die Maskeneinstellungen und der Prompt, der den Tausch beschreibt — drei grüne Markierungen, drei Handgriffe.
Magic Edit am Anfang: Bild laden, Maskenmodus wählen.Die Magic-Edit-Einstellungen: Mask (Brush / Auto-detect), Opacity, Hardness — Brush size und Blending strength weiter unten.
Nach der Bearbeitung: Der Before-/After-Regler bestätigt, dass sich nur der maskierte Bereich geändert hat.
Blend Images — mehrere Bilder verschmelzen Pro
„Combine multiple images into one — subject + style, or several references.“ Ein Motiv von hier, ein Stil von dort: Blend vermählt zwei Bilder (plus ein optionales drittes).
Untertab Blend Images, dann Image A und Image B laden („+ Add another“ für ein optionales C).
Wählen Sie einen Style, wenn Sie den Look lenken möchten.
Beschreiben Sie, wie sich die Bilder verbinden — wer was tut, in welcher Szene — und klicken Sie auf Blend →.
Zwei geladene Quellen (A + B) und ein Prompt, der die Fusion erzählt — alle drei Zonen grün markiert.Das Ergebnis: die Figuren aus Bild A und B vereint in einer Szene.
Blend Images am Anfang: Die Plätze A und B warten auf Ihre Bilder.Die Einstellungen: Source Images (A, B, + Add another), Style — und die Blending balance unter „More settings“.
06Videos erstellen Pro
Der Tab Video erschafft einen Clip aus einem einfachen Prompt, animiert Ihre Bilder, verbindet zwei Momente mit fließender Bewegung oder lässt ein Gesicht sprechen. Alle vier Video-Workflows gehören zur Pro-Edition.
Beim Wechsel auf den Video-Tab wird der obere Knopf zu „Warm up LTX 2.3 engine“: Klicken Sie ihn vor dem ersten Video, um die Engine vorzuheizen. Kurze Clips sind schneller und stabiler — beginnen Sie mit 5 s.
Text to Video — ein Clip aus einem einfachen Prompt
„Create a video entirely from a text description.“ Kein Ausgangsbild: Beschreiben Sie Szene und Bewegung, und TRAG filmt.
Tab Video → Untertab Text to Video.
Wählen Sie den Rahmen: Format (TikTok, YouTube, Square oder Custom), Aspect ratio (9:16, 16:9, 1:1, 4:3), Definition (SD 480p → UHD 2160p) und Duration (5s, 10s, 15s oder Custom).
Beschreiben Sie die Einstellung — Motiv, Kamerafahrt, Stimmung — und klicken Sie auf den Aktionsknopf, um die Engine filmen zu lassen.
Die Text-to-Video-Einstellungen: Format, Aspect ratio, Definition, Duration, Style.
Image to Video — ein Standbild animieren
„Bring a still image to life with motion.“ Ein Bild + eine Bewegungsbeschreibung = ein Videoclip, mit synchronem Audio und Dialog, wenn Sie welche beschreiben.
Tab Video → Untertab Image to Video, dann Ihr Bild laden (Source image → Click to choose, oder eines aus der Media Gallery mit „Use as source“ schicken).
Wählen Sie das Format — TikTok (vertikal), YouTube (16:9), Square oder Custom — und die Duration (5s, 10s, 15s oder Custom). Quality und Smoothness (24 / 30 / 60 FPS) wohnen unter „More settings“.
Beschreiben Sie die Bewegung — was das Motiv tut, die Kamerafahrt, die Klangkulisse, sogar einen zu sprechenden Satz.
Klicken Sie auf Animate Image → und lassen Sie die Engine arbeiten: Der Clip spielt danach direkt im Viewport.
Image to Video: Format, Dauer und Auflösung rechts, Bewegung unten beschrieben.Die Video-Einstellungen: Quelle, Format, Duration — Quality und Smoothness unter „More settings“.
Ein generierter Clip in Wiedergabe — Quelle und Prompt grün markiert.
Smooth Motion — von einem Bild zum anderen
„Morph a start frame into an end frame with fluid motion.“ Geben Sie Start- und Endbild vor: TRAG erfindet die fließende Bewegung dazwischen.
Untertab Smooth Motion, dann Start frame und End frame laden.
Wählen Sie Rahmen und Geschmeidigkeit: Format, Duration — und Smoothness (24 / 30 / 60 FPS) unter „More settings“.
Beschreiben Sie die Bewegung vom ersten zum letzten Bild und klicken Sie auf Generate Motion →.
Smooth Motion: ein Startbild, ein Endbild — die Bewegung erfindet sich dazwischen.Die Einstellungen: Start frame, End frame, Format, Duration — Quality und Smoothness unter „More settings“.
Lip Sync — ein Gesicht sprechen lassen
„Drive a face video or image with an audio track so the lips match.“ Ein Gesicht (Foto oder Video) + eine Tonspur = perfekt synchrone Lippen.
Untertab Lip Sync, dann Face video/image und Audio track laden. Keine Audiodatei zur Hand? Record from mic nimmt Ihre Stimme direkt auf.
Wählen Sie den Rahmen: Format und Duration — Quality und Smoothness unter „More settings“.
Fügen Sie einen optionalen Prompt hinzu, um das Ergebnis zu lenken, und klicken Sie auf Sync Lips →.
Lip Sync: ein Gesicht, eine Tonspur (oder das Mikro) und die Artikulationsstärke.Die Einstellungen: Face video/image, Audio track, Record from mic, Format und Duration.
07Audio erstellen Pro
Der Tab Audio komponiert ganze Tracks — mit oder ohne Songtext — remixt Ihre Stücke und generiert eine exakte Passage neu. Alle drei Audio-Workflows gehören zur Pro-Edition.
Text to Music — einen Track komponieren
„Compose music from a description.“ Beschreiben Sie das Stück, setzen Sie die Stimmung… und schreiben Sie den Songtext, wenn Ihnen danach ist:
Tab Audio → Untertab Text to Music. Der obere Knopf wird zu „Warm up ACE-Step 1.5 engine“: ein Klick zum Vorheizen.
Schreiben Sie Ihren Songtext (optional) im zentralen Lyrics-Editor: Strukturieren Sie ihn mit Verse, Chorus und Bridge, wählen Sie die Sprache (EN, FR, ES, DE, IT, PT, JA, ZH, KO, RU…). Leer lassen für ein Instrumental.
Formen Sie die Musik rechts: Style (Pop, Rap, Afro, Rock, Electronic, Cinematic), Mood (Happy, Epic, Chill… sechzehn Stimmungen), Key & Scale (die kleine Klaviertastatur!), BPM und Duration (30s, 1m, 2m oder Custom).
Beschreiben Sie das Stück in der unteren Leiste und klicken Sie auf Generate Music →. Der Track erscheint in einem Player, bereit zum Anhören — und abgelegt in der Media Gallery.
Text to Music: der Songtext-Editor in der Mitte (Verse / Chorus / Bridge), die Musikeinstellungen rechts.Die Musikeinstellungen: Style, Mood, Key & Scale, BPM, Duration — Quality unter „More settings“.
Ist der Track generiert, schickt ihn der Knopf ✦ Use as source des Players mit einem Klick zu Remix this track, Section Edit oder Lip Sync (Audio):
Ein generierter Track: Das „Use as source“-Menü verkettet zu Remix, Section Edit oder Lip Sync.
Remix — einen Track umgestalten
„Transform an existing audio track into a new style.“ Ihr Song, ein neues Gewand:
Untertab Remix, dann den Track laden (Source audio → Click to choose).
Wählen Sie Style und Mood und dosieren Sie Keep Original (unter „More settings“): Je höher der Prozentwert, desto stärker scheint das Original durch.
Beschreiben Sie die neue Richtung — Genre, Vibe, Tempo — und klicken Sie auf Remix Track →.
Remix: ein Quell-Track, ein Zielstil und der „Keep Original“-Regler.Die Remix-Einstellungen: Source audio, Style, Mood, Key & Scale — Keep Original unter „More settings“.
Section Edit — eine Passage neu generieren
„Replace or regenerate a chosen section of a track.“ Der Refrain enttäuscht? Generieren Sie nur ihn neu, ohne den Rest anzurühren:
Untertab Section Edit, dann den Track laden.
Grenzen Sie die Section ein, die überarbeitet werden soll (z. B. 0:12 – 0:24, über „Set range…“).
Wählen Sie Match: Keep key & tempo, um im Einklang mit dem Rest zu bleiben, oder Free für freie Fahrt.
Beschreiben Sie den Ersatz und klicken Sie auf Repaint Section →.
Section Edit: Wählen Sie den neu zu generierenden Bereich, behalten Sie (oder nicht) Tonart und Tempo.Die Einstellungen: Source audio, Quality, Match — Keep key & tempo, oder Free.
Die Prompt-Leiste im Section-Edit-Modus: Beschreiben Sie den Ersatz, mit ✦-Zauberstab, Mikro und Anhang griffbereit.
08Creation Flow & Job-Stapel
Der Creation Flow ist Ihr Render-Kontrollturm: die Live-Warteschlange, die Historie all Ihrer Kreationen und der Start ganzer Stapel.
Das Feature des Jahres Exklusiv
TRAG ist das einzige Werkzeug am Markt mit einer Render-Warteschlange, die diesen Namen verdient — von Hand gesteuert oder von einem MCP-Agenten gefahren.
Die Render-Warteschlange verfolgen
Öffnen Sie den Creation Flow über die Seitenleiste (der Zähler auf dem Symbol zeigt wartende Jobs). Jede Zeile zeigt ihren Zustand — Generating mit Prozentwert und Restzeit, Waiting mit Schätzung, dann Completed — plus die Knöpfe Open / Cancel. Oben rechts: History, Add Multiple Jobs, und während der Ausführung Stop, Pause und Stop all.
Die Warteschlange bei der Arbeit: ein Job generiert, die nächsten warten, dazu die Befehle History / Add Multiple Jobs / Stop / Pause / Stop all (grün umrahmt).Alles fertig: Jede Zeile wechselt auf „Completed“, jede mit ihrem „Open“-Knopf.
Die Kreations-Historie
Der Knopf History öffnet die Creation History: Sitzungsstatistiken (Kreationen pro Workflow) und je Eintrag Use prompt (den Text übernehmen), Save preset (die Einstellungen merken) und Open. Export sichert die Historie, Clear leert sie.
Die Creation History: Zähler pro Workflow und die Aktionen Use prompt / Save preset / Open.Ganz am Anfang ist die Historie leer — sie füllt sich mit jedem Render.
Add Multiple Jobs — einen ganzen Stapel starten
Lust, über die Mittagspause zehn Bilder und fünf Tracks zu generieren? Add Multiple Jobs arbeitet eine ganze Liste von Kreationen automatisch ab:
Kopieren Sie die „Matrix“ der gewünschten Kategorie — Copy Image, Copy Video oder Copy Audio. Das ist eine Textvorlage, die einer KI (ChatGPT, Claude…) beibringt, Ihre Jobliste zu verfassen.
Lassen Sie die Liste schreiben: Fügen Sie die Matrix mit Ihren Ideen in Ihre Lieblings-KI ein und erhalten Sie eine .md-Datei zurück (ein Job pro Zeile, eine #-Überschrift pro Kategorie).
Ziehen Sie die .md in die Zone „Drag result here“: TRAG liest sie und meldet „X jobs ready“. Falls Ihre Jobs Dateien nutzen (Bilder, Audio…), ziehen Sie zusätzlich eine .zip mit diesen Ressourcen in die zweite Zone.
Wählen Sie den Ausgabeordner und klicken Sie auf Generate: Die Jobs ziehen von selbst durch den Creation Flow, und jeder Render landet in der Media Gallery.
Das Prinzip: Die Matrix „Copy Image“ dient als Vorlage, Ihre Jobliste wird eine strukturierte .md.Die .md abgelegt: „15 jobs ready“ — es bleibt nur zu generieren.
Der Add-Multiple-Jobs-Dialog: Matrizen zum Kopieren, die .md-Ablagezone, die .zip-Zone für Ressourcen und der Ausgabeordner.
Noch einfacher mit Trag Muse: Das fuchsiafarbene Banner „Use your agent to orchestrate“ lässt Ihren KI-Agenten TRAG direkt steuern, ganz ohne Copy-Paste — siehe Trag Muse & Agent Gateway.
Ein fertiger Stapel im Creation Flow. Die Pfeile zeigen auf „Add Multiple Jobs“ und den Trag-Muse-Schnellzugriff der Seitenleiste.
09Media Gallery
Jede Kreation — Bild, Video, Track — wird automatisch in der Media Gallery abgelegt. Sie ist Ihre Bibliothek: wiederfinden, abspielen, wiederverwenden.
Stöbern und filtern
Oben in der Galerie: Filter nach Typ (All / Image / Video / Audio), nach Herkunft (All / Mine / Agent sessions — praktisch, um zu isolieren, was ein Agent erstellt hat), Sortierung (Newest first…), Rastergröße und Refresh.
Die Galerie und ihre Filter — hier noch leer: „Assets you generate will appear here.“Die gefüllte Galerie: Klicken Sie auf eine Miniatur, um ihr „Item Details“-Panel zu öffnen.
Die Karteikarte eines Mediums: Item Details
Das Panel Item Details zeigt alles Wissenswerte: Vorschau (oder Player), Dateiname, Typ, Größe, Datum, Ursprungs-Workflow — sogar „Request from: AI agent“, wenn die Kreation von einem Agenten stammt. Weiter unten der vollständige Prompt mit drei Knöpfen: Copy, Send to chat (zurück in die Main chat bar zum Überarbeiten) und Save as preset. Schließlich exportiert Save As… die Datei, wohin Sie möchten, und Delete entfernt sie.
Item Details: Metadaten, dann „Save As…“ und „Delete“ unten (Panel scrollen).Der Original-Prompt, mit einem Klick wiederverwendbar: Copy, Send to chat, Save as preset.
Eine Kreation wiederverwenden: Use as source
Der Knopf ✦ Use as source ist die Brücke zwischen Ihren Workflows: Er schickt das gewählte Medium als Ausgangspunkt einer neuen Kreation los. Für ein Bild: Image to Image, Magic Edit, Blend Images (A oder B) oder Image to Video. Für ein Video: Smooth Motion oder Lip Sync (Face). Für einen Track: Remix, Section Edit oder Lip Sync (Audio).
„Use as source“ aus der Karteikarte eines Bildes: vier mögliche Ziele.Der Vollbild-Betrachter bietet dieselben Abkürzungen: Use as source und Save As….
Für ein Video: integrierte Wiedergabe, dann „Use as source“ Richtung Smooth Motion oder Lip Sync.
Auf der Festplatte leben Ihre Kreationen im beim Onboarding gewählten Ausgabeordner (änderbar in Settings › Storage), unter sprechenden Namen wie TRAG_image_t2i_082.png — der Ursprungs-Workflow steckt im Namen.
10Einstellungen
Der Settings-Knopf der Seitenleiste öffnet die Einstellungen, gegliedert nach Rubriken: Connection, Storage, Hardware & Models, Preferences und Language.
Ordner, Hardware und Modelle
Storage — der Gallery folder (wo Ihre Bibliothek lebt) und der Generated files folder (wo neue Kreationen gespeichert werden): zwei Browse…-Knöpfe zum Ändern.
Hardware & Models — die aktuelle Hardware-Diagnose, Re-scan hardware für eine neue Erkennung, die manuelle Auswahl und Installed models & workflows zum Hinzufügen oder Entfernen geladener Engines.
Preferences — die Interface-Sounds, das Start-Tutorial, eigene Tastenkürzel (Alt+F schaltet Vollbild um) und die Anzeigeskalierung.
Language — die Sprache der Oberfläche.
Unten im Fenster: Reset stellt die Standardwerte wieder her, Save changes speichert Ihre.
Settings › Storage & Hardware: Ausgabeordner und Verwaltung der installierten Modelle.Settings › Preferences & Language: Sounds, Tutorial, Kürzel, Sprache.
Ihr Konto, Ihre Lizenz
Ein Klick auf Ihr Profil unten in der Seitenleiste öffnet das Konto-Panel: Manage account & billing, Ihr Plan, die Version der App mit ihrem Knopf Check for updates, Ihre Kommunikationseinstellungen — und Report a problem, der direkte Draht, wenn etwas hakt. Hier prüfen Sie, ob Ihre Pro-Lizenz aktiv ist.
Das Konto-Panel: Ihr Plan mit Early-Bird-Vorteil, die echte Version mit „Check for updates“ und „Report a problem“ — beide grün markiert.
Wie TRAG sich aktuell hält
TRAG prüft still beim Start, danach alle 6 Stunden. Gibt es nichts Neues, sehen Sie nichts.
Existiert eine Version, erscheint ein dezentes Banner unten links. Nie blockierend — arbeiten Sie weiter; Later stellt es für 24 Stunden stumm.
Ein Klick auf Update now: Die App schließt sich selbst, aktualisiert sich und startet neu. Ein Patch wiegt ein paar Megabyte — nicht die Gigabyte des Installers.
Bereits geladene Modelle werden von einem Update niemals neu heruntergeladen.
Lieber selbst nachsehen? Konto-Panel → Check for updates.
Trag Muse & Agent Gateway Muse
Trag Muse macht aus Ihrer Workstation ein vernetztes Produktionsstudio: Ihre Agenten und Ihre APIs steuern TRAG von der ersten Idee bis zum fertigen Master — während Ihre Dateien, Modelle und Renderings auf Ihrem Rechner bleiben.
✦ Was Trag Muse freischalten wird
Steuern Sie TRAG aus Claude, Codex oder jedem MCP-Agenten heraus — sogar aus der Ferne.
Verbinden Sie die APIs, die Sie nutzen — Seedance, Kling, Nano Banana und mehr — aus der vertrauten Oberfläche.
Machen Sie aus Ideen und Storyboards Produktionen mit dem Creation Flow.
Schneiden, montieren und verfeinern Sie Ihre Medien in einem vernetzten Arbeitsbereich.
Behalten Sie die Kraft lokal — Dateien, Modelle und Rendering auf Ihrem Rechner.
Bald verfügbar, als Add-on zu Free und Pro. Das Muse-Fenster in der App sagt es am schönsten — „join the first wave“: Drücken Sie Keep me posted, und Sie erfahren den Tag der Öffnung.
Die Technik dahinter ist das Agent Gateway in Settings › Connection — der Rubrik mit fuchsiafarbener Borte. Sobald Ihr Zugang öffnet, ist die Einrichtung in vier Handgriffen erledigt:
Schalten Sie das Agent gateway ein (Schalter auf On — der Status wechselt zu „● Running“).
Notieren Sie die lokale Adresse unter „Reachable at“ (mit Kopierknopf) — sie wird Ihr Agent verwenden. Die Option Local network stellt sie auch Ihrem WLAN bereit, falls Sie TRAG von einem anderen Gerät steuern.
Laden Sie die Konfiguration mit Save mcp.json herunter und folgen Sie den Hinweisen am Bildschirm, um sie in Ihren Agenten einzubinden (Claude, Codex…).
Lassen Sie das Gateway auf On: Ihr Agent kann jetzt in TRAG erstellen — seine Werke sind in der Galerie mit „Request from: AI agent“ markiert und über „Agent sessions“ filterbar.
Settings › Connection: das laufende Agent gateway, die Adresse für Ihren Agenten und der Knopf „Save mcp.json“ (grün markiert).
Beim Firewall-Hinweis auf „Abbrechen“ geklickt? Nichts ist kaputt
Alles, was TRAG von sich aus tut — mit seinen Engines auf Ihrem Rechner sprechen, Modelle laden, nach Updates sehen — braucht keinerlei Firewall-Erlaubnis. Der einzige Fall, der sie braucht: von einem anderen Gerät in Ihrem Netzwerk gesteuert zu werden. Wenn Sie den Windows-Hinweis abgelehnt haben, haben weder Downloads noch Generierung noch Updates gelitten. Um die Erlaubnis nachträglich zu erteilen:
Weg 1 — über die Windows-Einstellungen (keine Kommandozeile)
Öffnen Sie Start, tippen Sie Firewall und wählen Sie Windows Defender Firewall.
Klicken Sie aufEine App oder ein Feature durch die Windows Defender Firewall zulassen.
Klicken Sie auf Einstellungen ändern(fragt nach Administratorrechten).
Suchen Sie TRAG Studio in der Liste. Ist es dort: Haken bei Privat. „Öffentlich“ nicht anhaken. Ist es nicht dort: Andere App zulassen… → Durchsuchen… → TRAG.exe im Installationsordner wählen → Hinzufügen, dann Privat anhaken.
Mit OK bestätigen und TRAG neu starten.
Haken Sie Privat an (Heimnetzwerk) und niemals Öffentlich. Ein öffentliches Netz ist ein Hotel, ein Flughafen, ein Café — kein Ort, um sein Studio zu exponieren.
Weg 2 — ein einziger Befehl (für Geübte): Eingabeaufforderung als Administrator öffnen, Pfad bei Bedarf anpassen:
Antivirus von Drittanbietern. Manche blockieren den Windows-Firewall-Hinweis oder den Downloader selbst. Kann TRAG keine Modelle laden, obwohl Ihre Verbindung funktioniert, pausieren Sie den Virenschutz vorübergehend oder nehmen Sie den Installationsordner in seine Ausnahmen auf.
Firmen- oder Schulnetzwerk. Ein Proxy oder Filter kann download.trag.studio blockieren. Das Symptom: Die Modelle beginnen nie zu laden, während der Rest des Internets funktioniert. Versuchen Sie es über eine Heimverbindung oder einen mobilen Hotspot, oder bitten Sie die Netzwerkadministration, diese Domain zuzulassen.
11Tipps für bessere Ergebnisse
Ein paar Reflexe, die alles verändern — vom ersten Prompt bis zum finalen Render.
Präzise Prompts
Motiv + Aktion + Stimmung + Licht. „Ein Leuchtturm im Sturm, riesige Wellen, dramatisches Licht“ schlägt immer „ein Leuchtturm“. Die ✦-Vorschläge unter der Prompt-Leiste sind gute Vorbilder.
Der Prompt beschreibt, die Regler regeln
Format, Dauer, Qualität, Stil: ein Klick im rechten Panel. Nie im Prompt — so vermeiden Sie wirre Ergebnisse.
Standardwerte respektieren
Die Voreinstellungen sind auf Ihren Rechner kalibriert (danke, Studio Index). Ändern Sie eine Sache nach der anderen: So wissen Sie, was den Unterschied machte.
Die Engine vorheizen
Ein Klick auf Warm up vor der Sitzung, und der erste Render startet ohne Wartezeit. Das grüne „ready“-Abzeichen sagt, wann.
Quelle + Prompt > Einstellungen
Beim Umwandeln eines Bildes oder Tracks wiegen die Qualität der Quelle und die Klarheit des Prompts schwerer als jede erweiterte Einstellung.
Erst kurz, dann lang
Prüfen Sie die Video-Idee an einem 5-s-Clip in Fast-Auflösung, dann länger und feiner neu rendern. Sie iterieren doppelt so schnell.
Die Main chat bar, Ihre beste Verbündete
Alles läuft über die Main chat bar, die eine Leiste am unteren Bildschirmrand. Beschreiben Sie Ihre Idee und lassen Sie ihre Werkzeuge arbeiten: Die ✦ magic wand schreibt Ihren Prompt mit einem Klick um und stärkt ihn (präziseres Motiv, Licht, Stimmung), das Mikrofon nimmt Diktate auf, die Büroklammer hängt eine Referenz an, und die ✦-Vorschläge darunter zeigen den Detailgrad, der funktioniert. Aus der Galerie legt „Send to chat“ einen alten Prompt zurück in die Leiste, um ihn zu einer neuen Version umzuarbeiten.
12FAQ — Häufige Fragen
Kurze Antworten auf die häufigsten Fragen.
Brauche ich Internet?
Nein. Sobald Installation und Modell-Downloads abgeschlossen sind, läuft alles offline, lokal auf Ihrem Rechner. Internet braucht es nur zum Herunterladen der App, der Modelle und der Updates.
Sind meine Kreationen privat?
Ja. Die Generierung findet auf Ihrer GPU statt; Ihre Prompts und Dateien bleiben auf Ihrem Rechner. Nichts wird in eine Cloud gesendet.
Welche Hardware brauche ich?
TRAG startet ab einer NVIDIA RTX der 20er-Serie (4 GB), 16 GB RAM und einem Intel Core i5 der 7. Generation oder Äquivalent — siehe Mindestanforderungen. Beim Onboarding berechnet TRAG Ihren Studio Index und passt die Optionen an Ihre Maschine an — weniger Leistung heißt nur bescheidenere Einstellungen, keine verschlossene Tür.
Die Engine startet nicht / meine GPU wird nicht erkannt
Bei der Installation prüft TRAG, welche CUDA-Version Ihr Grafiktreiber unterstützt, und installiert die passende Variante — Sie müssen nichts aktualisieren. Bleibt die Engine rot, öffnen Sie %LOCALAPPDATA%\TRAG Studio\logs\ und suchen Sie die Zeile engine device=: Sie lautet cuda (Ihre Karte arbeitet) oder cpu (Prozessor-Fallback). Schicken Sie uns diese Zeile an hello@trag.studio — sie genügt uns, um zu verstehen, was passiert ist.
Beim Start erscheint ein Firewall-Fenster — was tun?
Klicken Sie nur auf „Zulassen“, wenn Sie TRAG von einem anderen Gerät im Netzwerk steuern möchten (Agent Gateway). Andernfalls schließen Sie das Fenster bedenkenlos: Die App funktioniert ohne diese Berechtigung einwandfrei. Falls Sie abgelehnt haben und später darauf zurückkommen möchten: Die manuellen Schritte stehen in Trag Muse & Agent Gateway.
Wie lang darf ein Video sein?
Die Dauer wird in den Videoeinstellungen festgelegt (5 s, 10 s, 15 s oder Custom). Bedenken Sie: Kurze Clips sind schneller und stabiler — so iteriert man richtig.
Wo werden meine Kreationen gespeichert?
Im beim Onboarding gewählten Ausgabeordner (änderbar in Settings › Storage). Alle erscheinen zusätzlich in der Media Gallery.
Was unterscheidet Free und Pro?
Free ist kostenlos und unbegrenzt, kann aber nur Bild (Text to Image + Image to Image). Pro schaltet alles frei: Magic Edit, Blend Images, das ganze Video, das ganze Audio — und lädt alle zugehörigen Modelle.
Was sind die PRO-Funktionen?
Die Workflows mit PRO-Abzeichen in der Oberfläche: Magic Edit, Blend Images, das ganze Video (Image to Video, Smooth Motion, Lip Sync) und das ganze Audio (Text to Music, Remix, Section Edit). Sie werden mit dem Wechsel zu Trag Studio Pro aktiv.
Wie wechsle ich zu Pro?
Über das Web-Portal: Sie kaufen (Einmalzahlung), der Schlüssel wird an Ihr Profil gebunden, dann schaltet die App die Workflows frei und bietet den Download der Video- und Audio-Modelle an. Sie können Pro direkt kaufen oder mit Free beginnen und später wechseln — unterwegs geht nichts verloren.
Was ist Trag Muse?
Das vernetzte Produktionsstudio, das als Add-on zu Free und Pro kommt: Ihre Agenten (Claude, Codex oder jeder MCP-Agent) und Ihre APIs (Seedance, Kling, Nano Banana…) steuern TRAG über das Agent Gateway — während alles auf Ihrem Rechner gerendert wird. Es steht kurz bevor: Drücken Sie Keep me posted im Muse-Fenster, um der ersten Welle beizutreten.
Kann ich eine KI TRAG steuern lassen?
Ja — genau dafür gibt es Trag Muse. Über das Agent Gateway verbindet sich ein externer Agent (Claude, Codex oder jeder MCP-Agent) mit Ihrem lokalen TRAG und kann Kreationen starten und verketten — markiert mit „Request from: AI agent“ und in der Galerie filterbar („Agent sessions“). Muse kommt bald: Keep me posted trägt Sie in die erste Welle ein.
Prompt oder Einstellungen — was ist der Unterschied?
Der Prompt beschreibt den Inhalt: Motiv, Stimmung, Dialog. Die Einstellungen sind technisch: Format, Dauer, Stil, Qualität. Schreiben Sie nie eine technische Einstellung in den Prompt — das rechte Panel erledigt das besser, ohne Mehrdeutigkeit.
Sagen Sie uns, wie wir helfen können.
hello@trag.studio ist das Tor zum Support — jede Nachricht wird von einem Menschen gelesen.
Создавайте изображения, видео и музыку — на своём ПК, только для себя.
TRAG Studio — это Windows-приложение для генерации с помощью ИИ, работающее на 100 % локально, на видеокарте вашего компьютера. Без облака, без скрытых подписок, без очередей: ваши идеи, ваши файлы, у вас дома.
✦ Безлимитная генерация 100 % приватно и офлайн Изображение Видео Аудио 11 творческих воркфлоу
TRAG Studio построен вокруг трёх категорий — Image, Video и Audio — доступных через вкладки в верхней части экрана. Каждая категория объединяет воркфлоу: готовые творческие мастерские.
Изображение
Text to Image (создать из текста), Image to Image (преобразовать изображение), Magic EditPro (ретушь закрашенной области) и Blend ImagesPro (слить 2-3 изображения).
Видео Pro
Text to Video (ролик из простого промпта), Image to Video (оживить кадр, с синхронным звуком и репликами), Smooth Motion (связать начальный и конечный кадры) и Lip Sync (синхронизировать лицо с аудиодорожкой).
Аудио Pro
Text to Music (сочинить трек, с текстом песни по желанию), Remix (преобразовать готовый трек) и Section Edit (перегенерировать конкретный фрагмент).
Trag Muse Muse
Подключённая продакшн-студия, скоро в доступе: управляйте TRAG из Claude, Codex или любого MCP-агента и подключайте API, которыми пользуетесь, — пока всё рендерится на вашей машине.
Для кого это
Инфлюенсеры и авторы контента
Клип каждый день в формате TikTok, YouTube или Square, b-roll по запросу, музыка, которая принадлежит вам — всё пакетом за ночь через Add Multiple Jobs.
Диджитал-агентства
Готовые для клиента визуалы в объёме, без платы за изображение и тревоги о квотах — и всё остаётся на ваших машинах: конфиденциальность по построению.
Создатели нарративных вселенных
Последовательные персонажи через Image to Image и Blend, ожившие сцены, саундтрек к каждой главе — целая вселенная с одного стола.
Инди-студии и музыканты
Концепт-арт, аниматики, черновые треки и ремиксы для быстрых итераций — безлимитные попытки, ноль облачных счетов.
По всему руководству вы встретите скриншоты приложения: ярко-зелёные рамки и стрелки на них указывают на обсуждаемый элемент. Нажмите на любое изображение, чтобы увеличить его.
Три предложения: Free, Pro и Trag Muse
TRAG существует в двух редакциях, плюс необязательный слой автоматизации:
Предложение
Цена
Что можно делать
Загружаемые модели
Trag Studio FreeFree
Бесплатно
Только изображения: Text to Image + Image to Image, без ограничений.
Только модели изображений
Trag Studio ProPro
Разовая покупка (веб-портал)
Всё: изображения (+ Magic Edit, Blend Images), всё видео, всё аудио.
Все модели (изображение + видео + аудио)
Trag MuseMuse
Дополнение — скоро
Подключённая продакшн-студия: ваши агенты и ваши API управляют TRAG через Agent Gateway. Сочетается с Free или Pro — присоединяйтесь к первой волне из приложения.
— (программный слой)
Два пути на выбор:
Начать бесплатно, перейти на Pro позже. Скачайте TRAG Studio Free с сайта, создавайте изображения сколько угодно… а когда позовут видео или аудио — купите Pro на веб-портале. Ключ привязывается к вашему профилю: приложение разблокирует воркфлоу и предложит скачать недостающие модели.
Купить Pro сразу. Покупка помещает ключ в профиль; при первом входе онбординг сразу устанавливает полный набор.
В приложении закрытые воркфлоу отмечены значком PRO (например, «Magic Edit Pro») — это визуальная метка этой матрицы. Подробная матрица по каждому воркфлоу — в FAQ.
Окно Pro в приложении: все воркфлоу разблокированы одной покупкой — со скидкой Early-Bird, пока она действует.
02Установка
Установка идёт через классический мастер Windows — несколько кликов «Next», и готово. Вот точный путь, экран за экраном.
Прежде чем начать: установщик содержит приложение и его исполняемые движки (Python, CUDA, ComfyUI) — но не ИИ-модели. Они загружаются позже, при первой настройке, и только те пакеты, что вы отметите. Установка всё равно может занять время — это нормально и происходит лишь один раз.
Запустите файл TRAG_Studio_V1.0_Setup, скачанный с сайта TRAG (около 1 ГБ). Windows запросит подтверждение безопасности: согласитесь, чтобы продолжить.
Распакуйте установщик. Откроется небольшое окно самораспаковки, нацеленное на папку «Загрузки». Нажмите Extract и дайте процессу завершиться.
Скачанный файл, готовый к запуску — зелёный значок TRAG в ваших «Загрузках».Самораспаковка: нажмите «Extract» и дождитесь конца.
Сделайте выбор в TRAG Studio Setup. Установщик открывается одним экраном: папка установки уже заполнена — ваша пользовательская папка (…\AppData\Local\Programs\TRAG Studio — права администратора не нужны), плюс две уже отмеченные галочки: ярлык на рабочем столе и правило брандмауэра. Оставьте их и нажмите Установить TRAG Studio →.
Дайте установщику поработать. Пока слайд-шоу представляет студию, полоса рассказывает, что именно происходит — включая шаг, где TRAG определяет, какую версию CUDA поддерживает ваш графический драйвер, и скачивает подходящий вариант. Делать ничего не нужно — только ждать.
Один экран, три решения: папка, ярлык, правило брандмауэра — затем «Установить».Установка рассказывает о себе: здесь определён драйвер CUDA 12.6, скачивается нужный вариант.
Завершите и запустите. «Installation terminée» предлагает удалить временный установочный файл (около 2,5 ГБ — отметьте, чтобы освободить место) и большую кнопку Запустить TRAG Studio →. При первом запуске TRAG встретит вас экраном входа — переходим к следующему разделу!
Готово: освободите временный файл и запустите студию.
При первом запуске может появиться окно брандмауэра Windows. Нажимайте «Разрешить» только если собираетесь управлять TRAG с другого устройства в сети (см. Agent Gateway). Иначе просто закройте окно — TRAG прекрасно работает и без этого.
03Вход и первая настройка
При первом запуске TRAG проведёт вас за несколько шагов: вход, определение железа, выбор воркфлоу, папка вывода. Пять минут (не считая загрузки моделей).
Войти
Экран «Welcome back» предлагает две двери: Continue with Google или e-mail и пароль. С Google вход завершается в браузере — TRAG ждёт и продолжает автоматически, как только вы закончите. Ещё нет аккаунта? «Create one» создаст его мгновенно.
Аккаунт несёт вашу лицензию: ключ Pro привязан к профилю. Вход обязателен — именно он позволяет вашим покупкам и пресетам следовать за вами.
Вход через Google: завершите в браузере — TRAG продолжит автоматически и вернёт вас в студию.
Приветствие онбординга
TRAG представляется одной фразой — «Local generative AI, made for everyone.» — и напоминает обещание: простой интерфейс, запускающий мощные open-source-движки на вашей машине, без сомнительных загрузок и крутых кривых обучения. Нажмите Get started →.
Добро пожаловать в TRAG Studio: всё работает локально — ваша работа никогда не покидает устройство.
Определение железа и Studio Index
Чтобы предложить подходящие настройки, TRAG изучает вашу машину. На экране «Tell us about your machine» нажмите Detect (рекомендуется): за секунду приложение распознает видеокарту и процессор, оценит каждый и вычислит ваш Studio Index — общий индекс, калибрующий приложение под мощность ПК.
«Detect my hardware»: позвольте TRAG просканировать GPU и CPU (или настройте вручную).Результат сканирования: каждый компонент получает оценку, а Studio Index подытоживает общую мощность.
Хотите держать всё под контролем? «Set up manually instead» раскроет три списка — видеокарта, процессор, память — с живым предпросмотром «Expected performance» (Image / Video / Audio). Опция «I don't know my hardware» выберет за вас осторожные настройки.
Ручная настройка: GPU, CPU, RAM и обновляющийся предпросмотр производительности.
Список GPU включает и профессиональные карты, и рабочие станции.По процессору: топовый, средний или начальный уровень.И по памяти: больше RAM = длиннее видео и крупнее пакеты.
Минимальные требования
TRAG подстраивается под вашу машину — и порог ниже, чем кажется:
Компонент
Минимум
Видеокарта
NVIDIA RTX 20-й серии — 4 ГБ VRAM
Память
16 ГБ ОЗУ
Процессор
Intel Core i5 (7-е поколение) или эквивалент AMD
Ниже этого Studio Index просто выберет более скромные настройки; выше — каждый лишний гигабайт VRAM покупает скорость и разрешение.
А потолок вот-вот снесёт: новое поколение ПК NVIDIA Spark — суперчип GB10 Grace Blackwell, 128 ГБ единой памяти, до петаФЛОПа ИИ-вычислений на рабочем столе — ровно то железо, под которое TRAG и создавался. На Spark пакеты, занимавшие вечер, занимают кофе-паузу.
Что на деле меняет ваша машина
Помимо порога выше, комфорт работы с TRAG день за днём определяют три вещи: свободное место на диске, видеопамять и наличие — или отсутствие — карты NVIDIA.
Место на диске — настоящая первая стена
Модели устанавливаются в папку приложения, пакет за пакетом. Точные размеры:
Пакет
Размер
Входит в
Magic Wand (ассистент промптов)
3,6 ГБ
у всех, автоматически
Изображение — генерация
10,9 ГБ
Free
Изображение — редактирование
30,9 ГБ
Free
Видео
47,2 ГБ
Pro
Аудио
19,1 ГБ
Pro
Итого
111,7 ГБ
Чтобы установить и делать изображения: рассчитывайте на 50 ГБ свободных.
Чтобы иметь всё, включая Pro: рассчитывайте на 120 ГБ свободных.
На ноутбуке с небольшим системным SSD первым блокирует именно этот пункт — а не видеокарта.
Брать всё никто не заставляет: отметьте нужное, остальное добавите позже, ничего не потеряв.
Сами творения уходят в папку вывода со следующего шага — в другое место, и со временем это тоже накапливается.
Проводник Windows считает в гибибайтах, тогда как наши цифры — десятичные гигабайты: файл, заявленный как 29,15 ГБ, отображается в Windows как «27,1 ГБ». Это не оборванная загрузка.
Видеопамять — что она покупает на самом деле
VRAM решает судьбу видео, а не изображений. Картинки спокойно идут уже с 4 ГБ; запас нужен именно видео.
4 ГБ — изображения без забот. Видео: короткие ролики в скромном разрешении.
6 ГБ — комфортное видео короткими роликами. Замерено на ноутбуке тестера с RTX 3060: занято 4,9 ГБ из 6, без происшествий.
8 ГБ и больше — длиннее ролики, выше разрешения, крупнее пакеты.
И, как рассказано в обзоре интерфейса, тёплым остаётся только один движок за раз — это выбор ради бережного отношения к карте, а не ограничение.
Нет карты NVIDIA? TRAG всё равно работает
Без пригодного GPU TRAG переходит на процессор: индикатор в нижней строке сообщает об этом янтарным цветом, и генерация работает — просто гораздо медленнее. Годится, чтобы попробовать, но не чтобы производить. Лучше сказать это здесь, чем оставить кого-то думать о поломке.
Выбрать воркфлоу — и дать экрану проверить диск
Экран моделей перечисляет пакеты — Image, Video, Audio — с их реальными размерами; базовые движки скачиваются автоматически. Как говорит сам экран: изображение бесплатно, движение и звук — Pro. Любой пакет можно скачать — значок PRO лишь сообщает, что может выполнять ваш план.
Три детали делают этот экран надёжным:
Он перечитывает диск при каждом открытии. Баннер сверху объявляет это — «Checking what is already on this machine…», затем вердикт: «Disk checked · 14 of 18 model files verified · 9.4 GB left to download» — с кнопкой Re-check.
Он знает три состояния, а не два. Полный проверенный пакет носит зелёный значок Already downloaded (галочки нет — остаётся сдержанное Download again). Прерванный файл становится янтарным с Check needed и кнопкой Redownload. Отсутствующее сохраняет галочку и точный оставшийся объём.
Закрытие окна ничего не отменяет. Карточка загрузки живёт дальше; свёрнутая, она сохраняет процент и полосу на виду — «Keep working — this continues in the background.»
Экран моделей: баннер проверки сверху, реальные размеры пакетов, значки PRO на Video и Audio, оценка внизу.
И работать вы начинаете рано: как только скачано необходимое (около 14,5 ГБ), студия открывается, а остальное продолжает загружаться в фоне. Пакеты можно добавить или убрать в любой момент через Settings › Hardware & Models — модель, уже лежащая на диске, никогда не скачивается заново.
Выбрать папку вывода
«Where should your creations be saved?»: выберите папку, куда будут попадать изображения, видео и треки. Нажмите Choose…, выберите (или создайте) папку в проводнике Windows и подтвердите кнопкой Continue →. Её можно сменить в любой момент в Settings.
Выбор папки вывода: нажмите «Choose…».Открывается проводник Windows: создайте, например, папку «Trag output» в «Документах».
Путь задан: остаётся «Continue →» (отмечено зелёным).
Финишная прямая
TRAG показывает три козыря, о которых стоит помнить — Main chat bar с её ✦ magic wand (ваш промпт улучшен в один клик), Add Multiple Jobs (запуск целого пакета разом) и Media Gallery (все ваши творения, готовые к повторному использованию). Затем «You're all set» подтверждает, что движки установлены: нажмите Let's Create →.
Три вещи, которые стоит изучить сразу — и подсказка: ИИ-агент может даже творить за вас (Settings › Connection).«You're all set»: всё установлено — за дело.
Обучающий тур (8 шагов)
При первом открытии короткий обучающий тур по очереди подсвечивает ключевые зоны (выбор режима, воркфлоу, настройки, промпт…). Идите по нему кнопкой Next → или пропустите через Skip — его всегда можно перезапустить через «Take the tour» в боковой панели.
Обучающий тур (шаг 1 из 8): «Next» ведёт шаг за шагом.Спешите? «Skip» закроет тур — он останется доступен в боковой панели.
04Интерфейс с одного взгляда
Весь TRAG умещается на одном экране, устроенном так, чтобы не потеряться. Вот карта местности.
При запуске TRAG подгружает модели («Warming up the models») и оставляет вас в пространстве Create:
Запуск: TRAG приводит модели в готовность.Главный интерфейс (здесь — Text to Image). Зелёная рамка выделяет низ боковой панели: светлая тема, Settings, Help, полный экран и ваш аккаунт.Cinema Flow, кинотаймлайн — Storyboard, Script, Film, Edit. Превью грядущего: погуляйте и нажмите «Keep me posted».
Боковая панель (слева) — Search (палитра команд), Create (мастерская), Media Gallery (ваши творения), Creation Flow (очередь рендеров) и Cinema Flow (превью кинотаймлайна — скоро), а внизу: Light mode, Settings, Help, Toggle Fullscreen и ваш профиль.
Вкладки Image / Video / Audio (сверху, по центру) — категория творчества. Каждая категория затем показывает свои подвкладки воркфлоу (Text to Image, Image to Image, Magic Edit, Blend Images…).
Вьюпорт (центр) — сцена, где результат появляется, сравнивается, проигрывается.
Main chat bar (внизу) — опишите идею и нажмите большую кнопку действия (Generate Image, Animate Image, Generate Music…). ✦ Magic wand улучшает ваш промпт в один клик, микрофон принимает голосовую диктовку, а ниже — пример-подсказка для вдохновения.
Кнопка Warm up (вверху слева) — прогревает движок активной категории, чтобы первый рендер стартовал без ожидания.
Строка состояния (в самом низу) — здоровье локальных сервисов: «AI engine connected» (движок генерации, с активностью GPU) и «AI Companion connected» (ассистент промптов, на CPU).
Кнопка Warm up и состояние движков
У каждой категории свой движок, и TRAG держит тёплым только один, оберегая вашу видеокарту. Значок вверху слева расскажет всё:
Два индикатора здоровья: кнопка «Warm up» вверху слева и строка состояния внизу справа.
Красный — Engine offline: движок остановлен. Двойной клик по значку перезапустит его.Оранжевый — Warming: движок запускается (процент растёт). Смена категории остужает прежний движок — тёплым остаётся только один.Зелёный — ready: движок прогрет; генерация стартует мгновенно.
Есть и четвёртое состояние: когда GPU недоступна, индикатор в нижней строке становится янтарным и говорит прямо — «AI engine connected (CPU — no GPU detected)». Это тот самый запасной путь через процессор из раздела 03: всё работает, только заметно медленнее.
Светлая, тёмная… или Creator
Первая кнопка внизу боковой панели меняет атмосферу: чистая светлая тема, глубокая тёмная и режим Creator — матовый чёрный, созданный для работы без отвлечений, с необязательными акцентами (например, «Obsidian Orange»). Небольшой тост подтверждает каждую смену оформления.
Светлая тема — тот же интерфейс, светлое настроение.Матовый чёрный режима Creator — здесь с акцентом «Obsidian Orange»; тост подтверждает выбранное оформление.
Палитра поиска
Кнопка Search боковой панели открывает палитру команд: печатайте, чтобы отфильтровать экраны, воркфлоу и действия («Go to Media Gallery», «Text to Image», «Open Settings»…), и подтверждайте Enter. Esc закрывает её.
Палитра поиска: весь TRAG на расстоянии клавиатуры.
05Создание изображений
Вкладка Image собирает четыре воркфлоу: создать из текста, преобразовать изображение, отретушировать точное место или слить несколько изображений в одно.
Промпт описывает содержание; настройки описывают технику. В промпте: сюжет, атмосфера, свет. В правой панели: формат (Dimensions), стиль (Style), качество (Quality). Никогда не пишите «4K» или «квадратный формат» в промпте — один клик в настройках сделает это лучше.
Text to Image — создать из текста
«Create a brand-new image from text alone.» Стартовый воркфлоу, самый прямой:
Опишите изображение в нижней строке — сюжет, стиль, свет, настроение.
Нажмите Generate Image →. Результат появится во вьюпорте и автоматически попадёт в Media Gallery.
Text to Image: настройки справа, промпт внизу, результат в центре.Панель настроек крупно: Dimensions, Style, Quality — затем Custom settings, Creativity и Negative prompt под «More settings».
После генерации на результате появляются две кнопки: ✦ Re-use prompt (начать с того же текста) и ✦ Use as source (отправить изображение в другой воркфлоу). Лента Recent Generations под вьюпортом держит последние попытки в одном клике.
Готовый рендер: «Re-use prompt», «Use as source» и лента «Recent Generations» для прыжков между попытками.
Image to Image — преобразовать изображение
«Restyle, enhance, mix or upscale an existing image.» Дайте исходное изображение, опишите изменение:
Подвкладка Image to Image, затем загрузите изображение через Source image → Click to choose (или отметьте «Iterate from last result», чтобы оттолкнуться от последнего рендера).
НастройтеStyle, Quality и коэффициент Upscale (1x / 1.5x / 2x — идеально для чёткого увеличения).
Сравните. Вьюпорт показывает ползунок Before / After: тяните его, чтобы пройтись между оригиналом и результатом.
Image to Image: зелёные рамки выделяют подвкладку и рабочую зону.Настройки: источник, Style, Quality, Upscale — и Similarity to source под «More settings».
Генерация в разгаре: преобразование проходит по изображению.Сравнение «Before / After»: тяните рукоятку, чтобы взвесить изменение.
Magic Edit — ретушь закрашенной области Pro
«Paint a region and replace just that part — add, remove or swap objects.» Восхитительно просто: вы закрашиваете область, говорите, что там должно быть, — и TRAG не трогает больше ничего.
Подвкладка Magic Edit, затем загрузите изображение для ретуши (Image to edit → Click to choose).
Выберите маску справа: Brush (свободная кисть) или Auto-detect. При необходимости подстройте Opacity и Hardness кисти — Brush size и Blending strength живут под «More settings».
Закрасьте прямо на изображении область для изменения — она покроется подсвеченной вуалью. «Clear canvas» стирает маску, «Reuse mask» возвращает предыдущую.
Опишите изменение в нижней строке (добавить, убрать, заменить…) и нажмите Apply Edit →. Сравнение Before / After затем позволит проверить ретушь.
Magic Edit в действии: закрашенная область на изображении, настройки маски и промпт с описанием замены — три зелёные метки, три жеста.
Magic Edit в начале: загрузите изображение, выберите режим маски.Настройки Magic Edit: Mask (Brush / Auto-detect), Opacity, Hardness — Brush size и Blending strength ниже.
После правки: ползунок Before / After подтверждает — изменилась только замаскированная область.
Blend Images — слить несколько изображений Pro
«Combine multiple images into one — subject + style, or several references.» Сюжет отсюда, стиль оттуда: Blend женит два изображения (и третье по желанию).
Подвкладка Blend Images, затем загрузите Image A и Image B («+ Add another» — для необязательного C).
Выберите Style, если хотите направить результат.
Опишите, как изображения соединяются — кто что делает, в какой сцене — и нажмите Blend →.
Два загруженных источника (A + B) и промпт, рассказывающий о слиянии — все три зоны отмечены зелёным.Результат: персонажи изображений A и B встретились в одной сцене.
Blend Images в начале: слоты A и B ждут ваши изображения.Настройки: Source Images (A, B, + Add another), Style — и Blending balance под «More settings».
06Создание видео Pro
Вкладка Video создаёт ролик из простого промпта, оживляет ваши изображения, связывает два момента плавным движением или заставляет лицо говорить. Все четыре видео-воркфлоу входят в редакцию Pro.
При переходе на вкладку Video верхняя кнопка превращается в «Warm up LTX 2.3 engine»: нажмите её перед первым видео, чтобы прогреть движок. Короткие ролики быстрее и стабильнее — начните с 5 с.
Text to Video — ролик из простого промпта
«Create a video entirely from a text description.» Без исходного изображения: опишите сцену и движение — и TRAG снимает.
Вкладка Video → подвкладка Text to Video.
Выберите рамку: Format (TikTok, YouTube, Square или Custom), Aspect ratio (9:16, 16:9, 1:1, 4:3), Definition (SD 480p → UHD 2160p) и Duration (5s, 10s, 15s или Custom).
Опишите кадр — герой, движение камеры, атмосфера — и нажмите кнопку действия, чтобы движок начал съёмку.
Настройки Text to Video: Format, Aspect ratio, Definition, Duration, Style.
Image to Video — оживить кадр
«Bring a still image to life with motion.» Изображение + описание движения = видеоролик, с синхронным звуком и репликами, если вы их опишете.
Вкладка Video → подвкладка Image to Video, затем загрузите изображение (Source image → Click to choose, или отправьте из Media Gallery через «Use as source»).
Выберите Format — TikTok (вертикальный), YouTube (16:9), Square или Custom — и Duration (5s, 10s, 15s или Custom). Quality и Smoothness (24 / 30 / 60 FPS) живут под «More settings».
Опишите движение — что делает герой, куда едет камера, звуковая атмосфера, даже реплика для произнесения.
Нажмите Animate Image → и дайте движку поработать: ролик затем проигрывается прямо во вьюпорте.
Image to Video: формат, длительность и разрешение справа, движение описано внизу.Видео-настройки: источник, Format, Duration — Quality и Smoothness под «More settings».
Сгенерированный ролик в проигрывании — источник и промпт отмечены зелёным.
Smooth Motion — от кадра к кадру
«Morph a start frame into an end frame with fluid motion.» Дайте начальный и конечный кадры: TRAG придумает плавное движение между ними.
Подвкладка Smooth Motion, затем загрузите Start frame и End frame.
Выберите рамку и плавность: Format, Duration — и Smoothness (24 / 30 / 60 FPS) под «More settings».
Опишите движение от первого кадра к последнему и нажмите Generate Motion →.
Smooth Motion: начальный кадр, конечный кадр — движение рождается между ними.Настройки: Start frame, End frame, Format, Duration — Quality и Smoothness под «More settings».
Lip Sync — заставить лицо говорить
«Drive a face video or image with an audio track so the lips match.» Лицо (фото или видео) + аудиодорожка = идеально синхронные губы.
Подвкладка Lip Sync, затем загрузите Face video/image и Audio track. Нет аудиофайла под рукой? Record from mic запишет голос на месте.
Выберите рамку: Format и Duration — Quality и Smoothness под «More settings».
Добавьте необязательный промпт, чтобы направить результат, и нажмите Sync Lips →.
Lip Sync: лицо, аудиодорожка (или микрофон) и сила артикуляции.Настройки: Face video/image, Audio track, Record from mic, Format и Duration.
07Создание аудио Pro
Вкладка Audio сочиняет целые треки — с текстом или без — ремикширует ваши записи и перегенерирует точный фрагмент. Все три аудио-воркфлоу входят в редакцию Pro.
Text to Music — сочинить трек
«Compose music from a description.» Опишите произведение, задайте настроение… и напишите текст песни, если душа просит:
Вкладка Audio → подвкладка Text to Music. Верхняя кнопка превращается в «Warm up ACE-Step 1.5 engine»: один клик для прогрева.
Напишите текст (по желанию) в центральном редакторе Lyrics: структурируйте его кнопками Verse, Chorus и Bridge, выберите язык (EN, FR, ES, DE, IT, PT, JA, ZH, KO, RU…). Оставьте пустым для инструментала.
Сформируйте музыку справа: Style (Pop, Rap, Afro, Rock, Electronic, Cinematic), Mood (Happy, Epic, Chill… шестнадцать настроений), Key & Scale (маленькая фортепианная клавиатура!), BPM и Duration (30s, 1m, 2m или Custom).
Опишите произведение в нижней строке и нажмите Generate Music →. Трек появится в плеере, готовый к прослушиванию — и займёт место в Media Gallery.
Text to Music: редактор текста в центре (Verse / Chorus / Bridge), музыкальные настройки справа.Музыкальные настройки: Style, Mood, Key & Scale, BPM, Duration — Quality под «More settings».
Когда трек готов, кнопка плеера ✦ Use as source одним кликом отправит его в Remix this track, Section Edit или Lip Sync (аудио):
Сгенерированный трек: меню «Use as source» ведёт в Remix, Section Edit или Lip Sync.
Remix — преобразовать трек
«Transform an existing audio track into a new style.» Ваша песня — в новом наряде:
Подвкладка Remix, затем загрузите трек (Source audio → Click to choose).
Выберите Style и Mood и дозируйте Keep Original (под «More settings»): чем выше процент, тем сильнее проступает оригинал.
Опишите новое направление — жанр, вайб, темп — и нажмите Remix Track →.
Remix: исходный трек, целевой стиль и регулятор «Keep Original».Настройки Remix: Source audio, Style, Mood, Key & Scale — Keep Original под «More settings».
Section Edit — перегенерировать фрагмент
«Replace or regenerate a chosen section of a track.» Припев подводит? Перегенерируйте только его, не трогая остальное:
Подвкладка Section Edit, затем загрузите трек.
Обозначьте Section для переработки (например, 0:12 – 0:24, через «Set range…»).
Выберите Match: Keep key & tempo, чтобы остаться в ладу с остальной композицией, или Free — отпустить вожжи.
Опишите замену и нажмите Repaint Section →.
Section Edit: выберите диапазон для перегенерации, сохраните (или нет) тональность и темп.Настройки: Source audio, Quality, Match — Keep key & tempo, или Free.
Строка промпта в режиме Section Edit: опишите замену — волшебная палочка ✦, микрофон и вложение под рукой.
08Creation Flow и пакетные задания
Creation Flow — ваша диспетчерская рендеров: живая очередь, история всего созданного и запуск целых пакетов.
Фича года Эксклюзив
TRAG — единственный инструмент на рынке с очередью рендеров, достойной этого имени: управляйте вручную или доверьте её MCP-агенту.
Следить за очередью рендеров
Откройте Creation Flow из боковой панели (счётчик на иконке показывает задания в ожидании). Каждая строка отражает состояние — Generating с процентом и оставшимся временем, Waiting с оценкой, затем Completed — плюс кнопки Open / Cancel. Вверху справа: History, Add Multiple Jobs, а во время работы — Stop, Pause и Stop all.
Очередь в работе: одно задание генерируется, следующие ждут, и команды History / Add Multiple Jobs / Stop / Pause / Stop all (в зелёных рамках).Всё готово: каждая строка переходит в «Completed», у каждой — своя кнопка «Open».
История создания
Кнопка History открывает Creation History: статистику сессии (создания по воркфлоу) и для каждой записи — Use prompt (вернуть текст), Save preset (запомнить настройки) и Open. Export сохраняет историю, Clear очищает её.
Creation History: счётчики по воркфлоу и действия Use prompt / Save preset / Open.В самом начале история пуста — она наполняется с каждым рендером.
Add Multiple Jobs — запустить целый пакет
Хочется сгенерировать десять изображений и пять треков за обеденный перерыв? Add Multiple Jobs автоматически проходит целый список созданий:
Скопируйте «матрицу» нужной категории — Copy Image, Copy Video или Copy Audio. Это текстовый шаблон, который учит ИИ (ChatGPT, Claude…) составлять ваш список заданий.
Поручите написать список: вставьте матрицу в любимый ИИ вместе с вашими идеями и получите файл .md (одно задание на строку, заголовок # на категорию).
Перетащите .md в зону «Drag result here»: TRAG прочитает его и объявит «X jobs ready». Если задания используют файлы (изображения, аудио…), перетащите также .zip с этими ресурсами во вторую зону.
Выберите папку вывода и нажмите Generate: задания сами пройдут через Creation Flow, и каждый рендер попадёт в Media Gallery.
Принцип: матрица «Copy Image» служит шаблоном, а ваш список превращается в структурированный .md..md на месте: «15 jobs ready» — остаётся лишь сгенерировать.
Окно Add Multiple Jobs: матрицы для копирования, зона .md, зона .zip для ресурсов и папка вывода.
Ещё проще с Trag Muse: фуксиевый баннер «Use your agent to orchestrate» позволяет вашему ИИ-агенту управлять TRAG напрямую, без копипаста — см. Trag Muse и Agent Gateway.
Завершённый пакет в Creation Flow. Стрелки указывают на «Add Multiple Jobs» и ярлык Trag Muse в боковой панели.
09Media Gallery
Каждое творение — изображение, видео, трек — автоматически попадает в Media Gallery. Это ваша библиотека: находить, проигрывать, переиспользовать.
Просматривать и фильтровать
Вверху галереи: фильтры по типу (All / Image / Video / Audio), по происхождению (All / Mine / Agent sessions — удобно выделить созданное агентом), сортировка (Newest first…), размер сетки и Refresh.
Галерея и её фильтры — пока пустая: «Assets you generate will appear here.»Заполненная галерея: нажмите на миниатюру, чтобы открыть панель «Item Details».
Карточка медиа: Item Details
Панель Item Details показывает всё важное: превью (или плеер), имя файла, тип, размер, дату, исходный воркфлоу — и даже «Request from: AI agent», если создание пришло от агента. Ниже — полный промпт с тремя кнопками: Copy, Send to chat (вернуть в Main chat bar для доработки) и Save as preset. Наконец, Save As… экспортирует файл куда угодно, а Delete удаляет его.
Item Details: метаданные, затем «Save As…» и «Delete» внизу (прокрутите панель).Исходный промпт, переиспользуемый в один клик: Copy, Send to chat, Save as preset.
Переиспользовать творение: Use as source
Кнопка ✦ Use as source — мост между вашими воркфлоу: она отправляет выбранное медиа как отправную точку нового создания. Для изображения: Image to Image, Magic Edit, Blend Images (A или B) или Image to Video. Для видео: Smooth Motion или Lip Sync (Face). Для трека: Remix, Section Edit или Lip Sync (аудио).
«Use as source» из карточки изображения: четыре возможных направления.Полноэкранный просмотрщик даёт те же ярлыки: Use as source и Save As….
Для видео: встроенное воспроизведение, затем «Use as source» в Smooth Motion или Lip Sync.
На диске ваши творения живут в папке вывода, выбранной при онбординге (меняется в Settings › Storage), под говорящими именами вроде TRAG_image_t2i_082.png — исходный воркфлоу зашит в имени.
10Настройки
Кнопка Settings боковой панели открывает настройки, разбитые по разделам: Connection, Storage, Hardware & Models, Preferences и Language.
Папки, железо и модели
Storage — Gallery folder (где живёт библиотека) и Generated files folder (куда сохраняются новые творения): две кнопки Browse… для их смены.
Hardware & Models — текущая диагностика железа, Re-scan hardware для повторного определения, ручной выбор и Installed models & workflows для добавления или удаления загруженных движков.
Preferences — звуки интерфейса, обучение при запуске, свои горячие клавиши (Alt+F переключает полный экран) и масштаб отображения.
Language — язык интерфейса.
Внизу окна: Reset возвращает значения по умолчанию, Save changes сохраняет ваши.
Settings › Storage & Hardware: папки вывода и управление установленными моделями.Settings › Preferences & Language: звуки, обучение, клавиши, язык.
Ваш аккаунт, ваша лицензия
Клик по профилю внизу боковой панели открывает панель аккаунта: Manage account & billing, ваш план, версия приложения с кнопкой Check for updates, предпочтения по рассылкам — и Report a problem, прямая линия, если что-то не так. Именно здесь вы проверяете, что лицензия Pro активна.
Панель аккаунта: ваш план с преимуществом Early-Bird, настоящая версия с «Check for updates» и «Report a problem» — оба отмечены зелёным.
Как TRAG обновляется
TRAG проверяет обновления тихо при запуске, затем каждые 6 часов. Если нового ничего нет — вы ничего не видите.
Когда версия есть, внизу слева появляется ненавязчивый баннер. Никогда не блокирует — работайте дальше; Later откладывает его на 24 часа.
Один клик по Update now: приложение само закрывается, обновляется и перезапускается. Патч весит несколько мегабайт — не гигабайты установщика.
Уже скачанные модели обновление никогда не скачивает заново.
Хотите проверить сами? Панель аккаунта → Check for updates.
Trag Muse и Agent Gateway Muse
Trag Muse превращает вашу рабочую станцию в подключённую продакшн-студию: ваши агенты и ваши API ведут TRAG от первой идеи до финального мастера — а файлы, модели и рендеры остаются на вашей машине.
✦ Что откроет Trag Muse
Управляйте TRAG из Claude, Codex или любого MCP-агента — даже удалённо.
Подключайте API, которыми пользуетесь — Seedance, Kling, Nano Banana и другие — из уже знакомого интерфейса.
Превращайте идеи и раскадровки в продакшн с Creation Flow.
Монтируйте, собирайте и дорабатывайте медиа в подключённом рабочем пространстве.
Держите мощь локально — файлы, модели и рендер на вашей машине.
Скоро в доступе — как дополнение к Free и Pro. Окно Muse в приложении говорит лучше всех — «join the first wave»: нажмите Keep me posted, и вы узнаете день открытия.
Техника за кулисами — Agent Gateway в Settings › Connection, разделе с фуксиевой каймой. Когда доступ откроется, настройка уложится в четыре жеста:
Включите Agent gateway (переключатель в On — статус меняется на «● Running»).
Запишите локальный адрес под «Reachable at» (с кнопкой копирования) — его и будет использовать агент. Опция Local network откроет его и в Wi-Fi, если вы управляете TRAG с другого устройства.
Скачайте конфигурацию кнопкой Save mcp.json и следуйте подсказкам на экране, чтобы подключить её к агенту (Claude, Codex…).
Оставьте шлюз включённым: агент теперь может творить в TRAG — его работы помечаются «Request from: AI agent» в галерее и фильтруются через «Agent sessions».
Settings › Connection: работающий Agent gateway, адрес для агента и кнопка «Save mcp.json» (отмечены зелёным).
Нажали «Отмена» в окне брандмауэра? Ничего не сломалось
Всё, что TRAG делает сам — говорит со своими движками на вашей машине, загружает модели, проверяет обновления — не требует никакого разрешения брандмауэра. Единственный случай, когда оно нужно: управление с другого устройства вашей сети. Если вы отклонили окно Windows, ни загрузки, ни генерация, ни обновления не пострадали. Чтобы выдать разрешение задним числом:
Путь 1 — через настройки Windows (без командной строки)
Откройте «Пуск», введите брандмауэр и выберите Брандмауэр Защитника Windows.
НажмитеРазрешение взаимодействия с приложением или компонентом в брандмауэре Защитника Windows.
Нажмите Изменить параметры(запросит права администратора).
Найдите TRAG Studio в списке. Если он там: отметьте Частная. «Публичная» не отмечайте. Если его нет: Разрешить другое приложение… → Обзор… → выберите TRAG.exe в папке установки → Добавить, затем отметьте Частная.
Подтвердите кнопкой OK и перезапустите TRAG.
Отмечайте Частная (домашняя сеть) и никогда — Публичная. Публичная сеть — это отель, аэропорт, кафе: не место, чтобы выставлять свою студию.
Путь 2 — одной командой (для уверенных): откройте командную строку от администратора и при необходимости поправьте путь:
Сторонний антивирус. Некоторые блокируют окно брандмауэра Windows или сам загрузчик. Если TRAG не может скачать модели при работающем интернете, временно приостановите антивирус или добавьте папку установки в его исключения.
Сеть компании или учебного заведения. Прокси или фильтрация могут блокировать download.trag.studio. Симптом: модели так и не начинают скачиваться, хотя остальной интернет работает. Попробуйте домашнее подключение или мобильный хот-спот, либо попросите администратора сети разрешить этот домен.
11Советы для лучших результатов
Несколько привычек, которые меняют всё — от первого промпта до финального рендера.
Точные промпты
Сюжет + действие + атмосфера + свет. «Маяк в шторм, огромные волны, драматический свет» всегда победит «маяк». Подсказки ✦ под строкой промпта — хорошие образцы.
Промпт описывает, настройки настраивают
Формат, длительность, качество, стиль — один клик в правой панели. Никогда в промпте: избежите путаных результатов.
Уважайте значения по умолчанию
Настройки по умолчанию откалиброваны под вашу машину (спасибо, Studio Index). Меняйте по одной вещи за раз — будете знать, что сыграло.
Прогревайте движок
Один клик по Warm up перед сессией — и первый рендер стартует без ожидания. Зелёный значок «ready» подскажет, когда.
Источник + промпт > настройки
При преобразовании изображения или трека качество источника и ясность промпта весят больше любой продвинутой настройки.
Сначала коротко, потом длинно
В видео проверьте идею на ролике 5 с в разрешении Fast, затем перезапустите длиннее и тоньше. Будете итерировать вдвое быстрее.
Main chat bar — ваш главный союзник
Всё проходит через Main chat bar — единую строку внизу экрана. Опишите идею и дайте её инструментам поработать: ✦ magic wand переписывает и усиливает ваш промпт в один клик (точнее сюжет, свет, атмосфера), микрофон принимает голосовую диктовку, скрепка прикладывает референс, а подсказки ✦ ниже показывают работающий уровень детализации. Из галереи кнопка «Send to chat» возвращает старый промпт в строку, чтобы переработать его в новую версию.
12FAQ — Частые вопросы
Короткие ответы на вопросы, которые нам задают чаще всего.
Нужен ли мне интернет?
Нет. После установки и загрузки моделей всё работает офлайн, локально на вашей машине. Интернет нужен лишь для скачивания приложения, моделей и обновлений.
Мои творения приватны?
Да. Генерация идёт на вашей GPU; промпты и файлы остаются на вашей машине. В облако ничего не отправляется.
Какое железо мне нужно?
TRAG стартует с NVIDIA RTX 20-й серии (4 ГБ), 16 ГБ ОЗУ и Intel Core i5 7-го поколения или эквивалента — см. Минимальные требования. При онбординге TRAG вычисляет ваш Studio Index и подстраивает опции под машину — меньше мощности значит лишь скромнее настройки, а не закрытая дверь.
Движок не стартует / GPU не определяется
При установке TRAG проверяет, какую версию CUDA поддерживает ваш графический драйвер, и ставит соответствующую сборку — вам ничего не нужно обновлять. Если движок остаётся красным, откройте %LOCALAPPDATA%\TRAG Studio\logs\ и найдите строку engine device=: там будет cuda (карта работает) или cpu (переход на процессор). Пришлите эту строку на hello@trag.studio — её достаточно, чтобы понять, что случилось.
При запуске появляется окно брандмауэра — что делать?
Нажимайте «Разрешить» только если хотите управлять TRAG с другого устройства сети (Agent Gateway). Иначе спокойно закройте окно: приложение отлично работает и без этого разрешения. Если вы отказались и хотите вернуться к этому позже, ручные шаги описаны в разделе Trag Muse и Agent Gateway.
Какой длины может быть видео?
Длительность задаётся в настройках видео (5 с, 10 с, 15 с или Custom). Помните: короткие ролики быстрее и стабильнее — так и надо итерировать.
Где сохраняются мои творения?
В папке вывода, выбранной при онбординге (меняется в Settings › Storage). Все они также появляются в Media Gallery.
В чём разница между Free и Pro?
Free — бесплатно и без лимитов, но только изображения (Text to Image + Image to Image). Pro открывает всё: Magic Edit, Blend Images, всё видео, всё аудио — и скачивает все соответствующие модели.
Что такое функции PRO?
Воркфлоу со значком PRO в интерфейсе: Magic Edit, Blend Images, всё видео (Image to Video, Smooth Motion, Lip Sync) и всё аудио (Text to Music, Remix, Section Edit). Они активируются с переходом на Trag Studio Pro.
Как перейти на Pro?
Через веб-портал: вы покупаете (разовый платёж), ключ привязывается к профилю, затем приложение разблокирует воркфлоу и предложит скачать модели видео и аудио. Можно купить Pro сразу или начать с Free и повыситься позже — по пути ничего не теряется.
Что такое Trag Muse?
Подключённая продакшн-студия, которая выйдет как дополнение к Free и Pro: ваши агенты (Claude, Codex или любой MCP-агент) и ваши API (Seedance, Kling, Nano Banana…) управляют TRAG через Agent Gateway — пока всё рендерится на вашей машине. Она на подходе: нажмите Keep me posted в окне Muse, чтобы попасть в первую волну.
Могу ли я доверить ИИ управление TRAG?
Да — именно для этого существует Trag Muse. Через Agent Gateway внешний агент (Claude, Codex или любой MCP-агент) подключается к вашему локальному TRAG и может запускать и связывать создания — они помечаются «Request from: AI agent» и фильтруются в галерее («Agent sessions»). Muse выходит скоро: Keep me posted записывает вас в первую волну.
Промпт или настройки — в чём разница?
Промпт описывает содержание: сюжет, атмосферу, реплики. Настройки — это техника: формат, длительность, стиль, качество. Никогда не пишите техническую настройку в промпт — правая панель сделает это лучше и без двусмысленности.
Расскажите, чем мы можем помочь.
hello@trag.studio — это дверь в поддержку: каждое письмо читает человек.
TRAG Studio Setupで選択。 インストーラーは1画面で開きます:インストール先はあなたのユーザーフォルダー(…\AppData\Local\Programs\TRAG Studio — 管理者権限は不要)で事前入力済み、さらに2つのチェックが最初から入っています:デスクトップショートカットとファイアウォールルール。そのままにしてTRAG Studioをインストール →を押します。
開くたびにディスクを読み直します。 上部のバナーが宣言します — 「Checking what is already on this machine…」、そして判定:「Disk checked · 14 of 18 model files verified · 9.4 GB left to download」 — Re-checkボタンつき。
「Where should your creations be saved?」:画像・動画・トラックの保存先フォルダーを選びます。Choose…をクリックし、Windowsエクスプローラーでフォルダーを選択(または作成)して、Continue →で確定。あとからSettingsでいつでも変更できます。
起動時、TRAGはモデルを事前読み込みし(「Warming up the models」)、Createスペースへ案内します:
起動中:TRAGがモデルに火を入れています。メイン画面(ここではText to Image)。緑の枠はサイドバー下部を示しています:ライトモード、Settings、Help、全画面、アカウント。Cinema Flow、シネマタイムライン — Storyboard、Script、Film、Edit。来たるものの予告編:眺めて「Keep me posted」を押しましょう。
ギャラリーとフィルター — ここではまだ空:「Assets you generate will appear here.」作品が並んだギャラリー:サムネイルをクリックすると「Item Details」パネルが開きます。
メディアのカルテ:Item Details
Item Detailsパネルには知りたいことがすべて:プレビュー(またはプレイヤー)、ファイル名、種類、サイズ、日付、元ワークフロー — エージェント発の創作なら「Request from: AI agent」まで。下には完全なプロンプトと3つのボタン:Copy、Send to chat(Main chat barへ戻して練り直す)、Save as preset。最後に、Save As…で好きな場所へ書き出し、Deleteで削除。
Item Details:メタデータ、下部に「Save As…」と「Delete」(パネルをスクロール)。元のプロンプトはワンクリックで再利用:Copy、Send to chat、Save as preset。
創作を再利用:Use as source
✦ Use as sourceボタンはワークフロー間の橋:選んだメディアを新しい創作の出発点として送り出します。画像なら:Image to Image、Magic Edit、Blend Images(AまたはB)、Image to Video。動画なら:Smooth MotionかLip Sync(Face)。トラックなら:Remix、Section Edit、Lip Sync(音声)。
画像のカルテから「Use as source」:行き先は4つ。全画面ビューアーにも同じショートカット:Use as sourceとSave As…。
動画の場合:内蔵再生、そして「Use as source」でSmooth MotionやLip Syncへ。
サイドバー下部のプロフィールをクリックすると、アカウントパネルが開きます:Manage account & billing、あなたのプラン、アプリのバージョンとCheck for updatesボタン、お知らせ設定 — そして何かおかしいときの直通線Report a problem。Proライセンスが有効かはここで確認できます。
アカウントパネル:Early-Bird特典つきのプラン、実際のバージョンと「Check for updates」、そして「Report a problem」 — どちらも緑でマーク。
Freeは無料かつ無制限、ただし画像のみ(Text to Image + Image to Image)。Proはすべてを解放します:Magic Edit、Blend Images、動画全部、音楽全部 — 対応モデルもすべてダウンロードされます。
PRO機能とは何ですか?
画面でPROバッジのつくワークフローです:Magic Edit、Blend Images、動画すべて(Image to Video、Smooth Motion、Lip Sync)、音楽すべて(Text to Music、Remix、Section Edit)。Trag Studio Proへの移行で有効になります。
模型屏幕列出各个包 — Image、Video、Audio — 标注真实体积;基础引擎自动下载。正如屏幕自己所说:图像免费,动态和声音属于 Pro。任何包都可以下载 — PRO 徽章只说明你的套餐能运行什么。
三个细节让这块屏幕值得信赖:
每次打开都重新读盘。顶部横幅先宣布 — “Checking what is already on this machine…”,然后给出判定:“Disk checked · 14 of 18 model files verified · 9.4 GB left to download” — 附一个 Re-check 按钮。
启动时,TRAG 预载模型(“Warming up the models”),然后把你放进 Create 空间:
启动中:TRAG 正在给模型点火。主界面(这里是 Text to Image)。绿框标出侧边栏底部:浅色模式、Settings、Help、全屏和你的账号。Cinema Flow,电影时间线 — Storyboard、Script、Film、Edit。未来的预告片:逛一逛,点下 “Keep me posted”。
画廊和它的筛选器 — 这里还空着:“Assets you generate will appear here.”装满作品的画廊:点缩略图打开它的 “Item Details” 面板。
媒体档案卡:Item Details
Item Details 面板囊括一切要点:预览(或播放器)、文件名、类型、大小、日期、来源工作流 — 若出自智能体之手,还有 “Request from: AI agent”。往下是完整提示词和三个按钮:Copy、Send to chat(送回 Main chat bar 再加工)、Save as preset。最后,Save As… 导出到任意位置,Delete 删除。
Item Details:元数据,底部是 “Save As…” 和 “Delete”(记得滚动面板)。原始提示词,一键复用:Copy、Send to chat、Save as preset。
复用创作:Use as source
✦ Use as source 按钮是工作流之间的桥梁:把选中的媒体作为新创作的起点送出去。图像可去:Image to Image、Magic Edit、Blend Images(A 或 B)、Image to Video。视频可去:Smooth Motion 或 Lip Sync(Face)。曲目可去:Remix、Section Edit、Lip Sync(音频)。
从图像档案卡出发的 “Use as source”:四个目的地。全屏查看器提供同样的捷径:Use as source 和 Save As…。
视频的情况:内置播放,然后 “Use as source” 通往 Smooth Motion 或 Lip Sync。
TRAG Studio는 그래픽카드 위에서 100% 로컬로 동작하는 Windows용 AI 생성 앱입니다. 클라우드도, 숨은 구독료도, 대기열도 없습니다. 아이디어도 파일도 전부 당신 곁에.
✦ 무제한 생성 100% 프라이빗 & 오프라인 이미지 영상 음악 11가지 창작 워크플로우
TRAG Studio는 세 가지 카테고리 — Image, Video, Audio — 로 구성되며, 화면 상단의 탭으로 오갑니다. 각 카테고리에는 워크플로우, 즉 바로 쓸 수 있는 창작 아틀리에가 모여 있습니다.
이미지
Text to Image(텍스트로 생성), Image to Image(이미지 변환), Magic EditPro(칠한 영역만 다시 그리기), Blend ImagesPro(2~3장 융합).
영상 Pro
Text to Video(프롬프트 한 줄로 클립을), Image to Video(정지 이미지를 움직이게, 오디오·대사 동기화), Smooth Motion(시작 프레임과 끝 프레임 잇기), Lip Sync(얼굴과 오디오의 입모양 맞추기).
음악 Pro
Text to Music(가사 옵션이 있는 작곡), Remix(기존 트랙을 새 스타일로), Section Edit(특정 구간만 재생성).
Trag Muse Muse
연결된 프로덕션 스튜디오, 곧 공개: Claude, Codex 또는 어떤 MCP 에이전트로든 TRAG를 조종하고, 쓰던 API를 연결하세요 — 렌더링은 전부 당신의 머신에서.
이런 분들께
인플루언서 & 콘텐츠 크리에이터
TikTok·YouTube·정사각 포맷으로 매일 한 편, B-roll은 주문형으로, 음악은 온전히 내 것 — Add Multiple Jobs로 밤사이 일괄 생성.
디지털 에이전시
클라이언트 납품 수준의 비주얼을 대량으로, 장당 과금도 쿼터 걱정도 없이 — 모든 것이 사내 머신에 남아 기밀은 설계부터 보장됩니다.
세계관 스토리텔러
Image to Image와 Blend로 캐릭터의 일관성을 지키고, 장면은 영상으로, 각 장의 사운드트랙까지 — 책상 하나에서 세계 하나를.
인디 스튜디오 & 뮤지션
컨셉 아트, 애니매틱, 가이드 트랙과 리믹스로 빠른 반복 — 시도는 무제한, 클라우드 청구서는 0원.
이 가이드 곳곳에 앱 스크린샷이 등장합니다. 그림 속 밝은 초록 상자와 화살표가 설명 중인 요소를 가리킵니다. 어떤 이미지든 클릭하면 확대됩니다.
세 가지 플랜: Free · Pro · Trag Muse
TRAG는 두 에디션과 선택형 자동화 레이어로 제공됩니다.
플랜
가격
할 수 있는 것
다운로드되는 모델
Trag Studio FreeFree
무료
이미지 전용: Text to Image + Image to Image, 사용량 무제한.
이미지 모델만
Trag Studio ProPro
1회 구매(웹 포털)
전부: 이미지(+ Magic Edit, Blend Images), 영상 전체, 음악 전체.
모든 모델(이미지+영상+음악)
Trag MuseMuse
애드온 — 곧 공개
연결된 프로덕션 스튜디오: 당신의 에이전트와 API가 Agent Gateway로 TRAG를 조종합니다. Free 또는 Pro와 병행 — 앱에서 첫 번째 물결에 합류하세요.
—(소프트웨어 레이어)
두 가지 경로 중 마음대로 고르세요:
무료로 시작하고, 나중에 Pro로. 사이트에서 TRAG Studio Free를 내려받아 마음껏 이미지를 만들다가, 영상이나 음악이 필요해지면 웹 포털에서 Pro를 구매하세요. 키는 프로필에 묶이고, 앱이 워크플로우를 해제하며 부족한 모델의 다운로드를 안내합니다.
바로 Pro 구매. 구매하면 키가 프로필에 들어가고, 첫 로그인 시 온보딩이 처음부터 풀 구성을 설치해 줍니다.
앱 안에서 잠긴 워크플로우에는 PRO 배지가 붙습니다(예: “Magic Edit Pro”). 워크플로우별 상세 대조표는 자주 묻는 질문에 있습니다.
앱 속 Pro 창: 한 번의 구매로 모든 워크플로우 해제 — Early-Bird 할인은 한정 기간입니다.
02설치
설치는 익숙한 Windows 마법사 방식입니다 — “Next” 몇 번이면 끝. 화면별 정확한 흐름을 안내합니다.
시작하기 전에: 설치 파일에 들어 있는 것은 앱 본체와 실행 엔진(Python, CUDA, ComfyUI)입니다 — AI 모델은 없습니다. 모델은 그다음 첫 설정 때, 체크한 팩만 다운로드됩니다. 그래도 설치에는 잠시 시간이 걸릴 수 있습니다 — 정상이며, 단 한 번뿐입니다.
TRAG 사이트에서 받은 TRAG_Studio_V1.0_Setup 파일(약 1 GB)을 실행하세요. Windows가 보안 확인을 요청합니다: 허용하고 진행하세요.
설치 프로그램을 풉니다. 작은 자동 압축 해제 창이 열리고, 다운로드 폴더가 지정되어 있습니다. Extract를 누르고 끝날 때까지 기다리세요.
다운로드된 파일, 실행 준비 완료 — 다운로드 폴더의 초록 TRAG 아이콘.자동 압축 해제: “Extract”를 누르고 완료를 기다리세요.
TRAG Studio Setup에서 선택합니다. 설치 프로그램은 화면 하나로 열립니다: 설치 폴더는 사용자 폴더(…\AppData\Local\Programs\TRAG Studio — 관리자 권한 불필요)로 미리 채워져 있고, 두 개의 체크가 이미 켜져 있습니다: 바탕화면 바로가기와 방화벽 규칙. 그대로 두고 TRAG Studio 설치 →를 누르세요.
설치 프로그램에 맡기세요. 슬라이드쇼가 스튜디오를 소개하는 동안, 진행 바가 무슨 일이 일어나는지 정확히 알려줍니다 — TRAG가 그래픽 드라이버가 지원하는 CUDA 버전을 감지하고 맞는 변형을 받아오는 단계까지. 기다리는 것 말고는 할 일이 없습니다.
화면 하나, 결정 셋: 폴더, 바로가기, 방화벽 규칙 — 그리고 설치.설치가 스스로 중계합니다: 여기서는 CUDA 12.6 드라이버를 감지해 맞는 변형을 받는 중.
마치고 실행하세요. “Installation terminée” 화면은 임시 설치 파일 삭제(약 2,5 GB — 체크해서 공간 확보)와 큼직한 TRAG Studio 실행 → 버튼을 제안합니다. 첫 실행에서는 로그인 화면이 맞이합니다 — 다음 섹션으로!
끝: 임시 파일을 정리하고 스튜디오를 실행하세요.
첫 실행 때 Windows 방화벽 알림이 뜰 수 있습니다. 네트워크의 다른 기기에서 TRAG를 조종할 계획이 있을 때만 “허용”을 누르세요(Agent Gateway 참고). 아니라면 그냥 닫아도 됩니다 — TRAG는 아무 문제 없이 돌아갑니다.
03로그인과 첫 설정
첫 실행 시 TRAG가 짧은 설정을 안내합니다: 로그인, 하드웨어 감지, 워크플로우 선택, 출력 폴더. 모델 다운로드를 빼면 5분이면 충분합니다.
로그인
“Welcome back” 화면에는 두 개의 입구가 있습니다: Continue with Google, 또는 이메일과 비밀번호. Google을 고르면 로그인은 브라우저에서 끝납니다 — TRAG는 기다렸다가, 끝나는 순간 자동으로 이어갑니다. 아직 계정이 없다면 “Create one”으로 즉시 생성.
계정은 라이선스를 담는 그릇입니다. Pro 키는 프로필에 묶입니다. 로그인은 필수 — 바로 그것이 구매와 프리셋을 당신을 따라다니게 합니다.
Google로 로그인: 브라우저에서 마치면 — TRAG가 자동으로 이어가 스튜디오로 데려다줍니다.
온보딩의 환영 인사
TRAG는 한 문장으로 자신을 소개합니다 — “Local generative AI, made for everyone.” 심플한 화면으로 강력한 오픈소스 엔진을 당신의 머신에서 돌리고, 수상한 다운로드도 가파른 학습 곡선도 없다는 약속이죠. Get started →를 클릭.
TRAG Studio에 오신 것을 환영합니다: 모든 것이 로컬 — 작업물이 기기 밖으로 나가지 않습니다.
하드웨어 감지와 Studio Index
알맞은 기본값을 제안하기 위해 TRAG가 머신을 살펴봅니다. “Tell us about your machine”에서 Detect를 클릭(권장): 1초 만에 그래픽카드와 프로세서를 식별해 점수를 매기고, PC의 역량에 맞춰 앱을 보정하는 종합 지표 Studio Index를 계산합니다.
“Detect my hardware”: GPU와 CPU 스캔은 TRAG에 맡기세요(수동 설정도 가능).스캔 결과: 부품마다 점수가 붙고, Studio Index가 종합 성능을 요약합니다.
직접 고르고 싶다면 “Set up manually instead”로 세 가지 선택기 — 그래픽카드, 프로세서, 메모리 — 가 열리고 “Expected performance”(Image / Video / Audio) 미리보기가 실시간 갱신됩니다. “I don't know my hardware”를 고르면 보수적인 설정이 자동 적용됩니다.
이보다 낮으면 Studio Index가 더 겸손한 설정을 고를 뿐이고, 이보다 높으면 VRAM 1GB마다 속도와 해상도로 돌아옵니다.
그리고 천장이 곧 날아갑니다: 신세대 NVIDIA Spark PC — GB10 Grace Blackwell 슈퍼칩, 128 GB 통합 메모리, 책상 위에서 최대 1페타FLOP의 AI 연산 — 는 TRAG가 마음껏 달리라고 태어난 바로 그 하드웨어입니다. Spark에서는 하룻밤 걸리던 배치가 커피 한 잔 사이에 끝납니다.
내 컴퓨터가 실제로 바꾸는 것
위의 문턱을 넘고 나면, 일상 속 TRAG의 쾌적함은 세 가지가 결정합니다: 디스크 여유 공간, 비디오 메모리, 그리고 NVIDIA 카드의 유무.
디스크 공간 — 진짜 첫 번째 벽
모델은 팩 단위로 애플리케이션 폴더 안에 설치됩니다. 정확한 용량:
팩
용량
포함 대상
Magic Wand (프롬프트 도우미)
3.6 GB
전원, 자동
이미지 — 생성
10.9 GB
Free
이미지 — 편집
30.9 GB
Free
영상
47.2 GB
Pro
음악
19.1 GB
Pro
합계
111.7 GB
설치하고 이미지를 만들려면: 여유 공간 50 GB를 잡아 두세요.
Pro까지 전부 갖추려면: 여유 공간 120 GB를 잡아 두세요.
시스템 SSD가 작은 노트북에서는 그래픽카드보다 먼저 이 지점이 발목을 잡습니다.
전부 받을 필요는 없습니다: 원하는 것만 체크하고, 나머지는 나중에 잃는 것 없이 추가하세요.
작품 자체는 다음 단계에서 고르는 출력 폴더로 갑니다 — 다른 곳이지만, 시간이 지나면 이 역시 쌓입니다.
Windows 탐색기는 기비바이트로 세지만 우리의 숫자는 십진 기가바이트입니다: 29.15 GB로 안내된 파일이 Windows에서는 “27.1 GB”로 표시됩니다. 다운로드가 불완전한 것이 아닙니다.
VRAM — 실제로 사 주는 것
VRAM은 영상을 결정하지, 이미지를 결정하지 않습니다. 이미지는 4 GB부터 여유롭게 돌아가고, 여유가 필요한 쪽은 영상입니다.
4 GB — 이미지는 걱정 없음. 영상: 짧은 클립, 무난한 해상도.
6 GB — 짧은 클립이라면 영상도 쾌적. 테스터의 RTX 3060 노트북 실측: 6 GB 중 4.9 GB 사용, 문제 없음.
8 GB 이상 — 더 긴 길이, 더 높은 해상도, 더 큰 배치.
그리고 화면 한눈에 보기에서 말했듯, 데워진 엔진은 한 번에 하나뿐입니다 — 카드를 아끼기 위한 선택이지, 제한이 아닙니다.
NVIDIA 카드가 없다면? 그래도 TRAG는 돌아갑니다
쓸 수 있는 GPU가 없으면 TRAG는 프로세서로 물러납니다: 하단 표시등이 앰버색으로 알려 주고, 생성은 작동합니다 — 다만 훨씬 느리게. 써 보기에는 충분하고, 생산에는 부족합니다. 고장으로 오해하게 두느니 여기서 말해 두는 편이 낫습니다.
워크플로우 고르기 — 디스크 점검은 화면에 맡기세요
모델 화면에는 팩 — Image, Video, Audio — 이 실제 용량과 함께 나열되고, 기본 엔진은 자동으로 다운로드됩니다. 화면 스스로 말하듯: 이미지는 무료, 움직임과 소리는 Pro. 어떤 팩이든 다운로드는 가능 — PRO 배지는 당신의 플랜이 실행할 수 있는 것을 알려줄 뿐입니다.
이 화면을 믿을 수 있게 하는 세 가지 디테일:
열 때마다 디스크를 다시 읽습니다. 상단 배너가 먼저 선언합니다 — “Checking what is already on this machine…”, 그리고 판정: “Disk checked · 14 of 18 model files verified · 9.4 GB left to download” — Re-check 버튼과 함께.
상태를 둘이 아니라 셋으로 압니다. 완전하고 검증된 팩은 초록 Already downloaded 배지를 답니다(체크박스는 사라지고, 조용한 Download again만 남습니다). 중단된 파일은 호박색 Check needed와 Redownload 버튼으로 바뀝니다. 없는 것은 체크박스와 정확한 남은 용량을 유지합니다.
창을 닫아도 아무것도 취소되지 않습니다. 다운로드 카드는 살아남고, 접힌 상태에서도 퍼센트와 진행 바가 보입니다 — “Keep working — this continues in the background.”
모델 화면: 상단의 검증 배너, 팩별 실제 용량, Video·Audio의 PRO 배지, 하단의 예상치.
그리고 일은 일찍 시작됩니다: 필수 요소(약 14,5 GB)가 도착하는 순간 스튜디오가 열리고, 나머지는 백그라운드에서 계속 내려받습니다. 팩은 언제든 Settings › Hardware & Models에서 추가·삭제할 수 있으며, 디스크에 이미 있는 모델은 절대 다시 내려받지 않습니다.
출력 폴더 선택
“Where should your creations be saved?”: 이미지·영상·트랙이 도착할 폴더를 고릅니다. Choose…를 클릭해 Windows 탐색기에서 폴더를 선택(또는 생성)하고 Continue →로 확정. 이후 Settings에서 언제든 바꿀 수 있습니다.
출력 폴더 선택: “Choose…”를 클릭.Windows 탐색기가 열립니다: 예컨대 문서 안에 “Trag output” 폴더를 만들어 보세요.
경로 설정 완료: 남은 것은 “Continue →”(초록 표시)뿐.
마지막 스퍼트
TRAG가 기억해 둘 세 가지 카드를 보여줍니다 — Main chat bar와 ✦ magic wand(프롬프트를 클릭 한 번에 강화), Add Multiple Jobs(배치를 한 번에 투입), Media Gallery(모든 작품을 꺼내 쓰는 서고). 이어서 “You're all set”이 엔진 설치 완료를 알립니다: Let's Create → 클릭.
지금 바로 탐험할 세 가지 — 힌트 하나 더: AI 에이전트가 대신 창작할 수도 있습니다(Settings › Connection).“You're all set”: 준비 완료 — 이제 만들 시간.
가이드 투어(8단계)
처음 열면 짧은 가이드 투어가 핵심 구역(모드 선택, 워크플로우, 설정, 프롬프트…)을 차례로 비춥니다. Next →로 따라가고, 바쁘면 Skip으로 닫으세요 — 사이드바의 “Take the tour”로 언제든 다시 시작할 수 있습니다.
가이드 투어(1/8단계): “Next”로 한 걸음씩.바쁘신가요? “Skip”으로 투어를 닫아도 — 사이드바에 늘 대기 중입니다.
04화면 한눈에 보기
TRAG의 전부가 화면 하나에 담겨 있고, 길을 잃지 않도록 설계됐습니다. 지도를 펼쳐 볼까요.
실행하면 TRAG가 모델을 미리 불러오고(“Warming up the models”), Create 공간에 내려줍니다:
기동 중: TRAG가 모델에 시동을 겁니다.메인 화면(여기서는 Text to Image). 초록 상자가 사이드바 하단을 표시합니다: 라이트 모드, Settings, Help, 전체 화면, 계정.Cinema Flow, 시네마 타임라인 — Storyboard, Script, Film, Edit. 다가올 것의 예고편: 둘러보고 “Keep me posted”를 누르세요.
Image / Video / Audio 탭(상단 중앙) — 창작 카테고리. 각 카테고리 아래에 워크플로우 하위 탭(Text to Image, Image to Image, Magic Edit, Blend Images…)이 이어집니다.
뷰포트(중앙) — 결과가 등장하고, 비교되고, 재생되는 무대.
설정 패널(오른쪽) — 현재 워크플로우의 옵션: Dimensions, Style, Quality… “More settings”가 고급 항목을 펼칩니다.
Main chat bar(하단) — 아이디어를 적고 큼직한 실행 버튼(Generate Image, Animate Image, Generate Music…)을 누르세요. ✦ magic wand가 클릭 한 번에 프롬프트를 강화하고, 마이크는 음성 입력을 받으며, 아래에는 참고용 예시 제안도 있습니다.
Warm up 버튼(왼쪽 위) — 활성 카테고리의 엔진을 예열해 첫 렌더링을 대기 없이 시작합니다.
상태 바(맨 아래) — 로컬 서비스의 건강 상태: “AI engine connected”(생성 엔진, GPU 활동 표시)와 “AI Companion connected”(프롬프트 도우미, CPU 쪽).
Warm up 버튼과 엔진 상태
카테고리마다 엔진이 있고, TRAG는 그래픽카드를 아끼기 위해 한 번에 하나만 데워 둡니다. 왼쪽 위 배지가 모든 걸 말해 줍니다:
두 개의 건강 지표: 왼쪽 위 “Warm up” 버튼, 오른쪽 아래 상태 바.
빨강 — Engine offline: 엔진이 멈춰 있습니다. 배지를 더블클릭하면 재시동.주황 — Warming: 엔진 기동 중(퍼센트 상승). 카테고리를 바꾸면 이전 엔진은 식습니다 — 데워진 것은 늘 하나뿐.초록 — ready: 엔진이 데워졌고, 생성은 즉시 출발합니다.
사실 네 번째 상태가 있습니다: 쓸 수 있는 GPU가 없으면 푸터 표시등이 호박색으로 바뀌며 솔직하게 말합니다 — “AI engine connected (CPU — no GPU detected)”. 03절에서 말한 프로세서 대체 경로입니다: 모든 게 돌아갑니다, 다만 훨씬 느리게.
라이트, 다크… 그리고 Creator
사이드바 하단 첫 버튼이 분위기를 바꿉니다: 산뜻한 라이트 모드, 깊은 다크 모드, 그리고 Creator 모드 — 방해 없는 창작을 위한 매트 블랙으로, 액센트(예: “Obsidian Orange”)도 고를 수 있습니다. 바뀔 때마다 작은 토스트가 확인해 줍니다.
라이트 모드 — 같은 화면, 환한 기분.Creator 모드의 매트 블랙 — 여기서는 “Obsidian Orange” 액센트. 토스트가 선택을 확인합니다.
검색 팔레트
사이드바의 Search 버튼이 커맨드 팔레트를 엽니다: 입력하면 화면·워크플로우·동작(“Go to Media Gallery”, “Text to Image”, “Open Settings”…)이 걸러지고, Enter로 실행합니다. Esc로 닫기.
검색 팔레트: TRAG의 전부가 키보드 사정권 안에.
05이미지 만들기
Image 탭에는 네 가지 워크플로우가 모여 있습니다: 텍스트로 생성, 이미지 변환, 정확한 부분만 손보기, 여러 장을 하나로 융합.
프롬프트는 내용을, 설정은 기술을 말합니다. 프롬프트에는 피사체, 분위기, 조명을. 오른쪽 패널에는 포맷(Dimensions), 룩(Style), 정밀도(Quality)를. “4K”나 “정사각형”을 프롬프트에 쓰지 마세요 — 설정에서 클릭 한 번이 더 확실합니다.
Text to Image — 텍스트로 생성
“Create a brand-new image from text alone.” 출발점이자 가장 직진하는 워크플로우:
Generate Image → 클릭. 결과는 뷰포트에 뜨고, 자동으로 Media Gallery에 수납됩니다.
Text to Image: 설정은 오른쪽, 프롬프트는 아래, 결과는 중앙 무대로.설정 패널 확대: Dimensions, Style, Quality — 그리고 “More settings” 속 Custom settings, Creativity, Negative prompt.
생성이 끝나면 결과 위에 버튼 두 개가 나타납니다: ✦ Re-use prompt(같은 텍스트로 다시)와 ✦ Use as source(이미지를 다른 워크플로우로 보내기). 뷰포트 아래 Recent Generations 줄에는 최근 시도가 클릭 한 번 거리에 있습니다.
완성된 렌더링: “Re-use prompt”, “Use as source”, 시도 사이를 오가는 “Recent Generations”.
Image to Image — 이미지 변환
“Restyle, enhance, mix or upscale an existing image.” 원본을 건네고, 바꿀 점을 말로 하면 됩니다:
Image to Image 하위 탭, 그리고 Source image → Click to choose로 이미지를 불러옵니다(지난 결과에서 이어가려면 “Iterate from last result” 체크).
Lip Sync: 얼굴 하나, 오디오 트랙(또는 마이크), 그리고 입모양 강도.설정: Face video/image, Audio track, Record from mic, Format, Duration.
07음악 만들기 Pro
Audio 탭은 곡 전체를 — 가사 있이든 없이든 — 작곡하고, 트랙을 리믹스하고, 정확한 구간만 다시 만듭니다. 음악 워크플로우 셋 모두 Pro 에디션입니다.
Text to Music — 한 곡 작곡하기
“Compose music from a description.” 곡을 묘사하고 무드를 정하고… 마음이 동하면 가사도:
Audio 탭 → Text to Music 하위 탭. 상단 버튼이 “Warm up ACE-Step 1.5 engine”으로 바뀝니다: 클릭 한 번으로 예열.
가사 쓰기(선택): 중앙의 Lyrics 에디터에서 Verse·Chorus·Bridge 버튼으로 구조를 잡고, 언어를 고릅니다(EN, FR, ES, DE, IT, PT, JA, ZH, KO, RU…). 비워 두면 연주곡이 됩니다.
오른쪽에서 음악을 빚습니다: Style(Pop, Rap, Afro, Rock, Electronic, Cinematic), Mood(Happy, Epic, Chill… 총 16가지), Key & Scale(그 작은 피아노 건반!), BPM, Duration(30s, 1m, 2m, Custom).
하단 바에서 곡을 묘사하고 Generate Music → 클릭. 트랙이 플레이어에 떠서 바로 들을 수 있고 — Media Gallery에도 수납됩니다.
Text to Music: 가사 에디터가 중앙에(Verse / Chorus / Bridge), 음악 설정은 오른쪽에.음악 설정: Style, Mood, Key & Scale, BPM, Duration — Quality는 “More settings”에.
트랙이 완성되면 플레이어의 ✦ Use as source 버튼이 클릭 한 번으로 Remix this track, Section Edit, Lip Sync(오디오)로 보냅니다:
생성된 트랙: “Use as source” 메뉴가 Remix, Section Edit, Lip Sync로 이어집니다.
Remix — 트랙에 새 옷을
“Transform an existing audio track into a new style.” 당신의 노래, 새 옷차림:
Remix 하위 탭, 그리고 트랙을 불러옵니다(Source audio → Click to choose).
“Replace or regenerate a chosen section of a track.” 후렴이 아쉽다면? 나머지는 그대로 두고 그 부분만 다시:
Section Edit 하위 탭, 그리고 트랙을 불러옵니다.
다시 만들 Section을 지정(예: 0:12 – 0:24, “Set range…” 사용).
Match를 선택: 곡 전체와 어울리게 Keep key & tempo, 아니면 자유롭게 Free.
교체 내용을 묘사하고 Repaint Section → 클릭.
Section Edit: 다시 만들 범위를 고르고, 키와 템포는 남기든 놓아주든.설정: Source audio, Quality, Match — Keep key & tempo, 또는 Free.
Section Edit 모드의 Main chat bar: ✦ 완드, 마이크, 첨부를 곁에 두고 교체 내용을 묘사하세요.
08Creation Flow와 배치
Creation Flow는 렌더링 관제탑입니다: 실시간 큐, 모든 창작의 히스토리, 배치 일괄 투입.
올해의 기능 독점
이름값 하는 렌더 큐를 갖춘 도구는 시장에서 TRAG뿐 — 손으로 몰거나, MCP 에이전트에게 맡기거나.
렌더 큐 지켜보기
사이드바에서 Creation Flow를 엽니다(아이콘의 배지가 대기 중 작업 수). 각 행이 상태를 보여줍니다 — Generating은 퍼센트와 남은 시간, Waiting은 예상치, 그리고 Completed — 여기에 Open / Cancel 버튼. 오른쪽 위에는 History, Add Multiple Jobs, 실행 중엔 Stop, Pause, Stop all.
일하는 큐: 한 작업은 생성 중, 다음은 대기, 그리고 History / Add Multiple Jobs / Stop / Pause / Stop all 명령들(초록 테두리).전부 끝: 모든 행이 “Completed”로 바뀌고, 각자 “Open” 버튼을 답니다.
창작 히스토리
History 버튼이 Creation History를 엽니다: 세션 통계(워크플로우별 창작 수), 그리고 항목마다 Use prompt(텍스트 재사용), Save preset(설정 저장), Open. Export는 히스토리 저장, Clear는 비우기.
Creation History: 워크플로우별 카운터와 Use prompt / Save preset / Open 동작.처음엔 히스토리가 비어 있습니다 — 렌더링마다 한 줄씩 채워지죠.
Add Multiple Jobs — 한 번에 배치 투입
점심시간에 이미지 열 장과 곡 다섯 개를? Add Multiple Jobs가 창작 목록 전체를 자동으로 처리합니다:
“매트릭스”를 복사 — 원하는 카테고리의 Copy Image, Copy Video, Copy Audio. AI(ChatGPT, Claude…)에게 작업 목록 쓰는 법을 가르치는 텍스트 템플릿입니다.
목록은 AI에게 맡기세요: 매트릭스와 아이디어를 즐겨 쓰는 AI에 붙여 넣고, .md 파일(한 줄에 작업 하나, 카테고리마다 # 제목)을 받아옵니다.
.md를 끌어다 놓습니다: “Drag result here” 구역에. TRAG가 읽고 “X jobs ready”를 알립니다. 작업에 파일(이미지, 오디오…)이 필요하면, 소재를 담은 .zip을 두 번째 구역에.
출력 폴더를 고르고 Generate 클릭: 작업이 Creation Flow를 알아서 줄지어 흐르고, 결과물마다 Media Gallery로 들어갑니다.
원리: “Copy Image” 매트릭스가 틀이 되고, 목록은 구조화된 .md가 됩니다..md 도착: “15 jobs ready” — 남은 건 Generate뿐.
Add Multiple Jobs 모달: 복사할 매트릭스, .md 투입 구역, 소재용 .zip 구역, 출력 폴더.
Trag Muse라면 더 간단합니다: 자홍색 배너 “Use your agent to orchestrate”로 AI 에이전트가 복붙 없이 TRAG를 직접 몰게 하세요 — Trag Muse와 Agent Gateway 참고.
이미지든 영상이든 트랙이든, 모든 창작물은 자동으로 Media Gallery에 수납됩니다. 당신의 서고입니다: 찾고, 틀고, 다시 씁니다.
둘러보기와 필터
갤러리 상단에는: 종류 필터(All / Image / Video / Audio), 출처 필터(All / Mine / Agent sessions — 에이전트의 작품만 골라 보기 좋음), 정렬(Newest first…), 그리드 크기, Refresh.
갤러리와 필터들 — 여긴 아직 비어 있네요: “Assets you generate will appear here.”작품이 가득한 갤러리: 썸네일을 클릭하면 “Item Details” 패널이 열립니다.
미디어의 카드: Item Details
Item Details 패널에는 알아야 할 모든 것이: 미리보기(또는 플레이어), 파일명, 종류, 크기, 날짜, 출처 워크플로우 — 에이전트가 만든 것이라면 “Request from: AI agent”까지. 아래에는 전체 프롬프트와 버튼 셋: Copy, Send to chat(Main chat bar로 돌려보내 다듬기), Save as preset. 마지막으로 Save As…는 원하는 곳으로 내보내고, Delete는 삭제합니다.
Item Details: 메타데이터, 하단에 “Save As…”와 “Delete”(패널을 스크롤하세요).원본 프롬프트, 클릭 한 번에 재사용: Copy, Send to chat, Save as preset.
창작물 재사용: Use as source
✦ Use as source 버튼은 워크플로우 사이의 다리입니다: 선택한 미디어를 새 창작의 출발점으로 보내죠. 이미지라면: Image to Image, Magic Edit, Blend Images(A 또는 B), Image to Video. 영상이라면: Smooth Motion 또는 Lip Sync(Face). 트랙이라면: Remix, Section Edit, Lip Sync(오디오).
이미지 카드에서 출발하는 “Use as source”: 갈 곳은 넷.전체 화면 뷰어에도 같은 지름길: Use as source와 Save As….
영상의 경우: 내장 재생, 그리고 “Use as source”로 Smooth Motion이나 Lip Sync로.
디스크에서 창작물은 온보딩 때 고른 출력 폴더(Settings › Storage에서 변경 가능)에, TRAG_image_t2i_082.png처럼 한눈에 읽히는 이름으로 삽니다 — 출처 워크플로우가 이름에 새겨져 있죠.
Storage — Gallery folder(서고의 집)와 Generated files folder(새 작품의 저장처): 각각 Browse… 버튼으로 변경.
Hardware & Models — 현재 하드웨어 진단, Re-scan hardware로 재감지, 수동 선택, 그리고 Installed models & workflows로 내려받은 엔진의 추가·삭제.
Preferences — 인터페이스 사운드, 시작 시 튜토리얼, 사용자 단축키(Alt+F로 전체 화면 전환), 표시 배율.
Language — 인터페이스 언어.
창 하단: Reset은 기본값 복원, Save changes는 내 설정 저장.
Settings › Storage & Hardware: 출력 폴더와 설치된 모델 관리.Settings › Preferences & Language: 사운드, 튜토리얼, 단축키, 언어.
당신의 계정, 당신의 라이선스
사이드바 아래쪽 프로필을 클릭하면 계정 패널이 열립니다: Manage account & billing, 당신의 플랜, 앱의 버전과 Check for updates 버튼, 알림 설정 — 그리고 뭔가 잘못됐을 때의 직통선 Report a problem. Pro 라이선스가 살아 있는지 여기서 확인합니다.
계정 패널: Early-Bird 혜택이 표시된 플랜, 실제 버전과 “Check for updates”, 그리고 “Report a problem” — 모두 초록으로 표시.
TRAG는 어떻게 최신으로 유지되는가
TRAG는 시작할 때, 그 후 6시간마다 조용히 확인합니다. 새 소식이 없으면 아무것도 보이지 않습니다.
새 버전이 있으면 왼쪽 아래에 조용한 배너가 나타납니다. 결코 방해하지 않으며 — 계속 작업하세요; Later는 24시간 동안 알림을 미룹니다.
Update now를 클릭하면: 앱이 스스로 닫히고, 업데이트하고, 다시 시작합니다. 패치는 몇 메가바이트 — 설치 파일의 기가바이트급이 아닙니다.
이미 받은 모델을 업데이트가 다시 내려받는 일은 절대 없습니다.
직접 확인하고 싶다면? 계정 패널 → Check for updates.
Trag Muse와 Agent Gateway Muse
Trag Muse는 당신의 워크스테이션을 연결된 프로덕션 스튜디오로 바꿉니다: 에이전트와 API가 첫 아이디어부터 최종 마스터까지 TRAG를 이끕니다 — 파일, 모델, 렌더링은 당신의 머신에 남긴 채.
✦ Trag Muse가 열어줄 것들
Claude, Codex 또는 어떤 MCP 에이전트로든 TRAG를 조종 — 원격에서도.
쓰던 API를 연결 — Seedance, Kling, Nano Banana 등 — 익숙한 화면 그대로.
아이디어와 스토리보드를 프로덕션으로 — Creation Flow와 함께.
미디어를 편집·조립·다듬기 — 연결된 워크스페이스에서.
파워는 로컬에 — 파일, 모델, 렌더링은 당신의 머신에서.
곧 공개, Free와 Pro의 애드온으로. 앱의 Muse 창이 제일 잘 말해줍니다 — “join the first wave”: Keep me posted를 누르면 열리는 날을 알려드립니다.
그 뒤의 배관이 Agent Gateway, Settings › Connection의 자홍색 테두리 구역입니다. 액세스가 열리면, 설정은 네 동작이면 끝:
Agent gateway를 켭니다(스위치를 On으로 — 상태가 “● Running”으로 바뀝니다).
로컬 주소를 적어 두세요: “Reachable at” 아래 표시(복사 버튼 포함) — 에이전트가 쓸 주소입니다. Local network 옵션을 켜면 다른 기기에서의 조종을 위해 Wi-Fi에도 열 수 있습니다.
설정 파일을 내려받습니다: Save mcp.json을 누르고, 화면 안내에 따라 에이전트(Claude, Codex…)에 연결하세요.
게이트웨이는 On으로 두세요: 이제 에이전트가 TRAG에서 창작할 수 있습니다 — 그 작품은 갤러리에 “Request from: AI agent”로 표시되고, “Agent sessions”로 걸러집니다.
Settings › Connection: 가동 중인 Agent gateway, 에이전트에게 줄 주소, “Save mcp.json” 버튼(초록 표시).
방화벽 알림에서 “취소”를 눌렀다면? 아무것도 망가지지 않았습니다
TRAG가 스스로 하는 모든 일 — 내 컴퓨터 안 엔진과의 통신, 모델 다운로드, 업데이트 확인 — 에는 방화벽 허가가 전혀 필요 없습니다. 허가가 필요한 단 하나의 경우: 네트워크의 다른 기기에서 조종될 때뿐입니다. Windows 알림을 거절했더라도 다운로드도, 생성도, 업데이트도 멀쩡합니다. 나중에 허가를 주려면:
방법 1 — Windows 설정으로(명령줄 불필요)
시작을 열고,방화벽을 입력해 Windows Defender 방화벽을 선택합니다.
클릭:Windows Defender 방화벽을 통해 앱 또는 기능 허용.
설정 변경을 클릭(관리자 권한을 요청합니다).
목록에서 TRAG Studio를 찾습니다. 있다면: 개인에 체크. “공용”은 체크하지 마세요. 없다면: 다른 앱 허용… → 찾아보기… → 설치 폴더의 TRAG.exe 선택 → 추가, 그리고 개인에 체크.
확인으로 확정하고 TRAG를 재시작합니다.
체크는 개인(가정 네트워크)에만. 공용은 절대 체크하지 마세요. 공용 네트워크란 호텔, 공항, 카페 — 내 스튜디오를 내놓을 곳이 아닙니다.
방법 2 — 명령 한 줄(익숙한 분들께): 명령 프롬프트를 관리자 권한으로 열고, 경로는 필요에 따라 조정하세요:
서드파티 백신. 일부는 Windows 방화벽 알림이나 다운로더 자체를 차단합니다. 인터넷은 정상인데 TRAG가 모델을 못 받는다면, 백신을 잠시 멈추거나 설치 폴더를 예외 목록에 추가해 보세요.
회사·학교 네트워크. 프록시나 필터링이 download.trag.studio를 막을 수 있습니다. 증상: 다른 인터넷은 되는데 모델 다운로드만 시작되지 않음. 가정용 회선이나 휴대폰 핫스팟으로 시도하거나, 네트워크 관리자에게 이 도메인의 허용을 요청하세요.
11더 좋은 결과를 위한 팁
첫 프롬프트부터 최종 렌더링까지, 모든 것을 바꾸는 몇 가지 습관.
정확한 프롬프트
피사체+동작+분위기+조명. “폭풍 속 등대, 거대한 파도, 극적인 조명”은 “등대 하나”를 언제나 이깁니다. 바 아래 ✦ 제안이 좋은 본보기예요.
프롬프트는 묘사, 설정은 조정
포맷, 길이, 품질, 스타일: 오른쪽 패널에서 클릭 한 번. 프롬프트에는 절대 넣지 마세요 — 혼란스러운 결과를 피할 수 있습니다.
기본값을 존중하세요
기본 설정은 이미 내 머신에 맞게 보정되어 있습니다(고마워요, Studio Index). 한 번에 하나만 바꾸세요: 무엇이 효과를 냈는지 알게 됩니다.
엔진을 예열하세요
작업 전 Warm up 클릭 한 번이면 첫 렌더링이 대기 없이 출발합니다. 타이밍은 초록 “ready” 배지가 알려 줍니다.
소스+프롬프트 > 설정
이미지나 트랙을 변환할 때는 소스의 품질과 프롬프트의 명료함이 그 어떤 고급 설정보다 무겁습니다.
짧게 먼저, 길게 나중에
영상은 먼저 5초 Fast 해상도로 아이디어를 검증하고, 그다음 길고 섬세하게. 반복 속도가 두 배가 됩니다.
Main chat bar, 최고의 파트너
모든 것은 화면 아래 단 하나의 바, Main chat bar를 지나갑니다. 아이디어를 적고 도구들에게 맡기세요: ✦ magic wand가 클릭 한 번에 프롬프트를 다시 쓰고 강화하며(더 또렷한 피사체, 조명, 무드), 마이크는 음성 입력을 받고, 클립으로 참고 자료를 붙이고, 아래 ✦ 제안은 통하는 디테일 수준을 보여 줍니다. 갤러리의 “Send to chat”은 옛 프롬프트를 바로 이 바에 되돌려 새 버전으로 다듬게 해 줍니다.
12자주 묻는 질문
가장 자주 받는 질문과 짧은 답.
인터넷이 필요한가요?
아니요. 설치와 모델 다운로드가 끝나면 모든 것이 오프라인, 로컬에서 돌아갑니다. 인터넷은 앱·모델·업데이트를 내려받을 때만 필요합니다.
제 창작물은 프라이빗한가요?
네. 생성은 당신의 GPU에서 일어나고, 프롬프트와 파일은 머신에 남습니다. 클라우드로는 아무것도 전송되지 않습니다.
어떤 하드웨어가 필요한가요?
TRAG는 NVIDIA RTX 20 시리즈(4 GB), 16 GB RAM, Intel Core i5 7세대 동급부터 시작합니다 — 최소 사양 참고. 온보딩에서 Studio Index가 계산되어 옵션이 머신에 맞게 조정됩니다 — 사양이 낮으면 설정이 겸손해질 뿐, 문이 닫히진 않습니다.
엔진이 안 켜져요 / GPU가 감지되지 않아요
설치할 때 TRAG가 그래픽 드라이버가 지원하는 CUDA 버전을 확인하고, 맞는 빌드를 설치합니다 — 직접 업데이트할 것은 없습니다. 엔진이 계속 빨간색이라면 %LOCALAPPDATA%\TRAG Studio\logs\를 열어 engine device= 줄을 찾아보세요. cuda(카드가 일하는 중) 또는 cpu(프로세서로 전환)라고 적혀 있습니다. 그 한 줄을 hello@trag.studio로 보내 주세요 — 무슨 일이 있었는지 이해하는 데 그것으로 충분합니다.
시작할 때 방화벽 창이 떠요 — 어떻게 하죠?
네트워크의 다른 기기에서 TRAG를 조종하고 싶을 때만 “허용”을 누르세요(Agent Gateway). 아니라면 안심하고 닫으세요: 그 권한 없이도 앱은 완벽하게 돌아갑니다. 거절했다가 나중에 마음이 바뀌면, 수동 절차가 Trag Muse와 Agent Gateway에 있습니다.
영상은 얼마나 길게 만들 수 있나요?
길이는 영상 설정에서 정합니다(5초, 10초, 15초, Custom). 기억하세요: 짧은 클립이 더 빠르고 안정적입니다 — 그게 올바른 반복법이죠.
창작물은 어디에 저장되나요?
온보딩에서 고른 출력 폴더에요(Settings › Storage에서 변경 가능). 전부 Media Gallery에도 나타납니다.
Free와 Pro의 차이는?
Free는 무료에 무제한이지만 이미지만 됩니다(Text to Image + Image to Image). Pro는 전부 엽니다: Magic Edit, Blend Images, 영상 전체, 음악 전체 — 해당 모델도 모두 내려받습니다.
PRO 기능이란?
화면에서 PRO 배지가 붙은 워크플로우입니다: Magic Edit, Blend Images, 영상 전체(Image to Video, Smooth Motion, Lip Sync), 음악 전체(Text to Music, Remix, Section Edit). Trag Studio Pro로 넘어가면 활성화됩니다.
Pro로 어떻게 업그레이드하나요?
웹 포털에서: 결제(1회)하면 키가 프로필에 묶이고, 앱이 워크플로우를 해제하며 영상·음악 모델 다운로드를 안내합니다. 바로 Pro를 사도, Free로 시작해 나중에 올라가도 — 도중에 잃는 건 없습니다.
Trag Muse가 뭔가요?
Free와 Pro의 애드온으로 찾아올 연결된 프로덕션 스튜디오입니다: 에이전트(Claude, Codex 또는 어떤 MCP 에이전트든)와 API(Seedance, Kling, Nano Banana…)가 Agent Gateway로 TRAG를 조종합니다 — 렌더링은 전부 당신의 머신에서. 곧 공개됩니다: Muse 창에서 Keep me posted를 눌러 첫 번째 물결에 합류하세요.
AI에게 TRAG를 맡겨도 되나요?
네 — Trag Muse가 바로 그 일을 합니다. Agent Gateway를 통해 외부 에이전트(Claude, Codex 또는 어떤 MCP 에이전트든)가 로컬 TRAG에 연결되어 창작을 시동하고 연결할 수 있습니다 — 작품에는 “Request from: AI agent” 표시가 붙고, 갤러리의 “Agent sessions”로 걸러집니다. Muse는 곧 공개: Keep me posted로 첫 번째 물결에 이름을 올리세요.
프롬프트와 설정, 뭐가 다른가요?
프롬프트는 내용을 묘사합니다: 피사체, 분위기, 대사. 설정은 기술입니다: 포맷, 길이, 스타일, 품질. 기술 파라미터를 프롬프트에 쓰지 마세요 — 오른쪽 패널이 더 잘, 모호함 없이 해냅니다.
무엇을 도와드릴지 들려주세요.
hello@trag.studio가 지원으로 가는 문입니다 — 모든 메시지를 사람이 읽습니다.